

masterqq
-
Content Count
536 -
Joined
-
Last visited
Content Type
Profiles
Forums
Calendar
Everything posted by masterqq
-
1/48 Su-30MKM Flanker-H (Hobby Boss Su-30MKK Conversion)
masterqq replied to Fighting Eighty-Four's topic in In-Progress Pics
Very nice build indeed, I love it... -
1/72 Airfix HS 125 Merpati Royal Malaysian Air Force N0 1 Squadron, Sg Besi Air Base , Malaysia
-
Thanks Martin, And finally this one is done.. have been an quite enjoyable build despite the flaws on the window.. Cheers folks..
-
Thanks guys..the GO2 Glue result look great, I will seek it out for my future attempt Anyway, finally found the time to have the painting done.. Next , decal... to be complete before Malaysia National Day on Aug 31..:)
-
Thanks guys, I do not have access to Micro Crystal Klear , So I do it the hard way, I cut some clear plastic from a bottle, then fill the gaps with super glue. The results is not very good, still pending sanding and polishing.. more to that later...
-
wow.. nice choice, I have the Airfix kit, I actually wanting to see how this HB kit is, will be following your build ..
-
Hi, This will be be 2nd build for this GB, and oldie from Airfix, my frind Mr B passed this kit to me with a condition that I must build it, I do lost the side clear window parts along the way , I will see what is the best way to replace those windows later Work startd on sealing the gaps on the doors, there are some sink marks that need to be deal with too... more later.
-
1/48 Academy 500MD ASW ROC Navy
-
Martin, Thanks...this one was an enjoyable buid .. And It is done, Moving on to my next build, thanks for watching..
-
Guys, No worry, HS 125 will start very soon, and finally have some time for update after my Easter holiday.... The interior is done, added seat belts from tape. The fitting generally was good, however some filler needed along the seams. The model is painted with sea blue, and kit's decal was applied. Next , finish off the weapon, sensors and final assembly, more later...
-
Hi, This is my build for this GB and go with the kit's marking for Taiwan Navy. This will be my build #1 for this GB, and the Airfix HS125 in the background will be next. Progress so far , ejector marks were filled... Assembled the door, have the interior painted, next will give it a little wash and work the clear parts and IP.
-
Good choice B.. Aidy, apa lagi , join la...
-
DEROS-Date of Expected Return from OverSeas-
masterqq replied to AVGBob's topic in Vietnam War Group Build
1/35 Tamiya M113 with Academy Turret. -
Rkic, Thanks again, am new to the pigment weathering, kinda like how it turn out.. and Finally, the M113 is Done. I added the antenna from my guitar string, and the crews in place. And I also painted a 3rd figure, hopefully have enough mojo to start a simple diorama later...
-
Thanks RKic, always love some figures on my AFV And the M113 get the Mig powder + water wash.. And result is a bit too heavy for my taste.. and batter after I reduce the effect by rubbing the surface with my finger. Next , Figures painting with Oil paint
-
Good work indeed, may I know what kind of flat coat you used after decal? it look so good.
-
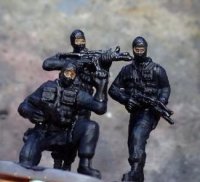
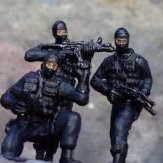
Hi, Some progress on the figures, also added the gunner figure, taken from Tamiya Saladin kit but modify accordingly for tropical scene..
-
Hi, Painted with various shade of tamiya Olive green + Dark green, Academy instruction called for Forest green instead of the usual OD for Aussie M113, I kinda like the flat tone right now, thinking whether to add a future coat before decal..I will use the Academy decal.
-
Thanks for the info Ikar..I am adding the driver figure to hide most of the opening. and the driver arms are done with the adding of epoxy putty, I think I gonna add part of the lower body next. The M113 is primed and pre shaded, I added the Aussie turret fro Academy kit, it fitted nicely, I know there are some differences between the variance, But I will not address it for now.. next painting.
-
Guys, thanks, I will use the extra from the Acadamy for the outside marking.. anyway, construction completed, the tamiya armor kit is quite a joy to build.less seam to be fill compare to aircraft. heading for paint shop soon I also try to modify the arms of the crew.. let se how it turn out.
-
Thanks ikar, Painted the interior with lighter shade of Sky + WHite, and the floor received a wash. I do not plan to detail the interior , as I want to close most of the hatches,will not install the beautiful engine too.. the decal is useless now, torn and won't separate from the backing paper. look like I will do without.
-
Hi, Started the build, painted the wheels with the help or the circle template.. next working on interior,
-
Thanks guys, Ikar is right, the Academy kit is kinda a copy of Tamiya kit, simillar break down of parts but with more option, I will start a M113 first, I will use the Tamiya chassis and maybe add one of the Academy's Turret... work already started on the wheels, will update some photo soon..
-
Hi, I 'm in for this GB, I think I wanna build an armour for a change , so either Tamiya M113 or M42 or both..starting soon
-
1/72 Hasegawa A-4k