


nr1forme
-
Content Count
91 -
Joined
-
Last visited
Content Type
Profiles
Forums
Calendar
Posts posted by nr1forme
-
-
58 minutes ago, jenshb said:
Thanks for the link Emil - the IPMS Stockholm forum was quite enlightening as well. Doesn't say what colour(s) he used for the lower surfaces though...
Jens
Cheers Jens!
I dont know about Björn but...
For the underside I´d preshade and mottle with a dark blue and then use RLM 65 or 76 from Mr. Hobby as a starting point. These are pretty much spot on for the light blue. I know some people like to use Tamiya XF-66 aswell. But in my opinion this is waaay too dark and too grey.
For enamels I´d start with Humbrol 23 or 87 and then darken/lighten to taste.
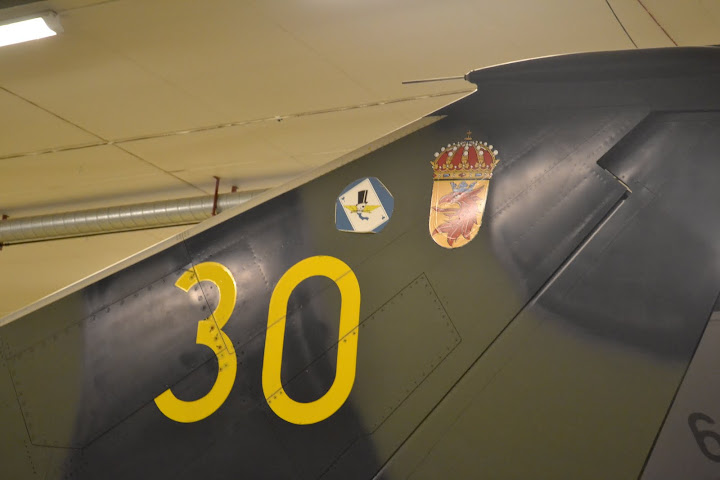
The color for the 1:1 A/C was called 058 Mörkt Blågrå (058 Dark Blue-Grey). And this was used from the 1940-ies all the way up until the 1990-ies.
In 1966 they changed the gloss levels of the paint from gloss to semigloss, but the shade was pretty much the same.
Watch this photo of an old SAAB B17 painted with 058 on the underside and you´ll see the similarity to the RLM colors.
https://www.instagram.com/p/CAUkpQBBsf1/?utm_source=ig_web_button_share_sheetThis Hawker Hunter also has 058 on it´s belly...
https://www.instagram.com/p/CBlcSlhFPDJ/?utm_source=ig_web_button_share_sheetAlso, remember that a large portion of the underside is natural metal on the Draken. This part of the aircraft is usually very grimy and dirty as it´s directly under the engine. Here I´d use something like Alclad Airframe aluminium and then weather heavily. The look you want is shiny metal but dirty if you get the jest. 🙂

Best regards!
Emil
-
This guy...
http://bjornsmodeller.blogspot.com/2015/07/saab-j-35j-draken-hasegawa-148-2015.html
Who is a pretty well known Swedish modeller used Mr Hobby paints to give his J35F a pretty convincing finish.
He used H 52 Olive drab lightened with H 337 Light Grey and some H309 Olive green to create the dark green color.
For the navy blue he used a number of different paints starting with a base consistning of H 54 Navy Blue and H 55 Midnight blue. Both of these were lightened with H 337 respectively. He also added some turqoise paint to get the greenish hue (probably using H46 Emerald).
The important thing to remember is that the navy blue on the Swedish Drakens weathered fast and heavily. The more weathered the more "greenish" it became. Almost turning into an "aotake-color" if you know what I mean.
Another thing to note is that if you want to be really accurate, the blue color should be glossy and the green should be matte. Don´t ask me why this is but its very evident on the 1:1 A/C. As you can see on the freshly painted aircraft on the pictures below.

]
Best regards from Sweden!
Emil
-
Seems like I’m a bit late to the party on this one. But as a long time Topcoat 501 user I tought I’d chip in. It really is an excellent product!
The trick to getting nice gloss coats from the can with the TC is to really mist the stuff on at first. Repeated light passes over and over until the surface looks slightly wet and slightly pebbly. Now stop and do not panic at this stage, it’s all good. 😀
Let it sit in room temperature for 15-20 minutes. When you come back to it the clear will have levelled and a sheen is there. Then hit it again in the same manner. If using the TC as a base for decals 2-3 sessions doing the above will give you a nice, strong and smooth glossy base to work from.
If you want a nice ”car-paint” gloss. Do the above and then lightly sand the surface back with some #2000 wetsanding paper. Then hit it again, this time more liberally.
Take your time and with each pass of the can you will see the gloss coming. A word of caution here...be very careful not to apply too much, or it will run. The sanded clear provides less of a ”tooth” that will ”hold” the paint. Do a couple of wet coats. See what it looks like. More gloss? Sand and hit it again. If happy, wait for a couple of weeks for it to cure, then sand back and polish with compounds. 😎
Another tip is to heat the can quite alot before spraying. The TC likes higher temps. Fill the kitchen sink with very hot tap water and let the can sit for a couple of minutes. Give it a thorough shake before spraying. Also, spraying outdoors in the nordic winter is to be avoided. Fogging and wierd drying behaviour can occur.
All the best!
Emil
-
I really like this. Super clean finish!
Well done! 🙂
-
Woooooow! Such a beautiful bird! 😲
-
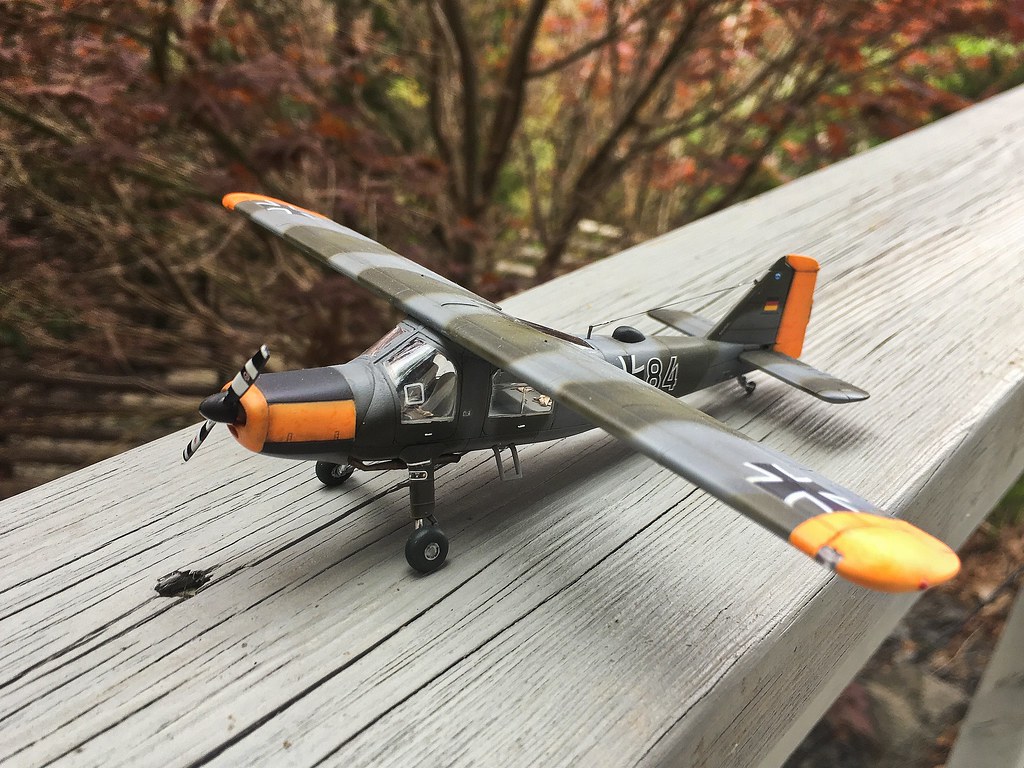
Hi!
I´m making my way back to the hobby after a long break and thought I´d share my latest completion with you.
The 1/72 Special Hobby Do 27 in Bundesluftwaffe Norm 62 colours. I love the "day-glo" on these schemes as it provides such a nice contrast to the drab of the camouflage.
Built straight out of the box and painted with Tamiya and Gunze paints except for the flourescent orange which is Vallejo Air. I also added belts from Tamiya tape cut in strips.Such a nice kit, thoroughly recommended. Just take care that the glass (front canopy and roof observation window) are thoroughly sealed before painting. Otherwise some paint-dust is bound to get inside and cloud the glass from the inside. Making it tricky to correct. Don´t ask me how I know. 🙂 🤦♂️
Kind regards!
Emil


-
Hiya mate!
Not sure you remember me. we had some discussion on russian jets several years ago. I´ve only just returned to modelling after a loong break. And thought I´d say hi. 🙂
This is such a nice model. Is it still mostly brushpainted? I know you´re a master with the "hairy-stick". Love the detail work. Especially the visible engine.
Kind regards!
Emil from Sweden
-
Looks great Dragan!
Even if the kit gave you trouble, the results are wonderful!
Cheers!
Emil
-
This is coming along really, really well Jan!
I think this is a super good build from a guy that´s "no car modeller"

You will find that the clear looks awesome after waxing.
I´ll be here watching mate!
Emil
-
Fantastic work mate!
-
Goodie Goodie!

This is awesome!
-
Hiya!
Great job there Janman!
I´ve built a quite a few cars recently and I think I´m starting to get the hang of it so if it is something you wanna know about painting or polishing or something else just shoot me a PM or reply in the thread. And I´ll keep looking at this modelling masterclass.
A car I built not long ago.......Very much recommended If you wanna have another go!
1/24 Fujimi Ferrari F430 Spider. (Iknow It´s missing the rearview mirrors I´ve added them now) :D
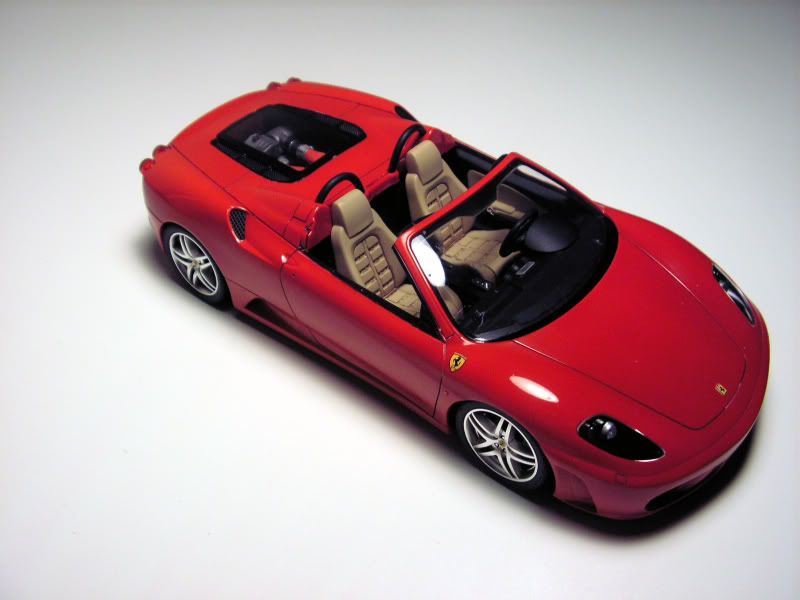

Cheers!
Emil
-
Thanks guys, most appreciated!
Emil
-
Hiya!
Is there anyone on here who know where to find pictures of the Cockpit and any prominent features on the Italian twin seat starfighters as I´m soon gonna start a bird from the 4th stormo, 20th gruppo of the AMI.
Especially ones showing the sidewall detail of the cockpit would be appreciated
 . My 1/48 th Hasegawa bird is pretty bare there.
Thanks!
Emil
-
Hi!
I´m not sure which Mr. color paint you´re using so I´ll provide altternative for both.
Regular (Nitro) Cellulose thinners works just fine to thin Mr. Color lacquer paints and surfacer.It should not be hard to find in your hardware store.
Here where I live you can buy it in litres and 1 litre is about 8 bucks US.
If you´re using the Acrylic version you could go to the pharmacy and get some IPA (isopropyl alcohol) they should know what you want. IPA is the same stuff as Tamiya X-20A thinner but without the retarder. If you want to these paints can be thinned with the above cellulose thinners as well.
Hope this helps!
Cheers!
Emil
-
Hi!
Wow guys thanks for the help! The reason that I asked was that I was gonna order some kits and supplies online and wanted to know if the A pit would fit because they had a Blackbox set at a good price.
But after reading your replies I decided against buying it so I just bought a pair of Aires Aces II seats for the kit.
(I know there is only one seat in the F16 but having a spare is never bad :blink:)
They did´nt have the complete set for the Tamiya kit in stock so I figured I could just scratch some things for the sidepanels and use the seats as most other things seem fine.....
Again, thanks for helping me out! :D
Cheers!
Emil
-
Hi!
Since there is alot of experts on the type on this forum I thought it´d be the best Pace to ask.
Im looking at building the new Tamiya F16 C and was thinking about using the Blackbox cockpit set for the Hase F 16
the only problem is that the Blackbox set is for the A version and the Tamiya kit is a C, will it be OK to use the A cockpit in the C without being that wrong......or do they differ alot?
Thanks!
Emil
-
What can you say....this is so good you could cry. Can´t wait to see some weathering on the ol´kitty.
Keep it up, your work truly inspires!
Cheers!
Emil
-
Hi there, master of brushpainting! ;)
So, you´re converting to spraycans. I sort of gave up on painting large areas with brushes and joined the dark side (airbrushers) a while back. The difference really is rediculous (for me since I´m not superhuman like some :lol:) , what you fight so hard with to achieve with the paintbrush you can achieve with the airbrush in like an instant. Not regretting my desicion at all.
After some fiddling around, I did this in 30 minutes with Tamiya acrylics and an Aztek A470. Not hard at all even for a beginner :)
I'm mostly looking for spray equivalents for light gull gray and possibly RAF barley gray. With some detective work I found out that Tamiya AS16 seems to be their equivalent for light gull gray, but is it a good match?I can´t comment on this really but from looking at the swatches in the catalog I can imagine that it´s pretty much spot on.
Also, would anyone know what would be the best match for Soviet (WWII) tank green? Again, from their line of spray paints.TS-61 Nato green is a dead on match for the armour green the russians used.
If nothing of these works you could always look into something like this.
I guarantee that it will make everything alot easier. And its pretty cheap if you don´t like it so it won´t "be a big pill to swallow".
HTH!
Emil
-
Thank you very much Murph, for taking your time and helping me out!
Much appreciated!
Cheers!
Emil
-
Hi!
I have a 1/72 Hasegawa BAE Harrier Gr. 3 that I´m thinking of starting soon. When looking at the sprues in the box I saw the cockpit is lacking alot of detail so I´m planning some mods.
The only resin stuff seems to be for the later marks and the US. AV8 Harrier II. So PE seems to be my only option besides scratch, which leads to my question. Can I use PE parts for the Gr. 5 in the cockpit of the Gr. 3 or do they differ alot? I´m thinking of using this Eduard set.
Ps. If anyone know if there is any AM decals avaliable for the Gr. 3 aswell please tell me, the ones in the box is crap basically:D. And I have trouble finding any Ds.
Thanks and Cheers!
Emil
-
I used PE scissors
I´ve been thinking of getting a pair of those too. They seem useful. :)
and I might receive a fourth one (aftermarket set) soon. Hopefully!Not making it easier to choose. :lol: I´m sure It will turn out nice whatever you choose.
Cheers!
Emil
-
Also visible are the cooling vents on the sides of the glare shield that were scratched from fine metallic mesh I salvaged from an old ear phone.
What tool do you use to cut small pieces like these? I always struggle with them.
Needless to say, the kitty looks great. Have you decided what scheme you´ll do yet.........
 wolfpack.........wolfpack ..... ;)
Emil
-
Great Hun Terry!
Too bad about the silvering, but if you had´nt said anything i would´nt have noticed.
Cheers!
Emil
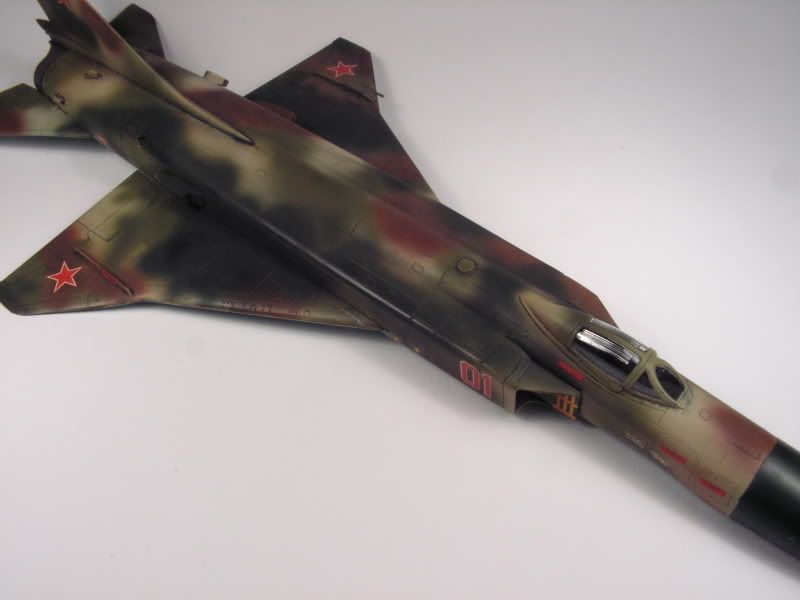
1/48 AMK MiG-31B/BS Foxhound, my first venture in this scale!
in In-Progress Pics
Posted
Great to see that you’re back and at it again with this one. Looking forward to seeing your progress!
👌🏻😎
/Emil