


archybean
-
Content Count
253 -
Joined
-
Last visited
Content Type
Profiles
Forums
Calendar
Posts posted by archybean
-
-
The bigger issue is going to be finding a hangar space as a home. Boeing/Spirit have reluctantly given space to do the restoration. I'm not sure if they have a dedicated home. It'd be a shame to take off and not be able to land there
-
How sad. RIP Anton.
Freaked me out as I met Walter Koenig yesterday at comicon in Houston.
-
Here's my best contribution to this thread. Atlas E site just east of Council Grove Kansas.

-
Okay, hands up everyone who saw the title of the post and thought it was a Boeing 727 derivative? :wave:/>
+2 :-/. Perhaps because I'm running on 4 hours of sleep though...
-
Ooh. The Slave I looks very tempting. I'm in that awkward spot between jobs; moving states no less. I'll keep an eye out on it as it's one of my 'must haves'
-
Good points. I'm thinking that I'll need to find somewhere to take a class; if nothing else have the basic functions shown. I learn best by just doing; I had to teach myself all the programs in college: AutoCAD (knew the absolute basics, but learned much more and still am), Photoshop, Illustrator, InDesign. Never did grasp autodesk 3d program we had...bombed it so bad I can't even remember the name of it!
-
Amazing work!
I haven't posted anything on ARC in I don't know how long. I haven't been able to do any modelling in almost 4 years. Short version: laid off 6 weeks before my daughter was born, stay at home dad with her, job market sucking, depression, minimum wage jobs to survive...but I've finally gotten a full time professional job again. I'm going to be moving in the next couple weeks from Topeka to Dallas suburbs. So the stash is edging closer and closer to the light again. Itching to get back to my Liberty Bell 7 build I started 5 freaking years ago.
That being said...and not an attempt to hijack the thread, just thought it would get read sooner here with better answers...CJ, Bill...question for you guys or anyone else 3D modelling. What are your thoughts on programs to use? I see SolidWorks in use here; how is it versus Rhino? I've got Rhino but feel overwhelmed at it. 2D AutoCad, no problem there; 3D anything, haven't quite grasped it yet. Does Solidworks have an easier interface? Thanks in advance for any advice.
David
-
My suggestion for the name...Farce. B-21 Farce
-
Blast! Early pick and I was at work. Oh well. I'll take this if it's still available:
30) 1/72 Aviation USK 7201 Boeing B-17C Fortress Mk.I
Thanks again for everyone who helped make this happen again, always look forward to this.
-
I'll throw this in, now that I finally was able to look:
Jagdpanzer 38 Hetzer Squadron walk around hardback sealed
-
I'm in again this year. I'll need to sift through the stash in storage for a kit or two to donate. Always a good evening activity. I vote for an earlier date.
-
I haven't tried it yet, but we sell them at work and I have to listen to the stupid display for it every shift and have thought to get one. Don't just stick it, Bondic it!
-
Here are the better ones that I was able to get with my 300mm telephoto lens. First three are handheld, and last was with a makeshift tripod and 3 second exposure. Shot from Topeka, Kansas


-
My telescope is in pieces for a move, but I was able to get some hand held ones before totality and some sandbag shots during totality. I'll try to get a couple loaded tonight after work
-
Sounds like a great way to finish my Liberty Bell 7 project that has stalled out for a couple years now
-
Bam! Three replies at once
-
It impacted on the moon after jettison from the command module, impact site unknown. The only ones that didn't crash into the moon were Apollo 10 which is in heliocentric orbit and Apollo 13 which burned up in our atmosphere.
-
I went with the fam to Whiteman yesterday. I was hesitant after reading that Saturday people waited two hours in their cars to get to the gate to find out the traffic was being routed through the North Gate. Well there were no problems on Sunday! No line on the road to the base, only a brief stop at the gate for instructions to follow the directions to parking. From parking through security and bus ride to dropping off at the flight line was 15 minutes at the most.
Got to see the usual suspects that seem to be the only ones making appearances on the airshow circuit I was excited to see two F-35A's on static. They were on either side of the B-2, but close enough beyond the fence to still get a decent look at. Plus that is what telephoto lenses are for right?

Let's forget the politics on this and just enjoy that they were on display.


Other pictures in the album here
-
Wow! That would've been a great experience for everybody. Thanks for sharing!
-
In college I was building a rather fragile piece of an architecture model for my design class. My bottle of CA had a clogged tip and I was using a 1/16" stick of basswood to dip in the bottle and apply it where needed. I'd then hold the stick with my teeth (see where this is going?) while I sprayed accelerator for it to set. Well this one night I was more tired than I realized...that is until I put the stick in the wrong way! Moisture helps CA cure, and being that the mouth is full of moisture my teeth got glued together. I had my trusty cup of coca cola classic there and found out that it will dissolve CA!
-
Hello David,
Spectacular job including the stringers, inner pressure vessel, and recovery compartment stringers and parachute container! I hope you will get back to this project soon. If you are discouraged due to the time it's taking to convert this model to Liberty Bell 7 as it is today, remember it took Mother Nature 38 years to accomplish her conversion...and the additional time taken by the Cosmosphere restoration as well. :woo:/>/>/>/>/>/>/>
When you have time I have a couple of questions for you:
measuring the kit and referencing the David Weeks drawings told me the thickness of the model is almost as thick as the gap between the inner pressure vessel and outer skin. I'll be using styrene sheets to create the inner vessel. In order for the outer skin to look thin enough I had to use my Dremel to thin it out.
Q1. What was the ORIGINAL thickness of the MODEL'S crew compartment walls?
.1015"
I also used the pin vise to hand drill the 192 holes I ended up with on the bottom of the heat shield retaining ring. Kinda irritated they're not all aligned in the middle...especially with the landing bag going to be there it shouldn't be too noticeable.
The Heat Shield Retaining Ring (HSRR) hole pattern is QUITE complex. I don't have a photo that depicts the whole pattern well enough to count each hole - however:
-There are 48 slots cut radially that accept the 24 locking pins and 22 guide pins that are mounted on the heatshield. 2 pins are unused.
-The other circular cutouts are actually slightly oval.
-The outer edge of the HSRR extends outward beyond the base of the conical crew compartment to match the outer diameter of the reddish Fiberglass Attach Ring (FAR) which is bolted to the capsule. The FAR is used to mate the capsule to the booster. This HSRR extension is located immediately below the 'lip' of the FAR, and provides additional strength and support for the FAR. When the Marman Clamp is installed to mate spacecraft and booster, the FAR lip, HSRR edge, and booster adapter flange and 'sandwiched' inside the Clamp.
-The holes and slots in the HSRR are radially centered relative to the thickness of the capsule wall, but are offset inboard relative to the full width of the HSRR. The amount of offset is equal to the width of the HSRR that extends BEYOND the base of the conical crew compartment.
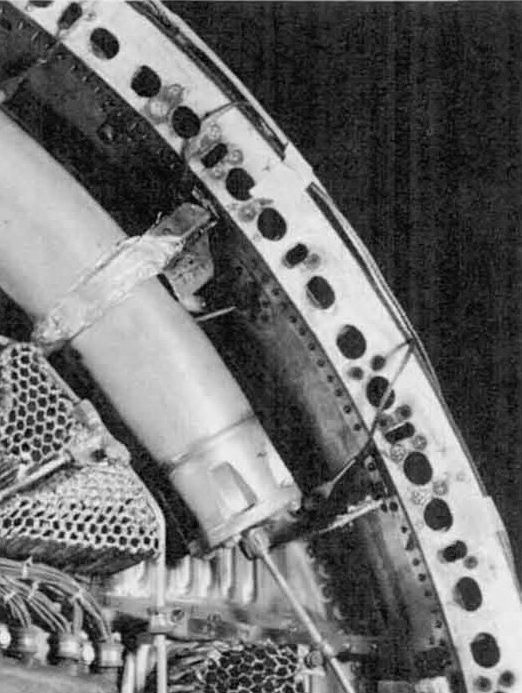
As you say, the Landing Bag will be obscuring the view of the HSRR, so IMO to comply with all of the above is WAY too much work for anything less than a 1:1 scale. I think it will look really impressive with the HSRR as you already have it!
I'm not planning on making the holes and slots exact, just trying to emulate the basic look of attach points for the heat shield like this:

Interestingly enough, the connection points seem to have changed at some point between Mercury-Atlas 1 (spacecraft #4, pictured below) and Mercury-Redstone 4(spacecraft #11, pictured above):

Q2. Is the Heat Shield Retaining Ring a kit part or did you make it yourself?
It is part of the kit, a small lip molded into the bottom of the capsule.
Q3. Same question for the Small Pressure Bulkhead?
It is not part of the kit and will have to be scratch built.
Q4. Did you find any data stating the diameter of the hatch in the Small Pressure Bulkhead? I haven't decided if it's the same diameter as the inside of the Recovery Compartment or not...still searching for info.
If you find the SEDR 104 Mercury Familiarization Manual online it has good graphic representations of the systems in the spacecraft and has dimensions of station points for bulkheads and whatnot. David Weeks' drawings also show these and are an invaluable resource.
Sincerely hope you can get back to this model, because you are doing an insanely accurate job of LB7!
Tom
-
Am I reading this right Tom that you do have the dimensions of the shingles but you do not have dimensions for the "corrugations"?
I've got a feeler out to see if I can get more detailed information.
David
-
Holy cow...I can't believe its been 17 months since I posted anything on this. Sadly, nothing else has been done on this build since then. I've started quite a few builds but just got burned out on them, including this one. I've shifted focus to another hobby, autograph collecting, and am starting to get the itch to jump back into this. Unfortunately I'm in the middle of packing the house to move! My wife got a new job and we're relocating a couple hours up the interstate.
-
I too am new to submitting anything to silly week, and like SteelWolf sent it in last night. Good to hear about fast tracking.
These two builds finally shook off my couple years long slump to actually finish something and got the juices flowing to dive into something else to finish. Too bad I have to pack stuff up for a move!


B-29 "Doc"
in General Discussion
Posted
And not your average 747 either! That was a heck of a thing to see take off