

Camus272
-
Content Count
452 -
Joined
-
Last visited
Content Type
Profiles
Forums
Calendar
Posts posted by Camus272
-
-
I will be facing this soon (assuming I actually finish all the projects I'm working on). I plan on rotating the display, boxing up the older items. A box can hold quite a few 1/48 or smaller kits, and in a house that can even be stuck in the attic, although in an apartment space might be a bigger problem. I'll probably start hanging more as well, freeing up the shelf.
-
I have had problems with their F-16 canopies. I hate them. I have had 2 come cracked in the box. I unmasked one on their F-16XL and cracked during painting, so I got a replacement from them. That one is deformed and doesn't fit right in the closed position. I'm going to look at adapting other brands to their kits..
-
18 hours ago, Niels said:
Any pics of the other jets joining the 706AS please? Would love to see which other schemes are in the loop 🙂
The only other scheme I've seen so far is the "Felon" solid gray (Have Glass?) scheme.
Twobobs has a sheet with these two at the printers.
-
16 hours ago, ST0RM said:
If I'm reading this correctly, they are an associate unit. So they will not have their own aircraft, but share them with the 64th. Aside from this one jet, that'll be it.
While I could be wrong, there aren't enough F-16s in the fleet with units getting them to replace the retiring A-10s.
So far there have had these airframes delivered to them:
85-147285-147485-149385-150186-021986-022286-0229 -
4 hours ago, BillS said:
Personally, I don’t know where the idea that 17875 is “off white”. When freshly painted insignia white is well, “white”. I think the exception is obviously heavily weathered or dirty areas. Turbine oil in particular leaves an oriangeish stain. So, missles of that period were white but might show hand prints etc. I think off white would look, I hate to say it this way, but off!
37875 is less "white" than 37925, so there is some (almost imperceptible) darkening to it. I've also noticed that Tamiya white is lighter (brighter?, whiter?) than 36875.
-
Does anyone else here find it annoying that Scalehobbyist and Spruebrothers carry different lines? I've found AK and MRP as my replacements for Modelmaster, but each one has exclusive retailers, so to stock I have to order from both, and with shipping rates being so high, I end up ordering more than I prefer. I'm starting to miss the days when I could run to my local retailer and pick up some FS colors easily.
-
10 hours ago, Drifterdon said:
That's what I was afraid of. Thanks Larry.
If you're airbrushing, can you mix flat and gloss? Or, are you specifically looking for spray cans?
-
Rustoleum never acquired Testors. Both are owned by RPM, who acquired Rustoleum in 1994, which didn't have any effect on Testors. But, it is clear that RPM is not interested in the hobby business, they have moved to "crafts" - lots of bright florescent and glitter colors.
-
Never had a problem, and every kit I've obtained in 20 years has been through the mail. I suppose it's possible that a box could get creased on the corners, but I've never cared about the boxes.
-
1 hour ago, Niels said:
Not like with FS36170 😉
Exactly. I've watched an F-16 change from a warm metallic bronze to a deep dark gray in a few minutes, as the clouds pass over.
-
6 hours ago, jonwinn said:
I have one coming soon, is this GB in the planning stage? I need to know as to when to start my F/A-18E.
It's going. Post your pics in the In-progress forum.
-
I've been using Duplicolor auto paint for my white priming. Because white is such a pain to cover as it uses so much, I was looking for a slightly cheaper alternative while still getting high quality results. It sprays very fine, and dries like other lacquer model paints. I don't use it for a full coat, but to get the base built up and then covered with another white. So far, so good, i think I'll keep using it.
-
Got some Alclad Primer on it, and tested out AK's 36270 on the horizontal stabs. Unfortunately, the color is quite off, so I'll have to break into the Model Master stash for that.
-
I'll jump in with another one. This time, a fully operation F-16C from the Minnesota ANG, from back when we had Block 25s here.

-
On 10/1/2022 at 11:31 AM, wxltcol said:
PS What I wrote is what I've heard about the situation and I'm happy to hear more and better information from someone better informed.
Well, it was RPM that owned Testors, which they acquired in 1984, before they expanded their Model Master Line. They later acquired Rustoleum into the company as well. But nothing has changed for decades as far as ownership, they just apparently decided that Model Master wasn't worth keeping alive. I wished that they would have sold it to some other hobby-focused company, but given the change in opinion about enamel paints int he last decade or two, it maybe wasn't worth it.
-
It seems down to only a few modeling posts per year. I suspect most users wanted to talk about the "off-topic"subjects rather than actual modeling.
-
This is really disappointing. Considering other people have said they had the same problem, I'm reluctant to order there again. If I do, I will be prepared to dispute the charge right away.
-
9 hours ago, ALF18 said:
Careful what you chop off for RWR. Essentially, the C has extra bulges, PLUS all the bulges present on the As. In this USN photo, I have identified some of them on the C.
The antennae on the lower nose at 1 are on the A model. On the C, those are present, plus the ones at 2, 3, and 4.
The tail on the C has 3 sets of bulges, plus the fuel vent.
ALF
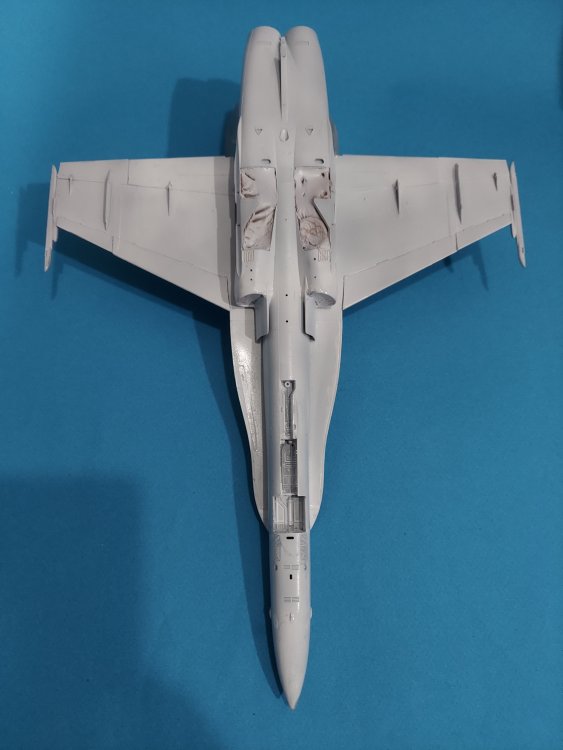
Thanks. Looks like I've got all those, it just #3 that Kinetic neglected to include 2 of, or address in the instructions. The antennas under the intakes seem to be only on the original version,( I hope) as I have now removed them. Also, on the insides of the vertical stabilizers, Kinetic has molded several plates. All the photos I see show smooth surfaces, so I've removed those.
-
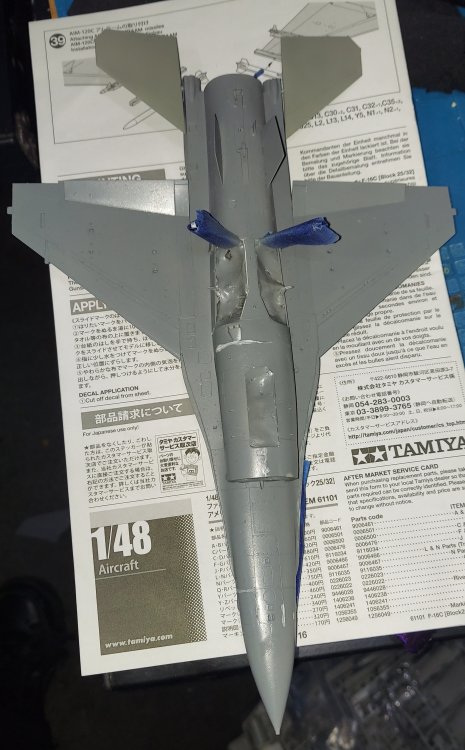
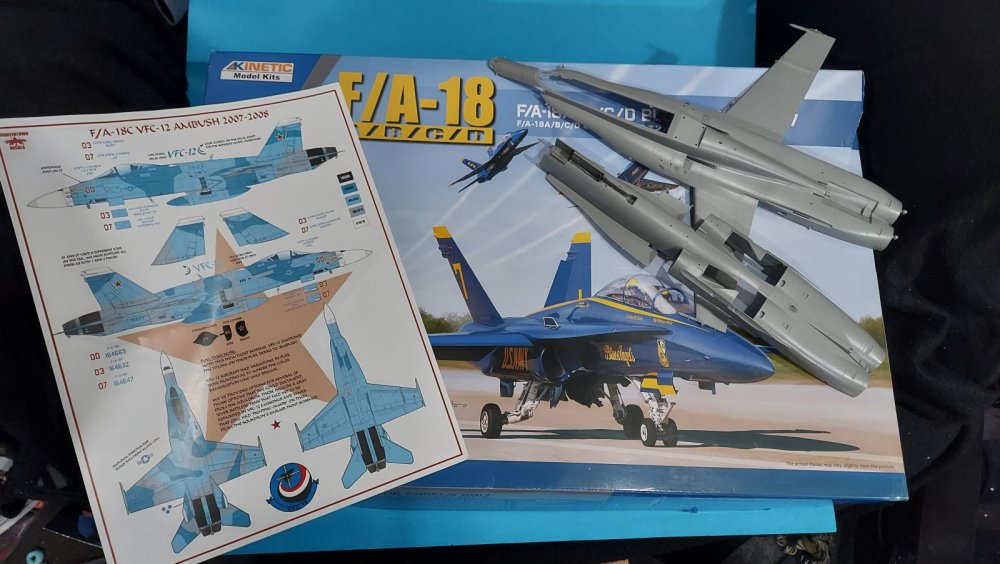
Sinking into this kit is learning a whole new routine. I may be a little too focused on F-16s, whether it’s Tamiya, Hasegawa, or Kinetic, I can pretty much put them together while half asleep. This is a whole new step by step process. Starting off, I thought Viper intakes were difficult, but the size and shape of these is something else. They didn’t turn out as well as I hoped, but next time I’ll take a bit more time to smooth out the interiors. As for fit, it was a struggle to keep them at just the right adjustment while drying. First note to self: Next time, contrary to instructions, I’ll mount the external intake parts and let it dry before installing the interior parts.
I find the best modeling days are the ones where the cockpit is ready to go in and the process can take off. I was able to assemble the whole kit (for pre-painting) in one session. I've read a bit of negative comments about this kit, but I think the options and level of detail is really good, and I'm actually having fun putting it together.
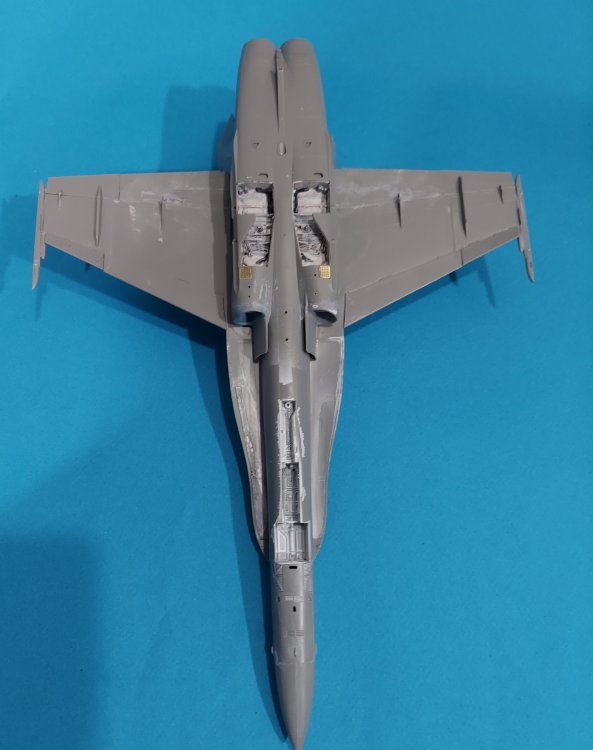

For priming I tried Alclad, and found this stuff to be amazing. Next up i started painting with MRP, again amazing stuff. This is the first time using it for overall base colors. I think I'm going to get hooked on this all-lacquer process, it dries in minutes to a really hard finish so the work can keep progressing. Now, for the colors I found 35450 to be pretty accurate, but 35190 is always a tricky one. Every time I paint that color, I customize it for the subject, as it always looks different. For this project, using MRP, I think I will lighten it significantly.
Now, for the setbacks (aren't there always) - While I'm trying to figure out how Kinetic has modeled all the RWRs, I see that there are inaccuracies in the instructions (or at least what they label optional, means: Check your references!) It seems that some of the antennas are for A models only, and that the vertical tail reinforcement plates are not present, so all that has to come off. But, hey, this is an educational build, and I'm learning about the upgraded Hornet blocks (hard to believe these are 30 years old and out of service now), and maybe I'll know something about them to compete with all the F-16 trivia in my head.
-
Hello all,
As I try to get up to speed on Legacy Hornet advancements in the last 35 years while I build VFC-12 07 (164647), I'm trying to figure out all the added-on lumps and bumps. Does anyone know what the sensors are which are located under the cockpit windscreen and leading-edges, above the front gear door? Also, does anyone know if these are included in the Kinetic kit? I believe everything else is in the kit, but I don't see those. Thanks for any help.
Edit: Looking at my copy of Uncovering the F-18, they appear to be extra RWRs. If not included, would they appear the same as the ones above the slime-lights?
-
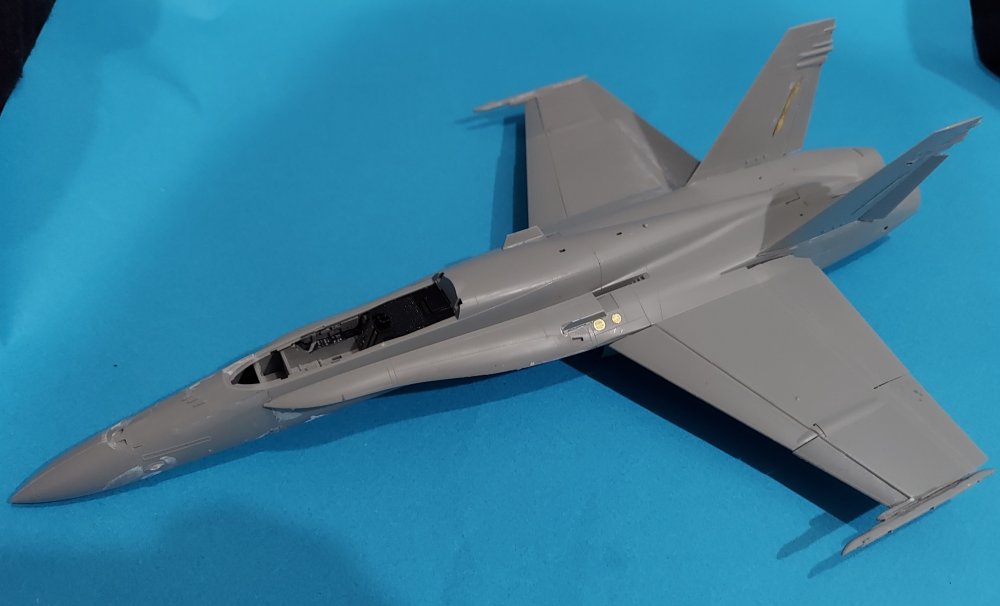
OK, here's my first F-18 project in 35 years. I think I'll go with VFC-12's 3-tone scheme from around 2008.
-
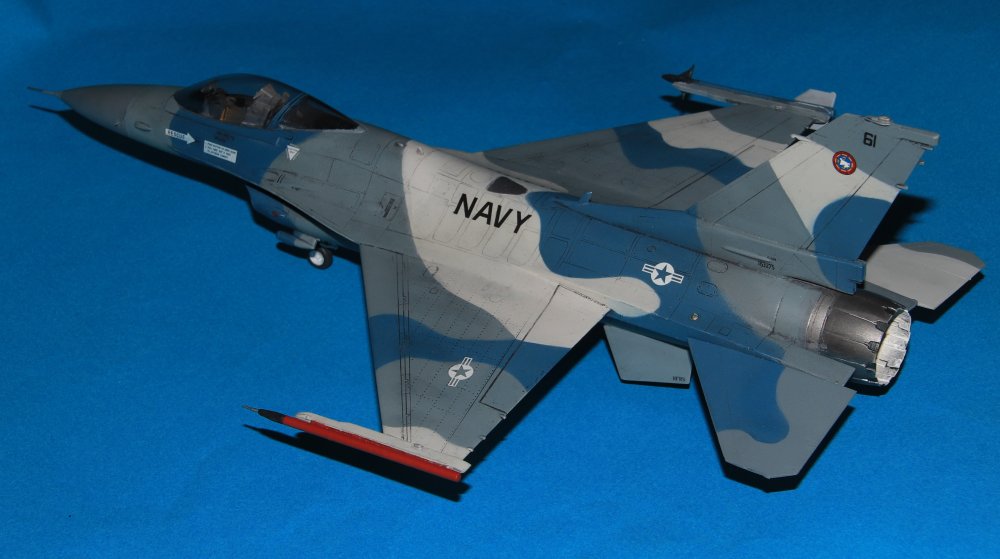
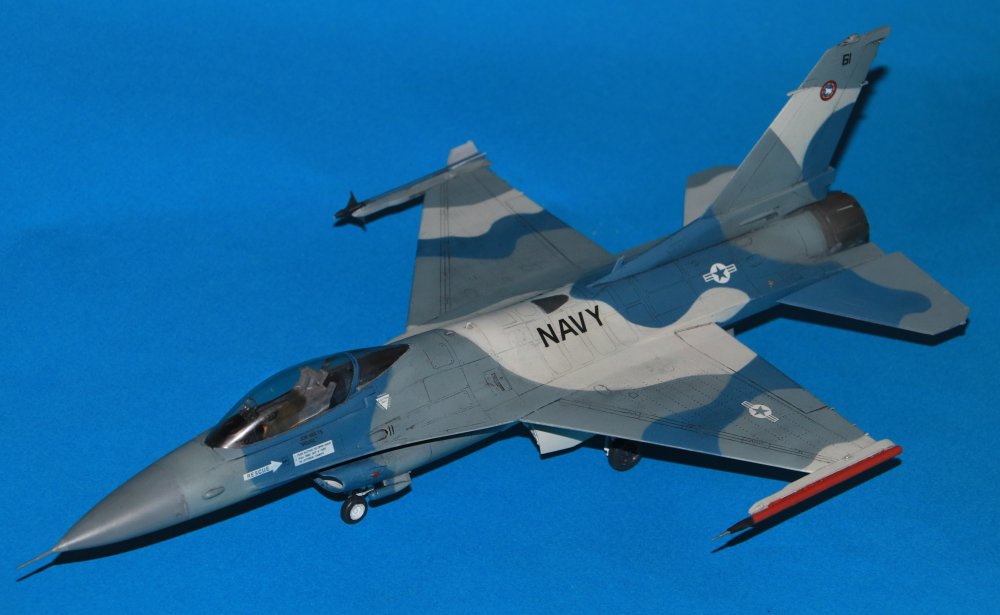
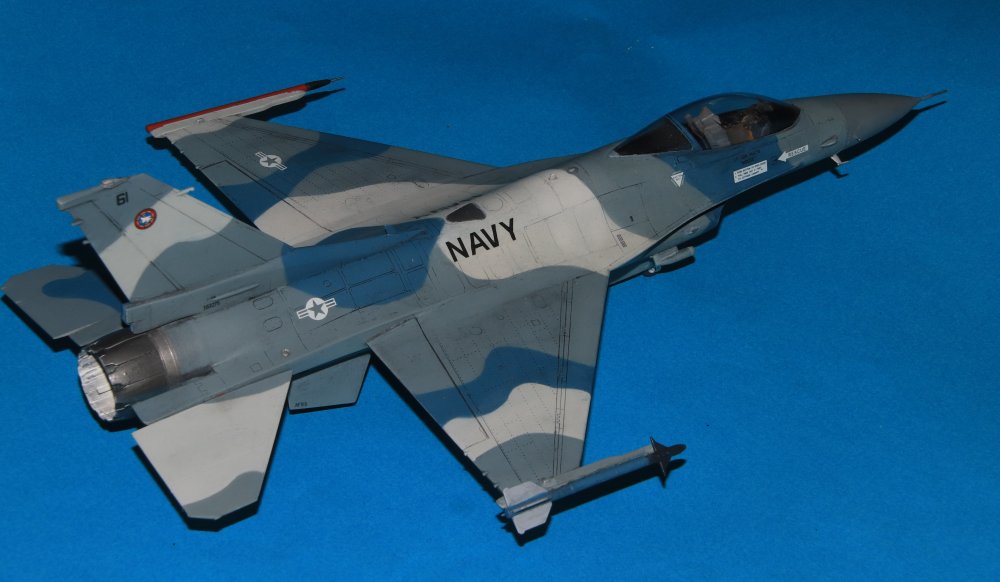
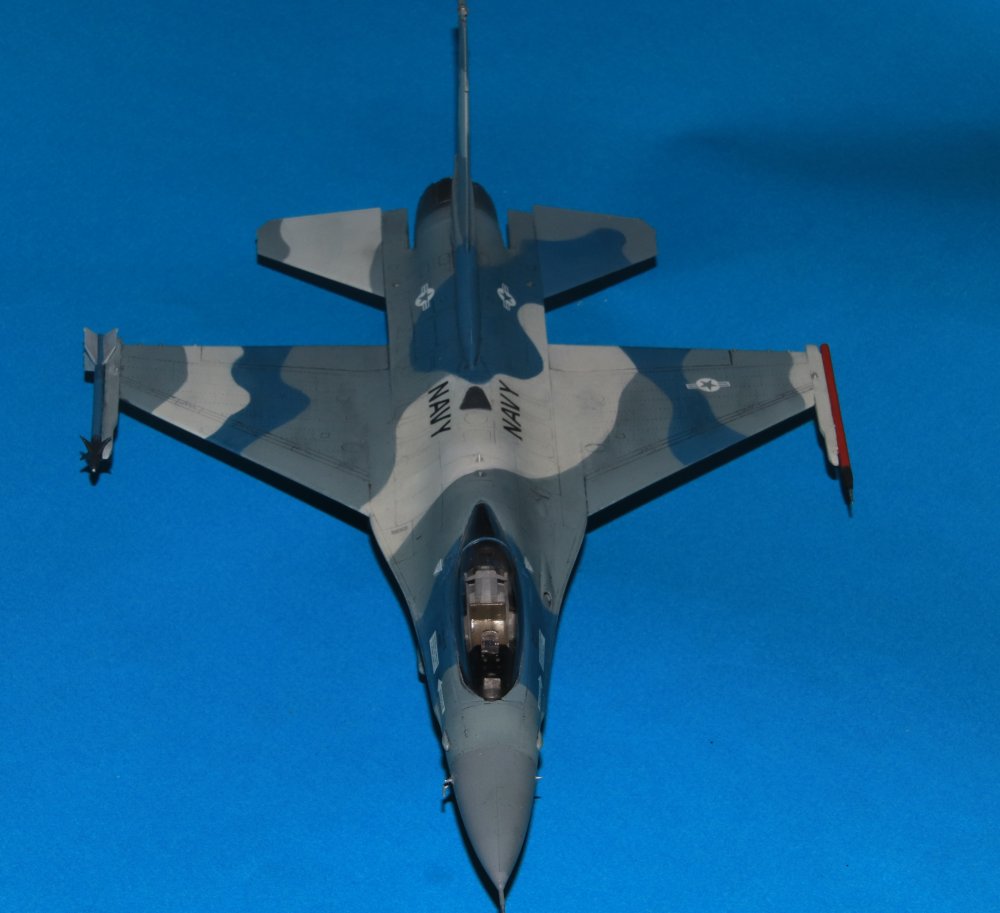
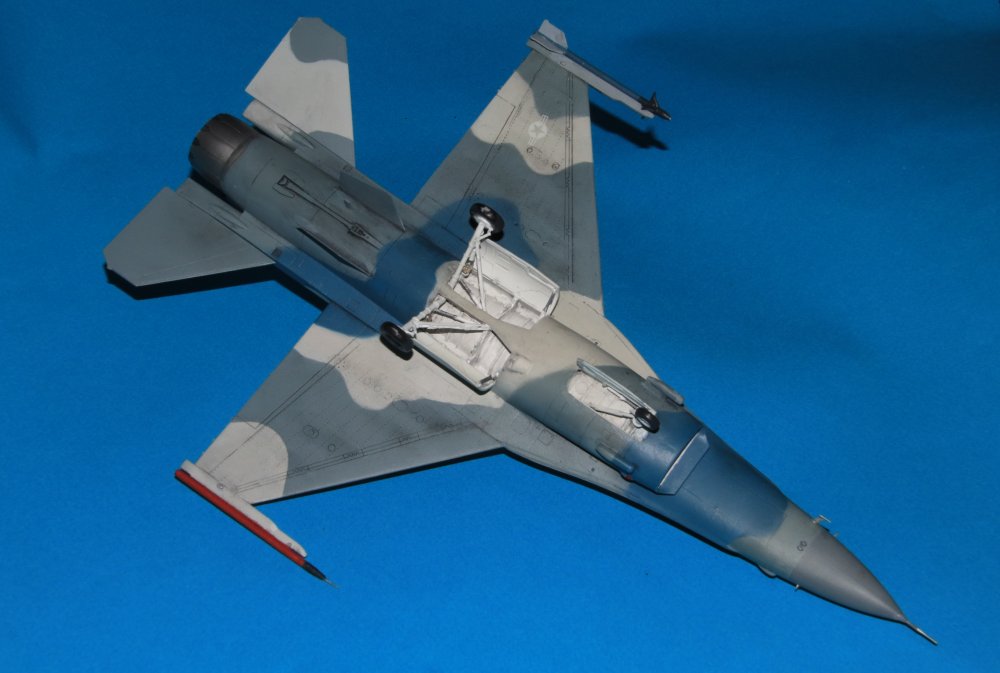
OK, calling this one done. A simple decal job, followed by a lot of fixing this-and-that. It could have been a little better, especially if I was more careful with masking (a good lesson), but I definitely like the way this one looks. I think this now one of my favorite Viper schemes. Photos are pretty rare, and I find it's place in the evolution interesting, as this was the first variation of the original F-16N aggressor scheme, but is somewhat similar to the current USAF splinter scheme. Now, I'm hoping to clean some stuff of the bench by tomorrow so I can look at the F-18 build, and another Viper quite soon.

-
It looks like he last signed in on March 13th. I do hope the hosting remains intact long enough for us to figure out some ways of distributing administration.
-
You're right about 35237. When I first sprayed in on my N, over 36495, it looked green more than gray, but then when I added the blue 35109 to the scheme, it turned into dark gray. Lots of strange effect going on with that one.


Reprint old decals, Help
in Tools 'n' Tips
Posted
I would think it would be easier to get another sheet from that kit (test it, and if necessary, put a coating over it before using). You could make a post in the Spares Box forum. I have most Hasegawa boxings (and I don't need any of the decals), but I think that's one of the few I don't have.