


hooknladderno1
-
Content Count
245 -
Joined
-
Last visited
Content Type
Profiles
Forums
Calendar
Posts posted by hooknladderno1
-
-
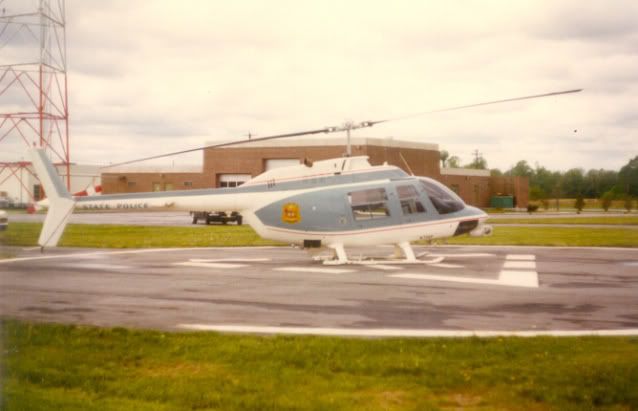
" After much thought, I have finally decided on what will be at least my first project for the Rescue Group Build. I will be modeling the Bell Jetranger 206 that was the first medevac aircraft flown by the Delaware State Police. This program began back in 1971. The aircraft is very similar to the currently available 1/32 scale kit. I am using a Testor's version that was purchased over E-bay a few months ago. Reference photos are very hard to find. The photos below are courtesy of Robert Ward. There is a replica of this aircraft on display at the Delaware State Police Museum in Dover. This replica aircraft was made from a donated military variant. From the photos below, you can see there are differences. As I am told, the replica aircraft was made from photos, and recollections of troopers and pilots who flew on the original aircraft. On a historical side note, I am told that the original aircraft sustained severe damage in a hard landing during 1971. I was unable to find any photos of what the interior configuration was like to include a patient on a back board. Later aircraft were designed so that the co-pilot seat was removeable, and the patient's feet would rest next to the pilot. I am designing this aircraft to accomodate a similar situation.
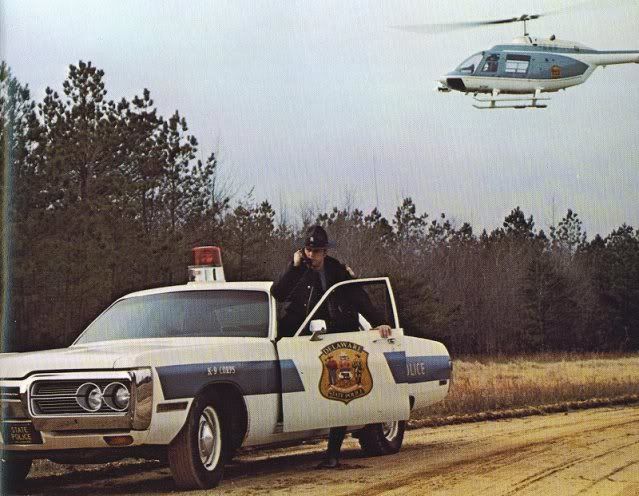
This is a really cool picture. I wish that the tail of the aircraft were in the photo. I don't know if this was staged, or spontaneous, but cool none the less...
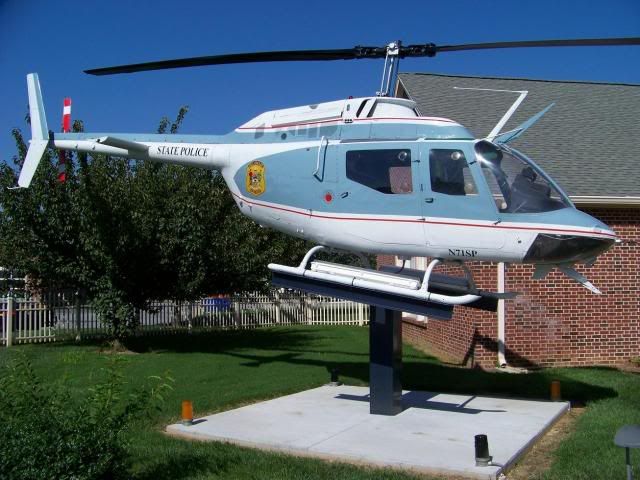
This is the Museum replica mentioned above.
I have started the project, but as my hobby room is in the process of being reorganized. My "photo area" is also not set up at the moment. I hope to have some pictures up real soon. I am really enjoying seeing everyone else's projects and progress!"
This was originally posted about a year and a half ago as part of the Rescue Group Build". Life has a way of getting a head of you. Anyway, I have recently made contact with a retired DSP Trooper/Pilot who has provided some additional information on this aircraft. So, I have dusted this project off, and along with Winnie's timely information - I will move forward with this build.
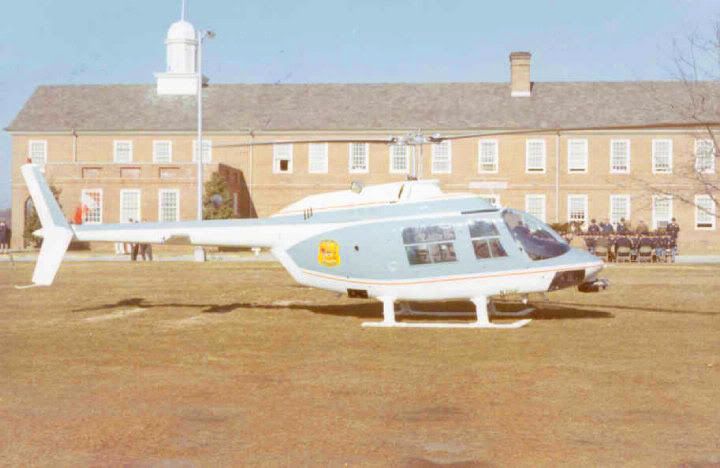
Here is a new picture of the aircraft when it was delivered:
One question - Does anyone know what interior paint colors were offered on civilian Jetrangers in the early 1970's?
David
-
Hi Burpinator,
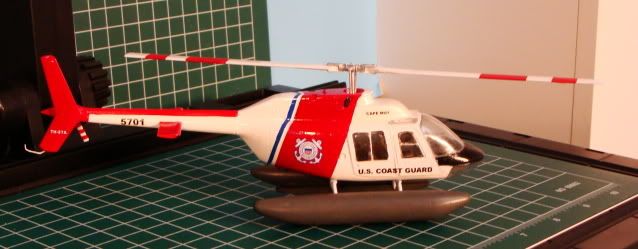
While not historically accurate, sometimes it can be fun to build fictional versions of classic aircraft. I am a big fan of the USCG and their bold, coloful paint schemes. Here is a photo of a build that I did a few years ago. Joseph at Fireball is great to work with! I would highly recommend him and his products.
David
-
John,
Don't ALL HEMS providers look like that?
Seriously, I would love to have the chance to fly in and work around one of these for comparison. We fly two EC-135 T2's, and love them. The only plus would be the extra cabin space(no rear bulkhead) and power. I like the enclosed fenestron tail rotor for safety. Only time will tell... I know the operating costs for a first generation EC-145 are much greater that for the EC-135's. Since our program doesn't fly these ships, I have no point of reference. At any rate, a new large scale EC-145 T2 kit would be welcomed - as well as (everyone has already mentioned) a Longranger, 407, 412, AW 139, S-76, etc...

David
-
Hi John,
Can't wait for the LifeNet decals. Hope you are well.
David
-
Anthony,
Sorry for being late in this thread, haven't been on line much lately. I am glad to hear that you are okay. Wishes for a speedy recovery for your wife and son. As for the mother-in-law, if you want to send her to the States, she can stay with us-
 Hope you are back from Tokyo safe and sound. Look forward to an update soon. Be well my friend.
David
-
Hi Pete,
I don't know if it would scale out right for you or not, but sometimes "bright" florists wire is great for projects like this. It comes in a variety of sizes, is soft yet still holds it's shape. It can be found at most craft stores like AC Moore or Michael's. Solder is another idea, but might not hold it's shape as well. Good luck. I'm sure that you will surprise yourself.
David
-
Paul,
She looks superb!!! Beautiful work.

David
-
I think that I may have something to add to my Christmas list....
I have what I believe is one of the first mass market hobby photoetch systems available 15-20 years ago called Auto-Etch. They produced parts that were "okay"... The company was only in business for a short time. I have wondered about the MM system - thanks for the feedback. Depending on the operating system that you are using, some of the CorelDRAW or Illustrator programs may be obtained fairly inexpensively. For most of us, the depth of knowledge of the program to produce good PE artwork is not that hard. Thus, if there are a number of custom PE pieces that you want/need, this might be a worthwhile investment. A question for those with the MM system: Does it require a laser printer, or is inkjet okay? Thanks.Just my two cents...David
-
Wow!
Paul, fantastic job! Do you plan on offering any resin castings of the instrument panel and/or seats? One of these days I will get around to starting the EC-135 P2 that is my office. Your work is an inspiration!
David
-
Good Day Gents,
As I also build emergency vehicle models, I decided to build my hometown fire company's chief's car. It is based on the Lindberg kit, with custom decals, two tone paint, and lots of detailing. The light bar was donated by a friend from a Welly die-cast Chevy Tahoe. Here are two links to the build - construction and the finished model. I hope you like it!
http://scalefirehouse.com/sfh_chat/viewtop...f=20&t=3223
http://scalefirehouse.com/sfh_chat/viewtop...f=19&t=3394
David
-
Anthony,
I've been silently following your wonderful progress on this project. Each update brings new and wonderful surprises! You are a true inspiration. Haven't had much modeling time lately due to family responsibilities and work. Did recently complete a fire apparatus project posted in the "Non Aircraft" modeling section. Hope to start my EC-135 project in the fall. Am waiting on decals that a friend is designing. Cheers!
David
-
Hi Guys,
I have an open/complete/unbuilt Italeri 1/35 scale HEMTT M977 that I would like to trade for an M978 Fuel Tanker in similar condition. Prefer to trade with individual in US or Canada. Kit is stored in a smoke free/pet free home. Trade kit doesn't necessarily have to be from same. Thanks for looking.
David
-
Hi there
Yes i have been developing this for the past 3 years,there was an article on ARC for 31st March.
This printed on a Epson printer A4 size,the white ink is a british invention that 2 friends and i have developed
it is currently being pantented and registered here in the UK.
It will not be avaiable for 2 years,but if any body wants some decals printed (white ink on to clear decal) please contact me at my email parkes682decals@aol.com
It prints pure brilliant white,this was done for a truck modeller who wanted the logo done for his company.
I am still getting modellers who suspect that it is see through and not dense enough,here's the photo's to prove it
Paul
Parkes682Decals
Paul,
This is great news! I have an ALPS MD-1000, and cross my fingers every time I go to print. I don't know what I will do the day it stops working. Now, any idea about replicating the the metallic gold? I build many wheeled model emergency vehicles that feature "gold leaf" lettering and striping. The ALPS does those very well. Best wishes to you on your new venture. I'm sure that I'll be a customer when it becomes available.
David
-
Hey Guys,
Looks like I am not going to get this project completed by the deadline. Extra shifts at work, busy at home with familiy, etc... On a positive note, I did get a lead on a contact at the Delaware State Police. I look forward to making contact with him, and hopefully get some additional information on this aircraft. Congrats to all those who were able to get their projects done! What a great tribute to the men, women, and machines who do such worthy and lifesaving work. Thanks to Wayne and Aaron for hosting this build.
David
-
Hey Guys,
Thanks for your suggestions. I ended up priming with Tamiya fine white surface primer yesterday. Wet sanded several hours later. Decanted/degassed Tamiya white synthetic spray lacquer, waiting several hours before shooting it. Came out really nice. Placed it in a food dehydrator for two hours. The model was then masked for paint the second color. After a little experimentation on a scrap primed water bottle, the maroon color came out well. The Tamiya masking tape is just fantastic! Thanks again for everyone's words of wisdom. I tend to be a " little impatient"...
David
-
Yea, but the BMF airplanes I see dont have a coating of scotch tape over it.
Are you asking how to remove the BMF from the backing sheet? From your original post, I thought that you were asking how to remove it once applied to a model. First, cut the foil a little larger than needed. I carefully lift the edge of the foil with an X-acto knife. You can then pick up the foil with tweezers. Apply where wanted, burnish down and trim. Hope this helps.
David
-
I am planning on using Tamiya TS-26 White spray on a current project. As it is a two tone paint scheme, I will be applying Tamiya masking tape to the white once set up. Any suggestions as to how long to let this "dry" before masking? I am impatient(modeler's curse), but don't want to ruin the underlying finish. Any suggestions would be appreciated. Thanks.
David
-
Im thinking of investing in a hairdryer to loosen up the adhesive, but the stuff is so thin that my fingers rip it when I attempt to peel it off, any other ideas?
I got some BMF to play with for $5, I can get 3 more sheets for $15 which is a good deal IMO.
ALso, I want to do a BMF version of a US plane as opposed to grey primer and aluminum paint, it just looks more authentic IMO, could someone give me a tutorial on how to use BMF to make a bare aluminum WWII plane using BMF?
Have you tried Scotch tape? Most of the adhesive from BMF is not very tenacious, unless you have applied additonal adhesive beneath it. Good luck.
David
-
Not really visible in the picture, but the seat back in the back seat (holy!) is in two segments, the the left is the left and middle seats, and is take out, so you are only left with the passenger seat base and back for the right hand side. the seat bottom sometimes stays in place, and other times is removed.
THe Long ranger has a slightly different mod, and the door actually folds forward, but is segmented. It does not require the doorframe to be removed, and can be opened with the machine running.
the strecher fits on a purpose built rail almost at the top just before the "hat rack" and is locked in place, and it rests on the bar that is visible in the picture.
The strecher can be folded in half and put in the "trunk", but if you "ambulance" the machine, the strecher would be in, unless you were loading, as the mod, although only taking about 5 minutes to prepare is a little of a pain to do, and requires you to bring all the extra bits back with you.
Winnie,
I think that I'll be getting out my razor saw and sheet plastic... Thanks again!
David
-
David:
What you are refering to is the "Litter Kit" which actually allows you to put two spacial built strechers in. you have to shut down the machine and let the rotor blades come to a stop, then opne the front door, THEN with a lever, open the "strecher door" which takes the door post from between the front and rear cabins, the rear door has an atttachment point at the rear edge that you hook into, letting the door swing the wrong way.
THEN you remove the copilot seat, and swing the bulkhead forward. you also have to remove the back seat cushion and back rest from the LH side.
THEN you can slide in the first strecher, which is difficult, particularily if the patient is heavy...
You can then strap the patient in using the seat belts and when you close the door again, you reattach the door-post, which also has a notch to secure the strecher in place, close copilot door, and bob-s-yer-uncle!
It is a pain in the buttocks, but works good.
One of the times I did this I had to do 2 attendants (nurses actually) one sitting on TOP of the patient administering CPR, and one ventilating. Whilst I flew the machine to a different location before we dropped the patient off at an airplane...
Here is a shot from the front, showing the bulkhead swung forward, and the strecher in place

Cheers
H.
Winnie,
Thanks! I had no idea that the bulkhead swung foreward! It is fortunate, that I simply tried to simulate the removable seat cushion and backrest. Since I haven't glued the cockpit together, now you have me thinking I may make the alterations that you have posted. As it stands now, I just simulated a frame at the bottom of the backrest and side door post. I was going to "place" a folded aluminum stretcher on the back seat. Now that I have photographic reference, I think I will "go for it". One question though. I assume that you could do just the "one stretcher option" and use just the upper one? If so, would the rear seat be covered or converted in any way, or would the stretcher simply rest upon it? Thanks again for your timely and invaluable contribution to this project!
David
-
Hi David ;
These pic's probably aren't related to you build but I thought I might post them anyway ;[i hope you dont mind].
It's a Faifax County Police Long Ranger ... from my aircraft magazine collection .

Unfortunatly my scanner plays up quite a lot when scanning pic's , I was only able to get those three .
John .
John,
Thanks for sharing these. Of particular interest is the Jetrange photo where the patient is being loaded. The Longrangers that I have seen had a portion of the bulkhead between the front and rear seats removed IIRC. The co-pilot seat was also removeable. From your photo, it appears that either there is no bulkhead on the co-pilot's side, or none at all separating the two areas. I hadn't been able to locate any references until now. Thanks! I am building mine as if the vertical portion of the bulkhead and seat back are removeable. There is an indentation in the bulkhead when viewed from the rear. A folding aluminum backboard will be secured on the rear seat, "ready for use" if needed...
David
-
The Hobbycraft kit isn't bad, but when you get to the Italeri kit you will find it much nicer.
If it helps you are not alone in your madness. :lol:
Aaron,
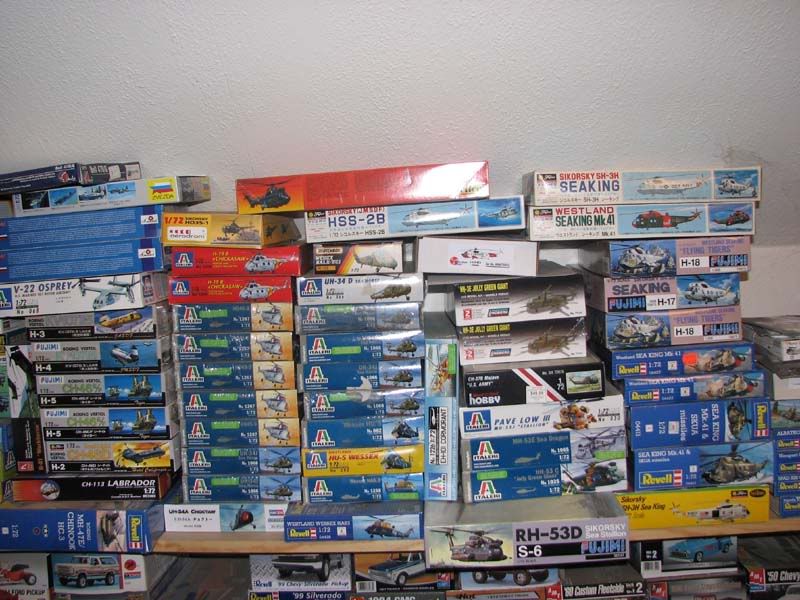
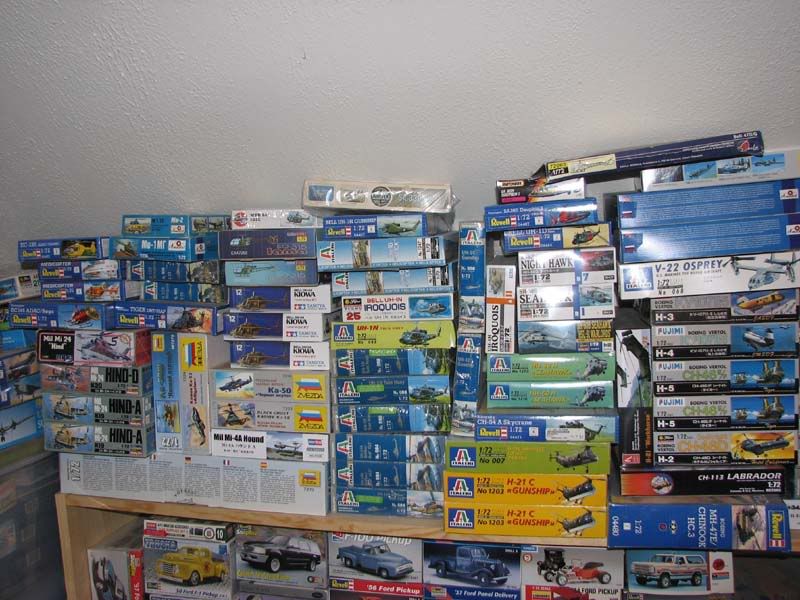
Somehow, I missed this post. Man, I thought my stash was "large"...
Do you mind if I show these photos to my wife? Maybe she will finally understand that I am not the only one with this affliction...(LOL). Look forward to seeing some of these get built. You already know of my vast "In Progress" collection. I'm working on making some progress on that list right now. Just took a little break. David
-
Nick,
Excellent job! Nicely done, especially for the scale. I wish that I could work on something that small. Someday, I hope to build a Jayhawk in 1/35 scale.
David
-
David........Ah Em OZ? New Zealand actually....................... :)
Remmington, did the parts arrive safely? Enquiring minds want to know..................I am having BK withdrawls.
Cheers
Anthony
Anthony,my apologies. I was at work, meant to type in "NZ" and typed "OZ" instead. Can I blame it on the jet fuel fumes, geographic disorientation or just old age??? The weather here in the Northeastern US is beautiful. And with a longgggg list of things to do, I am still going to try and steal a few moments of modeling time... We'll see.
David
Jetranger State Police Helicopter
in Helicopter Modeling
Posted · Edited by hooknladderno1
Ray,
Thanks for the photos! I got a little work done on the project last night, just no photos... I cut out the co-pilot's bulkhead leaving a horizontal piece in place as per Winnie's photo. I will add a triangular brace piece to the inner corner. I need to put the front and rear bulkheads in place, and decide what adjustments need to be made to the seating surfaces to make the aluminum backboard level. I will also add the hinged bulkhead piece from behind the co-pilot seat and place it next to the flight controls by the pilot.(see photo below)quote from Winnie:
http://img.photobucket.com/albums/v676/Shark-41/IMG_0391.jpg
Additional hardware will be added to make attachment points for the backboard. I am hoping to find some additional reference material regarding the "litter kit" conversion regarding the removeable door post. More to follow... Thanks for checking this project out!
David