


hooknladderno1
-
Content Count
245 -
Joined
-
Last visited
Content Type
Profiles
Forums
Calendar
Posts posted by hooknladderno1
-
-
Remington,
Have you been kidnapped? Impatient people(me) want to see how things are coming. I understand that the glass is coming from Oz, so there may be some delay. Just acting like my 8 year old son - I wanna see, I wanna see...

David
-
John,
Nice work on the APU. I agree that glass can be a pain, especially where it meets the fuselage. On my first(and only) completed rotorcraft to date, while it taking for a test flight( admiring my work) it fell to the floor. The windscreen and chin bubble broke loose from the fuselage, and cracked the surrounding paint - Oh the humanity... I was able to recover, and complete the model. But, I feel your pain. I did dip all of the clear parts above in Future prior to attachment, but still ended up putting the glue on a little heavily after the repair. I have heard of a couple of different techniques from other modelers here who have achieved great results. I guess it is like anything - it takes practice. I will try some of these different approaches on my present and future builds, and see what works best for me. Good luck on your project, and continued progress. As said above, slow progress is better than no progress...
David
-
Does not look well for getting this done now. So far we got eight inches of rain in the last 36hrs. My Basement is in a pretty good mess right now and I have a feeling will take a few weeks to clean/ work everything out.
Hey Brother,
My prayers are with you for dry weather and minimal damage. Take care of your priorities, the modeling will wait. Don't ask me how I know... Hang in there.
David
-
Wow !!! Almost perfect---you realize that despite what you may be seeing in the refernce photos, the fuel and hydraulic lines are actually translucent. Better made out of ultra thin tubing---not that you should take out the lines and start re-plumbing all over again so that you have an accurate model. But since Valley Con 2011 is still aways off you do have time to do it the "right" way.
Hope to see you Saturday at the LAMS Oliver !!!
:wub: 
George
George,
Translucent, opaque, transparent, - what ever the reality, you KNOW that Oliver will make it look great!
Oliver,
I don't know what else can be said about your fine craftsmanship. Just know that you are an inspiration! I appreciate each update. Thanks for taking the time to photograph each step, and share your progress.
David
-
Neo
Nice work so far. I like your technique for painiting the belts/buckles. Is all of the buckle detail molded in on the seats? I have an ADAC version of the 145, but didn't notice that much detail. I am at work at the moment, so I can't check. Look forward to following your progress.
David
-
Daniel,
I am back to work tomorrow. It is supposed to rain here tomorrow, but we may have an EC-135 in our maintainence hangar. Let me know what specific photos you need and I will try to get them for you. I assume that you want the right side view, as that is where you have removed the cowling? You can PM or e-mail me directly. By the way, I like your progress thus far. How did you make the angled antenna under the cabin?
David
-
Bought myself a Revell 1/32 EC-135 Polis version helicopter from Hobbylinc. As the wife doesn't always know what to get me for my birthday, so I thought that I would just order it myself... It is a great kit, containing lots of neat little extras as well as the corrected fenestron tail fin. This kit will hopefully become a replica of the aircraft that I fly on every day at work. It is also nice, as it is molded in white, as opposed to previous yellow, red, or orange versions...
David
-
For anyone interested, there is a company called Heligraphx. They make vinyl window decals and license plates of helicopters. This might be a great idea for displaying your finished models, or just something to place on your wall. If you are/were active in a flight service be it military/commercial/ law enforcement, firefighting or EMS, they can probably do your aircraft. Their attention to detail is amazing. The company is owned and run by a former Coastie turned EMS pilot and his daughter. Their products are reasonably priced, their turn around time is good, and well made. As one of the guys over on the Rescue Group Build is working on this rotorcraft, I thought that I would include a link to the license plate for it. http://www.heligraphx.com/imagelib/sitebui...get=tlx_picn63s
I have had both a window sticker and license plate made for my truck of my aircraft - of which I have posted pictures of a million times on this site before. I have no affiliation with the company, other than being a satisfied customer. Just thought that I would let you guys know about these products.
David
-
As one of my friends used to call them, he's by the way a very experienced pilot who amongst other machines have flown the canadian equivalent, the Voyageur.
SO the kit:
Academy HH-46 D, Kit decals, Eduard Zoom interior.
Some flaws, the Mr. Solution and Mr. Setter were too strong and left CRATERS under the decals, much to my chagrin, and the decals did not want to "snuggle" properly. On the other hand, if you disregard those little things, and the fact that the APU exhaust is still in the tweezers on my workbench, it did not turn out half bad.
I chose to do the exhaust mostly black this time, but miiiiiight be convinced to change it at a later stage.
Colors used: Orange, mix of red and orange from Vallejo
Gray (16061) from Gunze Aqueous acryllics
black also gunze.
Weathering: Mig Pigments wash (dark) and closs/flat coats by Testors acryllics.
Cheers and be gentle, but constructive criticism is welcome (promise I won't cry)
H.


Together with his friend the Labrador on the shelf!

Winnie,
Super job! I especially like the bright colors, and the graphics scheme. Nice work.
David
-
I am planning a project that will involve opening up doors to reveal interior details. Most of the doors have recessed panel lines, while a few others have raised panel lines. I would appreciate hearing your techniques and suggestions on how to accomplish them. Thanks.
David
-
Remington,
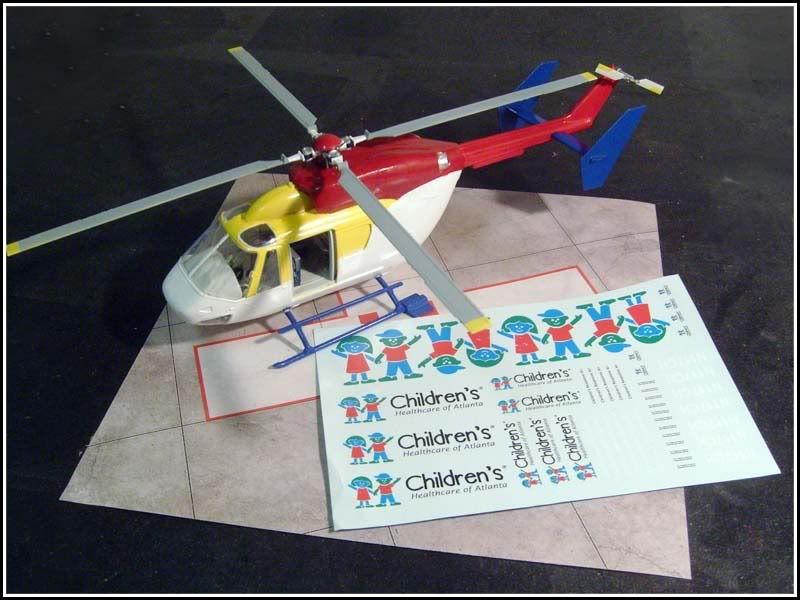
Bought myself one of the Polis kits from Hobbylinc for my birthday! Man, what a kit. That, and thanks to Daniel, I can now build two verisons of my aircraft. The first will be a simple version using the ADAC kit, along with the parts that Daniel sent me. I have the matching paint, and am waiting on the decal to be made. Later, I will do a more detailed version(will attempt open doors,etc) with the Polis kit. Just have to get my Delaware State Police Jetranger done first.
David
-
WOOOOHHHOOOOOHOOHOHOHOHOHOHOHO!
I am happier than a fat kid with a full ride scholarship to a cupcake camp haha
Actually, this is pretty dang good for having to mask 4 colors

I would say I got the masking about 90% correct... a few touchups, some clear, a few decals... this puppy is in the bag!
Also, Neo, you have a PM.
Remington,
I don't know how I missed your last update. Looking great! Have you had a chance to do any more work on the project? Look forward to your next update.
David
-
I am going to try a NMF, i will be using MM chrome silver. i have been doing a bit of expermenting with the airbrush, thinning, pressure ect. the main thing i have found is that the airbrush tip seems to clog up a lot. i have tried thinning the paint more and higher pressure's. no difference. so a few questions for anyone who has used this paint.
1. do you need to undercoat?
2. how thin should the paint be, i normally use 50-50
3. mist coats or just hit it?
4. drying time between coats, i know it takes a long time to cure
any other hints would be great.
p.s i dont want to use alclad or other types as this is a one off. thanks
Ant,
Even though it may seem wasteful to buy of jar of Aclad for a single project, the high performance characteristics, as well as avoiding the hassles of the MM Chrome are worth it. I have used Alclad for many non-aircraft subjects. It really is great stuff. As it is a lacquer, it dries hard, and handles well. Just my two cents...
David
-
Even though I sent these to Steve here at ARC and another walk around website, they were never posted so I thought I would upload them myself. They are detailed shots of both helicopter types under going maintance with lots of panels removed. They were taken at Air Methods at Centienal airport a Medical helicopter company who is all over the country (here in Denver they are Flight for life and Air life) they do all the conversions of the helicopters themselves, striping the airframes and rebuilding them with medical equipment. That is what was going on in these pics, especially with the A-star. Enjoy!
EC-145
http://www.flickr.com/photos/40916434@N05/...57623442908233/
A-star
http://www.flickr.com/photos/40916434@N05/...57623567521448/
For anyone looking to do an "Air Methods" aircraft in their current paint scheme, "Scalefinishes.com" carries matches to their blue, white and red paints. I am preparing to build the EC-135 that I fly on at work. Decals for this graphics scheme are also being designed at the moment. More details will be available when the decals completed and available.
David
-
All great comments above - technique simply applies to the desired result. One thing that I didn't see that although basic, bears mentioning. Pay attention to the thickness of the paint/clear coat on sharp edges or surfaces. The amount of pressure used on a flat surface will surely cut through the thinner layers of paint in those areas. It is great to see that you are practicing prior to trying a new technique on your pet project. I have had many moments of regret where I was too impatient to practice before using a new technique or product in the past. Look forward to seeing your project, and how it turns out.
David
-
I know that many here have suggested using Tamiya Lacquer Thinner to thin Tamiy White Fine Surface Primer for airbrush use. Anyone have any suggestions as to the thinner to primer ratio? Thanks in advance.
David
-
Daniel,
Have you had a chance to do any more work on this project? Just wondering... PM on it's way.
David
-
The Polis kit is the bomb... There are sprues marked for the VIP boxing, the Police boxing and the Medevac boxing, the only thing it doesn't have is the sprue with the backboard and stuff.
All in all, an excellent way to spend about $35 at your local LHS...
Is this what you are talking about?
Also, I agree with you about the time thing... this is a hobby not a freaking job... it doesn't have to be done yesterday "Rome wasn't built in a day
 )
)Yes,
That is the nose. The 145 kit comes with two, but one is too short, the other is too long. As far as the medical interior, most of the ones in the Revell kits reflect European styles, not those used in the US. The stretchers and backboards can be easily made from plastic, brass, and wood. Soft sided medical bags can be made from Sculpey, Fumo, or a similar product. I can provide a tutorial on making them if there is any interest. The 145 kit contains a similar angular radio configuration for the patient part of the cabin, but again, it is on the wrong side of the aircraft as opposed to the ones here in the States... Nothing that a little foil embossing, back filling with resin or epoxy, and scratchbuiliding couldn't solve though. Every aircraft is set up differently, depending on the flight program's needs, as well as who does the interior finishing. So, if you can get some interior photos from the AirLift program as a start, you can go from there. If you need anything more detailed than those on the CD that you have, let me know.
David
-
Remington,
Another great project! I agree that good work takes time. My pet project of building my own EC-135 can't be rushed. A recently re-introduced thread of Julian's EC-135 build is a great learning tool.
http://www.arcforums.com/forums/air/index....howtopic=116997
I would reccommend acquiring an EC-145 kit. As Julian had mentioned, many of the interior components are much more appropriate for the newer EC-135's especially the Air Methods/Metro Aviation interiors. I plan on using the 145 kit for the seats, IP, and interior floor. I hope to eventually acquire one of the Polis kits for the corrected parts and the fact that it is molded in white. Flash is the least of my worries. Does this kit contain the radar nose cone as pictured on the "walk-around" disc that I sent you? Just curious... Can't wait to see your next update.
David
-
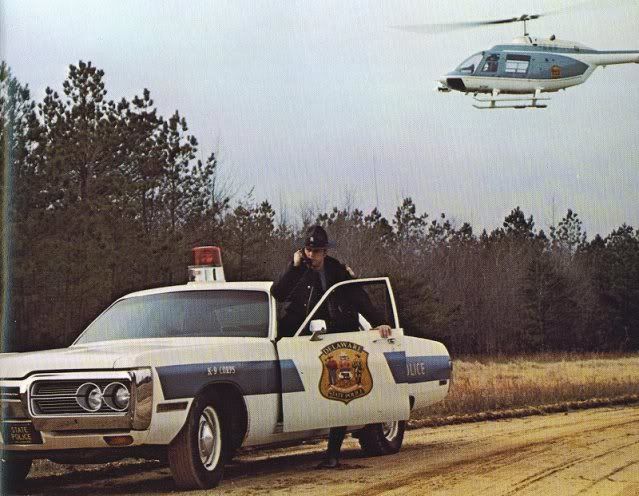
After much thought, I have finally decided on what will be at least my first project for the Rescue Group Build. I will be modeling the Bell Jetranger 206 that was the first medevac aircraft flown by the Delaware State Police. This program began back in 1971. The aircraft is very similar to the currently available 1/32 scale kit. I am using a Testor's version that was purchased over E-bay a few months ago. Reference photos are very hard to find. The photos below are courtesy of Robert Ward. There is a replica of this aircraft on display at the Delaware State Police Museum in Dover. This replica aircraft was made from a donated military variant. From the photos below, you can see there are differences. As I am told, the replica aircraft was made from photos, and recollections of troopers and pilots who flew on the original aircraft. On a historical side note, I am told that the original aircraft sustained severe damage in a hard landing during 1971. I was unable to find any photos of what the interior configuration was like to include a patient on a back board. Later aircraft were designed so that the co-pilot seat was removeable, and the patient's feet would rest next to the pilot. I am designing this aircraft to accomodate a similar situation.
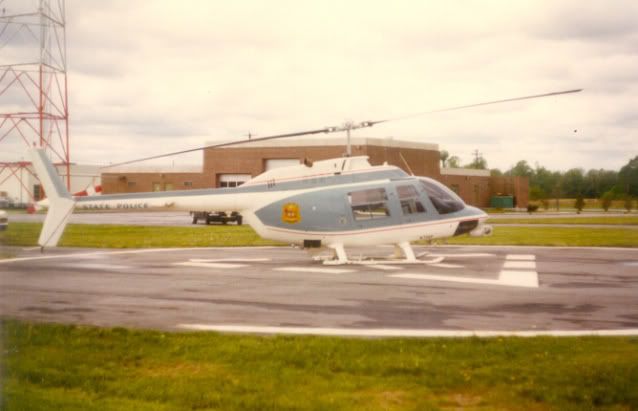
This is a really cool picture. I wish that the tail of the aircraft were in the photo. I don't know if this was staged, or spontaneous, but cool none the less...
This is the Museum replica mentioned above.
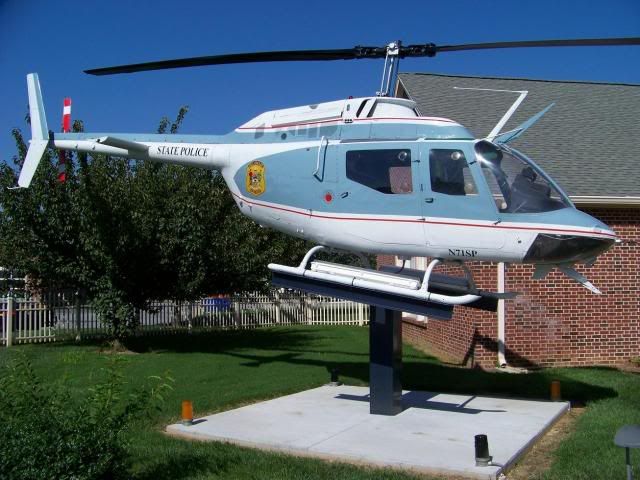
I have started the project, but as my hobby room is in the process of being reorganized. My "photo area" is also not set up at the moment. I hope to have some pictures up real soon. I am really enjoying seeing everyone else's projects and progress!
David
-
As above, it depends upon the paint that you are using. I have had success with PollyScale, and Testors Acryl and to a certain extent Tamiya. With the first two, add some Liquitex Retarder Medium, and a little of their Flow-Aid. You may need a little distilled water with the PollyScale or Acryl thinner for the Acryl as well. With the Tamiya, use the above Liquitex products, and a little of their brand thinner. The only challenge, is that the first coat of some acrylics will lift with the second application of a brush coat. This problem can be solved by a thin coat of Future between coats. Hope this helps.
David
-
Remington,
Looking great! Just as a suggestion, if you can get your hands on a food dehydrator, it can speed up the drying time between coats... Can't wait to see it progress.
David
-
As a side note on the subject, FineScale Modeler magazine (Nov. 1999) featured an article on printing decals with an ALPS printer. As part of the article, the authors(Paul Boyer and Rick Johnson) featured how they used the ALPS to print the Presidential Seal. Anyone with access to the article, check it out. The single photo of the resulting decals looks really cool.
David
-
Adam,
Welcome to the group. I too am a fan of the presidential aircraft. I have too many projects on the workbench or "on the drawing board" to even consider them, but they are neat looking, and a great part of our history. You could always go with custom made decals. There are several good designers/printers out there. Although I don't know the legalities involved, as long as it is for your own private use, I don't see why not? I'm sure that someone here with more knowledge on the subject could provide a better answer. Look forward to seeing your builds.
David
Finally Decided...
in The Rescue Group Build
Posted · Edited by hooknladderno1
Hi Guys,
Time has been very scarce lately, thus little progress on the project. I did put together the instrument panel. Hope to place some weights in it, and do a little seam filling and sanding over the weekend. Question to anyone who has built the 1/32 scale Testors Jetranger before. I noticed that the base of the instrument panel is not symmetrical. Is it supposed to be that way? Also, I am trying to work out the logistics of glueing the interior parts to the one side of the fuselage, and assuring that they line up with the other side of the fuselage once assembled. Any suggestions? I may post this question over at the general "Helicopter Section" for those not following this group build. Look forward to seeing everyone's progress. As promised, I'll post pictures when there is some visible progress.
David