


hooknladderno1
-
Content Count
245 -
Joined
-
Last visited
Content Type
Profiles
Forums
Calendar
Posts posted by hooknladderno1
-
-
I look forward to following this build! I also have a 135 project in the works.
David
-
John,
You may want to try posting a message in the "Parts Box" section of the Marketplace at the bottom of the ARC Forum homepage. You can request if anyone has an extra decal. If it is only one that you need, there may be a member that has an extra. One of the great things about this forum, is the sense of community, and willingness to help a fellow modeler out. Good luck.
David
-
Still the best thing I've ever used for masking canopies is parafilm M. Still using a roll bought long ago and have to make it last. I understand it's hard to come by now that Testors no longer sells it.
John,
Micromark still sells the Parafilm M. I have a few rolls that I bought a few years ago stashed away. Since their shipping can be a little high, I keep a list that I add to from time to time, and then place an order. Hope this helps.
David
-
Mike,
Your work does not dissappoint. The Longranger looks great. Can you tell us where you made the cuts on the lower fuselage? Also, did you make your own skids? They look narrower and more well detailed. Bring on the paint!
David
-
John,
Looking at your workbench and projects is such an inspiration! The conversions and bodywork are seamless. It is great to see so many subjects/versions you have created that are not available in kit form. I keep going back to your website to admire your work. Glad you are on the mend, and look forward to seeing more of your progress.
David
-
Mike,
It is great to see you back! Glad all is well, and you are getting settled from your move. I think I speak for more than just myself when I say that we are looking forward to following your updates on this project. I believe that following your lead, that many others will attempt such a conversion. Perhaps it will lead to some pieces such as the new doors being cast in resin(please,please)... Seriously, you are a very talented builder, and it will be good to see your magical creations once again.
David
-
Hi all.
Long time no post, I forgot my pasword and have been unable to get a new one till now.
Anyway, I am in love with Bell helicopters the 206 Longranger 4 was a long time favorate but that possition has been filld by the Bell 407.
I want, need and must have a Bell 407 model.
I picked up one of the recently released Revel Bell 206 Jet Rangers, nice kit, not too accurate but better then a kick in the nuts.
I'm not the best or most patient modeler in the world so I bashed this one together, I just wish they gave a high skid version.
Bell 430,
Welcome back! Nice work on the 206. I too am surprised that there is not more interest in the 206 or 407's. I am in the process of completing my first rotorcraft - a 206. I have plans to build a 206 L4, and a 407, both used by my local state police. I am in the process of gathering information and reference materials, then will stock away the kits. Obviously, there will be much conversion work to do. I will be gathering the technical information on where to make the cuts, making the new doors for both versions, and the larger windows and body flare for the 407. I have received several great suggestions and ideas recently on which paths to follow to accomplish this. This is a great forum, and I look forward to seeing your progress. Perhaps we could share ideas, techniques and suggestions at getting these projects a little further that just the "idea stage". G'day!
David
-
Gino, Alby, and Patrick,
Thanks for your replies. Since I will be building in larger scales(1/35 or 1/32), I will probably go with the brass rod. How do you get the bends consistent in the brass? Do you make a template out of wood, and then bend the brass over it? Do you hammer it, or use the bending tubes from K&S? I appreciate your guidance. Thanks.
David
-
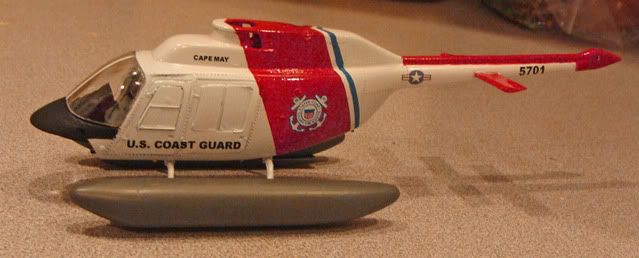
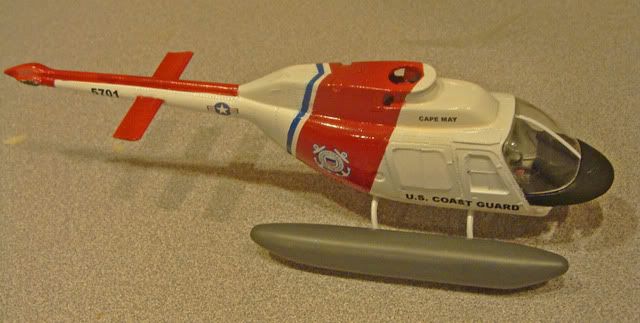
Hi Guys,
I am wrapping up my USCG Jetranger project. As in the photo below, the blades are finished in a high visibility scheme.
My question is this: The inner area of rotor blades has irregularly molded lines that look like layering of the blade materials. What color would they be? Does anyone have any reference photos that show this? The only photos that I could find were of the blades in motion. Thanks in advance.
David
-
Anyone have any suggestions on the materials, steps and techniques involved in making new skids for our rotorcraft models? Some of the projects that I have planned feature high option or longer skids than found in most of the base kits. Just wondering how to go about making these? Thanks.
David
-
Guys,
Thanks for all of the comments and suggestions. I thought that there must be more people out there that appreciated the 412! I will slowly work on getting the proper shapes/contours/proportions for the major components that must be made or corrected. Is it "cheating" to ask for help? Gino said that he has already made masters for certain parts, and Anthony will be doing so at a future time... I may focus my limited time/energy/skills on more basic projects for the time being.
I think that I have "fear of completion"... Fear - that I am going to totally ruin all of the hard work of a project in the final steps. Has anyone else experienced this(I know, crazy - right)? I have completed several model projects in the past, gaining new skills, trying new materials and techniques, and improving the end result of my projects. I will continue to work towards overcoming this phobia. Thanks to all of you for your contributions that make this such a great forum to learn, share, and grow in our hobby.
Sincerely,
David
Note - Sorry for the sappy post above. Just wanted you to know how much I appreciate the projects, knowledge and ideas shared here...
-
Okay Guys, be gentle now. With all of the recent discussion here on Huey variants and conversions, I am braving the waters to share a very rough project that I began about 10 years ago. With very limited knowledge of rotorcraft, Internet resources, forums, and tools like callipers, I began with a Revell 1/32 UH-1D.
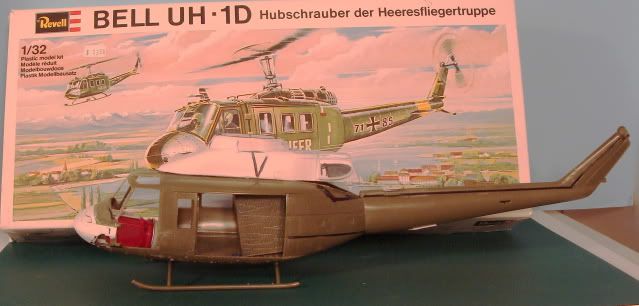
The upper cowlings and exhaust were removed. I then took a section of dense foam material used for porch railings, and attempted to carve a rough shape to resemble the upper structures.
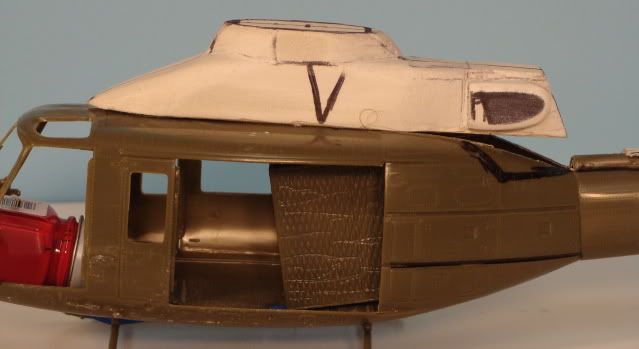
Evergreen strip was added to attempt to alter the shape of the nose and chin bubble windows. More work is needed here on both. Forming of the upper and lower edges of the nose, as well as adding some horizontal material where it is chipped, as well as remove some of material towards the front of the chin bubble.
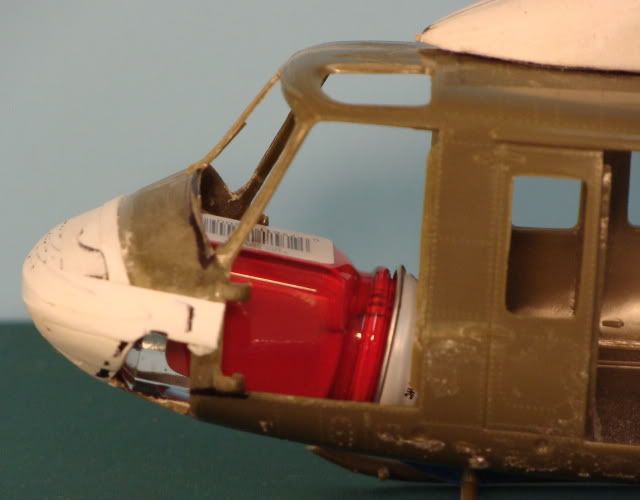
All of the contours and placement of the details will need major adjustment.
The rear exhaust will need major fabrication, aftermarket mesh, and a little guidance from the members here.
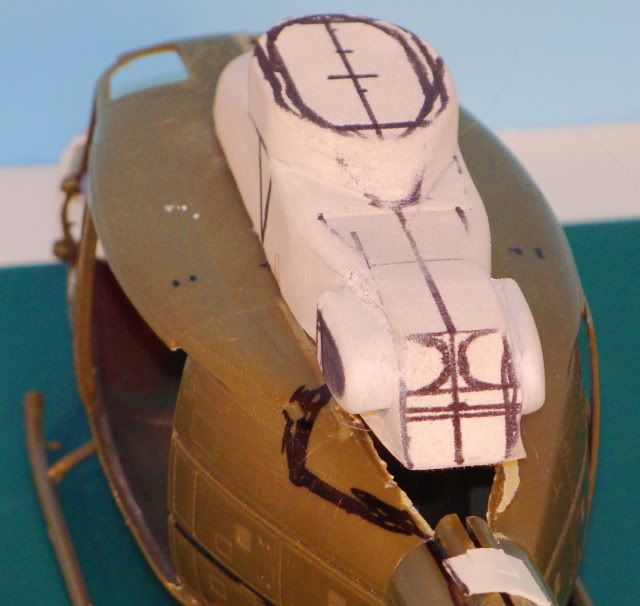
Now, with a little more knowledge, better skill level, and tools, I hope to be able to make a cleaner transition into something that more closely resembles a Bell 412. All comments, suggestions and feedback would be greatly appreciated.
Thanks.
Sincerely,
David
-
I would think you would be better off starting with an OH-58D for the 407 since it includes many of the same features as the 407 including the 4 bladed rotor.
Thanks guys for your ideas and suggestions. Aaron, do you know or can anyone tell me if the Academy 1/35 OH-58D kits have the 4 doors/windows included on the sprues as an option, or are they just the configuration that is on the boxart? Also, any suggestions for the tranmission/rotor cowling, or just cut down/modify the kit one? Thanks.
David
-
Hey Guys,
Just my two cents...
With the way that the posts are displayed, I may have missed it, but I didn't see any mention about the use of a food dehydrator. This was something that I learned about and tried about 10 years ago. They are not terribly expensive, Have trays that can be cut out, to hold a model or parts almost a foot long, and about 10 inches high. I am at work right now, so can not photograph the one that I have. It is great, as it has a variable heat setting, as well as it circulates the air throughout the chamber. I have not priced them in a while, but I am sure that a simple search of the Internet will yield you some at a pretty reasonable price. Let me know if you would like photos. Hope this helps.
David
-
Agree with strikeeagle. just order a bunch of stuff you need or see if anyone in your town needs any modelling stuff so they can chip in for the shipping. there has to be a few other people who needs stuff too. post a cassified or on kijii or something. i totally understand about that shipping prices but all you can blame is G.W. Bush.
I too, agree that the Tamiya White Primer is great stuff! I see that you are a member of a local IMPS chapter. As others have mentioned, check with some other members of your chapter, and see if they would be willing to go in on an order together, to save on the cost of the shipping. Personally, I live in an area without either a good hobby shop, or local modeling group. I do as others have suggested, and keep a Post-it note tablet on my workbench. As I get low on supplies, see something new that I just have to have, or want to add tools, paint, glue, kits, etc. to my "arsenal", I jot them down. When I am ready to place an order, I won't forget what I need, keep well stocked on supplies, and reduce the cost of shipping. You may have to do a little research, as some companies make you buy larger quantities of paint(bulk packs), don't carry certain supplies, or routinely charge higher for their items. I have a few companies that are my favorites, but it is just a matter of personal preference. Good luck on solving your problem.
David
-
Okay Guys,
Another newbie question:
Aside from the larger window areas, four blade main rotor system, and sleeker lines of the front rotor housing are there any other exterior differences between the two aircraft?[/i] I know that the 407 has a beefier engine and transmission, but I'm considering doing at least a 206 L4 conversion, and possibly a 407. The Delaware State Police (where I live) fly the 407's and a 412(oh yeah!), and used to fly the Longrangers. I took my first flight as a flight nurse in a Longranger several years ago with them. I would like to eventually do all three aircraft, but thought the Longranger would be a good start. I found drawings and measurements on the Bell website, and am considering using the recently re-released Revll Jetranger as the basis of this conversion. I had seen Michael's (BK117) start of such a project, but sadly, he has not graced this forum lately. Any one else considering a 206, 206 Longranger, or a 407 project? Perhaps we could do a mini group build? Please share you knowledge, thoughts and ideas. Thanks.
David
-
Anthony,
You continue your masterful work! Although I have not used the Archer products, I suppose it would depend on how many coats you will need to put on your project? Between primer, and the two color Westpac paint scheme, it would seem that there is still a fair amount of coating to put on. You would be the expert there... I believe that the Archer site does list ther thickness of their transfers(?). Look forward to viewing your continued progress.
David
-
Hey guys,
I have seen some discussion about the Revell 1/32 "Polis" kit. I had some questions regarding this version as opposed to the other releases of the EC-135:
1. I understand that this kit has an additional sprue, that supposedly corrects the "wrong direction" fenestron tail rotor. Does this also have a corrected tail fin as well?
2. I understand that it also has a winch kit and skid floats. Is this correct?
I had read the review of the kit on one of the websites that was linked in Scale Rotors several months back. I would appreciated any feedback from the members here that may have the kit or knowledge about it. Thanks.
David
-
There is a product called "Gundam markers." I know Bandai make them, and others may as well. There's a ton available through vendors like Amazon. I found mine at miniatures/war game oriented hobby/game shop locally.
I found that these seem to be genuine paint markers, rather than the "Magic Marker" style ink in Sharpies which gives the bleeding effect. I can't guarantee they'll work better in your gear bays, but in the places I've used them, they seem to resist bleeding.
DG
I like the Gundam Marker idea. You could also try some of the fine tipped paint pens available at arts and crafts stores like Michael's or AC Moore. If there is room in the area that you are detailing, following the Future coat, small pieces of Post-it note paper, aluminum foil, or masking tape could be used to protect the painted areas from the dreaded shaking hand... As for the wire ties, you could try small strips of decal material. This would allow for even cutting, size, and spacing of the wire ties. The only challenge, is to fight the surface tension that wants them to go in a direction opposite of where you want them to go. I encountered a similar problem when applying the small strips of decal film to the tail rotor of a recent project. The solution was a mix of Micro sol and Solvaset decal setting solutions.
Hope this helps. Good luck on your project.
David
-
Hey Guys,
As I am wrapping up my first rotorcraft build, I had a few questions for you:
1. Do you glue your main and tail rotors in place, or leave them loose for transport to displays, shows, etc. ?
2. If you do secure them, how do you package them for transport to prevent breakage?
Sorry for such basic questions, but I 'd hate to go through all of this work, only to do something stupid at the end...
Thanks.
Sincerely,
David
-
Oliver,
Fine work with the construction, texture, and weathering on this project. I especially like all of the deatils, and the hoist. Everything looks so real! I look forward to the next update.
David
-
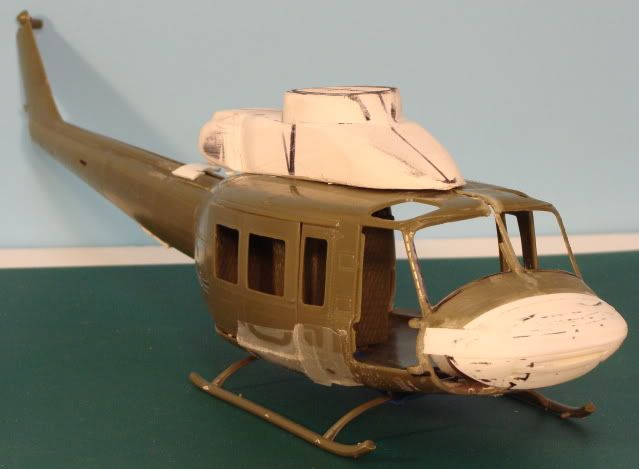
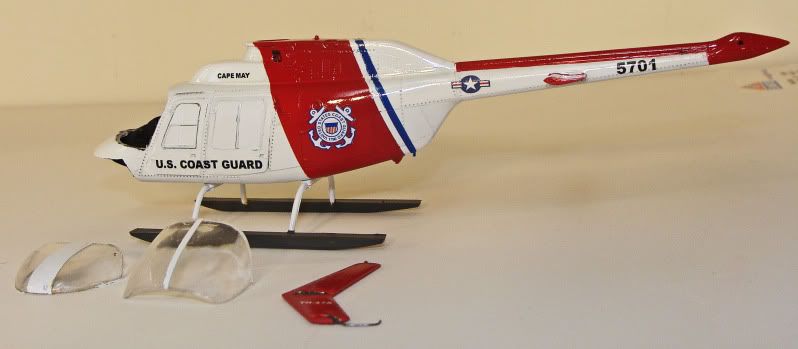
Okay Guys,
I have made some progress. The floats have been repainted and glued to skids. The windscreen has been glued back in place using Microscale Kristal Klear, and is awaiting remasking and final gap filling:
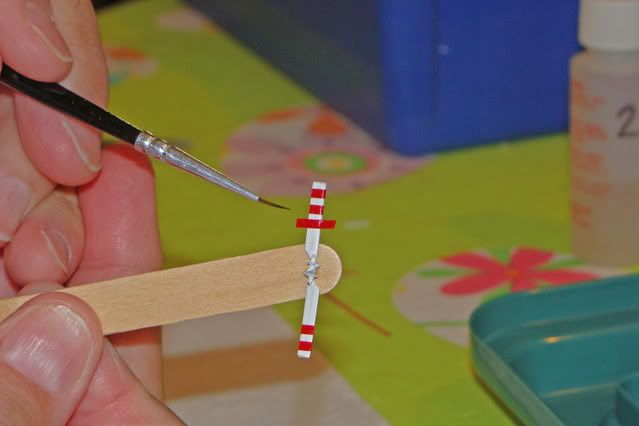
I finally decided on a "high visibility" scheme for the rotor system. Couldn't decide which way to go, paint or decal stripes? So, I figured that decal stripes would be a little more foregiving.
The only challenge was that with such small decal strips, they kept wanting to rotate and follow the length of the blade. A combination of Micro sol, and Solvaset, along with a diligent nudge from my brush got them in the right direction.
Here is the project where it stands now.

I have to assemble the main rotor system, re-attach the tail, touch up the paint, remove the window masking, resand, redip(Future) the chin bubble and re-attach and tackle many other details. As always, any comments or suggestions are appreciated.
Sincerely,
David
-
Help!
After a hard landing, the windscreen and chin bubble detached from my helicopter in progress... Upon removal of the masking tape, this is what I found:
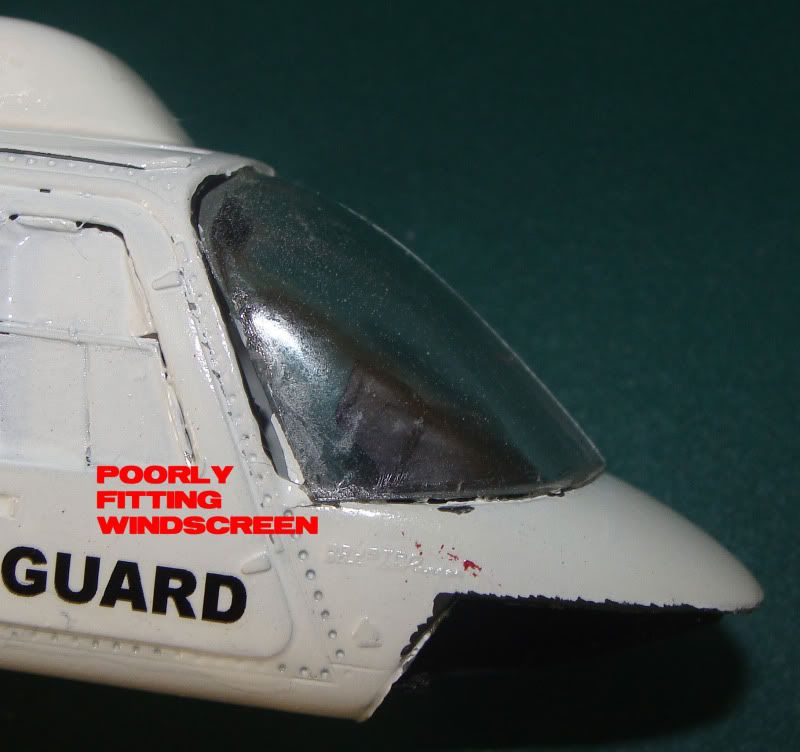
As this is my first aircraft model, I failed to dry fit the windscreen to the fuselage prior to coating with Future, and applying the masking tape. LESSON LEARNED! Any suggestions on possible remedies for the situation, short of sanding/building up the windscreen frame with plastic strips? I was really pleased with how the paint on the fuselage turned out, and had hoped not to have to repaint it... Thanks in advance for any guidance.
Sincerely,
David
-
Looking great-Very cool Idea! I might have missed it, but what kit are you using? Looks nice!
Regards..
Pig
Pig,
Thanks for the nice comments. The kit is the ESCI 1/48 scale #4061 Jetranger from many years ago.
Well, while on a training mission, the aircraft experienced a "HARD LANDING"! Upon inspection, the front windscreen, chin bubble, and tail were detached from the aircraft.
Upon closer inspection, I noted that the windscreen was poorly fit to the fuselage. As this is my first aircraft build, I had assembled the fuselage, dipped the windscreen in Future, then applied the masking tape. The windscreen was glued in place without ever being dry fitted to check and adjust the fit... LESSON LEARNED!
Now, the question is how do I fix it? Any ideas or suggestions would be greatly appreciated. I obviously also have to re-attach the tail, which will probably be drilled, pinned , and glued to provide some additional strength. The anti-glare panel will be masked and painted. The chin bubble will be cleaned up, and reattached as well. Originally, I had used Testor's clear cement. Any other ideas regarding the clear parts? Do you place a bead of glue all the way around the window opening, or just in certain spots?Thanks in advance for your suggestions. Finally, you will notice that the skids have been painted a dark gray. The floats have also been painted this color. They will be attached towards final assembly. Thanks for following along.
Sincerely,
David
Testors/Aztek Side Feed Cup Problem...
in Tools 'n' Tips
Posted
G'day Mates,
I have one of the original Testors/Aztek (black) airbrushes. Doesn't get used often, but I clean it religiously after use. After shooting Future for the first time recently, I noticed the next time that I went to use the brush, I could not get paint to come out. I was able to get the drops of lacquer thinner to spray easily through the nozzle when placed in the side feed inlet. I thought that it must be a problem with the 1 cc side feed paint cup that I use. I cleaned it with lacquer thinner, straight ammonia and Windex. I also made sure that the air vent hole in the cap was clear. Wondering if it was a nozzle problem, I took apart all of my nozzles as directed here. I was surpised at how much gunk was in the tip... I tried yesterday to use the airbrush again - same problem. On a lark, I tried one of the larger "Badger" style paint bottles that I have, and the paint flowed right through. I was able to narrow the problem down to the paint cup. I cleaned the inside of the paint cup with lacquer thinner, then took sections of pipe cleaners dipped in lacquer thinner to clear out any clogs within the feed tube of the paint cup. The pipe cleaner only went through so far - not all the way to the inner cup of the vessel. Anyone ever have this experience? I know that this is an inexpensive part, and easy to order on-line. Just wondered if my experience is unique? Thanks.
David