


hooknladderno1
-
Content Count
245 -
Joined
-
Last visited
Content Type
Profiles
Forums
Calendar
Posts posted by hooknladderno1
-
-
hooknladderno1, Sry if the chatter took your heli off subject, will be watching this one,
Wayne,
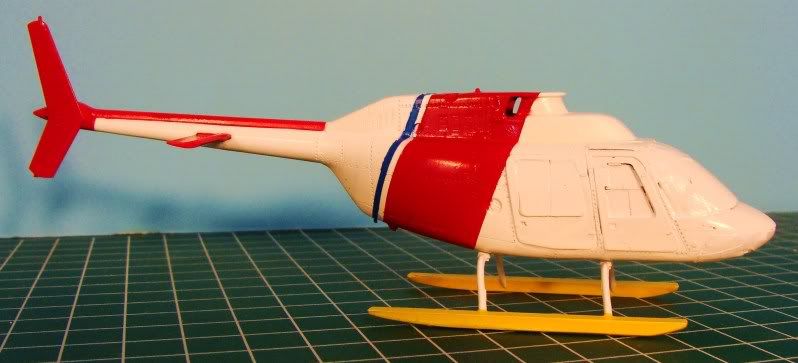
No worries. I enjoy learing about the history and reasoning behind the different color schemes. I just wish that I had some historic reference to go by for this project. Oh well, it kind of gives me a little "artistic license". No offense intended to anyone if it is not historically correct. Anyway, I received the fine decals from Joseph at Fireball Modelworks. His work is exceptional, and his customer service fantastic! I was able to get the blue stripe masked and painted, before a marathon shopping trip and dinner with the family. I hope to apply some Future tomorrow, and then get some of the decals applied in the next few days.
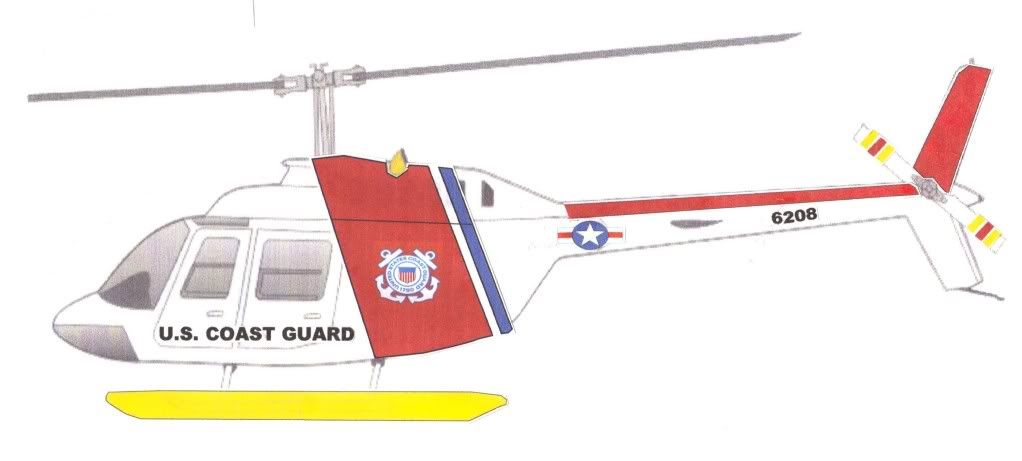
I do have a question. As shown in my original drawing, I had planned on yellow floats on the skids, simply as a high visibility, safety cue, to visually differentiate the skids/floats on final approach when landing. I do not know if this is a historically correct color, or should they be some other color? I have seen on the Bell 47 style kit(sorry, not up to speed with specific model designations yet), they were dark gray or black.
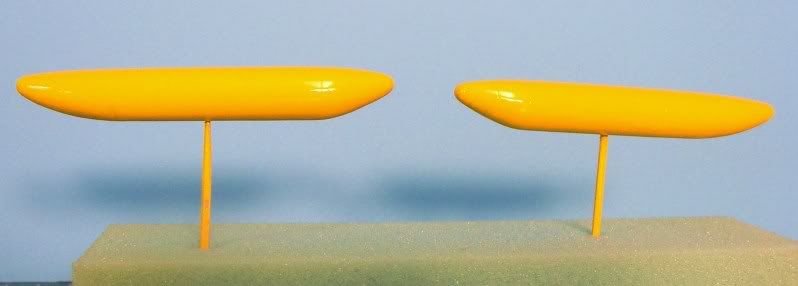
Either way, they will be toned down with some Pollyscale flat once painted. Just trying to make the aircraft look correct. Also, the paint has been touched up a bit since these photos were taken. I also lost(read broke off) the tail rotor guard in a little butter fingered mishap. Don't know how I will replace this yet. Thin wire or brass maybe... Any suggestions are appreciated.
Thanks again.
Sincerely,
David
-
One addition you might want to make to the scheme is to add a flat black anti-glare panel in front of the canopy, on the nose. It would be similar to the MH-65Cs and MH/HH-60Js.
Gino,
I had actually considered adding the anti-glare panel after doing the original line drawing/paint scheme. I just have to decide where to make the paint break lne.
For the stripe on my MH-60J, I used Testors Model Master French Blue and masked and sprayed it with an airbrush.I have a bottle of French Blue Acryl sitting here in front of me. I also have a tin of Humbrol 109. It is a flat color(not a problem as the whole model will get a coat of Future), but since it is an enamel, I decided against it due to compatibility issues. I had placed the model in a food dehydrator yesterday for a few hours to expedite the curing of the Tamiy red. I hope to get the blue stripe masked and shot today. Gino, I have been admiring your HH-60 J for several months. I have bookmarked many of the articles/pages on which it is featured. Someday I hope to build one half as good as yours.
Ray, Thanks for the photo. I like the proportions of the Canadian Coast Guard stripe. I probably should have made mine narrower. Oh well, there is always next time... Thanks for all of your replys and comments. I will post more pictures as progress continues.
David
-
David its looking good so far. Not sure what you are doing for markings but I was thinking, the USCG used some Bell 47's with floats for patrolling the harbors around NYC. Photos of those might help with station markings etc.
USCG red would still be used in the "racing stripe" as far as know, the International orange is only used for added visibility, typically nose and tail.
Hey Guys,
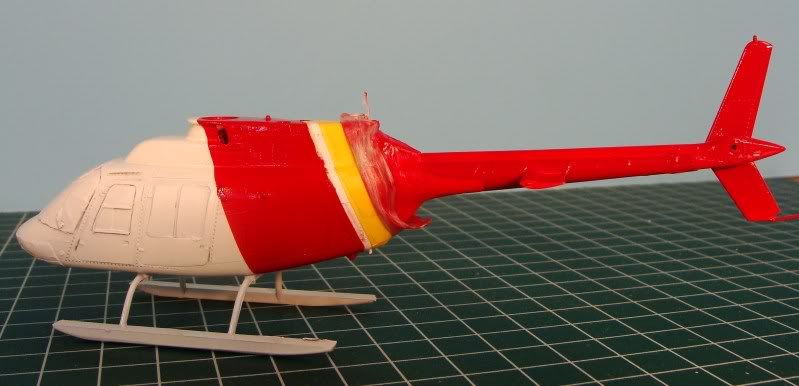
Didn't mean to stir up any controversey. Since I like both the standard white/red/ blue and high visibility international orange/white color schemes, and I was unable to locate any photographic evidence, I decided that the former would probably be more "period correct". I am just begining to learn about and develop an appreciation for the USCG. My hat is off to all of you whose fine work is represented on this website. I can only hope that my final effort does some justice to the men and women of the USCG. I am grateful to all of you who have shared your knowledge and projects here. I have ordered markings from Joseph at Fireball Modelworks. He gave me some guidance and ideas about what might be appropriate service numbers and aircraft type. My only concern is that the "stars and bars" may be too big for the area that I had planned. I will have to wait and see... I have to wait for the Tamiya paint(custom red acrylic mix) to cure, before I can mask for the blue stripe. The pictures above do not accurately represent the paint job, as I have since removed the masking. Overall, I am pleased with the results thus far. As with any finish, there will be some minor touch up work required. I had thought about airbrushing the blue on clear decal film and trying to apply it(the easy way out), as opposed to masking and airbrushing it. I am afraid to ruin what work I have done so far... Well, I am off to sand the primed floats, and paint them. Then I will try and decide about the blue stripe. Any suggestions would be appreciated. Thanks for looking.
David
-
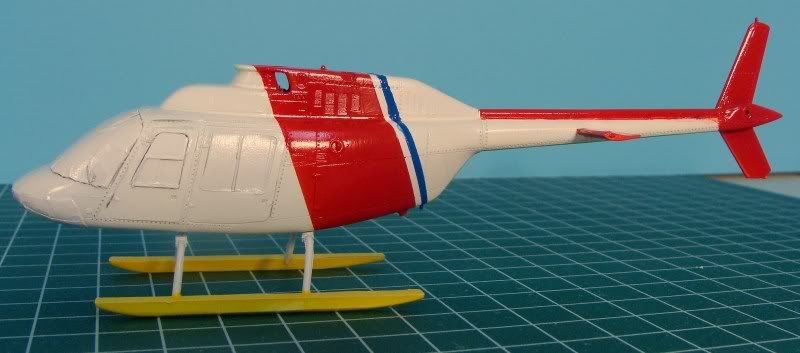
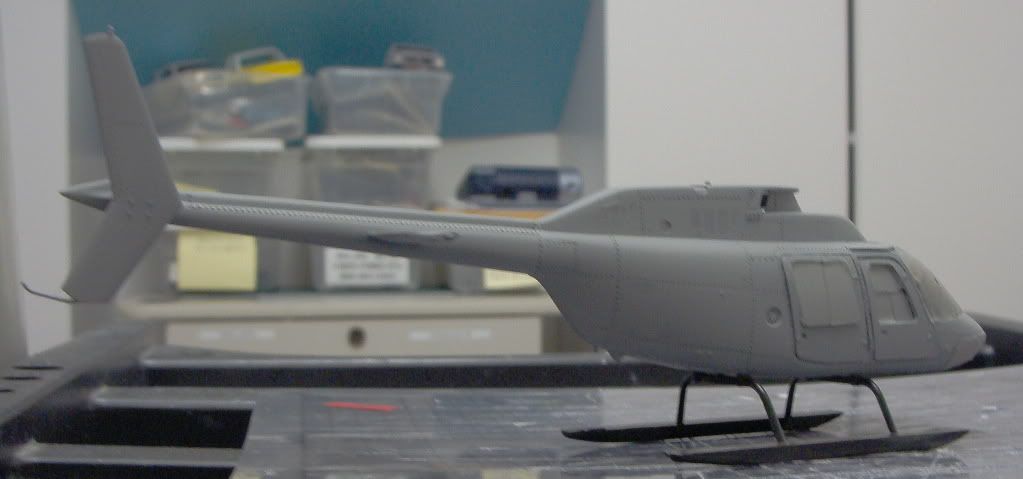
Well, after a successful day of puttying, sanding, mixing and masking, I was ready to take the plunge, and put some color on the JetRanger. Unfortunately, the Testor's Acryl Coast Guard Red that I received from Sprue Btothers the other day was chunky, gloppy(is that a word?), and useless. I played around with some Tamiya paints that I had, I was able to come up with a pretty good match, and began to prepare to practice airbrushing. As I have never been an accomplished airbrush user, I have used rattle cans with good results over the last several years. So, I primed some water bottles, and practiced spraying. After coming up with the right combination of pressure, thinning, and paint, I went to work. Here are the results:
The rear end of the fuselage is masked with tape, pending airbrushing the next layer, a blue stripe. The Parafilm M is pulled back to reveal the area for the stripe. Once cured, I will then mask off for the stripe.
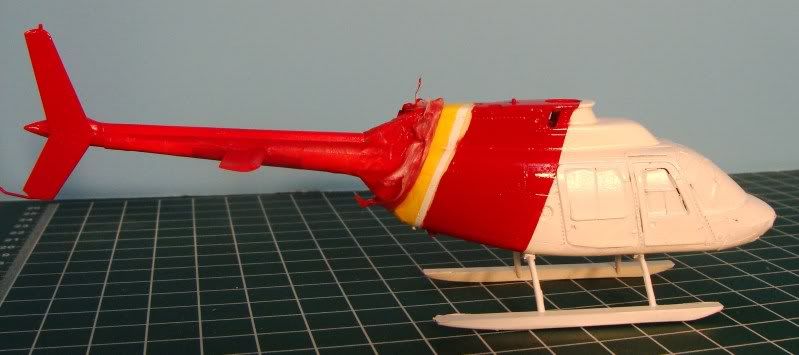
The tailboom is also masked. The bottom half of the tailboom will remain white. The tail of the aircraft will be red as shown. Decals have been ordered, and hopefully will be on their way soon. In the mean time, I am working on the seams for the floats, and they will be painted and attached to the skids. I still have to work out color scheme for rotor system. Let me know what you think.
David
-
Well, after admiring and collecting rotorcraft kits for many years, I have finally "taken the plunge" and begun my first project. I had actually started it several years ago but lack of knowledge, and skills left the project tucked away in a box. After dusting off the parts, this is what I began with.
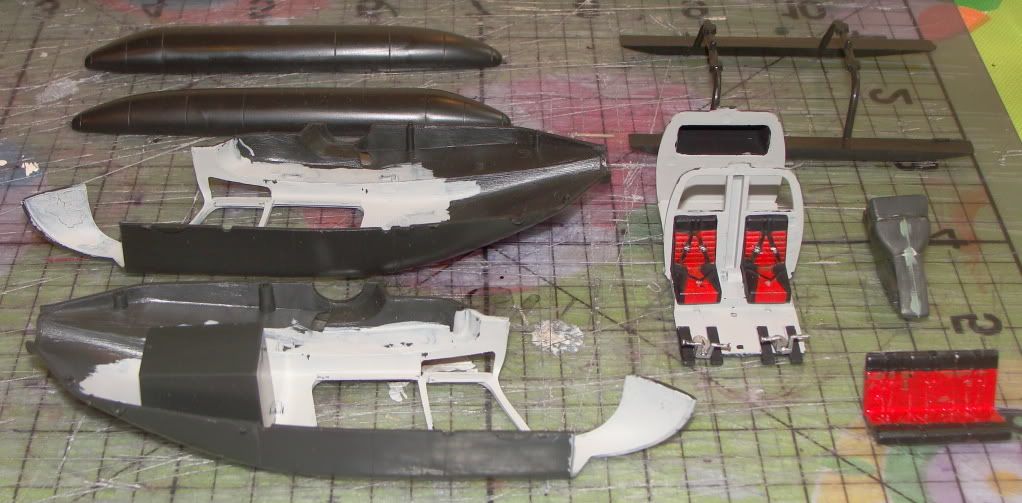
Once the interior was painted, and fuselage halves joined, I started working on the seams.
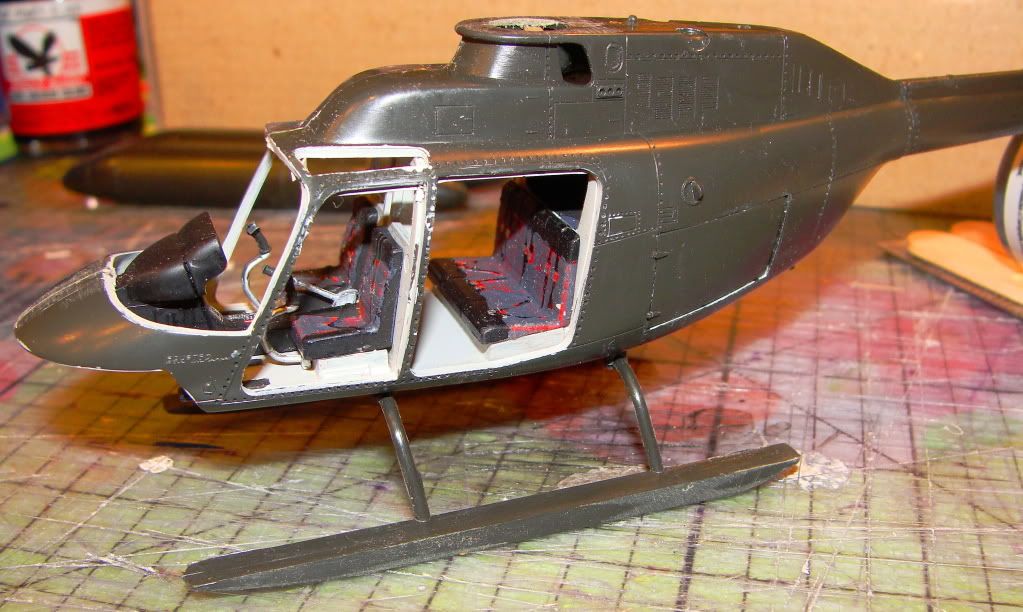
My first attempt at masking off the windows.
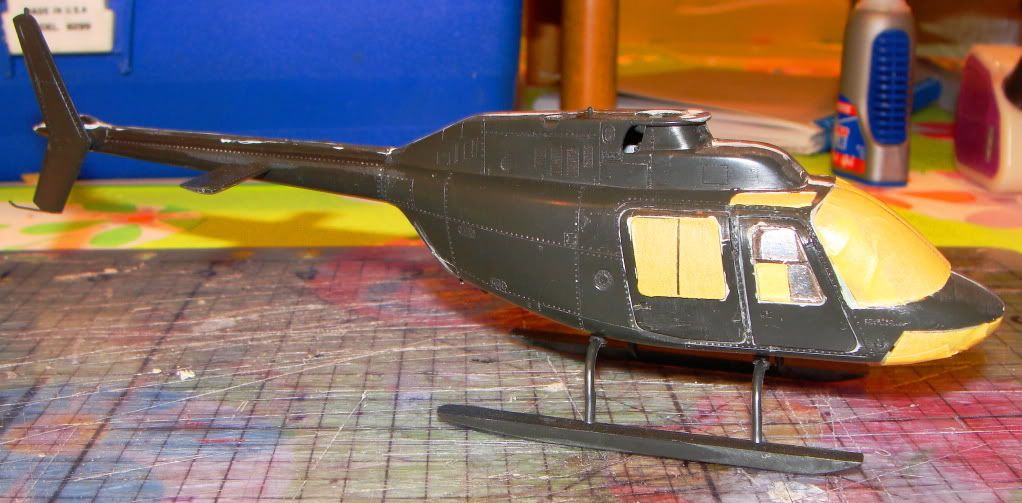
Here she is with a first coat of gray primer.
Seams were touched up, primer sanded, and white primer applied. This was followed by more sanding, and a few gloss coats of Tamiya white.
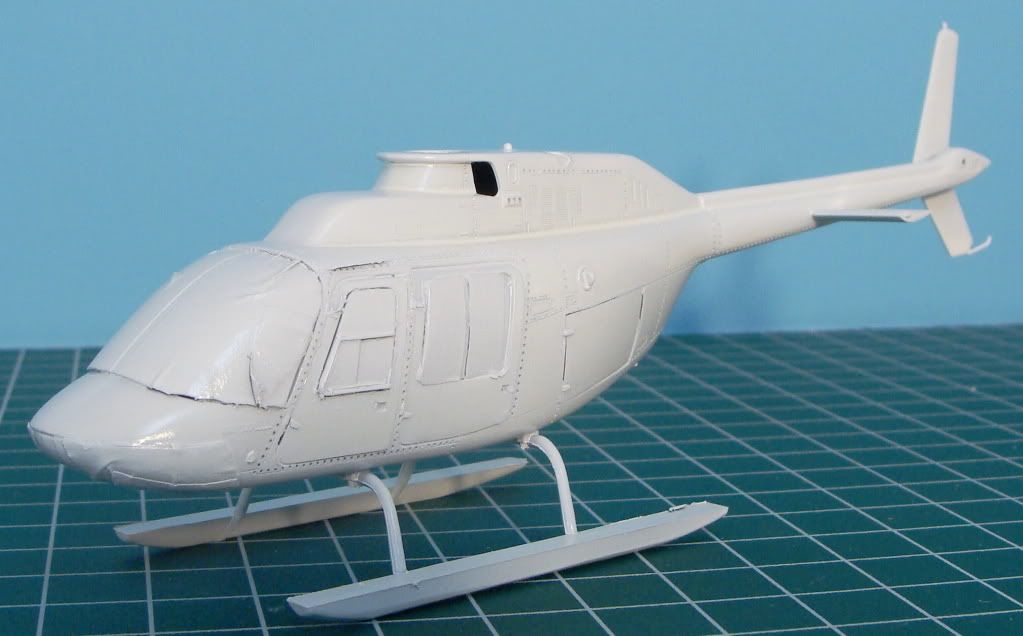
After much consideration, I debated whether to paint this after the aircraft utilized by the Los Angeles County Fire Department, or the United States Coast Guard. I was unable to find any reference material or photos that either agency used JetRangers. I decided to go with the USCG graphics scheme, as I really like the look, and the decals are readily available. The finished product should look something like this.
While this project is far from perfect, I have learned a lot while working on it thus far. As with any project, there are ups and downs... I hope to touch up a few rough areas, and make them more even. I know that I will need to pay more attention to the fit of the doors/windows, seams, etc. in the future. The craftsmanship displayed here has been a great inspiration. I hope to get the International Orange, and proper color blue paint for the stripe at the hobby shop tomorrow. I also need to order decals. I hope that this will be the first of many rotorcraft projects. I have many ideas that will require extensive conversion. Thanks for checking it out. Any comments or suggestions would be appreciated.
Sincerely,
David
-
Hello,
I am new to aircraft modeling, and recently applied Future to all of the "glass" on the Bell Jetranger that I am working on. Per a friend's suggestion, the clear pieces were left on the sprues, washed with mild detergent and rinsed in water, and dried. The parts were then dipped in Future, and any excess on the bottom edge was wicked away with an absorbent paper towel. The parts were then set aside to dry and covered to avoid dust settleing on them. I was very pleased with the result. The model is masked and awaiting final color coats. Hope this helps those who have never worked with Future before.
David
-
I am working on a project, and was wondering what paint do you guys use for blue stripe on United States Coast Guard aircraft? I am going to the hobby shop tomorrow, and would like to pick some up. Thanks.
Sincerely,
David
-
Oliver,
Thanks for your reply. I took your advice, and dipped all of the "glass" in Future. Shook off the excess, and blotted any remaining Future that pooled at the edge. Set them aside to dry per your suggestion. I also left them on the sprue, so that they wouldn't get marks from the tweezers. When cutting away the sprue, I plan to cut as close to the part as possible. Do you then just file any remaining stub, and apply Future to the bare spot? Sorry for such elementary questions, just want to get it right... Thanks.
David
-
Hey Guys,
I am finally "building" my first helicopter model, instead of just lurking and planning... I have searched in the Tips n Tools section regarding glueing of helicopter windows prior to painting.There is a lot of information about fixed wing aircraft, but I was looking for what you guys prefer to use to secure your windows before masking? Also, when dipping your windows in Future to protect them, how do you do so without getting that pool at the edge from where your tweezers grasp the part? I apologize if this should be posted elsewhere, but was hoping to get answers from those who specifically build rotorcraft. Thanks in advance.
Sincerely,
David
-
Gino,
I too have a great appreciation for the fine job that you did. I hope to one day do a similar conversion. I have looked at your build thread about 10 times already. What a great job. Right now, I am just "getting my feet wet" with my first helicopter build. I don't know how you guys who build 1/48 and 1/72 scale do it! My hat is off to you. I will probably stick to the larger 1/35 and 1/32 scale kits for future projects. Thanks for your inspiration!
Sincerely,
David
-
I have recently thought of having custom masks made for painting the graphic below in order to build a replica of the helicopter that I fly on at work. Due to the complex pattern, and difficulty in masking consistent angles and lines for each layer of color, I had considered having a sign shop make the masks up using vinyl or a sheet of removeable adhesive label material. They have printers/plotters which "cut" the vinyl/label material. This would allow for consistent placement of identical masks. Anyone have any experience with such a concept? Any feedback would be appreciated. Specifically, which material to use, anyone who does such work for modelers, etc.
Thanks.
Sincerely,
David
-
You can get clear paper with a light blue background. I get mine from Tango Papa, but it only works with laser or ALPS printers. Of course if you are printing white decals you need an ALPS anyway so that isn't really a problem.
Aaron I second that! I have had great success with Tango Papa decal paper. Tom is great to deal with, and his product is always "fresh" By this, I mean that he makes it up in small batches, so that the decal film works better. He explains the technical side of it better on his website - www.tangopapadecals.com I have no affiliation to Tango Papa other than being a satisfied customer. The blue tint to the backing paper does make viewing and handling white graphics easier. White decal film can be useful for making stripes on emergency vehicles.
David
-
Michael,
Any progress on the Long Ranger project? Just curious to see if you have had time to work on it lately? Anyone else working on a Jet Ranger/Long Ranger
project?
-
Yeah, my crew doesn't look like that either...
David
-
Anthony,
I have been away from modeling for a bit, as life, work and family have taken precedence. I will be looking forward to your project with great interest. I have always been a fan of the 412. Several years ago, I had begun a conversion of the Revell 1/32 scale Huey into a 412. It was to be based on the colorful units flown by the Los Angeles County Fire Dept. Obviously, at the time, I lacked the skills, knowledge and reference material to execute such a project. I had attempted to reshape the nose of the fuselage with Evergreen styrene strips. I also attempted to make a new cowling,main rotor and exhaust housing on the top of the aircraft with a dense styrene foam material used in porch railings. I will have to take some photos to show where the project sits. I think that this was too ambitious a project for a beginner, and thus it has sat. I should probably just build a simple kit out of the box, as I have never completed a helicopter build before. Once I have some experience, then I can tackle a more challenging project like a 412 conversion. I recall following a thread here on a similar project several months ago. I have recently thought of using one of the Academy(UH1N?) kits as the basis for the same project. We shall see. Sorry for rambling...
Sincerely,
David
-
Hey Gang,
I am working on a resin project that I plan to prime with my favorite Tamiya White Primer. I then will be spraying with Tamiya White and Yellow(from a rattle can). The color separation will be masked with Tamiya tape. My question is: How long should I wait for the first color(white) to set before masking for the second color(yellow)? I don't want to risk pulling up the paint, but was also hoping for this to be a less than extended project. Thanks for your help.
Sincerely,
David
-
Georg,
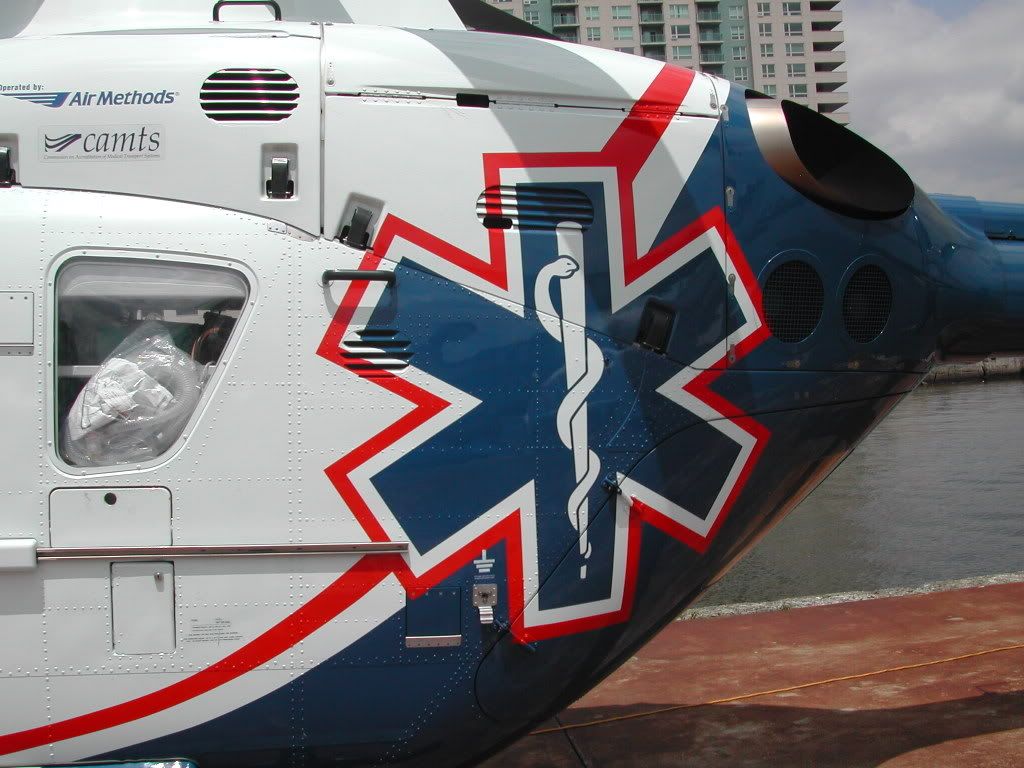
What a fantastic job! Your EC-145 came out great. I especially like the interior detail and the exterior graphics. The folks at Vanderbilt must be proud. I would like to see the progress of your ambulance model. If you could PM me, or post it under the "Non Aircraft Models" section, that would be great. I am currently working on an ambulance(actually two of them) right now. Keep up the great work!
Sincerely,
David
-
Georg,
Incredible detailing! I especially like the "Zoll" monitor/defibrilator mounted on the Port side wall over the gray equipment pouches. Now, I have to go outside and check my helicopter to make sure that you didn't "borrow" mine(LOL). Your work was worth waiting for. I look forward to your next update.
David
-
Mad Viper,
I assume that you don't have an airbrush available at this time. That is a shame, because it would provide you with many different options. That said, I don't know if you have Testor's available in the Netherlands, but they used to have a color, German Silver (if memory serves me correctly) available in their Model Master line, as a spray. It had less of a "chrome" quality to it. A word of caution though, Testor's regular silver enamels take "forever" to fully dry. Good luck with what ever you decide upon.
Sincerely,
David
-
Several years ago, I bought a few rolls of Parafilm M. Now, I am finally thinking about using them. Is it safe to use Model Master enamels and lacquer paints with, or should it only be used with water based paints Thanks.
David
-
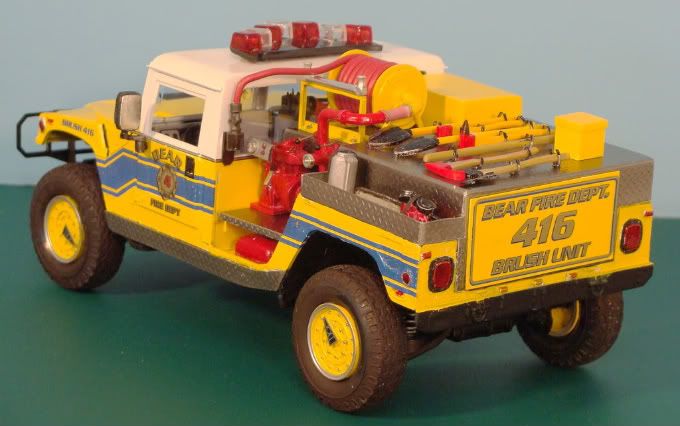
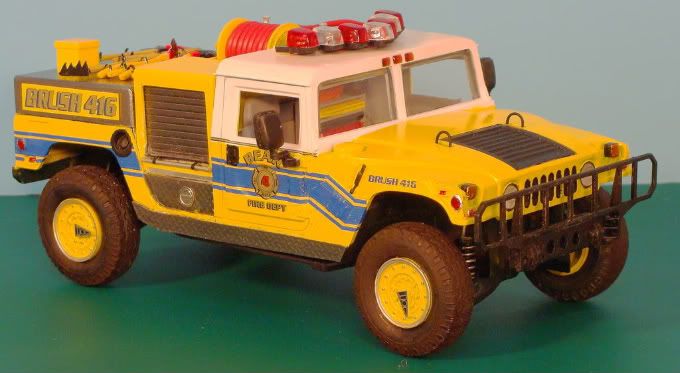
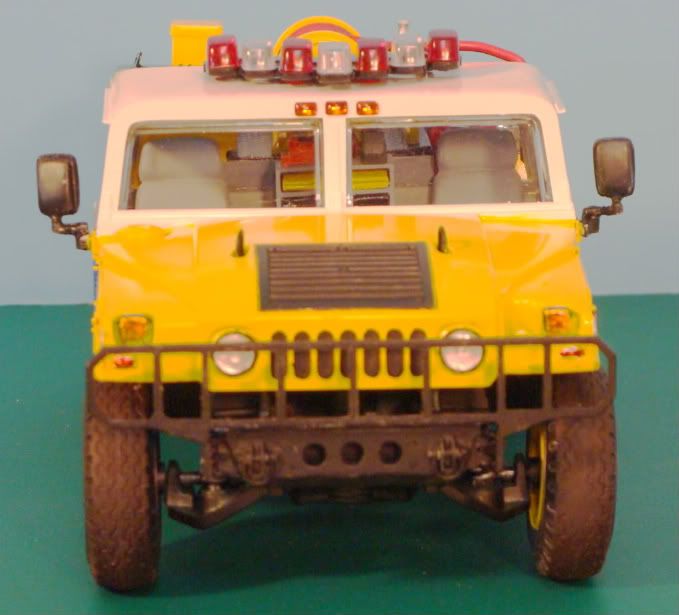
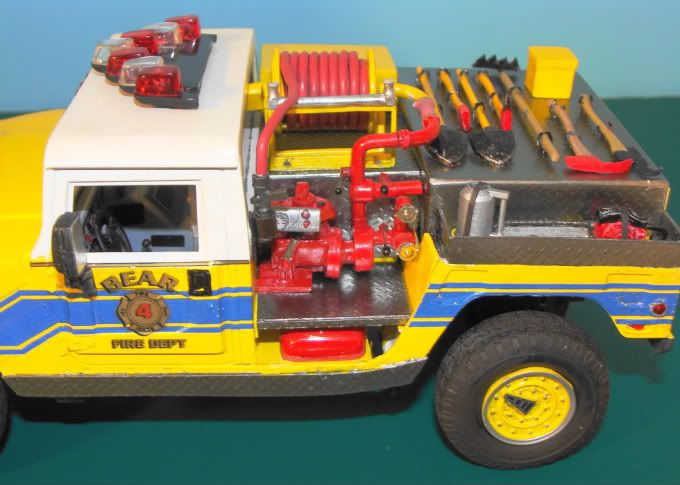
Below is my recently completed Hummer Brush Firefighting Unit. It was built for my fictitious Bear Fire Department. The unit was based on the 1/25 scale Jurassic Park Hummer. It received major scratchbuilding to the roofline and rear body. The pump, engine, hosereel, compartment, and tank were also scratchbuilt. The truck is painted with Tamiya White and Yellow. Graphics were custom made on an ALPS printer. Any comments would be appreciated. Thanks for looking.
Sincerely,
David

-
Many places that sell airbrushes also sell the moisture traps. Michael's, A.C. Moore, etc. may have what you are looking for. Good luck.
Sincerely,
David
-
Anthony,
I am speechless! I have to agree with LD, "This isn't scale modelling, it is scale engineering in plastic!". Your attention to detail, and accurately recreating every shape and surface is just amazing. You are a true inspiration. I look forward to each update. I believe that when complete, your Westpac will actually lift off and make a few orbits around for all of us to see! Keep up the fine work.
Sincerely,
David
-
Hey Guys,
Thanks for your replies. I will have to get some of the PollyScale Clear Flat.
Sincerely,
David
Italeri 1/72 C-130J Length/Wingspan?
in Props
Posted
Hi Gang,
Looking to find out what the length and wingspan of the 1/72 scale Italeri C-130J kit are? I am planning on building my first fixed wing aircraft, and am trying to decide if I will go with the 1/72 scale or Minicraft 1/144? I have read reveiws on both, and located dimensions for only the 1/48 and 1/144 scale versions. Thanks.
Sincerely,
David