


Andrea Bolla
-
Content Count
241 -
Joined
-
Last visited
Content Type
Profiles
Forums
Calendar
Posts posted by Andrea Bolla
-
-
Just a small update, put some paint here and there... I know painting figures in not really my best skill
decided to go with a tan (a bit to dark) flightsuit for both figures and added a new canvas cover giving it a "soft" look
-
Did the same surgery on the original resin parts and decided to keep much more of the plastic bits:
trying to differentiate a bit the two figures I added a kneepad to the pilot and also removed the oxygen masks and added the floating bags; a new oxygen mask will come from a couple of Academy pilots.
At first I thought it would be impossible to fit the pilot with his boots, so I removed them but found it was not enough: cut the legs and changed the angle a bit solved the problem and made room for the boots too... but they were gone so I used those from my early recast even if they are not as crisp as the original ones.
Now a question for the experts: HGU33 or HGU55, which helmet was in use on last Tomcat cruise? I'm oriented to do a machine from VF-31 using decals from "Fightertown Decals Tomcats at War Part 3".
And also considering that I would like to add a bit of entropy to the cockpit: how is common to have the pilot and the RIO wearing different color flightsuit?
_approach_an_F-14D_Tomcat_ready_for_a_flight_mission_launched_from_USS_John_F._Kennedy_(CV_67).jpg/1024px-thumbnail.jpg)
-
For the pilots a friend gave me an Aerobonus F-18 pilot with seat to test, but the resin seat has a very different angle and it does not fit at all...
before looking for a different solution I decided to try a bit of surgery: made a quick copy of the resin seat (just to save the original one if the test gave a positive result) and then:
fit is promising, need to work a bit on the legs but it seems feasible;
added the sides from the plastic parts and a bit of putty
now have to do it again twice on the original ones...
-
Hi everyone, the time spent around engine design and test was filled filled working on several areas of the model generating an high entropy build;
at first I was curious about draping decals over cockpit panels, something I have never done before: gave a base coat of paint matching the decal color for the panels and then applied decals wetting them with microset solution and completing with a few coats of microsol
decals performed very well with microscale products, without silvering or excessive distortions.
Cockpit tub received just a basic paint because with pilots on their seats it will be impossible to see anything.
-
If you prefer separate belts, then Aires with Fine Molds Nano Aviation seatbelts.
Amazing work so far Lucio.
-
After a bit of time spent reworking the 3d design I got this:
a new low pressure turbine with the bypass duct
and with the afterburner gutter
-
Still working on the engines, both the low pressure turbine and the augmentor gutter are badly replicated in the kit parts:
and the worst part in this kit:
Thought about some aftermarket replacement but considering that IMHO the best representation of this area is/was done by Shawn Hull or KA Models, the first long OOP and the latter more expensive than the kit itself I decided to design my own replacement parts:
first test confirms it's printable on my YHD-101: have to fix a couple of things in my 3D model and repair the UV curing station but hope to have them ready in a few days
-
Hi everyone, after a long hiatus I'm resurrecting this build: putting aside the nose section that caused this stop I worked on the engines;
decided to split the one-piece tubes into three sections to make it easier fixing the seam and paint:
to clean the seam on the corrugated tubes I made a "tool" with superfine Milliput simply pressed on the inner surface:
and then, working with a small ball milling bit on the two halves before gluing them, made enough space for a good amount of superfine Milliput and formed it with the "tool".
Using the closed nozzle as a template I drew a mask and cut them with a Silhouette Portrait:
not perfect but a near miss...
-
On 2/24/2020 at 10:46 PM, Neo said:
Hey guys. Anyone able to get a reply from sincere hobby?
Im still waiting for my amk tomcat. They sent me a email in November for the extra shipping. I said yes and ive heard nothing from them since. Ive been emailing the via the contact form their paypal email the info email NADA...
Im a patient guy but this is ridiculous.... and yes i know its not AMK's fault at this point
Same problem here, also tried other email address posted here without success.
-
intake trunks needs taking care of ejector pin marks and a bit of sanding to remove tool machining marks; fit is really good so they will become seamless with just a bit of MrSurfacer.
DACO book just arrived so I started working on the MLG cutting the oleo and preparing to replace it with a polished metal rod:
while drilling the upper part a bit of Milliput come loose...
-
Just another small update:
modded the IFR receptacle support to match the modified door and, instead following instructions, glued part U2 before inserting the tub/well compound into fuselage.
everything fits good so far.
-
25 minutes ago, shion said:
Your words or more precisely your choice of words contradict your message.
These are not "fancy reviews", these are reviews of people who actually build the kit for one and analyse the kit and compare it with Grumman blueprints for the other.
So it is not fiction, fantasy or BS like you write, it's real.
English is not my first language, so maybe my choice of words is not always perfect.
The "fancy review" I was talking about is the one you quoted in bold and it's quite obvious that it's much more a promo than a review.
I never denied that there are differences between the kit and Grumman blueprints and never said the shape of this kit is perfect too.
For sure they are fantasy or BS both the "machining marks" and all the "problems" around infamous part U2 in the japanese video.
For panel lines width up to your taste... maybe we could ask Janissary why he dared to desecrate the holy Tamiya rescribing it.
-
23 minutes ago, Whiskey said:
Now that's an opinion I can gladly read. So based upon your observations with the kit in hand, you're saying that some of the panel depth/width/ etc. issues are exaggerated by photography? Just want to make sure I am interpreting that correctly is all.
All the well known shape issues are there (hips, IFR, tailerons, MLG oleo compression), up to you if consider them a deal breaker or not.
IMHO the most annoying one is the IFR because it's so emphasized by the paint line running nearby; to my eyes the most offending problem in the hips area is the wrong cross section of outer engine nacelle extending to the inflatable bags, the extra width being negligible; for the taileron shape I doubt I can spot the difference on a built model so again it's up to your personal knowledge of the subject; I'm used to replace LG oleos with polished metal rods whenever possible so this one is not a grat problem for me.
Panel lines width, as wrote in a previous post, is a matter of personal taste: this kit has the very same panel width as the GWH Su-35 while KH Su-34 have them slightly larger (10% more or less) with same depth; someone may find them too big, someone consider HB even bigger, someone rescribes both a Tamiya and a HB...
Size apart some of the surface detail is missing as well documented.
Speaking about molds and production quality my kit has none of the defects noted by Dave or Zacto nor it has any broken or scratched part as noted by italian reviewer so maybe those problems are just restricted to an early batch; parting lines are present but they are much exaggerated by photography than they are in real life (both my canopy lines took a fraction of the time I needed to clean the only one seam on a Hase F-15J) but they are not all the same size (again in my canopy the area on the rear right was worse than the area on the front) and it's true that some panel lines running across them needs some fix; there are also a lot of ejector pin marks, quite annoying but not more than in similar kits.
-
5 hours ago, shion said:
You're moving the goalpost.
The reviewer states that the kit surface is "as smooth as glass", seeing the picture provided above, people can conclude that his statement is false.
You don't need to use digital micro here, a simple pic taken with a normal camera or a smartphone shows rough surface, parting lines and flowmarks.
Considering that this thread is about the kit and not about fancy reviews I'm not moving the goalpost at all: I have the kit, courtesy of my wallet, so I can check the real thing before spamming whatever BS found over the net.
Surface detail is exactly like any other top quality kit (after my post I also looked at a KH Su-34 through the same micro and it has a slightly larger panel lines with a better surface finish, I have not added those pictures to my post because I changed the micro setup a bit so to be correct I should have re-took all the snapshots again), parting lines are present but, apart causing a little mismatch in a couple of panel lines as noted by italian review you posted above, they are much smaller than they look in those photos (those on my canopy took just a couple of minutes of a polishing nail soft stick to be removed) and flowmarks are not common at all, maybe present only in an early batch.
-
27 minutes ago, shion said:
Pic in the italian review few pages ago:
Is it what you called "as smooth as they any other top quality kit" or he called "as smooth as glass"?
Not me.
Let compare AMK with a recent kit (GWH Su-35) under the same conditions (Celestron digital micro at same enlargement):
GWH
AMK
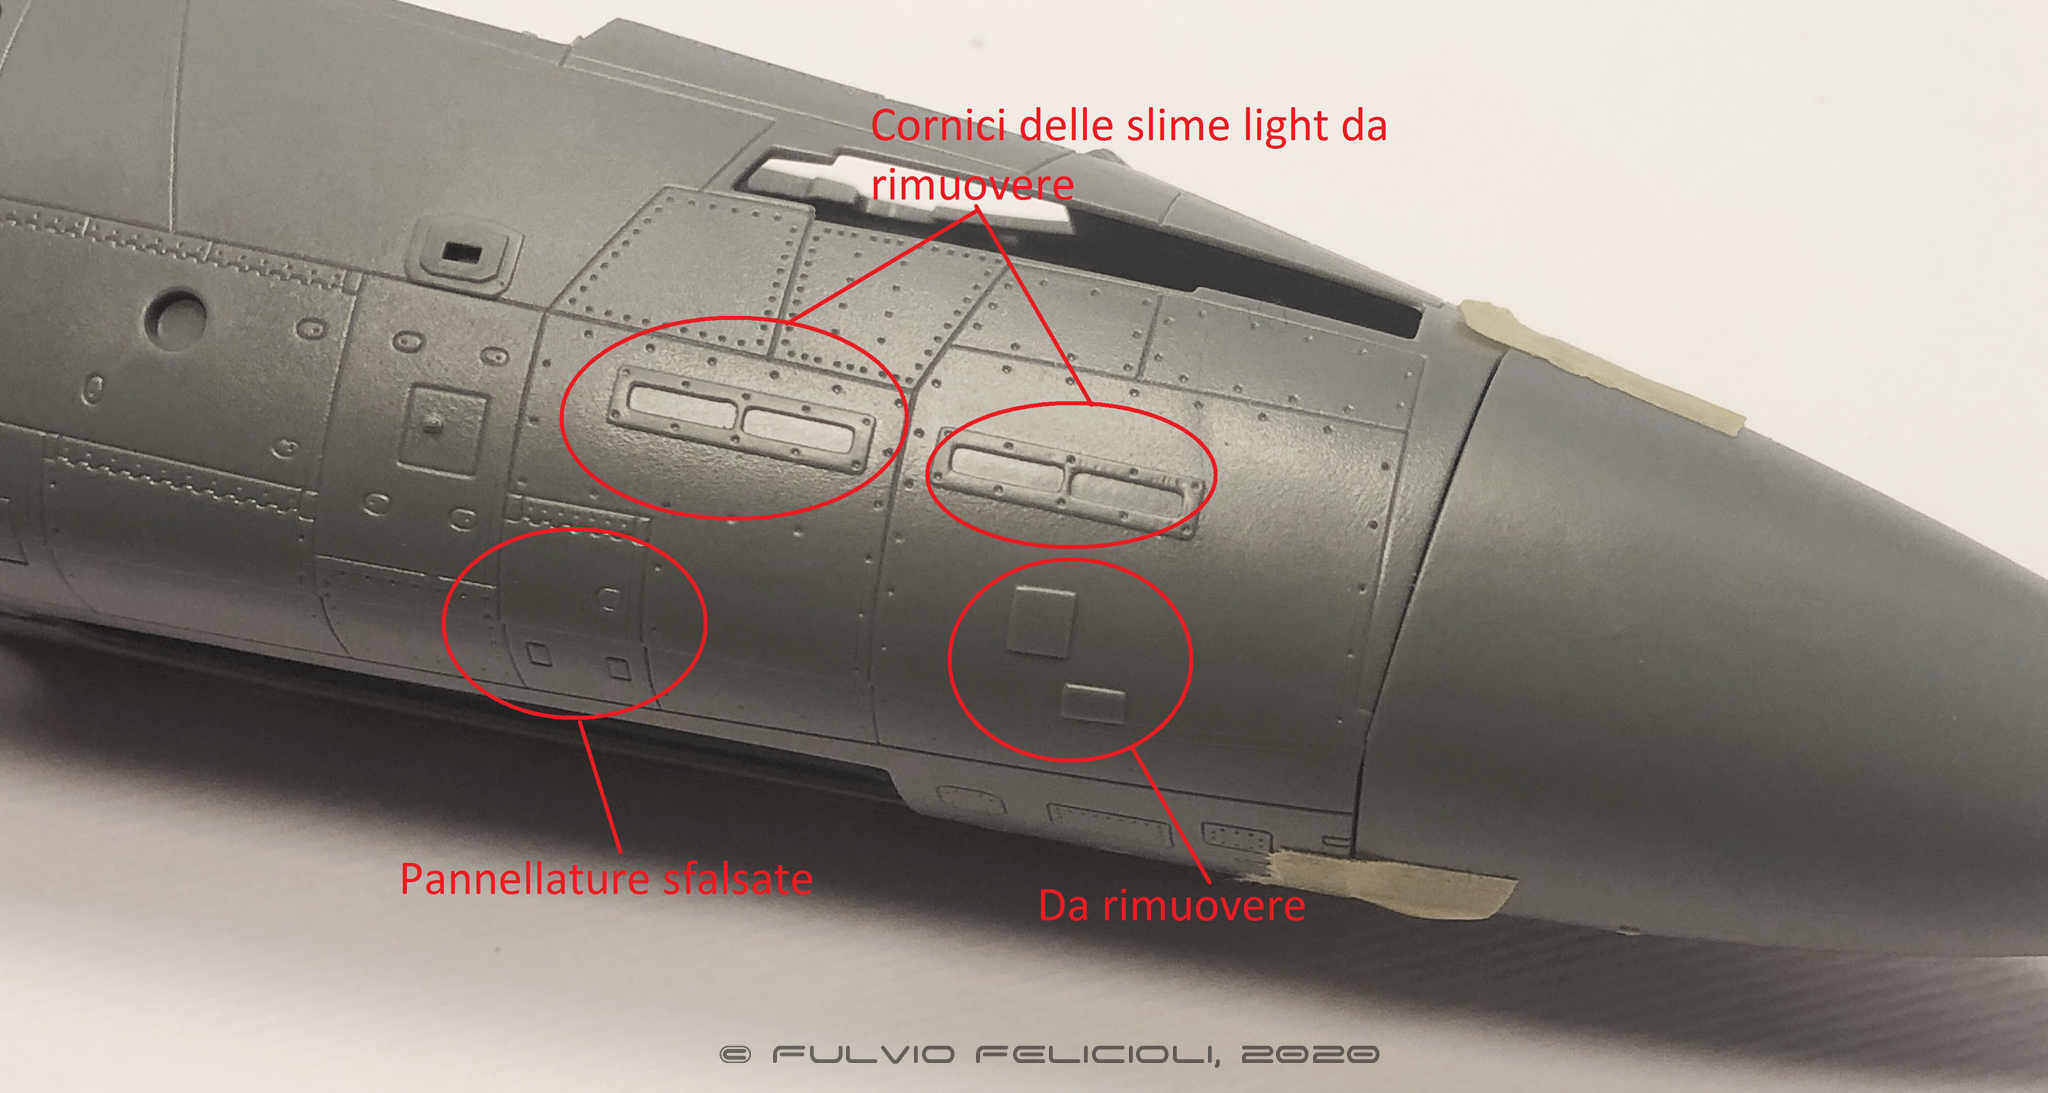
My nose section has been reworked (see my slow start build in "in progress" section) so you can see the original plastic only around the antenna plate (there is a bit of primer left I that used to check the panel re-scribing work around the IFR):
and here the slime light frames toned down a bit and polished with 00000 steel wool (lot of cleaning required here):
Sorry not to include a Tamiya kit in this comparison but their most recent A/C kit in my stash is the He162 Salamander that is 14 years old.
-
9 hours ago, shion said:
About this "review" in particular, the first time I readed it, some parts mesmerized me.
I test fit a few parts from the kit including the upper and lower fuselage halves. The fit is perfect. I’m talking airtight and seamless. The plastic surfaces are as smooth as glass. The majority of surface details (e.g., panel lines, fasteners) are delicately recessed and perfectly executed with a high degree of accuracy (but see below for a few observations). They are not over-done or over-scaled. In places where there are raised rivets on the aircraft, such as the inside of the speed brake wells, the kit has raised rivets. There are also a lot of construction options here, but I would not characterize this as “over-engineered.” It gets the job done. Further and most importantly, there are also numerous features of the F-14, as described throughout the following, which no other kit manufacturer has ever correctly represented in Tomcat kits before, but it’s here in the AMK kit.
Of the statements you quoted in bold the only questionable one is about the accuracy and execution of surface detail, where it was clearly demonstrated that they are not nor accurate nor perfectly executed.
Fit of main fuselage parts is indeed quite perfect and plastic surfaces are as smooth as they any other top quality kit (the "machining" marks on the surface in the build you posted are just nonsense).
Panel line size/scale is just a matter of personal taste: even the worst maintained and battered A/C in quarter scale should be as smooth as silk with almost invisible surface detail considering a panel gap of 2mm would scale to 0.04mm or 0.001in; look into the "in progress" section and you will found someone re-scribing and deepening the "perfect" Tamiya kit, and you can bet it will turn out an amazing build.
Regarding the nose cone fit I checked on my kit and as supposed you can add part U2 to the cockpit tub before inserting the whole assembly into front fuselage; that part is not really needed to keep the nose cone in place so if you think it can be more a problem than a solution you can avoid to use it; even if you follow the instructions that part fit without any major issue in it's place without need of pliers or brute force shown in video from your post.
-
2 hours ago, Whiskey said:
Understood that you have built the kit and hat's off to you sir. i am not making it up however because every kit picture I have seen there is a prominent line that distinguishes the nosecone from the fuselage. It is even more apparent when looking at pictures with a top view. I don't believe that it is that over-exaggerated on the 1:1 aircraft so that is why I asked. It kinda reminds me of how big the panel lines on the Hobby Boss F-14's are. In this instance it stands out, to me, because other panel lines are finer while this is huge.
It's a line between two separate parts not an engraved one, up to the builder how to finish that seam.
-
45 minutes ago, shion said:
U2 part is not only absolutely useless, I suspect it disturbs the fit between nose section and radar cover (in the longitidunal axis),
and maybe worse, it widens the one-part nose section (reason why the author had to use pliers to pull it out).
Considering the conical shape of the nose and that part U2 attach to the front of the cockpit tub I suspect that it should be mounted before sliding the tub assembly into the fuselage.
Beside that, if I was the video's author I would not have wasted the 3 minutes shown and would have sent that part directly to the scrap box.
-
2 hours ago, shion said:
you mean the radar cover?
To undertand why, take a look at this sequence:
What do you mean? Do you think is the inner part (U2) that cause the gap? That part is absolutely unnecessary, it may have been designed to help to align the nose cone but it fits perfectly without it.
-
On 1/10/2020 at 3:32 AM, GW8345 said:
Here's what's going in this pic;
The Tomcat is taxing up to Cat 3 and has just spread it's wings and dropped it's flaps/slats. The pilot is ensuring that all four spoilers will deploy, hence the reason for the spoilers are up.
Thanks for your kind reply!
So we can see a "full dirty" wing just for seconds during spoiler checkup and in that precise spot on the deck, is this correct?
On 1/10/2020 at 3:32 AM, GW8345 said:Here's what's going in this pic;
The green shirt by the nose gear is the catapult hook up guy, he is telling the Cat 3 director to take the aircraft forward.
The hold back bar has already been attached but has not entered the "zipper".
Hold back bar is attached by the same guy?
And a last general question, watching a few youtube videos about deck operations saw sometimes jacket/shirt color mismatch like a yellow jacket on a green shirt or brown on a white one: is this common or just an excepion.
Thanks in advance for you patience...
-
On 1/10/2020 at 2:11 PM, shion said:
still following this build on modelforum.cz: https://www.modelforum.cz/viewtopic.php?f=57&t=129855&hilit=amk&start=210
It's the very first build I saw with the multipart canopy.
But as soon as the builder try to complete the said multipart canopy:
Did you had the same problem with your kit? I just tried a quick dry fit on mine and I don't have that large air gap on top; still not sure if the look of the multi-part one is better than the single piece.
-
Real job kept me quite busy these days so just a little modeling done:
cut a vinyl mask to re-scribe the lower NACA, gave a bit of primer (no photo taken sorry) to mark better the new position but found that filler was not perfect...
Waiting for MrSurfacer to fully cure started to polish the clear parts: just a few minutes with a soft nail polish stick and a light buff with Novus 2 followed by Novus 1 and the mold lines are gone:
mold line was a little heavier on the right rear part so I have to re-check the painted part.
Still not sure if If I will use the multipart canopy I just tried a quick dry fit:
transparent parts are not polished yet, just a quick look...
-
3 hours ago, DIO said:
Sure you do, and of course there are issues! Missing panel lines, non consistent panel lines, missing details, the line on the hood are definitely issues.
Mold lines are present in every single part of every kit: when possible they are placed where they cannot be seen, on round pieces like landing gear they are always present and visible, in a standard two piece mold canopy you have them mostrli placed on the bottom (not always, many kits have a mold line running in the middle) but the canopy itself cannot bear any undercut, so no omega shape is possible; otherwise with sliding molds you can have a beautiful omega shape with consistent thickness but at the cost of having two seam lines so this is not an "issue" but something that you have to deal with present in many kits: require just a couple of minutes with a polishing stick and a dip in future, please consider that photos are taken under strong lights to spot any "scatches" and way bigger than the original part.
-
On 1/5/2020 at 9:27 PM, GW8345 said:
I have no problem answer questions about the aircraft, you can post them here, in a build thread (I do check in on Tomcat build threads) or make a post. Please don't PM me questions, I don't like answer questions via PM.
,_assigned_to_the_Gunslingers_of_Strike_Fighter_Squadron_One_Zero_Five_(VFA-105)_and_an_F-14_Tomcat_assigned_to_the_Swordsmen_of_Fighter_Squadron_Thirty_Two_(VF-32)_prepare_to_la.jpg)
Would like to know what is happening in and around the plane in this picture, would like to do something like this.
Also curious about why the ifr probe covers are missing and if was common (sow other planes without those panels too).
Please feel free to add as much info as you want about deck operations, appreciate your help.
Thanks in advance.
MONOGRAM F-84 E/G 1/48
in In-Progress Pics
Posted
Try using a scribing template like this:
insert the bomb in the corresponding sized hole and fix it with blu-tack: then you can use the template as a guide to roll the masking tape in a straight line.