

spejic
-
Content Count
2,176 -
Joined
-
Last visited
Content Type
Profiles
Forums
Calendar
Everything posted by spejic
-
From the decals it looks like the new Revell kit.
-
Thanks. These are really useful.
-
The studio model was done in a sort of emerald green with a lot (and I mean a LOT) of post-shading in very dark grey and near white. The thing is, these studio models were painted in mind of how they would eventually look on screen after various levels of lighting, processing, and the effects of film and analog television. So I wouldn't necessarily copy it directly. I would start with a hunter or forest green - a green that is very slightly on the purple side - and just do details in the way that feels right to you. It's probably better to err on the side of being subtle (maybe a l
-
There was footage released from the drone, but we only see the underside of the Su-27. We see what it's carrying, but not its number.
-
There are only two tragedies in life: one is not getting the kit one wants, and the other is having a massive unbuilt stash. - Oscar Wilde
-
I've had adhesion problems as well. The only place I use them now is to paint the white inside jet intakes. It does a remarkable job of not running when airbrushed which is a useful trait for tricky inside corners and shapes, and I'm not touching or masking over it in there.
-
Your models are really excellent and the information was very interesting. Thanks.
-
Inside the cockpit, the J has one extra panel on the right hand arm rest for the J/ASW-10 datalink. I think the position of this changed slightly after the MSIP upgrade. Otherwise it should be pretty much identical to the C.
-
This is very nicely built, and I especially like how the decals turned out. I agree gluing down swing-wings is the way to go, particularly in 1/144. You can get a much more scale appearance because invariably kits will have massive, toy-like gaps around the wings if built stock.
-
The best thing to do is try it yourself on a scrap model to see how it affects the particular paints you have and the styles you use. I've seen some excellent results from YouTube modellers using this wash, although I haven't used it myself. Yes, otherwise the model will always look like someone brushed oil on the aircraft, and not in a good way.
-
What weapon loadout can be used on this pylon for the F/18C?
spejic replied to blakeh1's topic in Jet Modeling
Here is the difference between a BRU-33A and a BRU-33A/A: In 1/72 it would be hard to tell the difference in pylon shape, so you can slightly angle the bombs away from each other to get the look of the later VER and thus be ok with putting laser guided bombs on it. -
The pose is really dynamic, and the crew figures capture an honest-feeling moment of time. Fine work.
-
The pinging is often caused by the tips not being perfectly even - if they aren't and you put pressure on them and the tines go a little sideways compared to each other, then the thing they are grabbing goes. Another problem is squeezing too hard. High quality tweezers help in both situations. They usually have a light touch, and they are engineered to be precise at the tip. I like electrical ones (the ones painted black) because static electricity can be a problem on the tiniest parts. The Vetus brand on Amazon is pretty good and not very expensive. I love my old Wiha tweezers, bu
-
The kit comes with the side doors molded closed, but has a nicely detailed interior. Has anyone tried opening them up yet? I ask because I'd like to do this, but I don't want to screw up such an expensive and hard to find kit either. The fine details near the door edge and thick plastic implies a harrowing and concerted process. And then there's the issue of filling in gaps the closed door may be hiding.
-
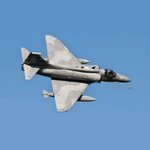
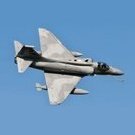
There are other differences, but they are kind of on the level of individual aircraft and time frame. The very first A-4Fs did not have the avionics hump, but that was soon part of the construction of the type and kits were sent out to add the humps to the first A-4Fs and also A-4Es. So a A-4F you build will almost certainly have the hump, and an A-4E you build will or won't depending on the year you are modelling. There were a few changes to antennas over time and location. A few minor changes in the instrument panel between early A-4E's, and late A-4Es and Fs. So you need to check pictures o
-
It's 1/1400. The ship is supposed to be 641 meters, so in that scale it would be around 45cm or 18 inches, which is what the kit is. A 1/650 scale Enterprise D would be enormous - about a meter long.
-
Army picks Black Hawk replacement - V-280
spejic replied to HeavyArty's topic in Helicopter Modeling
Yeah, it kind of reminds me of that cartoon style from around a decade ago, with the really big hands and feet but small torso. Way too much engine and tail for that fuselage. -
Seems like many of the items on sale at Hobby Link Japan are only 19¢ cheaper than normal.
-
I don't think there is a perfect one. I use different ones for different needs. If the gap is large I usually put styrene rods or stretched sprue into it before any putty. If there is any flex in the join most putties will crack. I usually use the Tamiya grey. You need to wait a day before sanding it - it might be dry sooner, but it will keep shrinking for a while. If I'm going to be doing lots of manipulation or fill lots of gaps at once or want something structural I will use a two part epoxy (Tamiya Slow or Milliput White) but those take a while to prepare and cure and for me on
-
in order of how often I used them, it would be: knife handle with #11 blade knife handle with square #17 blade knife handle with round #13 blade knife handle with dull #11 blade electrician tweezers sprue cutters I have like 7 knife handles. My modeling became more enjoyable when I decided to get a bunch and not keep switching blade types.
-
So... what's going on here? F-35C from the VX-9 test and evaluation unit.
-
Do mean traditional plasticine or modern polymer clay? The first should be ok, but the second definitely should not be in contact with models before it is baked and set. It is full of plasticizers and will eat through your model in time.
-
I'd think you'd need to be a couple of wamprats short to even think about fixing that horrible model, but you've done amazing work so far.
-
I'm in the September issue of Tamiya Modelling Magazine!
spejic replied to chukw's topic in General Discussion
Well deserved. That interior looks amazing. -
I used very fine wire. I wrap it around a toothpick because the tapered tip lets me chose the diameter and can be slipped off easily. I paint it yellow and apply the black stripes with a fine Micron technical pen. Your first tries will certainly be too big, but keep trying. This is a seat from a 1/144 Revell F-104G, but the principle is the same.