

spejic
-
Content Count
2,176 -
Joined
-
Last visited
Content Type
Profiles
Forums
Calendar
Everything posted by spejic
-
I actually just dipped a canopy in Tamiya X-22 a a few days ago for the first time. It looked even clearer and sharper than Future, and a bit of fogging I had from a previous dip in Future cleared up, but it's quite a bit thicker which may not be a problem for most models but it forced me to sand down the HUD in my 1/144 F/A-18D a bit to make it fit.
-
You can clean Future from your airbrush or brushes with isopropyl alcohol. I also recently found an unfortunate way that Future can go bad. If you leave the top open and you have fruit in your house, fruit flies will go into the bottle of Future because of its sweet smell. And they don't come out again. So now I have to buy a new bottle. But at least I drowned a couple hundred of those suckers.
-
I use the Model Master thinner or the Tamiya X-20 thinner. They both work well for all acrylics I use.
-
That's even worse. It is even less stable because it has multiple ingredients meant to react with each other. It will have a reaction just from the moisture in the air. Here's a thread about some people's long-term experiences with models built using baking soda: http://cs.finescale.com/fsm/modeling_subjects/f/19/t/84838.aspx
-
This looks really great. Nothing better than a VF-1 with an alternate paint scheme. I'm really interested in seeing how it turns out. I kind of lean towards the lighter schemes where fast packs are used because it makes a nice contrast. But really you can't go wrong. I've seen some wild builds and they never look bad.
-
Naval Air Test Center A-4M Skyhawk 1/48 Hasegawa
spejic replied to Collin's topic in The Display Case
Very attractive scheme that couldn't have been easy to pull off. Clean build with excellent panel line work. Thank you for showing us your kit. -
Hasegawa A-4 builders: the PITA of those kits
spejic replied to Collin's topic in General Discussion
That Skyhawk web site is fantastic. I leaned lots of tricks from it, and hope you continue. Here is how I deal with the intakes. I installed the inner duct part D12 so it is centered between the fuselage halves with a little gap on either side. When you do that, the intakes have a small step to that part, but only on the bottom half. You can put a little two-part putty there and smooth it down. You then get a very close match. -
Hasegawa A-4 builders: the PITA of those kits
spejic replied to Collin's topic in General Discussion
I don't have a problem with those. I even kind of figured out a way to do the intakes. But how in the world do you close the airbrakes. They are just the wrong shape. -
This looks very dynamic and the support of the helicopter is well hidden. It really looks fantastic. But using baking soda was a mistake. It's going to yellow, and it decomposes into a nasty goo in time when it is mixed with paints or glues.
-
Decal handling error - - - railroad decals, but no difference?
spejic replied to peter havriluk's topic in Tools 'n' Tips
It doesn't say on their web site how they are printed, but they don't say to put a sealing coat before applying so I assume it isn't water soluble printing. So I would just use the decals as they are now. -
Decal handling error - - - railroad decals, but no difference?
spejic replied to peter havriluk's topic in Tools 'n' Tips
This is on a home-printed decal, right? I don't think it is a fatal problem. But you will probably need to spray the Decal Bonder on top to actually make it waterproof, and you will end up with a very thick decal. The Decal Bonder is some kind of lacquer, very similar in smell and look to their Gloss Cote, but it isn't quite the same. I've tried using Testor's Gloss Cote as a decal sealer on ink-jet printed decals and it didn't work. I've since switched to Microscale Decal Film, which is a little trickier to use but makes a thinner surface and doesn't yellow. -
That is hilarious.
-
Freetime Hobbies used to have a massive storefront in Georgia, but they recently changed to a private warehouse. They are still a good internet store, especially for ship models.
-
Best tool to sand tight areas like ejection marks in wheelbay doors.
spejic replied to Berkut's topic in Tools 'n' Tips
I just hold little bits of sandpaper in tweezers. It is useful for many sorts of fine or awkward applications depending on how you fold the paper. -
I was worried enough that I bought a rest-of-my-life supply of the non-toxic glue last month (which I like because of its very slow setting time). Now, that happens to be a single one, but still.
-
Every modeller knows not to put body parts in front of a blade while cutting. This is always learned the hard way.
-
You can coat clear parts in gloss finish (and it might help make clear parts more clear), but flat will turn them opaque. That would usually be terrible, but there are occasions you want that. If you are making a house for a diorama with lights behind the window but you don't want people to see inside the house you can cover them in a flat coat to frost them.
-
It's possible to spray complicated sticky-out bits properly on the model. Just use low pressure and keep hitting it from every possible angle. You are better off moving the airplane and keeping the airbrush still because it's awfully easy to spill the contents of the airbrush cup on the model by moving it too much (I learned the hard way so you don't have to). The larger the model the harder that is, so I'd also do the landing gear separately first in 1/48. You may need to spray again after the gear is installed to cover any glue showing from installing the gear and doors. If you'v
-
You did a very nice job on all three Skyhawks, especially with modifying the paint to both make the decals show up properly and still look right. I really like the little details you added, like the brake lines and the canopy hooks, and the larger elements that people often miss like that band around the fuselage belly by the tailhook.
-
Yeah. That gives us the time to complete, like, two more models.
-
Take a pin or other sharp implement and lightly score all the panel lines. That should give the wash some grip. Alternately, use some other kind of implement to clean the wash that doesn't get into the panel lines. Try a coffee filter, which does not leave fibers behind and has no give so it will stay on the high surfaces. Fold it a few times you have a kind of paper block.
-
This is very well done. The fix for the slat wells looks flawless. The wash is just right.
-
I try to match the colors of the pre-printed part, which can lead to some weird paint choices. I have the Eduard's set for the A-4 Skyhawk, and it wasn't even close to the correct FS36231. It is instead a dead match to RLM 76.
-
If the search area is small, I will take some masking tape and tap it down on the carpet.
-
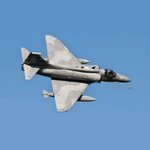
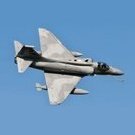
Yes - I checked my TA-4J pictures and saw some of them had this flange as well even though they were never upengined. There doesn't seem to be any pattern as to when or if they got the flange either. If A-4F's got the flange as part of the engine upgrade (and every certain A-4F+ I've seen has the flange), then at least we can say an aircraft without the flange is not a Super Fox. There is nothing about the antennas or cooling intakes or vents that indicate what variety of A-4 it is as far as I could see except for the fin-tip ECM, but not every upengined A-4F got (or kept) that. I'