

spejic
-
Content Count
2,176 -
Joined
-
Last visited
Content Type
Profiles
Forums
Calendar
Everything posted by spejic
-
What's weird is that this is part of the TA-4J sprue. I wonder why they went to the trouble of making a new metal part when they could have just included a sprue they've already designed which is made of cheap, cheap plastic.
-
I can't find one, but it seems that 2/3rds of all A-4F's had the conversion done. It's usually hard to tell in photos what kind of intake the aircraft is sporting, so I would look at the exhaust. The up-engined A-4F's exhaust will have a little flange at the end instead of being a smooth cone. This part is also on sprue Q.
-
The Furball decal set has a low-viz scheme for a Super Fox from VMA-142. Initially I was excited because the aircraft (155028) was also used by VMA-133, which is my strong preference, but VMA-142 used very light markings, not the more standard varieties used in VMA-133 at the time. But the set has so many numbers you can probably cobble something together.
-
There are many different techniques. They generally start with a light wood color for the whole deck and then various techniques to vary the colors (just using washes, masking planks with itty bitty bits of tape and overpainting many times, highlighting individual planks with colored pencil, so on). However these are mostly for battleships whose decks are weathered and more built for practicality than looks. The Titanic's deck is remarkably uniform in color with wood that had a very tight grain so there isn't much you can do at that scale. If the model has raised planking detail you might try
-
I think so too. I tested all the glues and similar substances I have with the pigments I have. I dropped them onto the test surface as a single bead to see what kind of shape they retain when the dry. Here are the results: PVA CONTROL smooth and rounded arcylic does not mix enamel really does not mix watercolor tube dries smooth and round, but noticibly weaker pastel dust almost works. dries flat and lumpy but strong two-part epoxy CONTROL smooth and slightly rounded arcylic does not mix enam
-
Zvezda Star Destroyer - a new detailing project
spejic replied to The Madhatter's topic in Sci-Fi Modeling
You combine a prop modeler's eye for what is photogenic with a hobby modeler's concern for detail. I love the feeling of scale these additions create. -
I need to install a tiny antenna on a model and I wanted to simulate the bright red insulator at the bottom. It's way too small to fashion a separate plastic part, and its position would make it very difficult to paint by brush. I thought the obvious solution would be to mix a paint and a glue and put a drop at the base of the antenna. So I did some tests on some scrap to see what worked best. The problem is, none of it worked at all. I've tried various types of paints mixed with many different glues and all of them destroyed the glue's strength. Acrylic gels mix fine with paint but they dry e
-
email sent. I will put this information up on my web site eventually.
-
Condor Decals made a sheet for that ("Latin Hawks" number 72022) 15 years ago. I have no idea how available that sheet is these days. Building a A-4AR from a Fujimi A-4M is mostly adding a lot of bumps and taking a few off. This biggest problem is the cockpit, which needs major reworking. If you actually want to do this, I can help. I built one of these up to the point of the first layer of paint, where it's been for the last few years. You know, I really should finish it one of these days.
-
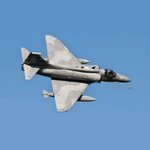
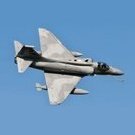
I've got a Harrier Gr.7 with acrylics and enamels and lacquers over each other in every possible combination and it looks fine years later. You just have to make sure the undercoats are dry (really, really dry - for some enamel brands this might take months) before putting something different on top.
-
That's a really tricky thing to do because the light on the real aircraft may not be appropriate to the image on the model, and the high level of detail in the photographic image may not match the detail level of the model. So you had a unique situation, but the finished model really looks excellent.
-
The decals you made are amazing. Could you tell us more about the technique you used?
-
-
Mostly out of the box. I extended the intake back a bit and I added some minor changes to the cockpit. These are kit decals, but the Pit-Road kit has almost no warning or stencil decals so some I printed myself. The bombs come from the Revell Tornado Gr.1 kit. The kit mostly goes together well. For some reason I had trouble fitting the wing to the fuselage, and I had to hack away a big chunk of the internals to make them come together. The airbrake requires lots of filling if you pose it closed. And the long pylons require bending to fit the wing. That stup
-
That is an amazingly sharp and flawless finish, and the very subtle weathering is perfectly appropriate. It's fine if they are detail pictures, like you did. I would get annoyed at 30 pictures of the whole aircraft at slightly different angles.
-
I still use it for most kits.
-
This was close to finished at the end of the 2018 Shelf Queens group build but I had such a painful time getting the front canopy to sit right that I put the thing in a box until the day I forgot my pain and glued in the last 2 parts. Well tonight I forgot the pain and glued in the last two parts. Here is the finished aircraft: There were an extensive number of additions and changes to the kit. See the group build thread for pictures of the now nearly hidden interior. I used a He-162-style ejection seat because it was a more modern
-
It depends on the artistic statement you want to make. Once you add covers to the aircraft, it adds a story to it - it stops being instance of airplane and starts being airplane in a particular state (like, say, in a hanger awaiting its next flight).
-
As they are removing colorful tails from F/A-18's, I think not.
-
That's a really nice build. I don't think there is a wrong way to paint a VF-1, but your scheme is particularly fitting and functional. I really like the shading you did in the wheel bays and the pilot figure is aces.
-
Alcohol will work in cleaning Future from airbrushes. I would use either that or water. Ammonia will react with the brass that most airbrushes are made of and you will see the chrome finish come off and eventually damage to the surface. At the very least rinse the airbrush with water after using anything with ammonia.
-
Actually, there is a TER specifically for the F-16, but that isn't it. The one typically seen on F-16's later than the date of this image have a more streamlined nose. The wrong (for you) TER comes in the Kinetic kit. You can get the one in the image from many Navy or Marines aircraft kits or a weapons kit or a separate resin version like the one from AeroBonus.
-
My only workbench rule is to have something I've seen before on the DVD player (usually something sci-fi from the 1990's) when I'm working. If I play something I've never seen before, I end up watching and not building. Yup. For me, constructing models is a hobby, painting them is work.
-
Just do a search for "F-15DJ 32-8082". Both the Japanese plane spotter sites and the aircraft image sites will keep the aircraft number with the images. I think Bing usually gives slightly better results than Google for such images as well.
-
Maybe, but you can tell by the markings near the intake that this is a RAF aircraft. Every nation has slightly different details in this area.