


VADM Fangschleister
-
Content Count
522 -
Joined
-
Last visited
Content Type
Profiles
Forums
Calendar
Posts posted by VADM Fangschleister
-
-
Hi guys,
I sent a prototype tailcone to Jennings. I will let him critique it. I don't think it's stupendous but for my purposes, it's fine. I am, however going to make another casting as the original mold cured in an oblong way and I cannot exactly duplicate that while the resin is curing so they come out a little odd.
I also have to work on the cockpit area to get a better windscreen setup and since MAY is here it's officially Summer in SC. I've been doing outdoor activities and pretty soon my yard will be filled with sailboats (I restore them) and that will take most of my off time. However, I will try to get the cockpit area done before that happens.
It may be this winter.
I will let the faithful know though and thanks veyr kindly for your inquiries. Those who want a prototype tailcone, send me a PM.
Fang
-
-
Ohhhhhhh...chills. ;)
Thanks Harold.
That PE is awesome. In fact, the whole thing looks very, very excellent.
Now, like has been said, a whole stable of trainers....going back to the JN-4 might be cool. But that 1/32 T-38 is a must. Pete's 1/16 bird is great (truly) but for an utter pedestrian like myself, I need BIG but small. That is, I cannot display larger than 1/32 in most cases. However, I do have 12 1/18 birds on top of the kitchen cabinets.
Thanks for posting that Harold. You have given me my fix for today.
Fang
-
Is there any sprue-p-orn to look at yet? Open box reviews from those who are among the privileged few?
Anything?
Anyone?
Bueller?
-
In other news, a hearty "good job" to VADM on what looks like an *extremely* challenging kit.
Thanks, Antonov!
It is "challenging". I'm having fun with it though. Today, the C-32 kit arrived and I was looking for the "United States Of America" decals to go over the windows. They are just a tad too large but I noticed the font isn't that unusual. Don't know the name of it (Jennings probably does) but it's pretty common. Roman something? And, it's solid black so printing it on an ink-jet would probably work just fine, maybe two layers though that can get frustrating when trying to line them up.
My current task on the model is the windscreen replacement and I'm pondering a method. I don't like the softness of the Bondo, so, I will probably use epoxy putty instead. It's harder, not too hard to carve though it works slower because of it. I was thinking about placing evergreen pieces where the frames for the windows are so I can be assured that I have flat panes. Only the very front windscreen is curved.
Artworks, right click on the drawings and save them to your hard drive. Then, scale them as necessary from your printer. Takes a little trial and error but I think that's why AIM9 posted them.
Cheers!
Fang
-
I'm sure this kit will be picked to death by the rivet counters,
OK, I'll start off in advance.
The picture has the nose too bulbous and the intakes are wrong.
OK, next?
(Seriously, I've been waiting for it too. My dad flew these in the 50's and thought they were pretty cool.)
Hope it at least meets the minimum expectations. Cockpits, other minor things...can be fixed. PE instrument panels and the like will be very nice AM accessories. Resin wheel wells, tires, etc. Oh yeah. Looking forward to it.
-
One of the best shots I've ever seen of that bird.
Are you thinking artwork J? This, the blue and silver federal paintjob and perhaps the Canadian red-stripe bird?
The federal one can be cobbled together with the Minicraft DC-6 kit decals, I would guess. The "United States" lettering would probably be just about right.
(correction: The DC-6 kit doesn't have the modern colors for Truman's plane, perhaps the VC-32 decals would be better for the "United States" script over the windows)
But then, you have the ability to do anything you want. You have no idea how envious that makes me.
Then there's Elvis's jet, Goldfinger's jet...a few others.
I suspect the most popular would be the presidential livery.
Nice photo, thanks for posting that.
Fang
-
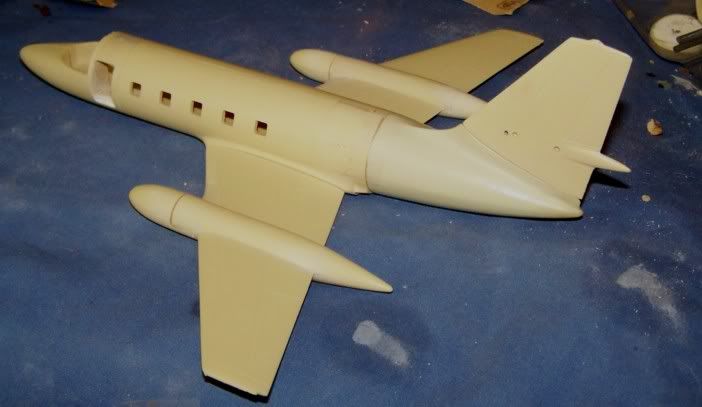
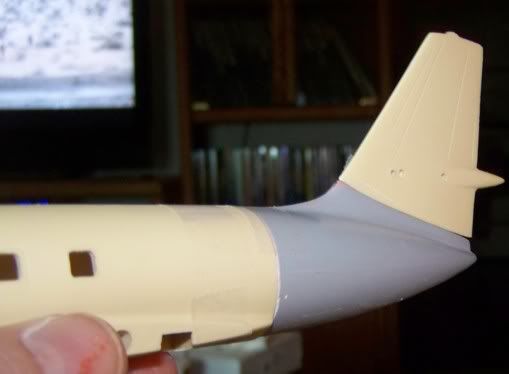
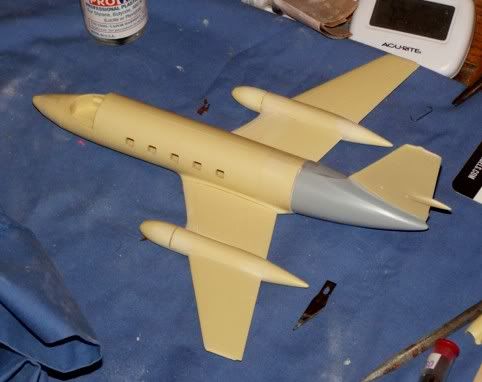
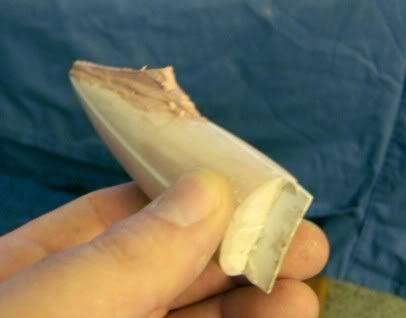
Here it is affixed to the model with tape. My hack job on the back of the fuselage resulted in some error and I will most likely repair any gappage with superglue. In any case, it's better than the original in terms of shape.
Jennings, you flatter me. Thanks.
Not sure what happened but the part seems a bit on the narrow side. Perhaps in my efforts to adjust, it shrunk just a micro-hair too small. I know I can work with it but others may be a bit put off. After seeing your exact drawings I can honestly say that my resin tailcone is nowhere near that level of perfection. I didn't exactly slap this together but it IS a prototype, if you get my meaning. It suits the purpose and that's about it. Model skills will still be necessary and I would be VERY careful where I cut the fuselage. I still believe just ahead of the front engine pylon index hole is best but I think I'm going to have to taper the area where the join begins just a bit. Not much, but enough to make it fare in well with the rest of the job.
I also detected what I think is a possible flat spot near the very tip of the tail. Guess I'm getting old eyes.
But if you want one, I can probably pour one or two. Contact me off-board and we'll set something up.
Still need to figure out how to make a hollow one. May have to make another cone to fit inside during the pour process.
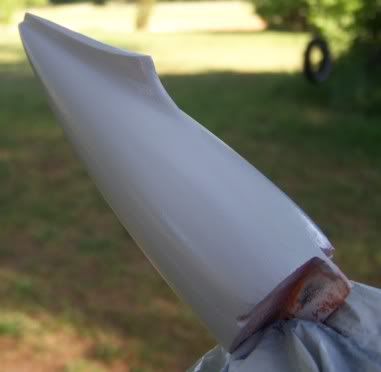
Edit: I ground out the insides of one of the castings, making it a LOT lighter. I have cast four copies and will make a few more.
After realizing the copies were all too small in diameter, I had to reexamine my casting method. Noting the clamp to keep the mold together was too tight, I slackened it way off and got a much larger diameter end product.
I've cut open the passenger door and will scratchbuild a set of stairs. Have lots of photos of the real thing to copy. Will also start working on a mold for the cockpit transparency. Will add some detail to the interior, build a nice cockpit and at the moment, I have to cut the resin down flush with the bottom of the door in order to make it correct.
Lots of work to do on this little 1/72 jobber. The tailcone was just for starters.
Thanks for looking.
Fang
-
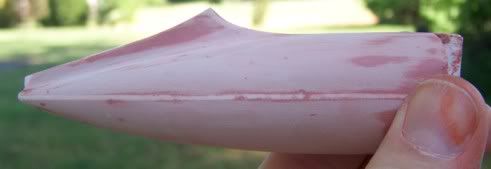
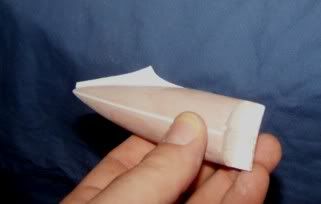
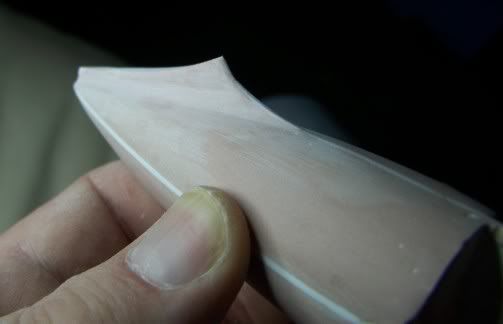
First casting. It is solid resin. Shouldn't be a problem for potential tailsitting, but, I'm postulating a hollow casting or, just routing this one out.
Oddly, it has divots all over it. Small, microscopic. I wetsanded the master ultra smooth so I can only say it got bubbles on it during the molding. It doesn't bother me (much) as I'll just putty them and sand them smooth, but this is turning out to be harder than I thought. Not in a negative way...it's all a great learning experience. I'm having a blast making this part.
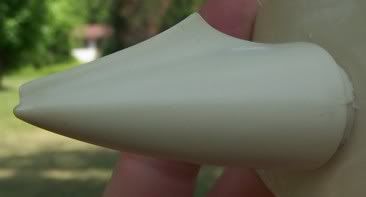
Superglue will be the main adhesive to get it affixed to the model. I will post a pic with the part taped to the fuselage some time later.
Thanks for looking.
Fang
-
-
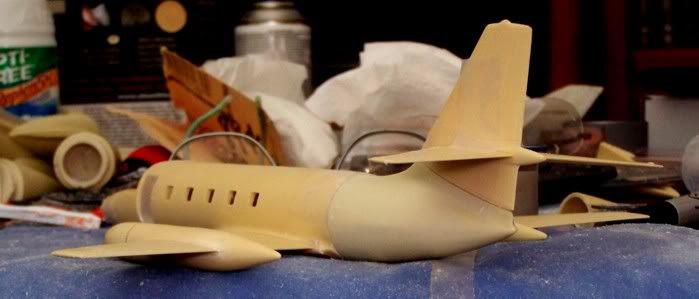
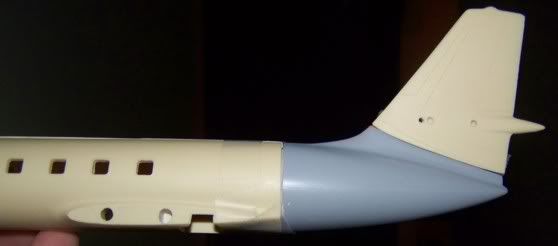
Test fitting the tailcone.
I don't have the tools to make perfect 90 deg cuts on compound curves, so I had to use the Mk 1 eyeball and though I did a fair job, I'll have to add putty and sand and adjust.
However, the first effort is looking good and All I have to do is get it to fit better and that will take some hours of adding putty here/there and I also need to adjust the shape of the vert stab fillet. It's canted to one side and looks wrong. That's easy enough to fix, however. I just didn't notice it until it was lined up with the rest of the fuselage.
Ongoing-------
One more for the "fun factor"
-
Well, given that I haven't had too many "shiny objects" in my life these past few years, I'm allowing myself the opportunity to indulge in multiple projects. Granted only two at the moment. That's plenty and for the Jetstar, the enthusiasm is high and will remain so. It was a long-awaited kit and I want very badly for it to sit in a case, completed and on display. So forgive me for being flighty. LOL
-
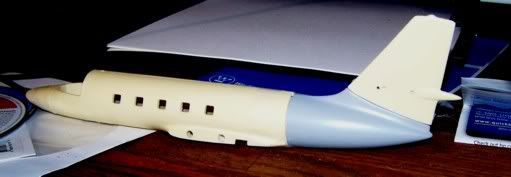
As many here know, you have to check and re-check over and over to make sure things are going ok.
I wetsanded the part after two coats of automotive primer and have most of the bumps, dips, etc worked out. But putting the new part next to the old for comparison and to make sure it's what I want.
The red line represents the new join line. The kit part will be cut right at the red line, the new part will have a step joint to it where the red line will meet the cut in the kit part.
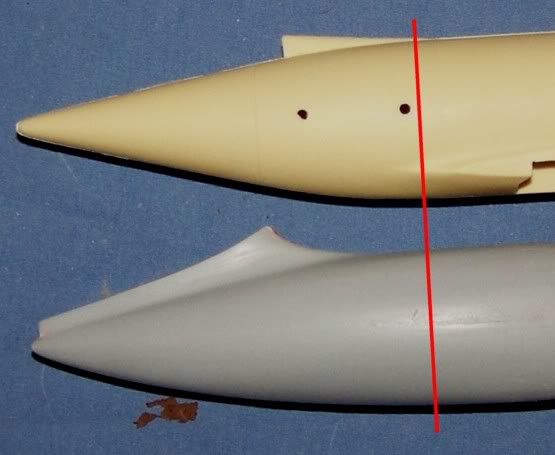
So far, everything looks A-OK.
-
Hi Paul,
Yep, the Hustler will have to wait. I got so excited about the Jetstar that I went into it full bore and haven't slowed down yet.
And yet, there isn't that much done yet.
The Sabreliner was a shorter range VIP transport. The Jetstar was bigger and many of them were painted in the "Presidential" livery. Pretty for sure.
But the Hustler is back-burner'ed for now. Sorry.
Might even be this coming winter before I get back to it. Summer is here in full force and I have sailboats to work on.
So the Jetstar might even get shelved temporarily.
-
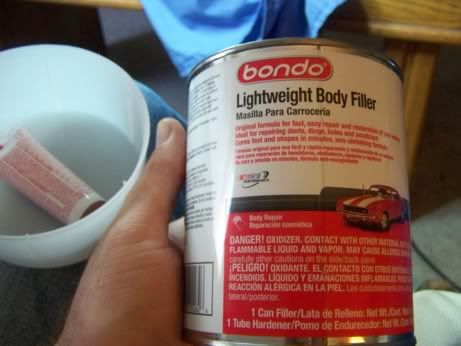
I used the spot filler putty to fill in some blivets on the surface left by air holes in the original Bondo. I just basically covered the whole thing and then sanded it back down. It helped to put it in the oven at 170 degrees to get it to harden. Otherwise, I'd wait until tomorrow.
After sanding:
Then a coat of automotive primer and I STILL didn't get all the holes filled. So...will do another spot-fill later tonight.
-
Inspirational, Euge.
This bird is really coming together. Love the idea of the vac-doors from a thickness standpoint. They look just as real as can be.
Keep us posted!
Fang
-
So... what would it take to get a resin copy of that bad boy from ya??

J
A bazillion jillion zillion dollars.
Just kidding.
The thought had occurred to me to supply those in need of "tail", so to speak, but I'm not at the casting stage yet and this whole thing could become a modeling disaster. So don't jump the gun yet, folks, though I appreciate that you think it's going to be good enough for general consumption.
So far so good but I'll leave it up to the participants to decide what's a fair price. I don't have any means to secure payment, though I do have a paypal account...but I generally haven't done anything like this except for me, myself and I.
I would hate for to make an enemy should things go askew. In the world of business, I always seem to "buy high, sell low" and other business leaders seem to think I'm up to something. ha ha.
If this thing turns out ok..then I'll see. But I also need to make the replacement cockpit transparency. That should be relatively simple. But then, I haven't planned for things I don't know about yet.
So hang tight gang. Thanks though for the confidence boost. Certainly it looks better than the kit tailcone.
I'll do some more on it later today.
Fang
-
Hey AIM9,
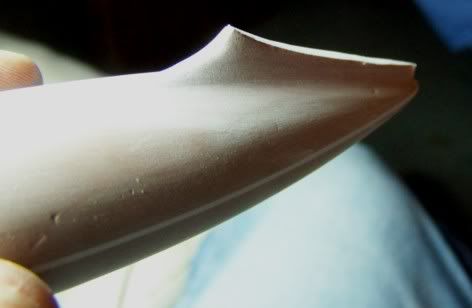
The new part will be cast hollow and looking at the L/G, the mains sit wayyyy back but I'll see how it works out using a ruler and the parts laid out on it. With this much resin in a tiny space...anything can happen.
The fairing for the vert-stab is a funny animal. It's a hollow thing in reality, as you know and I've carved it to mainly match the kit part where it will join up. And, the photos kind of don't do my work justice. It looks better in person, actually. And it is sharp on the LE and seems to compare well to my photos of the jet. I do need to re-work the very bottom/aft section though because there is a position light back there and the fairing goes all the way back to the tip of the tail. It's possible that not all Jetstars were thus equipped, however. So...I'm mulling it over.
But thanks for taking a look. Also, the L/G is only resin. Scary. Not sure what to do....though I may consider wire replacements with the resin glued to that. Not sure about that, either.
I do know the cabin door will be slid open and the ladder out. Next will be the cockpit windscreen fix....have no idea how to tackle that yet. Just an idea. Not much else.
More later
Fang
-
The tail fillet and the blending of vertical stab housing to fuselage.
First, I cut some Evergreen sheet to be the foundation.
Then glued it in place.
Then, a quick mix of Bondo and smear it on there, making sure I have enough so that when I blend the two parts there's no weird gap.
Then, after it cures, I work slowly, one side at a time and carve it to shape. I used some heavy grit sandpaper for rough shaping, a Dremel with a sanding drum on VERY low speed, the battery-powered one, and also some round grinding bits to get the shape close to final and some needle files and finally a finer grade of sandpaper to finish it up.
In the end, I'll have a more accurate looking part and I've already modified the kit vertical stab to glue right on top of this part. I had to grind away the lower portion of it but it will look perfect once mounted to this. I have to use some spot putty to finish up the surface detail and smooth it all out, then a coat of primer and a gloss paint to keep it from sticking to the mold.
More later, Thanks for looking.
Fang
-
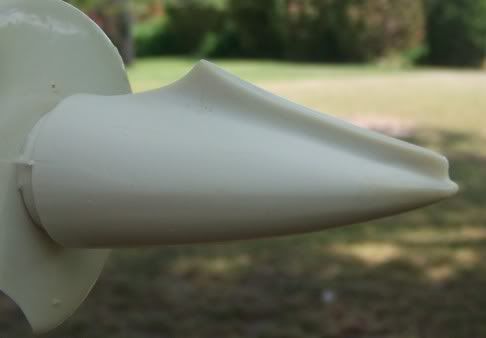
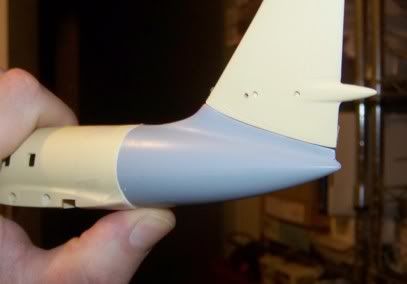
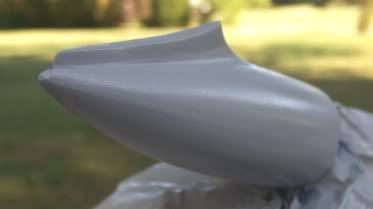
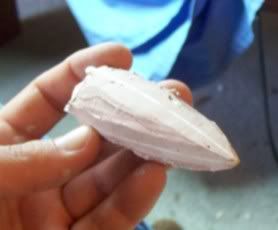
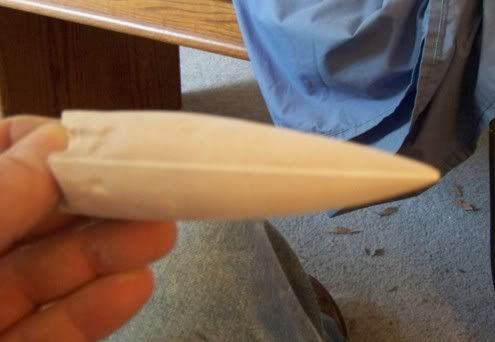
Got the new tailcone basically shaped out. According to the micrometer, it is the correct diameter.
Here's a good look at the final shape, but not the final product. Much to do yet.
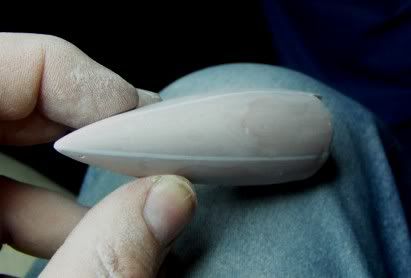
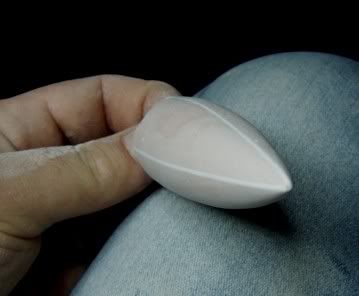
And how it compares to the kit. As was mentioned the tailcone seems to have a straight taper while the new tailcone has the more bulbous appearance, as given by the drawings and comparing more favorably with photos of the real jet.
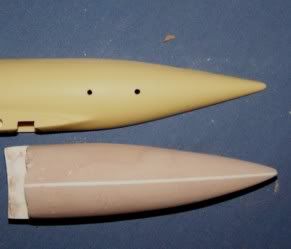
The kit's fuselage will get cut just ahead of the forward engine locating hole and the new tailcone that I just made will be cut to allow a "step" joint to assemble right into the back of the existing fuselage. That is, once I cast it in resin. However, there is another task to complete on it and that's the area where it fairs into the bottom of the vertical stab. So I will cut a piece of Evergreen strip and glue it to the top of the new tailcone, then blend it in with putty. I will repeatedly compare it to the width of the kit's vertical stab so that when I assemble it, it will look au natural.
Hope all this stuff is interesting. :)
I'm having fun anyway and AIM-9, if you're watching, let me know how I'm doing, OK?
Cheers
Fang
-
OK, so being as it was a nice day out, but I'm sick as a dog, I took advantage of the time to rest by prototyping a new tailcone. I borrowed heavily from Pig's mastery of forms and shapes and made a cross-sectional form of the new tailcone to eventually mold a replacement.
Here's how:
First, you print the drawings that you need to the right scale, in this case 1/72.
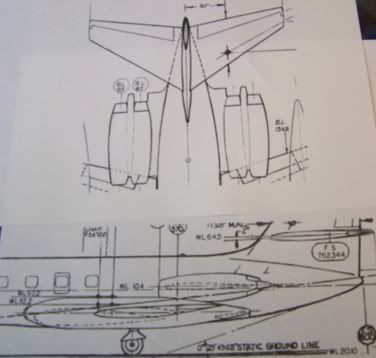
Then, cut them out and use them as templates to cut the Evergreen plastic forms.
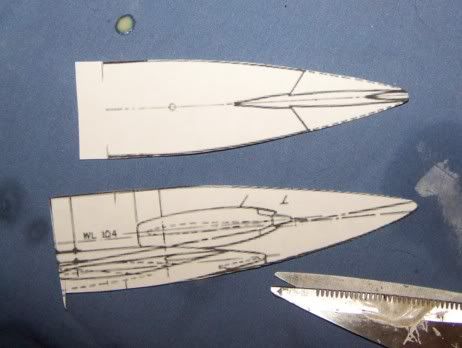
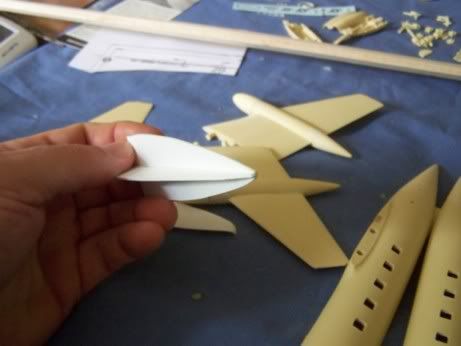
It's important to keep them at 90 degrees but need not be perfect. It's just a little easier. The small filler blocks of balsa help. They also allow you to use less body putty.
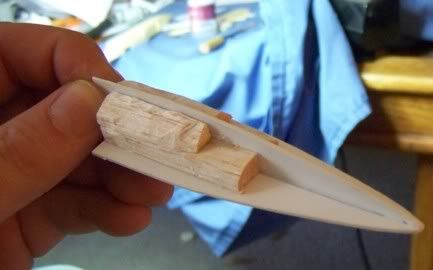
Then, a quick trip to the local car parts shop and I picked up some of this:
Follow the directions, work quickly (it needn't be pretty) and put on a few layers of this glop. Its curing time depends on how much hardener you use. Too much and you'll only have a minute or two to get it on there. Too little and it takes a lot longer to cure.
I used enough and it cured quickly so that in 15 minutes I was after it with my Dremel, doing the initial shaping with a sanding drum.
The initial results. More putty was needed and then more shaping.
I will get the basic shape, then I will add a small bit of evergreen strip where the vertical stab meets the fuselage and do some blending. The neat thing is that if I do it wrong, I can grind it away and try again. This is admittedly a first effort but I have done similar things on a larger scale.
Once the tailcone is the way I want it, I will cast one half, then the other out of resin, with a hollow interior to prevent tail-sitting and hopefully it will look better. I doubt it will be perfect but I hope it will appear more accurate than the way Anigrand molded it.
I'll post more later.
Thanks for looking.
Fang
-
Wow is insufficient.
All the thought, the effort, the contemplation, re-thinking and everything has paid off handsomely.
You're a genius and have managed to capitalize on so much knowledge.
Hat's off to you! Simply spectacular.
I agree though, did you make dupes? (Just in case?)
Fang
-
Some fine work there, AAF. Interesting subject and if it really bothers you about setting foot in the JETS section, you could always build it with its fake prop. Maybe that will calm you fears.
(just kidding)
-
Anigrand has a 1/144 Jetstar in their C-141 kit. Sometimes they group some of these small kits as a separate release, so here's hoping!
Yes, here are the parts as they show on their website:
If someone has the C-141A kit and can part with the 1/144 C-140, maybe you can get some satisfaction.

Czech Models 1/32 T-33A musings
in Jet Modeling
Posted
I have no complaints, love mine.
I agree about the flaps. Need them dropped and the speed brakes open! Easy enough to modify the kit parts on the flaps with some Evergreen strips. (maybe)
I Don't mind the wrong-era wheels for later birds. Plan on doing a 1950's period bird anyhow.
Jennings, got a friend who wants TV-2 decals. Who ya gonna call?
Sure was a pretty sight when opening the box. Very nice all the way around. Only real complaint was the control sticks. I understand Harold is working on that.