


VADM Fangschleister
-
Content Count
522 -
Joined
-
Last visited
Content Type
Profiles
Forums
Calendar
Posts posted by VADM Fangschleister
-
-
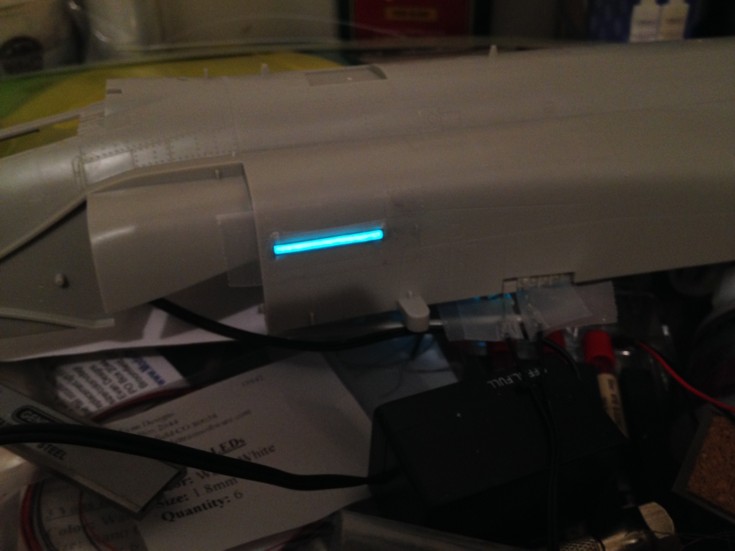
Here is the mixed stuff, in a little container to show the natural color when it's not glowing. It is quite easily applied to surfaces and adheres well and holds its shape.

-
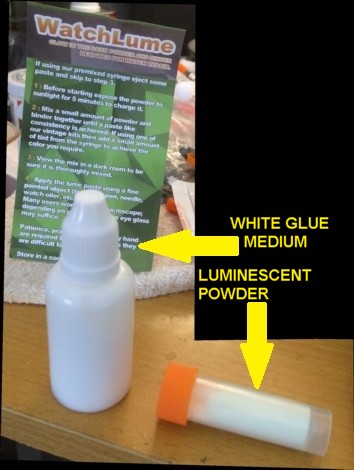
McFly, I came up with another possible inexpensive solution. I often dabble with watchmaking and sometimes have to re-apply lume to the hands or the the hour markers. The glow-in-the-dark powder is mixed with a white glue medium and when dry, is luminescent when charged up in room lighting, daylight or especially when UV light is applied to it. It's relatively inexpensive and can be bought off of eBay®.
There are different brands and some come with pre-filled applicators.
There are also different colors. I usually use just the standard green but it seems to match the color of the strips when not in use very nicely. Easily applied and charge it up with a hand-held UV light (or sunlight or a lightbulb) and voila! You have working slime lights!
-
https://www.ebay.com/itm/12V-A6-EL-Panel-Electroluminescent-Light-Neon-Sheet-Tape-Cuttable-Actuator
That link won't work, so it seems but if you copy and past in the eBay search window, you should be able to find it.
The trimmable sheets work
It'll take some thinking and patience. This is from a stalled project where the buyer backed out. I tried fluorescent paint with a UV LED behind it, didn't care for it. I ultimately decided on electroluminescent sheets that are cuttable/trimmable. They are powered by a 9VDC battery but with an AC inverter.
I cut a slit to slide the strip onto the model and planned on hiding any ugly edges with a photo-etch strip superglued in place. The retrofitted slime lights on the F-4's I worked on were raised above the regular surface of the aircraft skin so it would be scale in appearance.
I had not decided yet whether I would need a separate circuit for each light (four on each side) and I hadn't determined how to do the wingtips either.
But the effect is authentic and accurate.
-
Glad you're still in there kickin'.
I am not at the buying stage yet but curious if your 1/32 F-100 intake will fit on the all-new F-100F from Trumpeter. I'm assuming (uh-oh) that the engineering of theirs is identical to the "D"; Flat on the bottom.
I'm still awaiting reviews and comparison sprue shots from some enterprising individual.
-
I love this thread. I noted Randy's interior and marveled at it. Naturally, this model cries out for "diorama", either landing on the asteroid with The Companion and Zephram Cochran or on Eden with Sevrin. Maybe on the hostile planet where they crashed investigating Murasaki 312.... or even a giant wall presentation with the planet killer and Matt Decker flying into it.
My mechanical engineering side cries out for figuring out how to flip a switch and get the doors to operate, knowing full well that grips on the set opened and closed them, sometimes with difficulty.
I was glad to read that the original screen prop, the full-size magilla is fully restored and on display now.
You'll note my avatar and I made that long before this model was kitted. Perhaps a serendipitous moment.
It's truly a fun kit and a return to my childhood and back to the days when TV was still experimenting and taking risks before computer models and think-tanks and study groups all destroying the storytelling for their own agendas.
-
Remember, the Tardis is bigger inside than it is outside.
I will watch to see how you master this modeling feat. Shouldn't be a problem...🤨
-
1/32 F-106
1/32 F-101B
-
On 10/17/2020 at 1:54 PM, Winnie said:
You CAN assemble both levels, but tough to see behind the Radar Nav console...
Pondering that...maybe possible to have removable outside skin sections that are held in place with jewelers screws or pin-slides. Done in such a way as to not remove such a large section that causes structural weakness but where you can remove a section and with some modest LED lighting, display the interior. If it were me, I'd make the exterior panel cuts along existing panel lines and make sure they fit very snug so as to not have glaring gaps at the lines.
Another option might be hinged panels which wouldn't look exactly scale and might arouse some rivet-counter to critique the method...but then...such people are not worth paying attention to as it is.
Third option might be to cut the sections open, then replace with heat-formed clear skin replacements.
Any way you do it, as you know will require lots of forethought and planning and working slowly to meet the results you want. It's going to be a fun project though. Many hours will pay off!
-
-
-
-
-
-
-
-
-
-
-
-
Chine
Not chin.
-
http://www.internetmodeler.com/2001/august/new-releases/detail_ch_tf-102a.htm
Not sure if they're still around. If not...I have no idea.
HTH
-
6 hours ago, MoFo said:
They didn't. Hasegawa distributed Monogram kits in Japan, so they're branded Hasegawa/Monogram, the same way that MRC used to brand their imports MRC/Hasegawa, MRC/Academy and MRC/Fujimi in the past.
Ah.
Makes sense. Thanks.
-
Was surfing eBay for aftermarket for the kit and found two of the kits with shared Hasegawa/Monogram logo boxtops.
But the weird part was the kits were up for sale at over $350 for one and $633 for the other, both in Japan.
Plenty of "legacy" kits for much much less available in the $75 range.
I guess in Japan, that kit might be worth that kind of money but jeez.

-
23 hours ago, Benner said:
nice work. did you put the safety pins in all the areas like landing gear, arrestor hook, ECM dispensers, etc?
cutting away the ailerons at the moment and using sheet styrene to fill the holes. Though it is hard to see, a metal AOA probe has been glued onto the nose. I used the Fine Molds set.
The F-4 uses collars to safe the gear and I had it posed as either ready-to-launch or just returning. The EOR crew would've put the safety pins in the MAU-12's before it taxied back to the ramp. So no arrestor hook pins (I believe it's a bracket with a braided steel cable) and the AN/ALE-40's (Chaff/Flare) would normally be pinned but I opted to just leave them uninstalled. That is, the dispensers are not on the pylons. The seats are "safed" with some of the RBF streamers showing but the collars for the canopies are not installed. Since the parachute pack door is closed, it would have to be "ready-for-launch" I suppose.
As for ailerons, I found cutting them out after wing halves glued together, used EVERGREEN® styrene tubes that match in width to top/bottom of control surface, glued to the front of the aileron and then filled with modest amounts of putty.
The AOA probes you have a sweet. I used hypodermic tubing for pitot probes...two different sizes for the nose and vertical stab.
a.jpg.981c4c375f95f0164d830ce37ecca3b0.jpg)
a.jpg.1ec3763572959df4e059e4815136bf97.jpg)
a.jpg.ed2db956bb7fcc2032a4d3a2eb2fca86.jpg)
a.jpg.c7a1375bbfae25f7518086cef53b1b58.jpg)
a.jpg.55702d82bc3dee51d08e99588cf51d35.jpg)
a.jpg.2deae5886effdc90a3e30201f680e83f.jpg)
a.jpg.415126bca1d1e3b52693c9812f489e9e.jpg)
a.jpg.ff585e0363dd683c70e0c7659d5d8bbd.jpg)
a.jpg.a2e5204ecd7f59f5d94afbfc2fb975c0.jpg)
a.jpg.ca08a6049c5136ca13fa22c1065e60f3.jpg) Oddly, there are no photos of the aft fuselage that I could find.
Oddly, there are no photos of the aft fuselage that I could find.
Any ideas to simulate the formation lights?
in Tools 'n' Tips
Posted
I am shining a UV flashlight onto the material here and you can see it glows brightly when the UV light is on it. One application might be to have the model displayed in such a way that you can have UV LED's shining on places on the model in such a way to keep them bright like this.