

HOKUM52
-
Content Count
103 -
Joined
-
Last visited
Content Type
Profiles
Forums
Calendar
Everything posted by HOKUM52
-
WOW. can you please explain how you weathered it, perhaps with a picture or two. Id like to try this on a mig I have in the future!
-
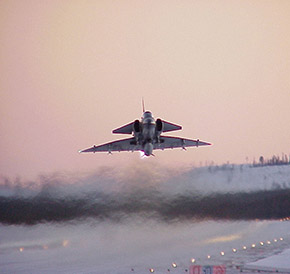
Here's the finished shots bar the missiles. they're a bit far out to examine detail unless you've got a large display. enjoy. . . . onto the Canberra immediately!!
-
. . FINISHED Photos next time :D
-
-
Will be following this one
-
SO lets spoil what we just did, and revisit the camo. We wanted a really accurate pattern, there's no way you can get it right the first time. After glossing it was Only as we were about to place the roundel we realised this was also way off. From the airliners link on first post. Thats it for now, weathering in my next post, it will be quite a transformation!
-
wow seriously nice!! was it difficult to create all those lighter jagged grey lines?
-
MORE to come but here's a sneak peak for now to keep you interested
-
from airliners.net link here: http://www.airliners.net/photo/UK---Air/English-Electric-Lightning/2043462/L/&sid=4f065a21096b954b60eb434dfa5ea52e As with our previous few models we like to pick a specific aircraft and attempt to do it as accurately as possible at a given point of time (normally dictated by decal availability) We had gone with the box decals for BE/xs923. We had no instructions from 12 years ago but after finding them online we saw they were mostly inaccurate as is often the case with aircraft that have been modified throughout their life. the picture below is how and whe
-
So, as the description says this kit was done when we were boys maybe more than 12 years ago. My brother and I decided we would complete all the models we had so that we could just focus on one at a time in the future but... Somewhere in between completing our last collection (t-50,J20,F-22) and waiting for the model we really wanted to do next (Eduard Mig21bis) , my brother got tempted to salvage an old EEL model so it could once again take its place on display. At first I wasn't keen on the idea but The EEL was something we had planned for the future. Before we knew it we now had a bashed
-
wow those pilots look sick!
-
amazing free hand on such a small model!
-
nice!! look forward to the finish, attention to detail is 10/10
-
Thanks ! Havin a break now until new trumpeter su24 or mig29a comes out
-
-
-
-
I would like to present the finish of a three year project Glad its over, loads of photos! Link to build :In progress
-
Firstly thank you for your comments! Secondly: Im glad to announce this models completion and the set at the same time. These three jets had unforeseen complications but nevertheless were relatively quick to build compared to our few previous models. That said, they've been on the go spanning 3 years due to being away etc etc. We are now in a nice position though as we have cleared all the models we have. No unmade or stashed kits for the first time in 4+1/2 years. Here's the wrap up for the J 20..... Pilot WIP He looks happy in there! If you'd like to see them all finis
-
Dont think so yet, but check hannants if your in the uk
-
AS usual, its been a long time since last posting, but progress has continued. The third and final model (j-20) is now just a week away from the finish. I'll skip most photos for this one and just post a few summary ones! Where I left off ... Aircraft was sprayed with black primer then the panel lines were pre-highlighted (as opposed to pre-shaded) with a light grey, and then its main colour laid on top. Then as you can see above, it was glossed up ready for decaling. The pre-highlighting seemed to disappear at first but not to worry as it comes back a little when matted. Alcad sta
-
Meanwhile I had the materials delivered for the stands. I'd seen another on the forum that had been home made and i liked them so decided to try something similar. The base was a gemmijet 1:200 stand which I Drilled a 6mm hole in the back for a clear acrylic rod to be stuck in. This was a quick check of the angle. two metal pins will go in and the top sawed off.. that will be clearer later.. I painted the inside of the T-50 engines, pilot and ladder fittings. : And liam finished up his: Still waiting on the other base, however these have been completed. I will post tomorrow
-
Ok! Back at home and time to finish these! at least two of them. Times limited First up was some filter layers. A thinned light grey was applied over the whole T 50 to dull down the luminous red and yellows (masked the engines of course). For the raptor the same but followed by a filter layer of alcad stainless steel to give it that metallic sheen. The results of these are very subtle making them difficult to capture in the camera, but it does make the difference when viewing by eye. everything is tested first , this pave hawks starting to look kinda wacko Once these filter layer
-
Thank you nicholassagan. My Brother was back from Uni for a couple of days and so his raptor was priority hoping to bring it up to speed with the T-50. First on the to do list was a little more painting. Sorry about the grainy pics btw Using some HD pics amazingly the decals were all finished in one day. Makes a nice change. It really is a relatively stencil free jet. Formation strips need some toning down Other side AND so here we are. Both at a completed decal stage, ready to move onto toning down some of those transfers with a little fading and then onto the weatherin
-
Continued.. I sprayed over the falsely present transfers on the flaps and wing tips. And have since resealed all the work under another klear coat. This is in fact where I currently am with the model and so the next update may be a while. Hope you found this part useful if you are going to be decaling this one yourself My brother is back for a week as of tomoro and he plans to crack on with the raptor so hopefully some new stuff on that too
