


Big Daddy
-
Content Count
392 -
Joined
-
Last visited
Content Type
Profiles
Forums
Calendar
Posts posted by Big Daddy
-
-
Man, what a race, Lewis' luck continues to suck. And that damn Vettel.....the boy sure can drive but he is such a schmuck. Did you hear him drop the F-bomb in the post- race interview? What a knob.
-
Very nice Don. You father in law would be proud. Sorry to see that some of the decals have silvered. That bites. The main markings look like they went down really well though.
Ya done good, buddy!

Mike
Thanks, Mike. I guess my Future coat wasn't smooth enough. I put a lot of Solvaset on them too. I have a spare set of decals from Leading Edge so I will likely strip them off and try again. Appreciate your input.
Don
-
Woohoo! Glad to see you finally finished the Sabre. I must say it looks great, definitly worth the wait.
Great job!
Hey, thanks, Pete. I was starting to wonder if anyone would notice.

Cheers,
Don
-
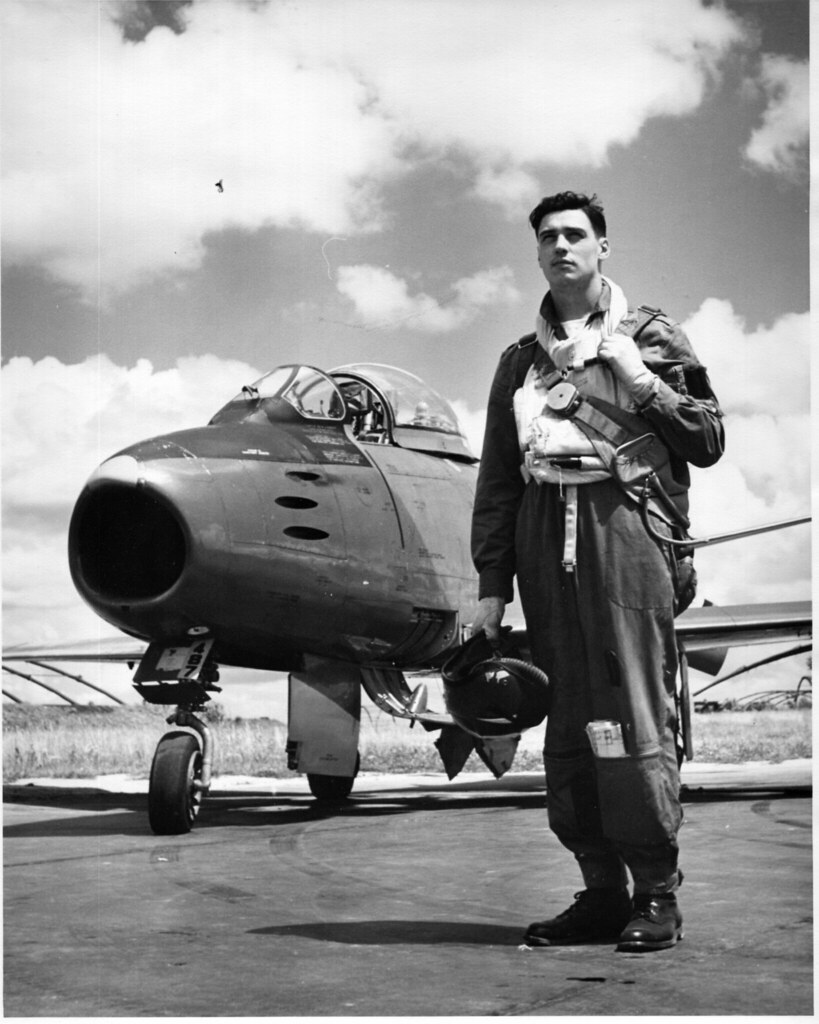
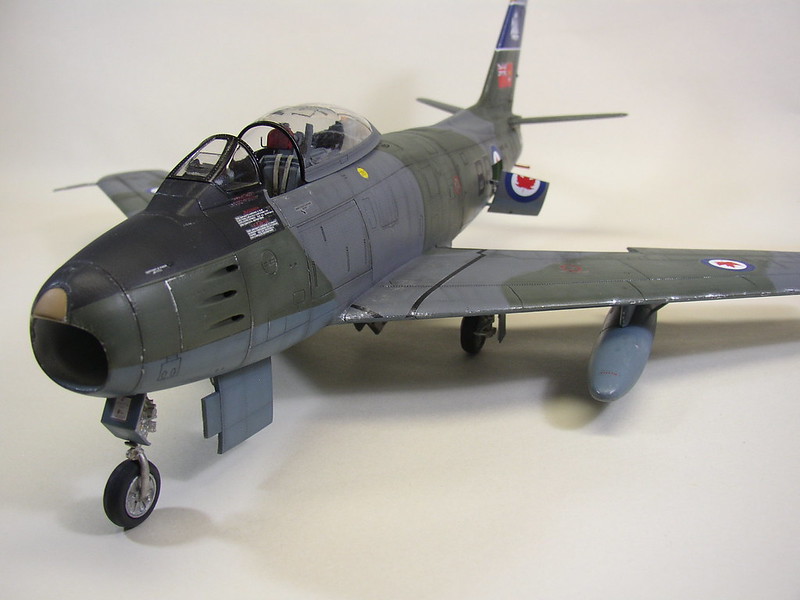
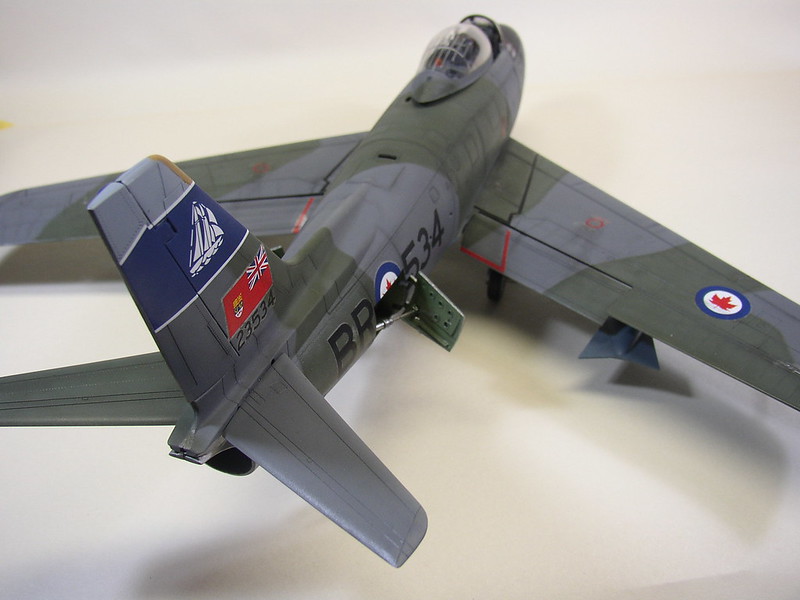
I received this 1:32nd scale Kinetic F-86 Sabre kit for Christmas 2011 from my sister-in-law and this has been the first kit I have started since I was about 12 years old. My wife and her sister lost their father over 2 years ago and I built this as a tribute to him. He flew Mk5 and 6 Sabres with the RCAF in Europe from 1956-58 with 434 Sqn, No. 3(F) Wing based in Zweibrucken. On Sept. 19, 1957, he was "flying Number Four in a four-plane section" in A/C No. 534, cruising at 35000 feet when he experienced an "electrical failure & flameout". He performed a textbook forced landing at Spangdahlem and walked away from it. His account of this was published in the Nov/Dec issue of Flight Comment, entitled "Heads-Up Flying". After many starts and stops, I finally finished this project today. I gave away the original decal sheet that came with the kit, thinking I would not need them as I was getting the Leading Edge sheet. However, I found to my dismay that it did not include many of the small access door and other decals that were on the OEM sheet. I will add these later when I track some down. Also, I haven't been able to pry off the port gun-bay door which is hiding quite a bit of detail. Hopefully I can get the panel off and will post another pic of it later. Hope you like it!!
Here's a pic of Larry and an F-86 from 1957...
And here is my finished build.


Thanks for looking!
Don
-
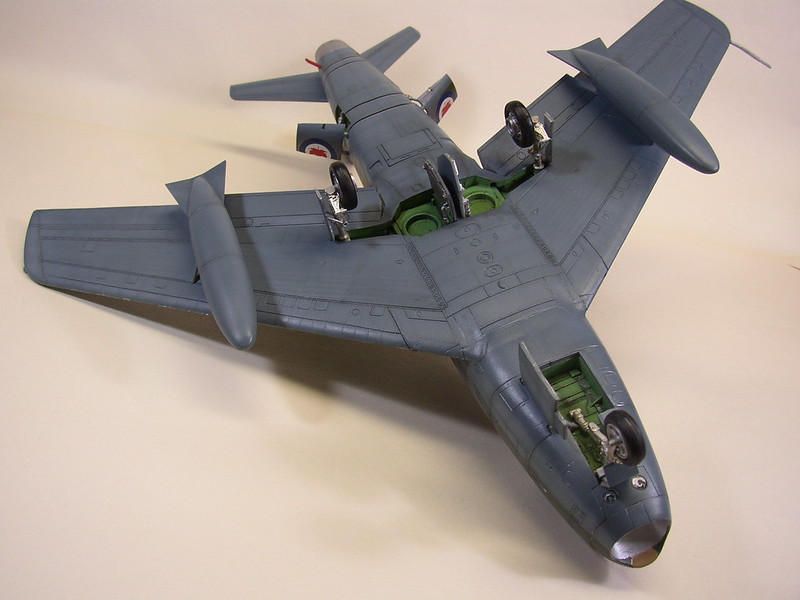
Better late than never, this build is complete. You will note that I haven't shown the port gunbay in the finished build pics. That is because I can't get it open, lol. I will continue to try to pry it open and will add a pic when I do. I have a display place set aside for this build in tribute to my father-in-law and will also post a final picture when it is ready. Thanks for all your patience and to all of you who have been so supportive and viewed this thread so often. I appreciate all of your support and comments and hope you enjoy Sabre 534.
Thanks for looking!
Don
-
At long last, this build is complete. You will note that I haven't shown the port gunbay in the finished build pics. That is because I can't get it open, lol. I will continue to try to pry it open and will add a pic when I do. I have a display place set aside for this build in tribute to my father-in-law and will also post a final picture when it is ready. Thanks for all your patience and to all of you who have been so supportive and viewed this thread so often. I appreciate all of your support and comments and hope you enjoy Sabre 534.


Thanks for looking!
Don
-
Fantastic job, Ian!! I always love your Lancs. She really looks the part, and I can say that with authority as I was up close and personal with VeRA just a couple of weeks ago. Well done!
:thumbsup: :thumbsup: Don
-
Hi Don, sorry I haven't been to the forum for a while....and yes, I am using a stylus with Procreate coz I think it's more natural to draw with a pen instead of a finger and I am going to get the new stylus with touch sensitive and it's more like a pen with pointed tip:
I am using a few apps on my ipad2 but Procreate is one of the best. Other apps such as SketchBook Pro, Brushes, Artstudio are good too.
Thanks Don.
Cheers
FT
Thanks! I was looking at the Jaja a few weeks ago. It's nice to know it is finally shipping.
Don
-
Great find, Mike!! I found my father-in-law's class, Course 51, from which he graduated on 15 Aug 1956 (according to his flight log). He is third from the right in the middle row. Man, they all look so young!
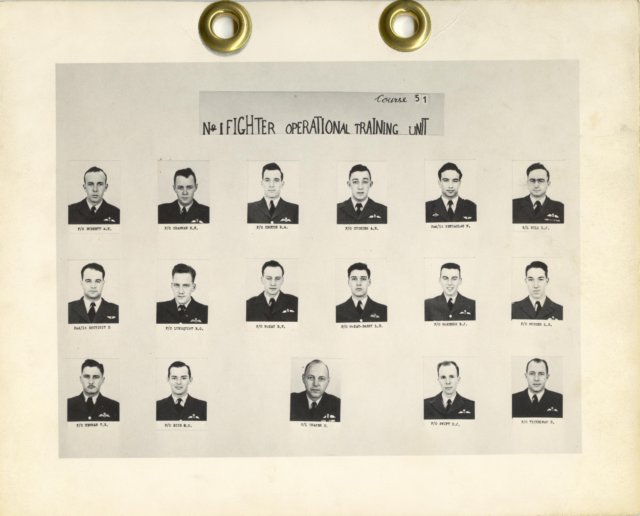
Thanks for posting this link!!
Don
-
Looking great, Mike.
A big congrats on your 24th. Coming up to 25 years for us too. Enjoy the Big Apple!
BD
-
Great job!! Love the finish!
:thumbsup: This is going to be an epic thread.
Don
-
Nice recovery, ALF! Seems like I have had to pull of one of those on every build I have done to date.

Looking forward to more progress.
Cheers,
Don
-
Well, at long last, this Sword is back on the bench and approaching completion. I finished the camo a couple of days ago. I started out masking with tracing paper and blu-tak "noodles" but that was frustrating me to no end so I wound up doing about half the job freehand with the airbrush. Can you tell the difference?

After everything dried, I decided to try a weathering technique I read about (somewhere?). I re-loaded the airbrush with the green camo and mixed in a couple of drops of white to lighten it ever so slightly. Then I sprayed inside various panel lines randomly, leaving the actual lines the original, darker colour. I then did the same with the RAF Gray. I am very happy with how it turned out. It is subtle but definitely gives the paint scheme a used, sun-bleached look and when I brush in some dark pastel into the panel lines I think it will be even more pronounced. I am going do the PRU Blue underside as well.


-
You've inspired me, Mike! Look what's back on the bench.
Cheers,
Don
-
10Sucht,
Don't sweat it. The last model that I built up until last spring was in 1962. I don't even think they had rattle-cans then.
I bought a Paasche VL at the LHS and was up and running with a couple hours practice (and a lot of help from the great folks on ARC). You will do just fine. Just take it slow and don't work on a decent kit until you feel you are ready. Good luck and don't be afraid to ask for help.Don
-
Hey Mike,
Just discovered this painting on the SPAAD's website. Don't know if you have seen it. Looks like this bird got around (or the painting isn't historically correct.).
"Swords of NATO" - This painting was done at the request of Archie Gill who was organizing a reunion of 2 Fighter Wing personnel. Archie's wife Bernice came up with the name of the painting. It is a warm summer evening just before sunset and there is lots of activity. Outside the number 2 hangar, the 421 Squadron flagship is being towed by a Mercedes Benz Unimog vehicle to the flight line while a 430 squadron Sword is being serviced inside. The control tower has just given landing clearance to a flight of CF-100's.

Cheers,
Don
-
-
Fantastic job!! Looks like it came right out of the jungle. I especially like the fuel staining in the last pic. Great touch! And yes, more pics please!!!
:thumbsup: :thumbsup: -
Beautiful job!!!!
:thumbsup: -
Thanks BD!
hey ALF!! Look what was sitting outside the CH2A hangar this morning!
 What are the odds?? (Sorry for the crappy eyePhone shots.)

-
Geez, that is going to be a BIG kit. And a Lancaster is coming, with a 38 in. wingspan!!.

-
Hey David,
yeah, I figured you had done your research but, you never know..
Sounds like you have your ducks in a row and a sound business plan. That's half the battle. So many people jump into business without doing the groundwork. Guess that's why 50% of them fail in the first year, and 50% of them in the second.
I wish you the best of luck and if you ever need any screenprinting advice, I am glad to help (if I can
 ). Best of luck!!
Don
PS: Go Riders!!!!
-
Riderfan,
I owned a screen-printing business from 1987-1998 in London, ON. I started with $5000 that I received from my mother's estate, bought a table-top, two-station printer, a dryer, some inks and some screen frames and learned how to print t-shirts in my garage. When I sold the business in '98, I had moved to my own building, owned an 8-colour automatic press that could print 1000 shirts an hour and the biz was earning over 250 grand a year.
I didn't print decals but did do heat-transfers which would have been a similar process. I am sure you have done a lot of research on the subject but I will run down the process for you just in case. Hopefully, things haven't changed too much and I am not completely out in left field.
Everything starts with the artwork. You are going to need to be able to create computer-generated, colour-separated artwork. Each colour needs a separate screen made for it. For example, if you have a design with four colours, each colour will be represented in its own piece of artwork, and be transferred to vellum or clear acetate as a solid black image (aka a film positive). The film positives are imaged onto the stretched "silk-screen" material (actually fine polyester mesh) that is coated with a photo-sensitive emulsion. The artwork and screen are sandwiched together in a vaccuum table and exposed to intense light for a few minutes. Everything not covered by the film positive hardens and becomes non-water-soluble. The screen is then washed out with water, revealing the image underneath. Once you have exposed all four of your screens, they can then be mounted in your screen-printing machine and the screens adjusted so that the colours are all "in register".
Keep in mind that mounting and stretching the screen mesh onto wooden or metal frames is an art in itself. It took me at least a couple of years and a lot of trial and error to perfect the process. I finally settled on adjustable roller frames (sorry, can't remember the brand name). The virgin mesh is attached to one side using a sliding tongue and groove attachment. You then attach it to the opposite side and slowly tighten the mesh to the desired tension, using a tension meter (this is an indispensable tool). The other two sides are attached to the frame and the screen is then tightened in that direction until you have even tension all over the surface of the mesh. The wonderful thing about the roller frame is, as the mesh ages, stretches and loses tension, it can be re-tightend on the frame. After two or three re-tensionings, the mesh becomes "hardened" and will maintain constant tension for years.
Once you have your screens properly stretched, they have to be degreased, washed out and then left to dry, preferrably in an enclosed, dust-free area. Once they have dried, they are then ready to be coated with emulsion (another process that took me a long time to perfect). You want a very even coating of emulsion on both sides, and, once the screens are coated, they must be stored flat in a dark, dust-free area to dry. Any prolonged exposure to light at this time will harden the emulsion and render them unusable.
Okay, back to the printing process. You have coated and exposed your screens, mounted them on your printer and registered the colours. The decal paper has been affixed to the printer palette in some way that it won't move. I used spray adhesive on the palettes for t-shirts. When you are printing multiple colours, you don't want the shirt (substrate) to move between colour applications or your colours will go out of register. With garments, all of the colours would go down wet-on-wet, meaning the shirt would not be pulled off the palette and ran through the dryer until every colour was printed. With heat transfers (or decals), you will probably print one colour at a time, remove the substrate and allow the ink to dry, then print the next colour, allow it to dry and so on until all the colours are laid down. With wet-on-wet printing, you get a lot of ink built up on the underside of the screen. This will eventually start to bleed back onto the substrate and mess things up.
I imagine that the inks used for decals will be air-dry inks, so, if you are doing a lot of decals you are going to need some kind of drying rack to hold them until the ink dries. The ink is poured into the screen that is mounted on the printer, the screen is then lowered over the substrate and a squeegee is pulled across the screen, forcing the ink through the opening in the mesh and onto the substrate. Even squeegee pressure is critical here. On an automatic machine, it can be adjusted by turning a dial but if you are pulling a squeegee by hand, you have to learn to maintain steady, consistent pressure for each pass. You then pull off the substrate, put it in the dryer rack, and do another one. Needless to say, if you are printing these manually, it can get very tiresome, as in a four-colour job, you are printing every sheet four times.
I know I haven't gotten into the details of equipment that you were asking for, but I wanted you to know the type of challenges that you will face if you are going to get involved in screen-printing. It is a centuries-old process that, when mastered, can produce beautiful work. In my last few years in the business, I was the only guy doing four-colour process work on garments in the area ( the four colours, cyan, yellow, magenta and black can produce 16-million colour combinations when combined in different percentages). Some of the garments we were producing were real works of art.
My recommendation to you (if you haven't already done it) is read some good books on the process, talk to local screen-printers, and most rewarding of all, talk to people in the business at trade shows. You will see all the latest equipment, newest techniques, and be able to find out from the experts what you will actually need to get going in the business. As I said, I started on a budget of $5000 and that only got me some fairly rudimentary equipment. When I sold the business, I had well over a quarter million invested in equipment, not to mention a business building on top of that.
Good luck!!
BD
-
Great collection, Mike!!
:thumbsup:

Formula 1 2012
in Race
Posted
Geez, don't read too much into my comments, OK? I just don't like Vettel.