


Thadeus
-
Content Count
1,712 -
Joined
-
Last visited
Content Type
Profiles
Forums
Calendar
Posts posted by Thadeus
-
-
Turkish F-16 parachute looks pretty similar in design to the Polish F-16 parachute. But it's not the exact same design. So this might explain the difference in
OTOH the ROCAF F-16 one looks similar to both of these, and not to the Belgian F-16. It might be one of these upgraded Vipers though, that look like F-16A's but are more similar to the F-16C block 50's:
So the difference might be that earlier Vipers got one design of the parachute, while the later ones got another design. After delivery countries just went with the serial number of the part (or its specification) that was assigned on delivery.
-
Oh this is great. Can't wait. Shame no Polish AF decals OOB, but there are a few sheets out there. We recently got a new paint scheme.
https://www.super-hobby.com/products/Su-22-Boar-Mouth-And-Bonus-Shark-Mouth-Tanks-57469434.html
-
Thank You.
I'm having a little bit of hard time keeping my focus here. I believe I was spoiled by building 1/48 Hornets.
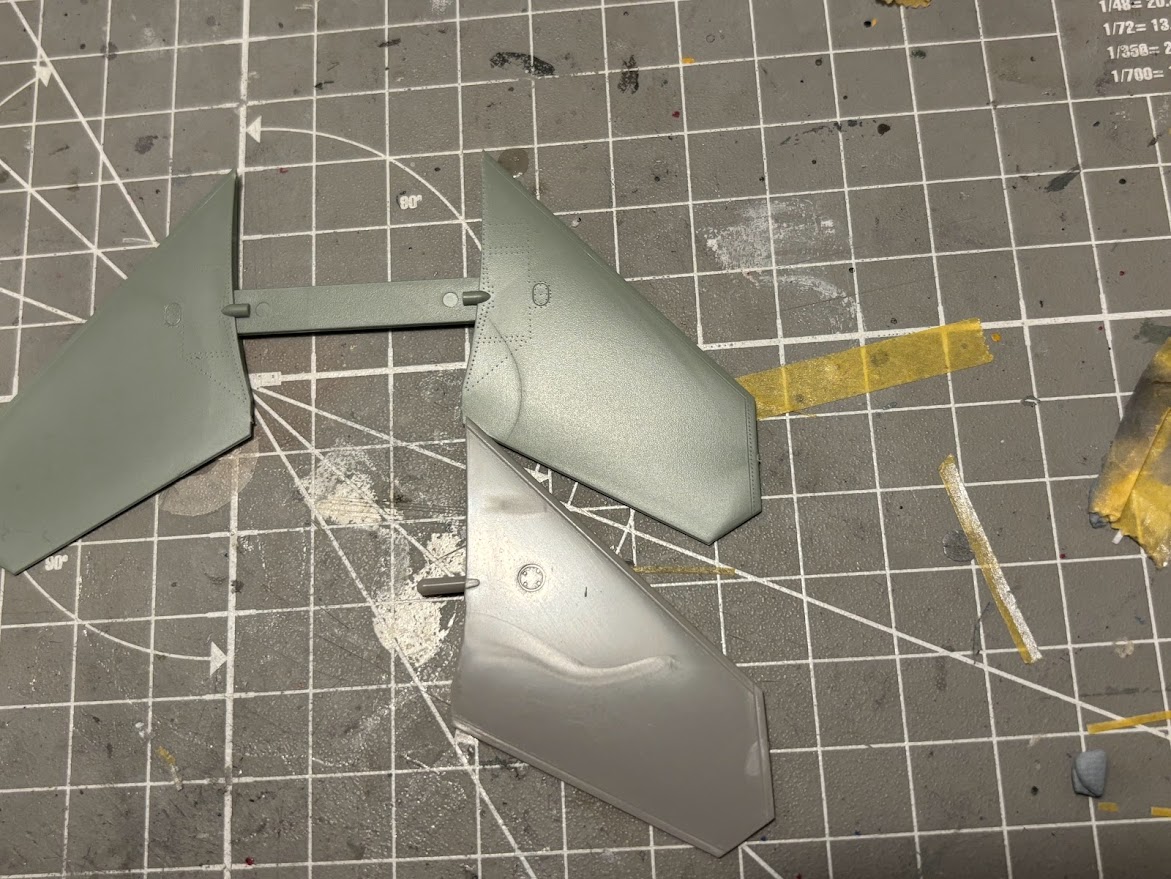
First thing to do is to cut the wings up. I have a way to do it with Hasegawa Super Hornets.
Academy is a little bit different, more in line with the Revell Super Hornet kits. Both 1/72 and 1/48. In some instances, the cuts are easier here than on a Hasegawa SH. Especially cutting out the small middle airfoil separate from the trailing edge flap.
Since I was at it I cut out the elevators from their support. Imagine my surprise when I found out that merely cutting of the rectangle tab isn't enough. The "pivot" is not round.
One thing I had to do was also to add a thin plastic to the wing part. I believe I used 0.2mm.
This does ensure a very nice fit on the upper fuselage.
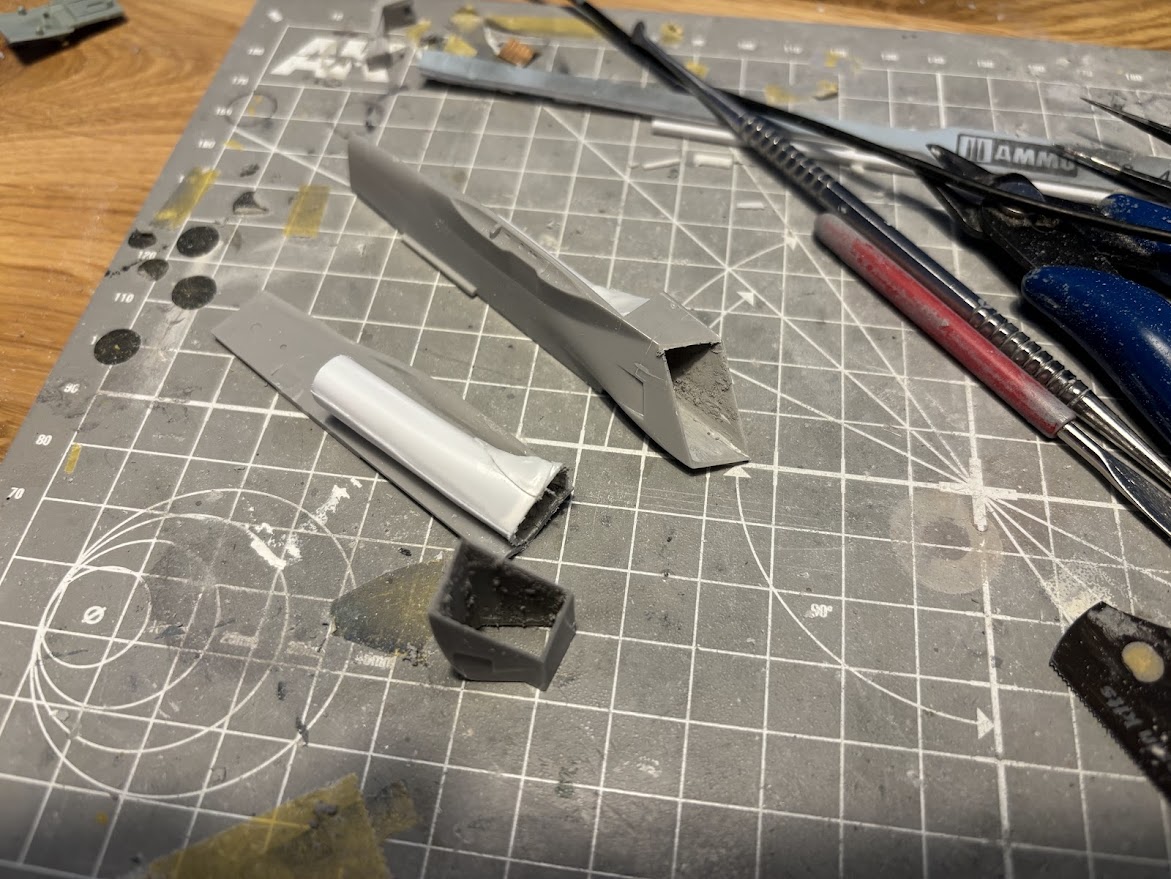
Now, onto the thing that I both expected and feared the most. My intakes. First I had to assemble the parts of the intakes. Now, I also needed to cut out a large chunk of plastic wall in the lower fuselage. I didn't take any picture of that. I needed to add a bit of filler to the upper joint, as the fit isnt the best there, and to the inner wall. Hasegawa made engraved representation of vents there. I don't like that, and if I was to use anything there I'll go with decals.
Now, on legacy Hornets I'd just use an appropriate tube of plastic card. Here however I couldn't figure out how to transition from round tube to square. I tried several options and I finally settled to do this the hard way. At first i wanted to leave the lower lip absent and just smooth out that area with putty. Something just wasn't right and I figured I'll have a lot of problems smoothing it out and then painting it.
So I took some random pieces of plastic and attempted to sort of encase the lower part of the front intake. The work here was very clumsy though. What I did on starboard intake was, after all my glueing has cured, I cut the front of the intake and started to fill all the inner imperfections. Next time I'll probably try not to glue the rear of the intake to the fuselage side. This will save me to have to cut the entire part in two. I'll just cut off the main intake part. Or try again to just insert a huge tube made of thinner more bendable plastic that will go from intake lip to the engine fan covers.
The end result isn't half bad for a first try. The intake tubes are long and no one will probably ever look at them. But now I have a more or less repeatable way of doing 1/72 scale Super Hornet intakes. As You can see, both intakes came out almost the same lenght.
And You'll have some hard time looking down that intake to tell that anything is there.
OTOH, Academy gives You this OOB. Neat. Much too short, but whatever it's way better than anything Hasegawa gives. It's going to be a bit of a pain to mask the colour demarcation there. I know there are these shrouds in the intake that are white that are supposed to keep the compressor blades from lighting up on a radar like a christmass tree, but this way all of the intake would be white. This way there is a bit of different colour deep down there.
Next up - cockpits!
Hasegawa gives You an option to make the canopy in open position. Academy, despite the lovelly detail - doesn't. Not wanting to let it deter me, and apparently not thinking too much, I took a razor saw and two cuts later here is the aft turtledeck of Academy SH. I had to fill the void with plasticard, but apart from that it was a hassle free job.
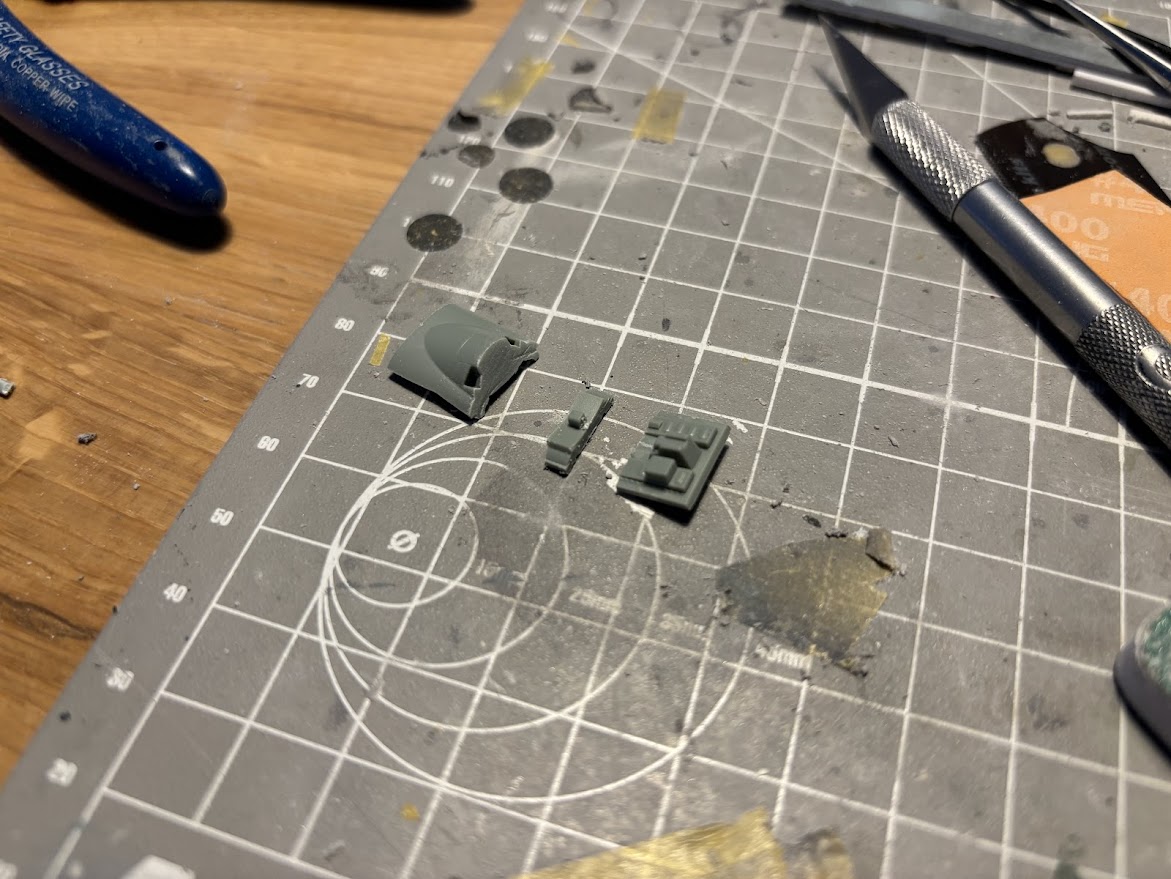
So... since I had an Eduard PE set for Hasegawa Hornet, I figured I'll use it on this build. Not too accurate, but I'll live with it. I'd have the same configuration for the Hasegawa kit with the kit decals anyway. Only thing I had to do was to paint the screens black. Don't worry I removed all the glue excess after I took that picture. It was still kind of fresh.
The colour I used here was Ammo fs36375. Probably the lightest light ghost gray. And it still was much darker than the paint Eduard used.
Academy got the regular FS36320 that I use instead of Dark gull gray.
Sooo. After almost 8 hours in the making, I'm almost ready to close the fuselage Academy build. Doing it without all the cutting and filling would shave me some 2-3 hours probably. In comparison, I managed to build a Hobby Boss MiG-15UTI from start to finish in a little more than 6 hours. So this will probably come out as a close to 20 hours build in the end.
Now... Hasegawa took me to get here a whooping 15 minutes short of 16 hours. Most of that time was probably on the intakes. Testing out all the combinations, filling, sanding, filling, and then sanding again. I might have forgotten a bit about filling. Or sanding. I actually got a bit fed up with all of this and started to look for a quick build to get my mind of sanding and filling. I keep thinking about a MiG-21 multibuild... And I still have a 1/48 scale F/A-18D to finish...
All in all most of the hard stuff is already done. Some tricky masking that I hate still remains to be done though.
Thanks for stopping by.
-
Lovelly work on the cockpit. It's gonna be a great build.
-
Hi there!
After completing my previous multibuild, a somewhat easy uncomplicated build, I wanted to build something more complicated. A double build of 1/48 F-16's came to my mind. I bought the kits, some extras and I was about to go to town and unwrap the boxes.
But I had a terryfing thought. I haven't built a Hasegawa 1/72 Super Hornet in almost 10 years! My gosh! One of my favourite kits of all time, probably the best 1/72 Hornet (legacy or super) allround. And the last one I built was that one:
built for the lovelly Hornet's nest GB here on ARC.
Since then a lot of things had happened both modellingwise and to me personally. Most importantly for this thread, Academy came out with a more modern kit of Super Hornet. And I've never built one before. Since I joined ARC for that group build in 2014, I figured I'm waaaay overdue for a Hasegawa Superbug. And I should include an Academy one and make it a double build. Will I still feel Hasegawa is the best Hornet kit in 1/72 by the end of the build?
Sooo, let's roll.
First, the boxings. I'd love to compare the basic boxings of both kits, but I have only one Hase Super Hornet at hand (and like 12 in deep storage I can't get to right now), but this one will do finelly. It's a special edition boxing, so it has the additional parts for the ACS rear cockpit, and the main fuselage has the newer ECS Bard Stack. AFAIK, Hasegawa basic boxing (the one with VFA-2 decals) doesn't have these, and it's a model of an early Super Hornet.
Academy has all the parts necesary for the late jet, including the longer wing slime light fences. No cut out petals on the exhaust though.
Both of these boxings can be built as the boxart jets, more or less accuratly. Nice.
Parts are sealed in a typical manner for both brands - Hasegawa in a single bag, Academy in multiple bags. I don't like the multi colour part feature, but it's what I got.
One thing I have no idea right now is what decals I'm going to use. Well. I am going to need some aftermarket decals for the Academy kit, that is for sure. I might go for the kit decals from Hasegawa. Some other options include the PE fret for the Hasegawa kit and a pair of ejection seats from Quickboost - don't know if I'll use them though.
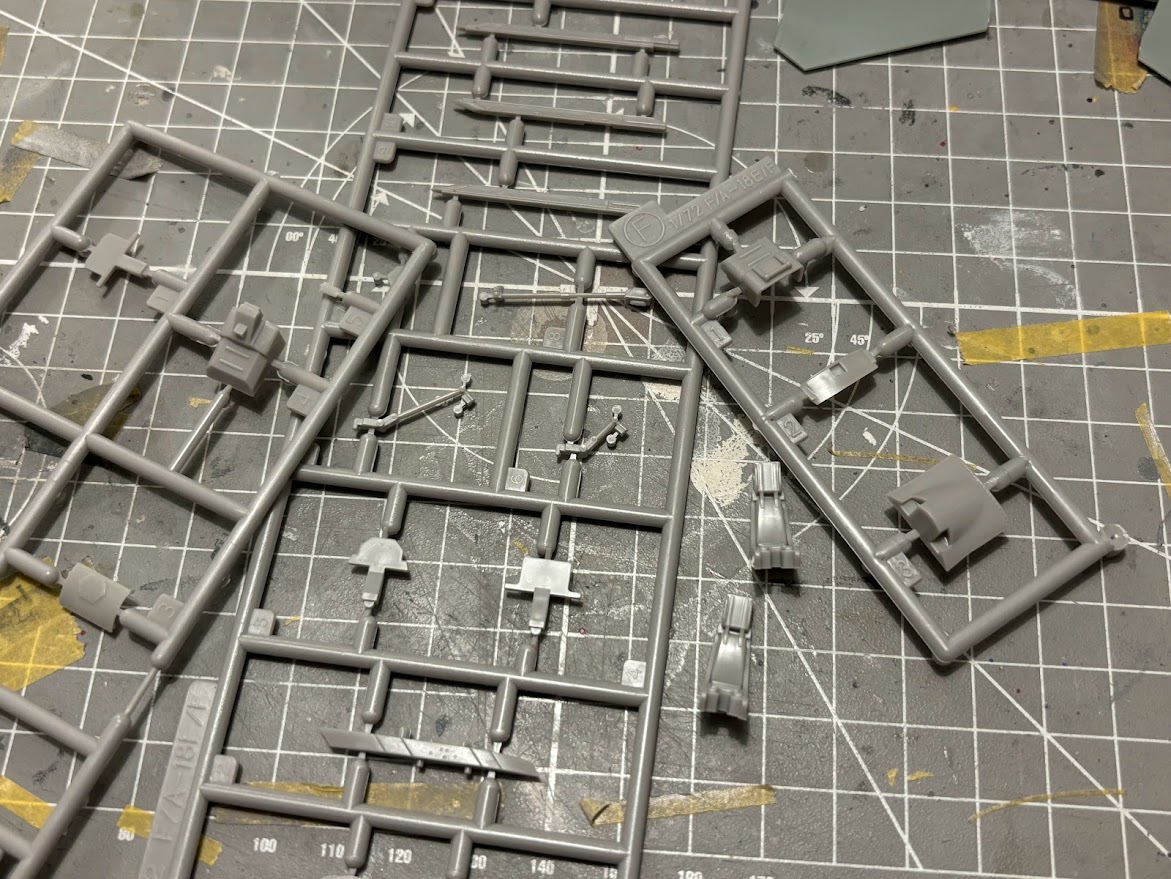
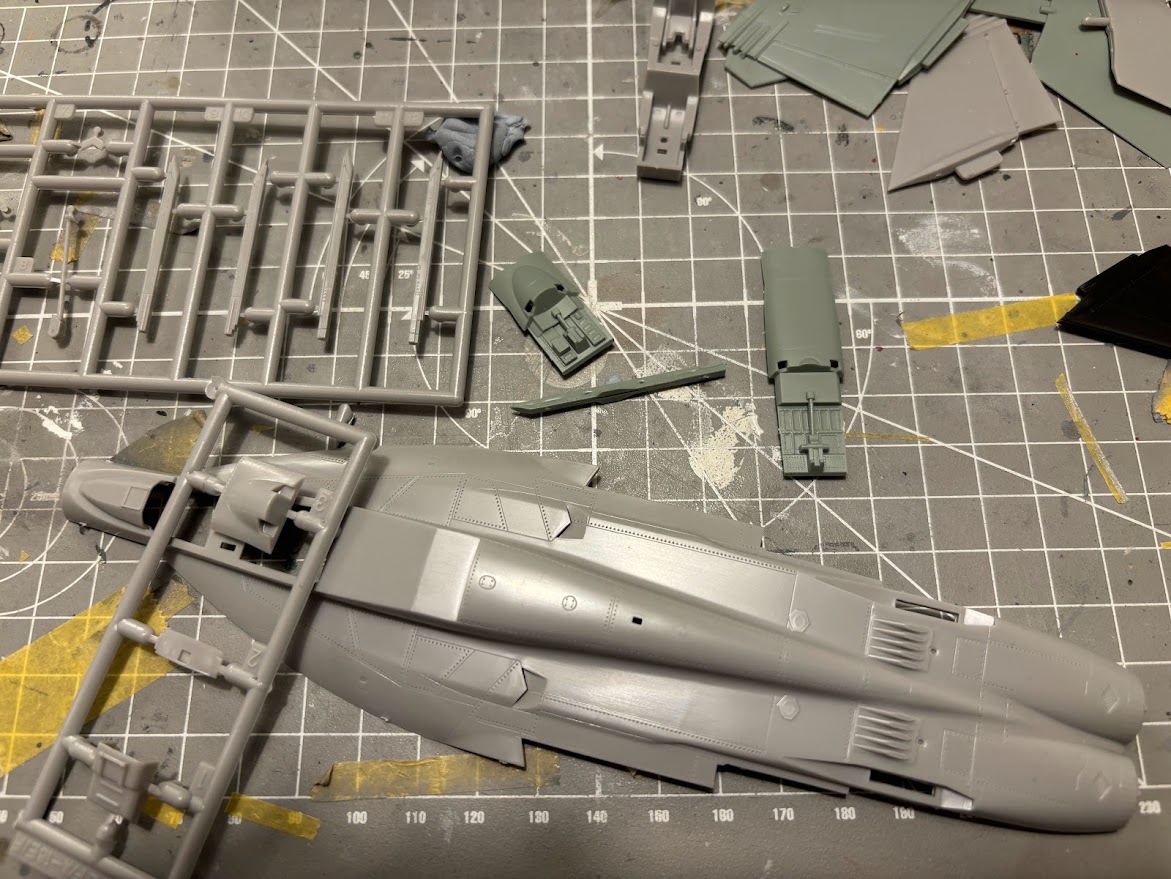
Kits...
For starters, both kits are cut up similarilly, with the top/bottom + nose parts. Hasegawa requires some more assembly. A few things of note, both kits are very similar in length, Academy features more panel lines and a quick look at some references say it has the upper hand here accuracywise. Spine is longer on Academy, as it should be. As for the spine outline, I'm still not convinced. For me, Hasegawa was always a tiny bit too flat. Academy feels too round on the other hand. I don't know yet.
A lot of differences in panel lines quality. Both wings feel very similar in size though, but the angle of the leafing edge looks to be significantly different.
Academy lines are much thinner than Hasegawa, and on the wings, much more accurate. Obviously, no flap down or wingtips up option.
Pylons, some differences here as well. But since these parts are mostly hidden I don't feel there is a lot to talk about here. Oh. Academy gives You six main pylons, two with fuel tanks and four without.
Bottom of the fuselage and wheel wells show the differences in approach. I feel Academy felt to make the best 1/72 scale Super Hornet possible, and make it snap tite. I have no idea how they managed to make it work, but it looks like they tried very hard, and might have achieved both of these goals.
Again, note the detail differences in Academy vs Hasegawa parts. There is a difference in thickness too.
Both kits feature nicelly detailed landing gear, again, with more details in the Academy box.
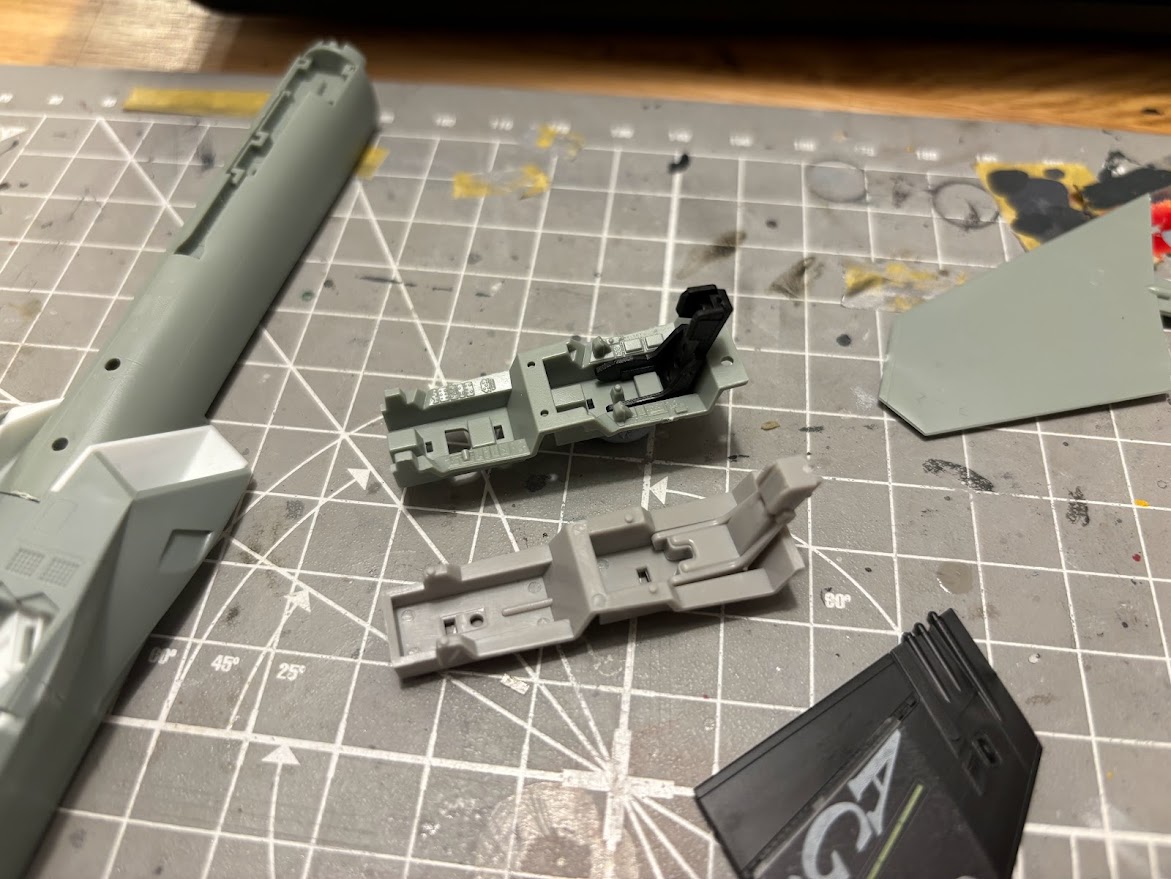
Now comes the part I can't really understand. The Academy cockpit is simply gorgeous. A lot of fine details, nice ejection seats.
And all that is covered by unopenable canopy. Wow.
In the other corner - Hasegawa. You get very basic, but nicelly molded cockpit "stuff". In this boxing You get both styles of the aft instrument panel cover. Only decals for the instrument panels, and You don't get the accurate ones for the aft IP. I didn't understand that in 2014, and I'm pleased to report I still don't. The parts are there. The jet has the ACS cockpit. Decals for the ACS cockpit exist (in Growler kits). I always liked the Hasegawa ejection seats. Oh, and You can pose the canopy open.
Again, the cockpit tubs show the difference in approach. Academy cockpit is lovelly even with these blobs for WSO sticks.
I like how You get stickers for this boxing of Academy F/A-18. Love the details on the fin.
Now, there isn't really much trouble in cutting up the Academy canopy and windscreen. It's doable with minimal fuss. What I find hard (for now at least) is coping with that cockpit turtledeck. The detail is lovelly - again much better than nothing, or Hasegawa's. But the closed up actuator and the quality of detail here make me question any attempt at opening the canopy. Some carefull planning is ahead of me, that is for sure.
Decals. Well, both sheets look nice, that is for sure. Hasegawa special editions often have additional markings for the ejection seat and some landing gear stencils. My Academy boxing doesn't have any. Although having built their F-4J Showtime 100 boxing and using kit decals I can't really say I'm going to use these ones on anything.
All in all, both kits seem nice. I've built dozens of Hasegawa Super Hornets and none of the Academy ones. This will be interesting to compare.
Both kits will have folded wings, as space on my display shelf is at a premium. I'm not planning on going aftermarket here.
Both kits I'd love to have with canopy up. It'd be nice to have a ladder, but in 1/72 You rarelly get that.
First cuts are done, some stupid decisions were already made and I'm pondering how to get out of a pickle or two. It's going to be so much fun.
One thing I can say for Academy kit, this really is a snap tite kit. An expensive, lovelly, hi tech modern snap tite kit. I've had a blast chasing my kidst with it. Shame there is no ready option for the closed gear door. Also, the stickers feel a bit too matte. The print is excellent though.
Thanks for stopping by!
-
Nice start. Great motivational pics for the build. I was looking at the Academy Hog for a while if I ever was to build a Hog in 1/48. The Hobby 2000 boxings are indeed much cooler.
-
Oh... I kind of forgot to update this thread.
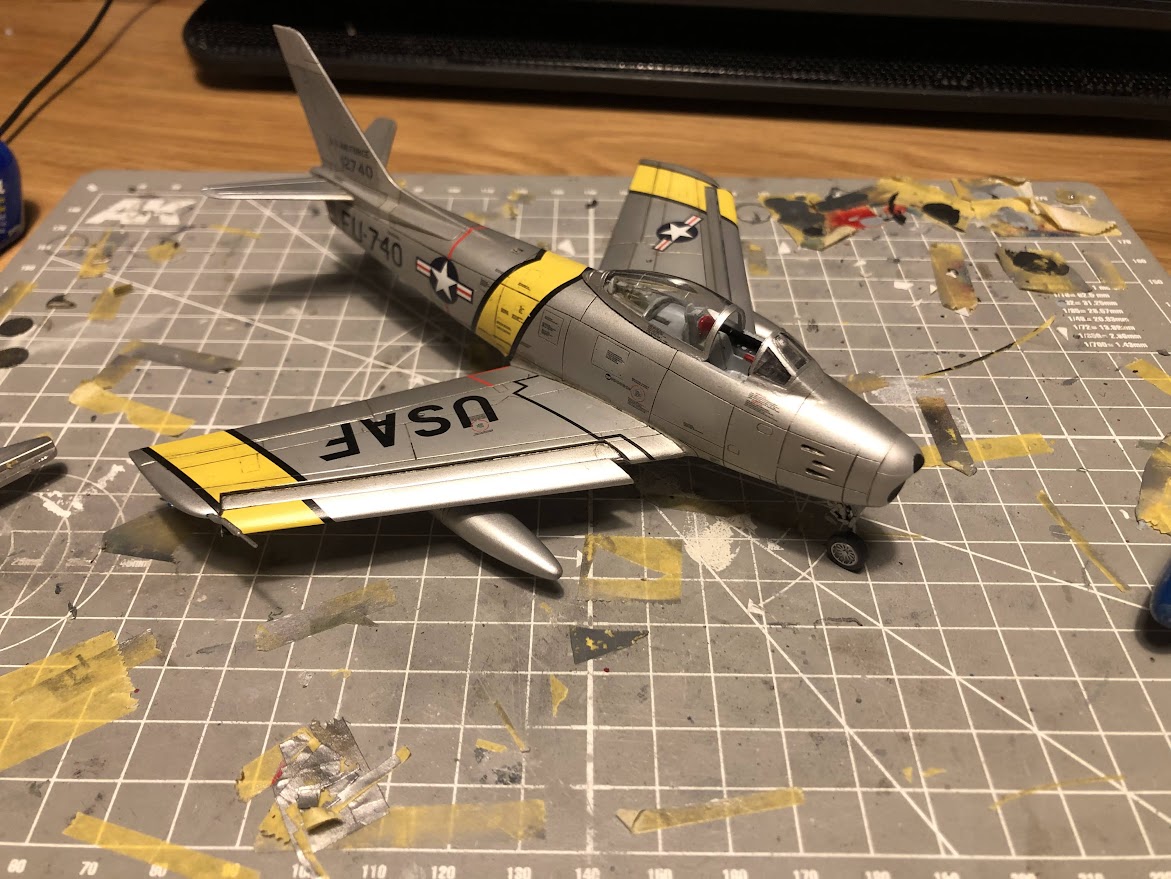
Academy Sabre, once I closed the fuselage was a pretty straightforward build. I did fill some gaps by the cockpit, since they were quite big. In hindsight I should've just added a plasticard piece.
Some sanding was required. Most of the work was around the nose of the aircraft. One thing I managed to screw up were the slats. As You can see, I glued them wrong. Fun fact, this was my "fix", as I thought my previous position was off.
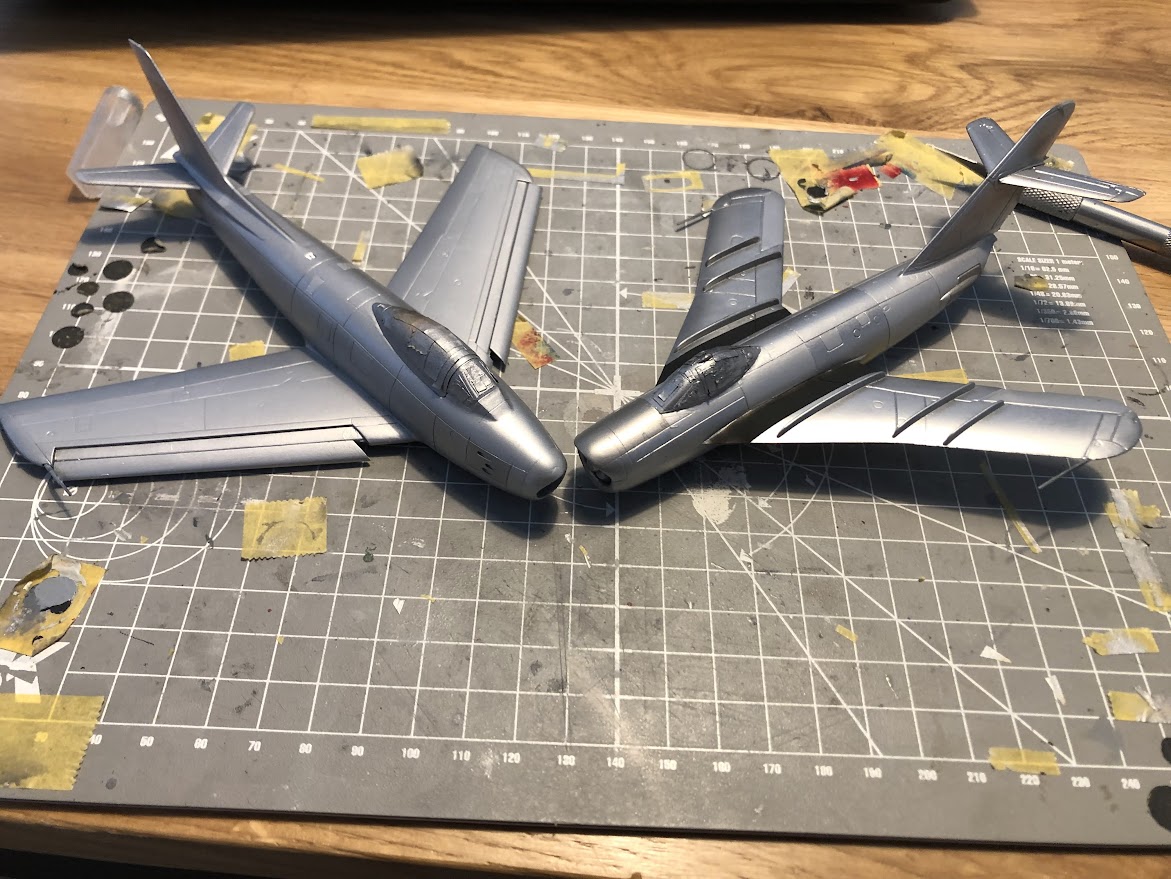
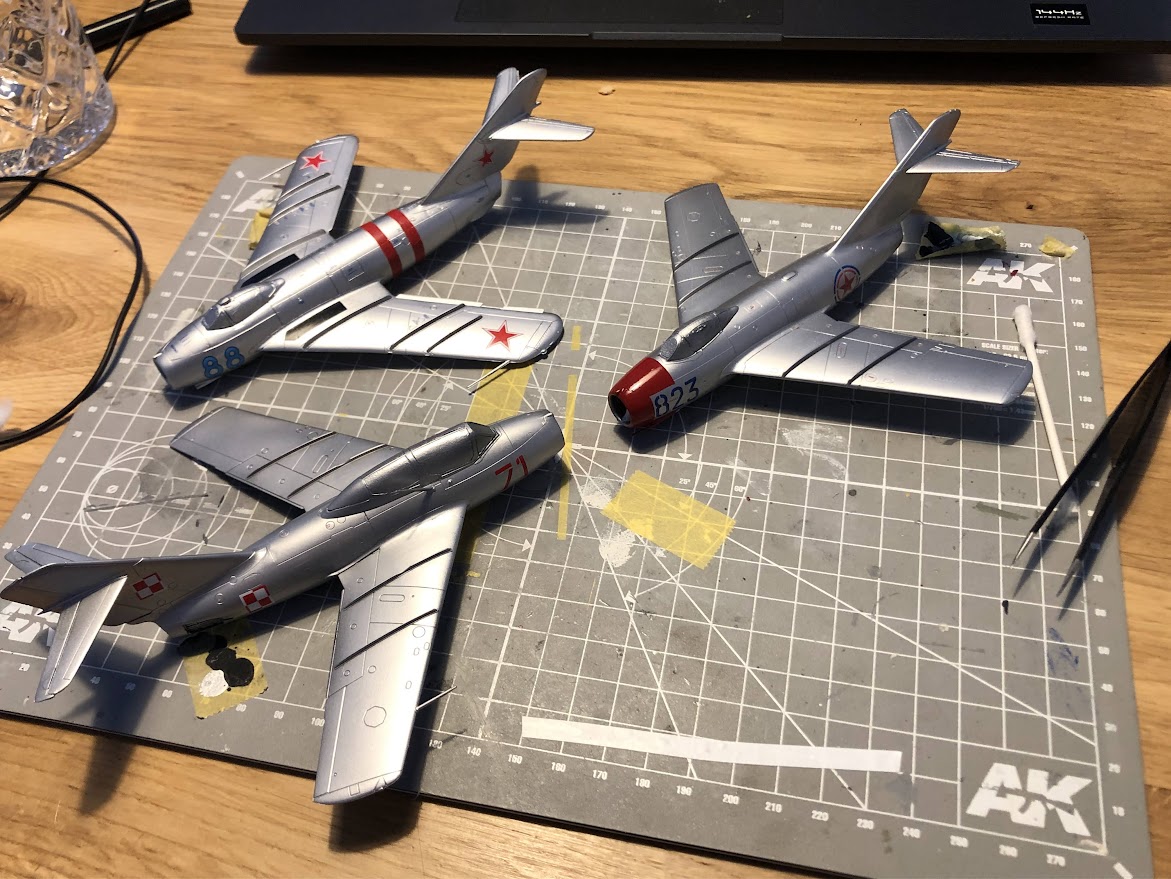
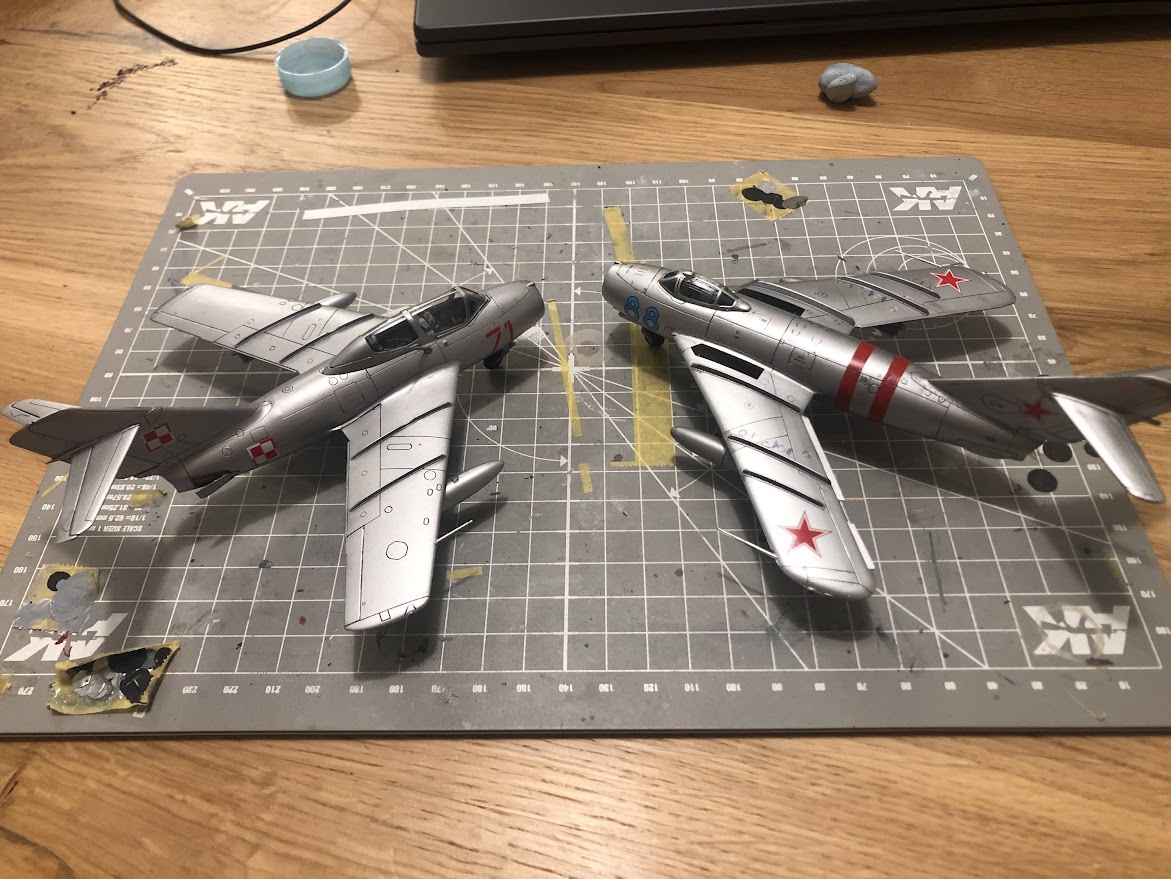
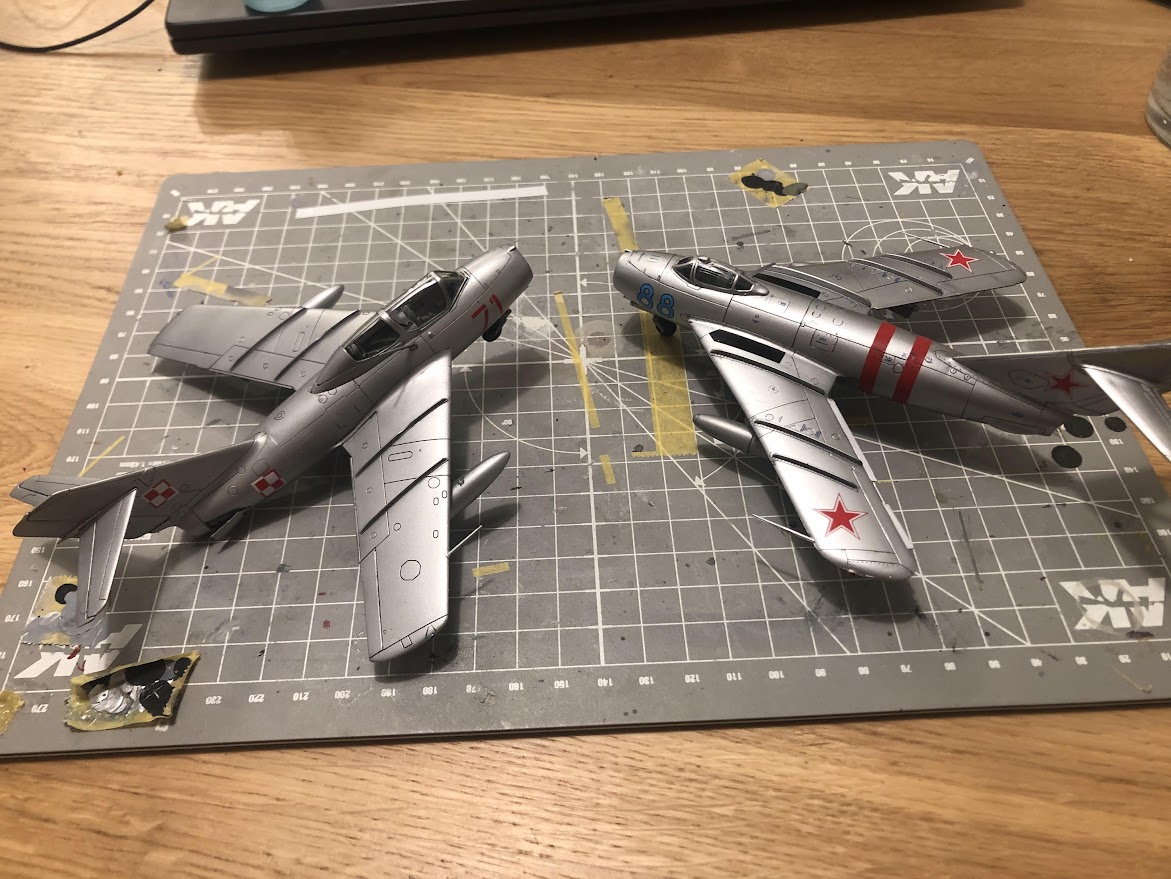
Here's the MiG-17PF and F-86E sprayed silver. Ok, actually, they both are sprayed Vallejo Metal Color Aluminum with some white Aluminum highlights. What I did differently on both jets, the Sabre paint was thinned with Vallejo thinner that pretty much killed all the shine on the metal. It came out lighter too. The Aluminum and white Aluminum paint was almost the same. So I added a bit of white to the white Aluminum - that made it more opaque.
On the MiG I used Tamiya X-20. As You can see, the colour looks differently. The lighter shade of Aluminum is just white Aluminum.
I really struggled to get this discoloration. The metal flakes also look much larger and the paint was more coarse in touch than on the MiG. It didn't really dry any faster with Vallejo thinner.
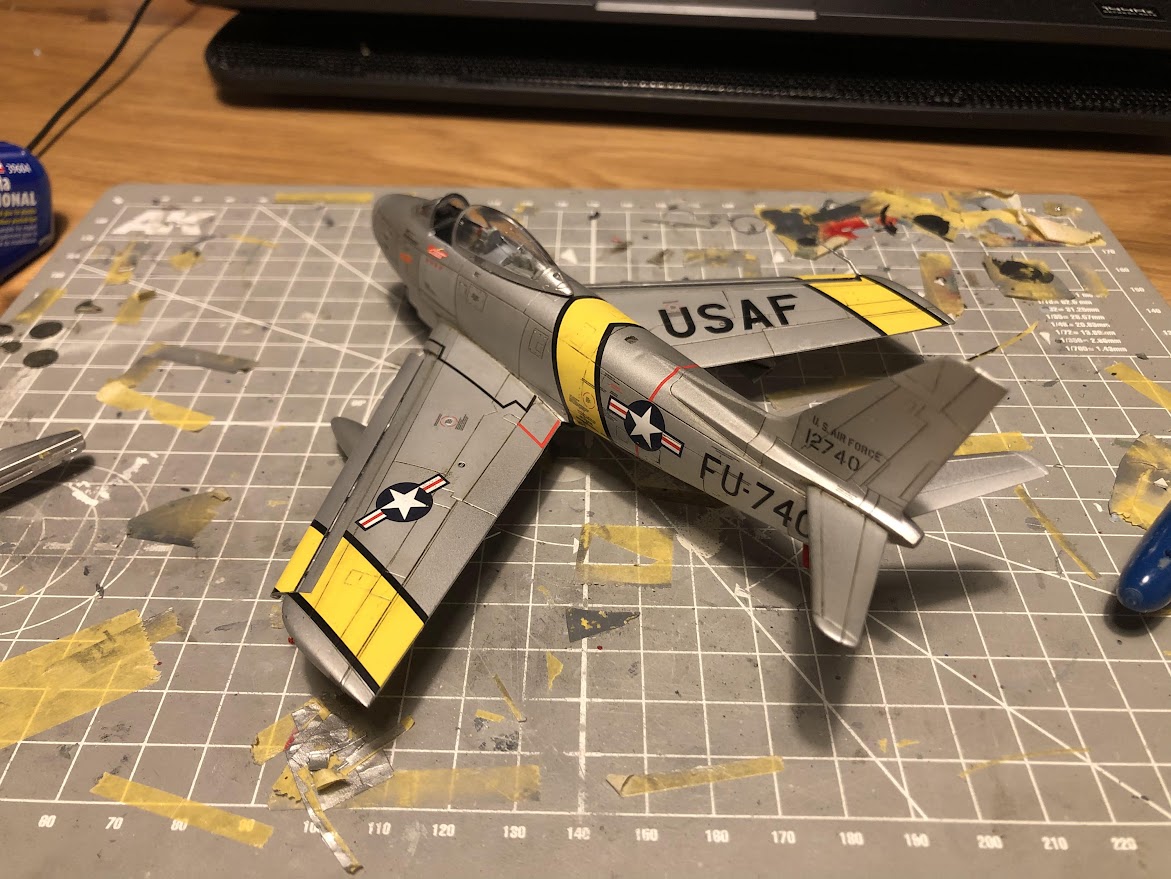
Here's my F-86E just after I added the last detail. The kit was a pleasure to build. I appreciate more the lines of the Sabre now. I also see why the F-100 was called a Super Sabre, there are so many features similar to the F-86. I could see myself building more of this kit. I just don't have many more schemes I'd like. One thing I don't like about this kit is the windscreen. I've had some trouble masking it to make the frames of the windscreen reasonably thin.
Cartograf decals were excellent. Although I can't tell if they silvered 😉
Next one up was the MiG-17pf. Well... that one took more time to research than to build the thing.
So as I wrote I wanted to build a MiG-17pf from the 1968 timeframe.
I had decals for the Czechoslovak AF MiG-17pf HF-13. I thought, fine. I'll build it as is. After doing some research I found some artwork of "my" MiG with red radome. I figured it's super cool.
https://www.valka.cz/MiG-17PF-HF-13-t52753
On that site I found info, that HF-13 was scrapped 1969, so I figured it was flying as late as 1968.
On the pictures the radomes didn't look similar to, say, the roundel red colour.
I also found that at some time Czechoslovak AF started numbering their arcraft with a 4 digit bort number. That was applied to the MiG-17pf's as well.
Czechoslovak AF did that right untill the "Velvet Divorce" of Czechia and Slovakia. So I guess the "HF-13" bort number was probably an early thing.
Well. I found another site: http://forgottenjets.warbirdsresourcegroup.org/Fresco.html there
there is a full list of serial numbers of MiG-17pf's and some, from Czechoslovak AF, have the "HF-??" number, but have the four digit number.
So figured, the HF-13 might have been an "1013". Quick search on the first site didn't confirm that theory but I figured I will go with it.
https://www.armedconflicts.com/-t52751
So, after painting the radome red I figured I'll repaint it and attemtp to make a number "1013" from spare decals. Oh boy that was pretty hard. I found out I have very few "3"'s and none of my "0"s are of similar height. I was almost desperate enough to purchase Smer MiG-17pf (apparently, a much better kit accuracywise) for the number "0203" but that bort number was decomisioned in 1967!
https://www.valka.cz/topic/view/52747/MiG-17PF-SP-7-0203
So in the end I just took the "3" I had and called it a day. The "0" was cut up from a larger decal and assembled on the model from four parts.
All in all, I'm not too happy with the overal outcome. I like the panel discoloration. But the canopy frame is a terrible work. Luckilly, I managed to get some dust inside the canopy. Every line was rescribed. I don't think I will ever build another one of this kit. I'll just go for the Smer (original Kopro). The radome nose is jus so much better in that kit. Here, despite my meager effort it looks anemic. The inside of the intake looks too tall and the panel lines needed to be rescribed anyway. I might just start with better parts I guess.
I am however glad I have this one on my shelf. I'ts one of the remainders of our recent history for me.
it was fun masking all the panels and spraying them different colours of Aluminum.
Thanks for stopping by! Untill next time!
-
I don't think it comes down only to scales. There are strict prop modelers, AFV ones and so on. I for one am mostly a 1/72 jet guy. It's nice to see how different aircraft look next to eachother. Both because of the size comparison but also features. Placing an F-5e next to an Su-24 puts things into perspective. But from time to time, its fun to build something slightly different. So I go into 1/48 and even once wandered into 1/32. Again, a 1/48 F-16 and 1/72 Su-34 are quite similar in size.
It all comes down to the subject for me. If it's Hornets, I'll build 1/700 to 1/32 provided I can get a half decent kit. For everything else except 1/72 I need to have an idea for a build or a nice model I'd like to build. So in 1/48 except for Hornets I got myself Tamiya, Hasegawa and Kinetic Vipers (and I even built the Italeri one too!), got a T-38 from Hobby Boss and an F-5F from AFV, plus a few F-14's from Tamiya and a couple F-4's from Academy. Initially I wanted only 12 1/48 scale models -
one for each colonyfor each shelf of a display case I got. Loved the idea of a single model per shelf. -
As I wrote earlier - I managed to finish the Hasegawa model. After more than 67 hours of work over 2.5 years.
Of course I overdid the weathering. The streaks on the upper wing surfaces should either not be there for my timeframe, or should be much lighter, assuming I depicted the jet mid-cruise.
I am very happy with the grays however. They look right to me. A tiny bit too blue perhaps. I'll make some comparison shots in the future.
This is as close to natural look of the model as I could achieve. On a sunny day in my kitchen.
So... next stop I guess will be the VFC-12 jet. Pretty cool...
Thanks for stopping by.
-
Thanks Holmes!
So. I actually finished the kit. But with some personal stuff happening I wasn't really into posting things or frankly keeping track of every step.
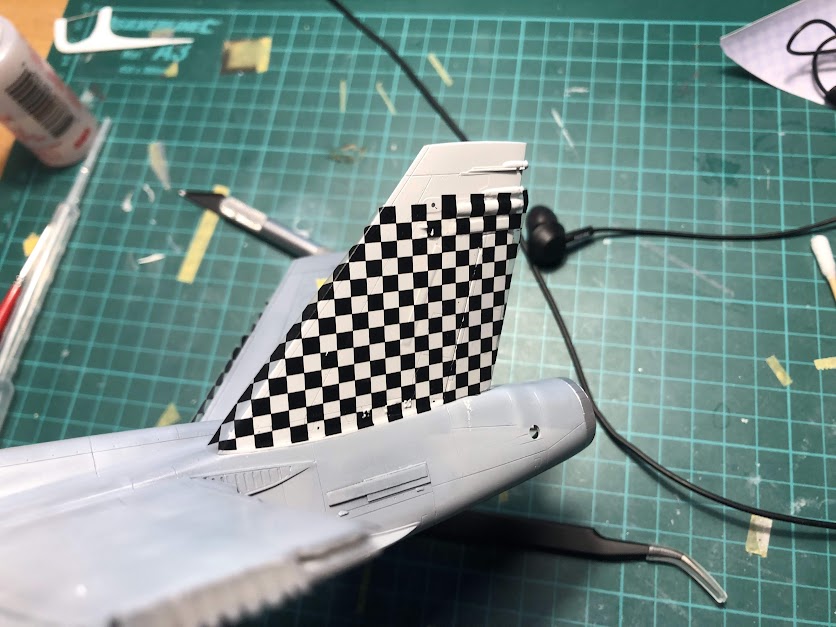
So... the tail fins almost cost me my sanity. See, apart from all the troubles with checkerboards, red and yellow trims, I knew there would be trouble with opacity of the CVW tailcode. After a few not so brilliant ideas I came up with something I figured will be easier. I will make a white background for my decals. I copied decals on my printer, and masked around the masking tape. I thought of cutting the shape, but this seemed a little bit easier for me. After each letter was complete I detached the masking tape from paper and put them on my cutting board.
After all the letters were done and just prior to spraying white I transfered my stencil to the model hoping I'll manage to place them more or less evenly.
The checkered area was gloss coated before, but still I lifted tiny bit of slime light during tests. So I had to invert the masking tape, so that the tacky surface was facing out.
I couldn't spray thick enough coat of white paint, but that much I figured would be ok-ish.
and voila! more or less. Next time I'll have to make the masks a tiny bit smaller than the letters. You can see a little bit of white just by the 'C'.
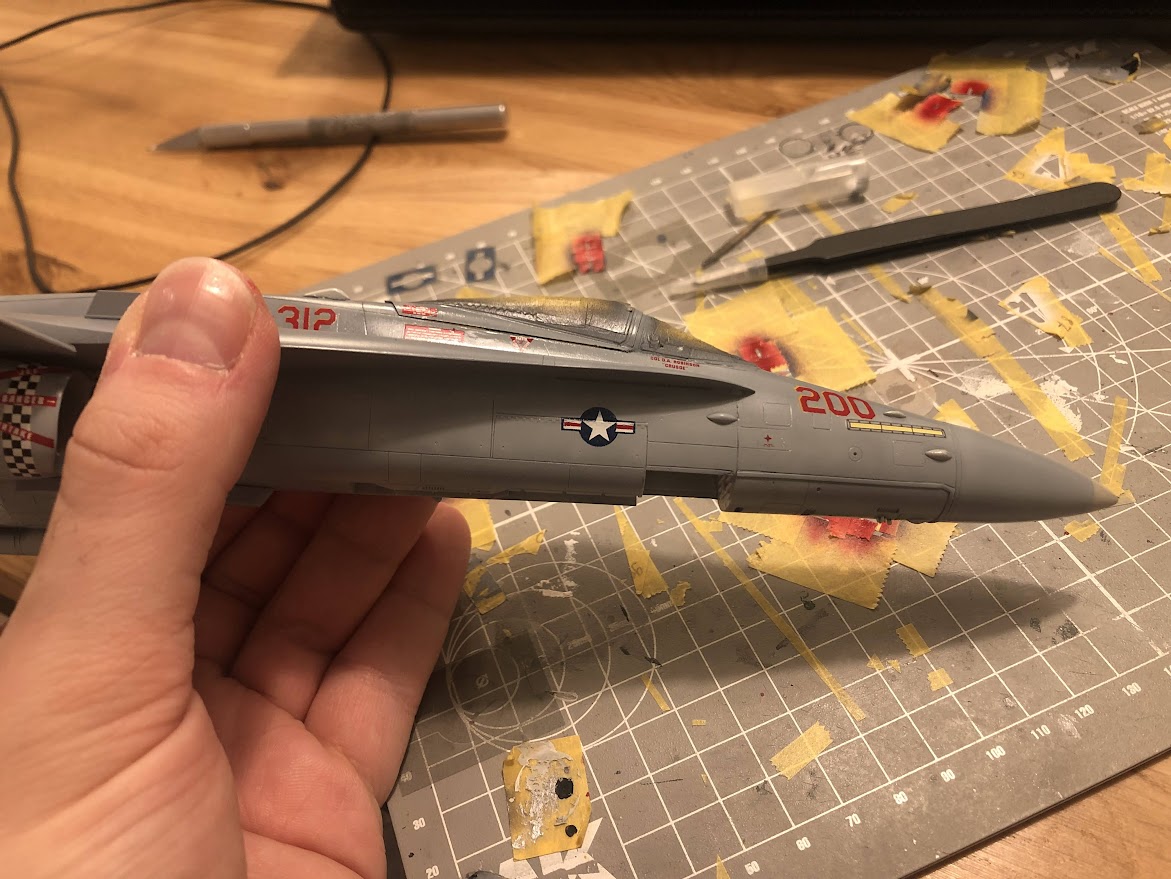
Next thing troublesome were the national insignia. See, Authentic Decal used too big star and bars - they should be a little smaller than the ones usually applied to Hornets. Or perhaps that is just the new standard size. They should be similar in size to the Kinetic F/A-18C ones. I found a single old 1/72 Fujimi F-4C decals that had stars of similar size. I just didn't like the cream white colour.
I couldn't find any decals of appropriate size available in my neck of the woods. At least not ones readilly available. But I figured, paint masks seem to be good enough. So I got some from Armycast. There are a lot of different insignia sizes. I chose one of the smaller ones - 12" or 10" I believe.
Now. I've never used such masks and frankly, I had no idea how to work them. I applied each layer, beginning with white background.
Then I took all the rest of the mask set and transfered it to the already placed mask.
If You want to do this, I suggest don't. It's a pain in the rear, and at this point I figured I just should've stuck to decals.
Eventually, three out of four markings came out mediocre, and one came out crooked.
They look much better from afar.
This is the worst one. I was so fed up with all this stuff I just left it as such. Frankly, I probably should've put the insignia to the edge of the electronics bay panel. Somehow looking at pictures I figured I should put it more aft.
So... about the decals. Well. They look ok-ish on the sheet. However, there were some trouble applying them. One should coat every decal with decal film. Just in case.
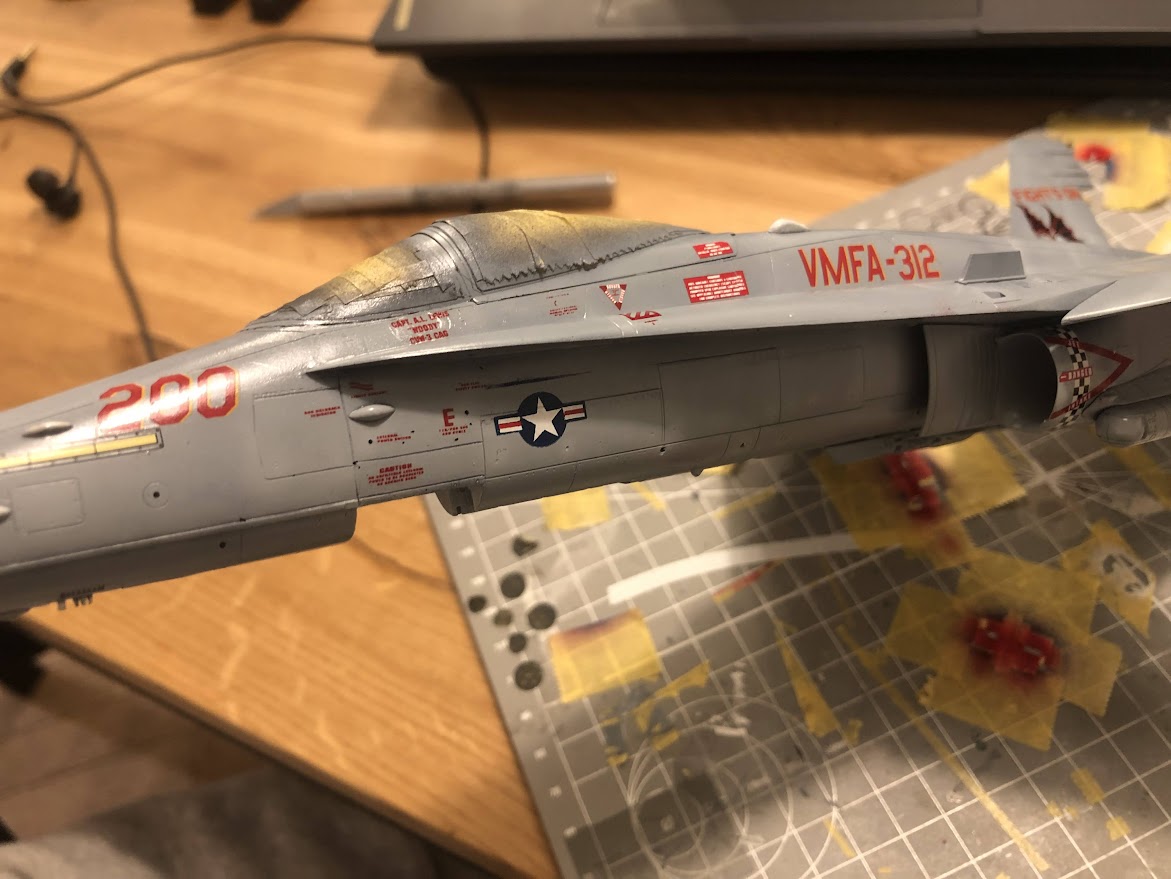
Another thing, red decals usually don't want to conform to curved surfaces. And the 'MARINES' decal didn't want to conform to my strengthening plates. Not much I could do with Micro Set and Micro Sol. Some of the decals are of wrong shape. For instance, the 'CHECKERBOARDS' decal has letters that are too short, some of the lettering on the stencils are too big - You can see that by the left national insignia and gun ammo door, same applies to the elevator position triangles. I also feel the intake warning triangle is too long and too wide, with arms being too skinny. I also feel the checkerboard tiles are a bit undersized. Perhaps they should be 3,5 mm, not 3,4 mm. You can see that by the position of the red trim on the tail and the red position light. It's almost at the line.
All in all, this is the only option I know for this scheme.
Next up was weathering and matt coat. I had some little trouble with attaching gear legs and gear door actuators. And I wanted to do that before the final coat, so the matt coat would even out any glue spills I'd have.
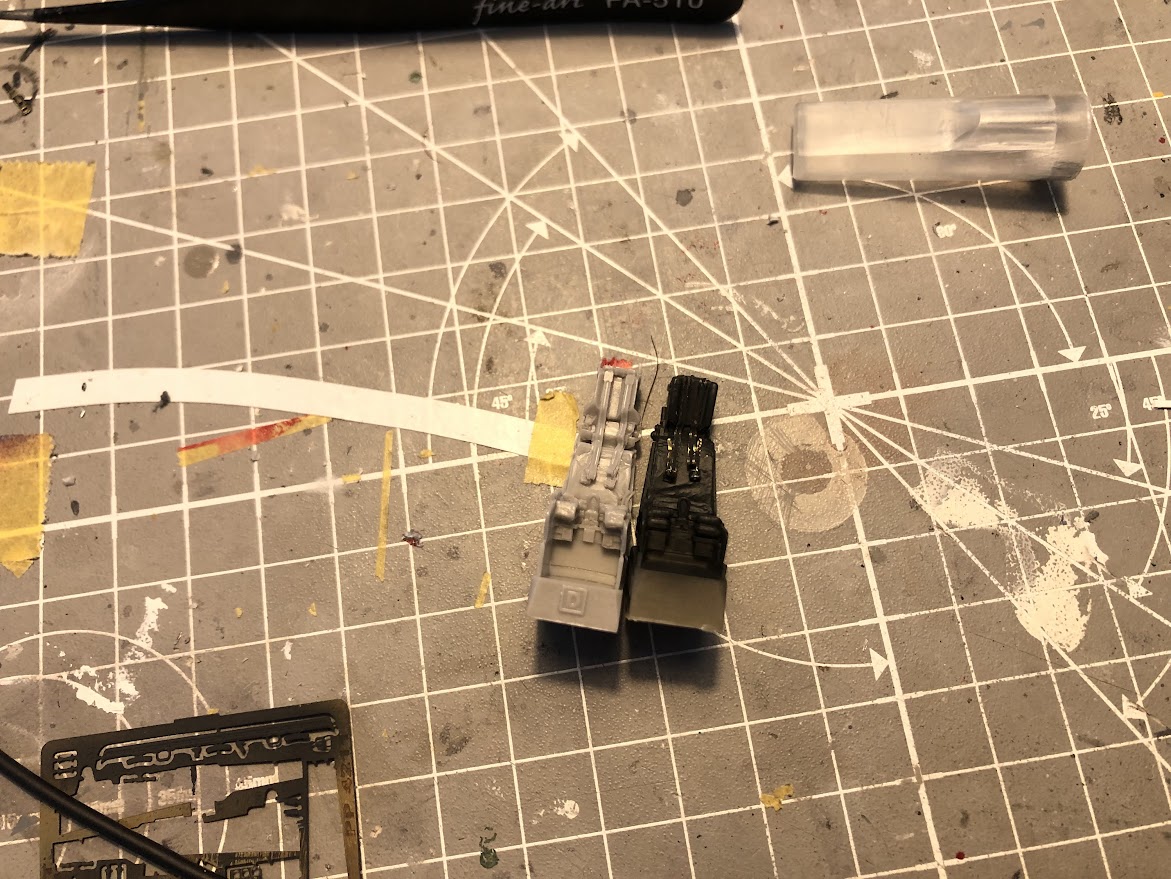
After that, there was some finishing cockpit work. I replaced the Aires SJU-5 supplied with the resin cockpit set with Quickboost F-14D seat. It fits almost perfectly. Good thing too, as I really messed up the upper seatbelts and harness.
Next up - finished pics.
-
That's looking like a very nice Tomcat.
-
-
On 2/25/2024 at 8:49 PM, BastianD said:
The moment you discover that the front control stick is still tidy attached to the box with parts, and the canopy is glued in place … 🤦🏼♂️
Anyway, it could not have been seen after all so no big drama.
Oh, I've seen that one. There was this bald guy that controlled it with his thought. Or was that dirty Harry in a russian jet? It must have been on tv, so it must have been real.
Restoration is looking pretty good.
-
Not well thought of... I guess this could be my idea of a theme for this build. I have dusted off my Inkscape skills and done a few of proper checkerboard decals, plus some mesh decals for the gun gas vents. So all I need is a printer. And decal paper. So armed with that I tried to remove the decals. Not a lot of success.
This gave me the idea - Since I will probably have to strip paint and repaint it, I might try and fix the mess I have. I quickly cut a few 1.2 mm strips of paint and attempted to mask the outermost rows of squares.
While I was at it I painted the addidional row of squares on the undersides. And fixed a few larger squares.
\
Ok, I admit, in person it looked a little better. I can see a few places I might need to mask and spray black.
On the other side I've found out I painted the colour trims a bit too far apart. I can see that I probably placed the lagre checkerboard colour a little too low as it's how I measured the position of the red trim...
Some tiny repaints are in order as well.
So in the end I might not need to print decals afterall. All I need to do is fix a few squares here and there. The thickness of the checkerboard decal seems now to be the least of my worries, as I tried to apply the rest of decals. They are quite non-conforming to curves, some will not stick. So I guess at least I'll have consistency in my decals.
I'll post a proper update about decaling when I finish.
Thanks for stopping by.
-
So... I got myself a nice multi sized cutting board. For squares from 2 mm to 3.5 mm. Apparently the squares on the Autheitic Decals sheet are 3.4mm. My paint layer apparently didn't cure well enough as the masking tape was showing some residue. A little bit which may be just some glue trace that would go away after a gloss coat.
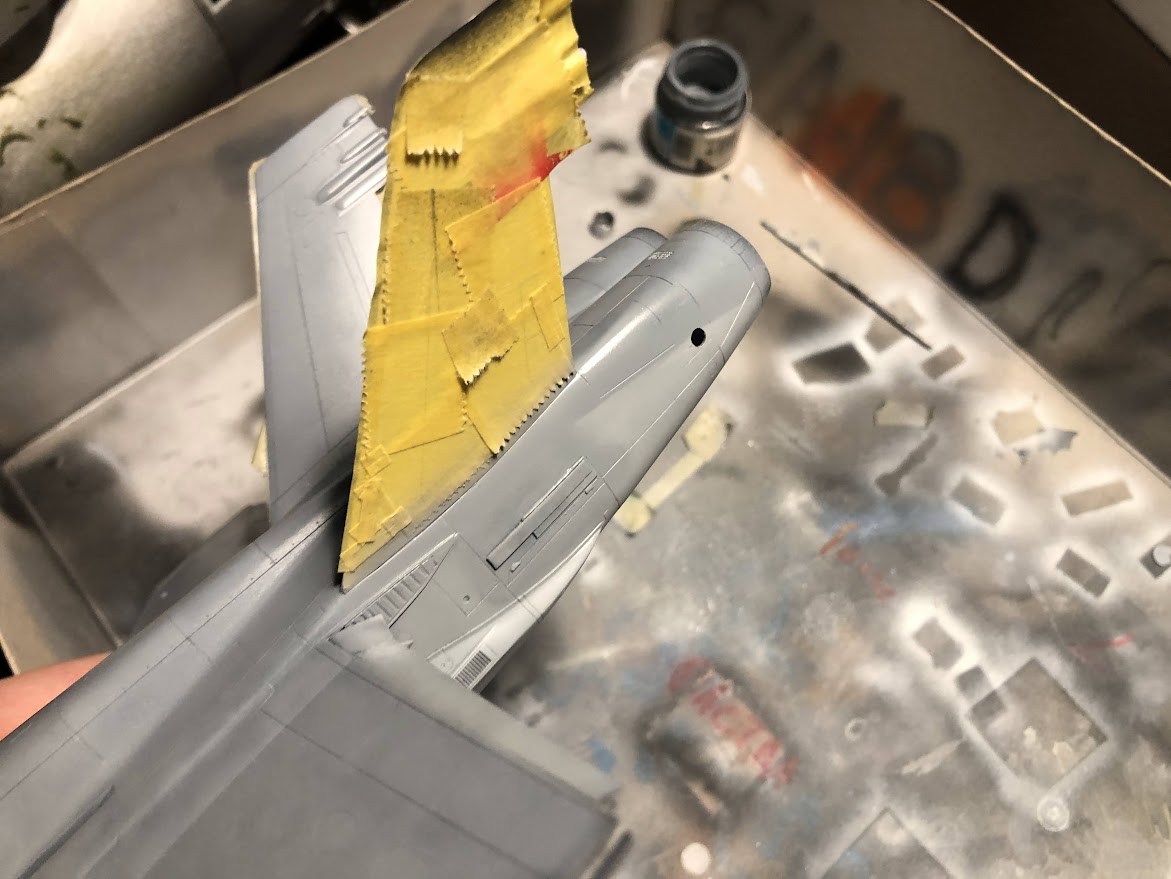
But I decided to go with decals. First decision try the tip decals or the checkerboard. I went with checkerboard.
They tore a bit, but I didn't want the main decal coated over with clear decal film, as it was already quite thick.
Eventually I managed to put down both of them. Not the best But I could live with it. There will be some masking and painting required as I struggled to apply the decal as it appeared on the actual aicraft. The decal angle didn't correspond 100% with the Hasegawa leading edge of the tail part.
There will be some work needed on the lower area of the fin. Let's call it passable - so that's a win right?
I did apply my usual decal coat on the coloured checkerboards. I don't know what happened (that seems to be the theme for the tail of this Hornet) but it broke in a few pieces, with some of them simply geting disintegrated. I was going to overlap the decal in the middle, but it also tore at the back. Frankly, I don't like how the entirety of this checkerboard thing looks right now and I'm not sure I can fix this. Also, notice how transparent these colours are. I should've gone with these decals first, then apply the large checkerboard. This way I could have removed the toom long squares. Not enough planning on my part I guess.
But this also shows, I'm going to have a huge problem fitting the CVW tail code. Even bigger than in 1/72.
Right now I'm not sure what to do with it. Options seem to exist - I can try and design myself checkerboard black decals and print them, or I can strip the whole thing and repaint it white with thicker paint, and then try to mask it again. That is quite a lot of work though... And lining up all these squares isn't really what I'm good at. Apparently.
Thanks for stopping by!
-
Second for the Night Hawk.
-
Nice project. It's looking pretty good. For the dry tip on Vallejo, they have a paint retarder that slows drying time a bit.
-
Yesss Yess Yes. I have become a man. I know fire... Hold... I know fs 36320.
After some careful deliberation I figured I'll stick with Gunze H307 as a top coat. After careful calculations I cheerfully guesstimated the mix of white and gray and added literally a 1/4 less of it.
That pic came out quite light. IRL the demarcation line is a bit more visible. Here i did it freehand, while on the rear fuselage I used elevators as masking templates.
And You know what? I did not like it. So I took what I had left in the jar, added a lot of thinner, added a little bit of white paint and misted the entire model. Then I added some more white paint and I did some more touchups. And I guess I found "my" own way of painting a Hornet. I might have gone a tiny little bit overboard with all the highlights and touchups. Just a tiny bit.
See the difference thouhg? I love how darker the dark ghost gray is in comparison to the light ghost gray. And it's not purplish blue just blue. Still, not the hue I'd like, it seems to be a little bit too blue for my taste, but I guess that's just Gunze ghost grays. I know I'm being full of myself, but it's a massive win for me.
And... well... I effed up massivelly on the white. I used Tamiya X-2 white straight over the black. I figured it would be better to paint white first and then mask it. I waited 24 hours before masking and everything seemed fine. But it wasnt.
At first I thought this was tape residue. I've had some very rare ocasions in which Tamiya tape left some residue on the clear parts. It was a bit sticky and everything.
But it didn't go away with the soapy water.
Well. Apparently that was the paint. I sprayed several very thin coats of paint. And It must have not dried properly on the underside. After I applied masking tape it stuck to it and roughed up the paint. Well, now I know. Wait longer with Tamiya paints.
I was going to take a while off after that. But just on the next day I decided to re-engage. After I wet sanded most of the paint I chose to paint the stabilators with Gunze H316. It's not a perfect job but short of stripping everything it seems to be the best I could do.
I might go over this with some P3000 wet sandpaper. Since I was at it I painted the metal parts - I used Vallejo Metal Color aluminium for the exhaust rings and Vallejo dull aluminium for the gun muzzle panel.
What I also did I masked the rings with tape I had just used on the white. Trully brilliant move on my part. Luckilly for me most of the white paint on the tape had dried already. So, some touch ups are required here.
Ok, one massive win, one large loss and one stupid mistake seems like an ok win to loss ratio. Next step should be decals (after a gloss coat). But I used Authentic decals for the VMFA-312 jet in 1/72. And I still remember they silvered quite badly when I built three 1/72 Academy F/A-18's. So I might mask the black checkerboard. Not the thing I'm too happy with, but I guess this is the only place I can actually save myself from using Authentic Decals decal sheet. It's not an easy task cutting out a hundred 3x3mm squares. And making them all even. And applying them evenly. I'll have to get myself one of these metal cutting boards. I've used one for the circle templates and it worked more or less as advertised.
I hope next time I'll come around these parts I'll have a nice black and white checkered tail on my Hornet.
Thanks for stopping by!
-
On 1/6/2024 at 3:16 AM, speedlimit said:
Nicely done!
Thanks a lot!
On 1/6/2024 at 9:50 PM, phantom said:looks good!
Thank You very much!
I'm still in the game. The Hasegawa and Hobby Boss Hornets will not build themselves.
I've decided to go with Hasegawa first.
But before that, I wanted to do some color checking. Apparently it's something I'm doing all the time now.
I migh have mentioned, My favourite colour for the 36375 and 36320 was always Pactra colours. Very similar to the old Model Master Acryl paints, but I feel a touch lighter. So I bought myself a jar of each, tested it agains the Hataka and Gunze colours, as these I had readilly available. I don't like the blueish intensity of the Gunze H308 and H307, and I always feel they are just too dark on the model. So I took my favourite 3x3cm plastic cards and painted them Tamiya Nato Black.
And I have to say, I was a bit surprised. From top to bottom - Pactra, Gunze, Hataka. Left is dark ghost gray, right is light ghost gray.
Apparently, Gunze colours were the lightest of the three. I went through my notes, and I usually added a drop of two of white to the Pactra paints. But then I kind of got it - I didn't use black basing back then. So basicly, what I found out (and what I should have figured out without testing) is that my painting technique causes problems I was having. Because of the black base and marbling I had some cool effects on the paintjob. But in order to preserve them I had to spray the base paint quite thin and add many layers leaving some of that black visible for the effect. It also accentuated the blueish hue of Gunze paints.
So my task now is to attempt at matching the colour of the chip to the actual model. I did kind of achieved that by using mixed H308 and white. I guesstimate I mixed 1:3 of the white to gray colour. In this lighting I really liked the effect.
Light ghost gray chips - from left to right Hataka, Pactra, Gunze.
To contrast it I migh use Gunze H307 with no white... Although the Pactra colour seems pretty nice to my eye.
Top one is Gunze, bottom is Hataka, right one is Pactra.
Well, next stop - dark ghost gray. I must be crazy to like this...
I suppose what would help would be to paint the entire model 36375 and only then paint the topside 36320. Of course, what doesn't help in anticipating the final colour is that the Gunze paints are a bit glossy.
-
for the variety of metallics I'm testing out the Vallejo Model Color line. They have very fine pigment. And they are acrylics, so if You have by any chance problem with laquers and other smelly paints that is a big plus.
Here is Vallejo Model Color Aluminium, White Aluminium and Vallejo Model Air Silver covered with Gunze H30. Paint chips have no gloss coat on.
-
Nice. HB Corsair is a very fun kit. And IMHO the double seater is one of the nicer variations out there.
-
Pretty neat start on the Starfighter. Can't wait for some more.
-
So... what better way to start 2024 than with a finished Hornet? I can't think of a better way 😉
First, there were some tiny details I almost forgot. Like the ecm bulge on the nose landing gear door.
A few moments later... Proudly guestimated part. Almost correct, but I noticed that a while after I finished the entire model and was checking out some pics I still had on my computer...
I was a bit afraid my masks would leave nasty glue marks on the canopy. Happy to report, almost no residue was found and almost no paint got though masks.
Oh, one thing. I had to fill some gaps where the decals didn't meet. I tried Gunze 36118 and 36081 but they seemed either much too light or much too dark. Out of the jar the Gunze Extra Dark Sea Gray was pretty good match. Slightly different hue, yes, but it is barely noticable. You can see my touchupsby the canopy frame and at the leading edge of the LERX.
I'm pretty happy with the way the ATARS windows came out. I did have huge problems fitting left nose gear door.
And just before I glued the Litening pod I figured I should make it more accurate. I've seen a lot of Hornets with -28 pod, and frankly I thought all of them had the air intake on the left side. Just after I did that I found a pic of "My" jet with the regular pod. That's probably why I didn't do the cut during the assembly... See? https://www.jetphotos.com/photo/7023137
So... after 60 hours and 20 minutes in the making, over more than a year I can call it complete. Sorry for the bad quality pics, they were the best I could do apparently. The fact they hide most of my mistakes isn't half bad either.
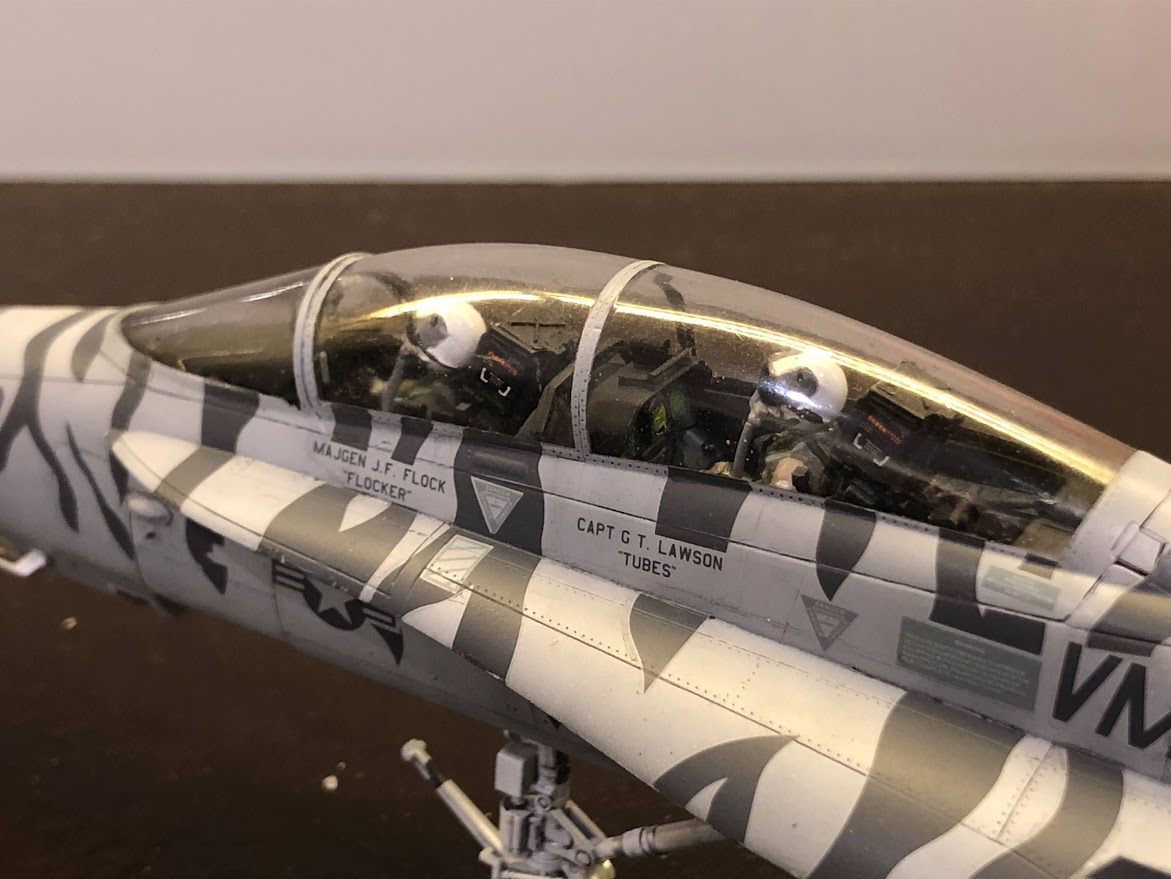
Check out these lovelly Tiger stripes. They line up pretty good allover, except for some of the mistakes I showed You before. The coolness factor of the overall scheme offsets the pain of having to source out every stencil from the spares box.
Awesome thing is, there was literally almost no silvering on the decals. Always a problem when You have to deal with decals with large carrier film. Plus I'm generally not too good dealing with these kind of troubles.
If I had to do another one I'd do it in a heartbeat. Something tells me 2024 can be a year of the Hornet...
Very hard decision is right in front of me. Hasegawa or Hobby Boss next? Hasegawa is easier with the paintjob but I want to try out different paints this time for the basic camo. Hobby Boss is harder paintjob and I have some colour decisions to do, but there is a lot of coolness factor in splinter scheme... Decisions...
Thanks for stopping by!
-
On 12/29/2023 at 4:05 AM, Lost_Erik said:
Great trio and cool build log. 👍
Thanks!
On 12/31/2023 at 4:39 PM, ALF18 said:Amazing progress for parallel kit builds.
I'm not so quick to say you've made a mistake with the Sabre instrument panel colours. Some are grey with black instruments, while some are overall black with black instruments and silvery highlights...
The important element is that it looks plausible. You're building for yourself, not a museum.
ALF
Thanks! Actually, for me finding an error I made and tracing back to where it actually originated from, what were the factors that contributed to said error is quite important skill. I use it at work and I use it in modeling.
The thing is I did read up on cockpit colours on the Sabre and this time I simply didn't think twice that gray cockpits could have gray instrument panels. This actually is my most feared error that I can't eliminate from my life. And sadly it's something that keeps happening - usually just when I loose my focus for a while. Had it been something more important than a piece of scale model I'd be worried 😉
So, how about some more MiGs?
The end of 2023 was quite eventfull and I managed to achieve most of my goals. Hell, entire 2023 was a very labour intensive year. Probably the most intensive I've had so far. And despite that, on the 28th of december i found myself at 18 completed builds. I was quite excited I might build 21 this year, and for a brief moment I thought I could squeeze in number 22.
See how well it appeared? Minimal weathering and I would be pretty much home free.
Well, the research for the UTI took a lot more time than I hoped - and even then I settled for a bort number from spares which is slightly innacurate for the jet I wanted. Some trouble happened with the MiG-17 paint as when I rubbed the wash down I took some paint in few places. Eventually, my oldest son got a new game and wanted me to play with him (ok, I wanted to play too) so I decided not to rush things and finished only the UTI and the MiG-17.
I did forego the UHF line antennae on the UTI. I don't know if I'll add it at a later stage.
I gotta say, these two turned out not so bad. My biggest fear was they would be tail sitters. And they seem quite ok. Oh... oh well. Quite ok it is.
Thanks for stopping by and have a great 2024!


F-16 Dragchutes
in Jet Modeling
Posted
Niels, I totally agree about the housing. It became quite apparent once I tried to fit the 1/72 Revell longer tail base to the Hasegawa F-16.
And frankly, all I'm saying is the parachute looks similar between both heavier F-16C/D of Turkish and Polish Air Forces, and the supposed lighter F-16A of the Tawian Air Force. The RNLAF Vipers have a different design than ROCAF F-16.
And the RNLAF as well as ROCAF Vipers both have the smaller dragchute housing. It might even be so the Tawianese parachute is only similar but smaller in diameter to fit in the housing that they have - if the ROCAF F-16's are lighter than say Polish AF Vipers.
And I won't dispute - Norwegians did it first. They even have the second nicest scheme for the Viper, second only to the Polish AF 😉
Oh, and good catch on the Venezuelans - they have again similar design of the parachute to the ROCAF. I totally forgot about them.
https://airfighters.com/photo/31022/M/Venezuela-Air-Force/General-Dynamics-F-16A-Fighting-Falcon/0678/
and the Chilean F-16A's had similar design to the RNLAF.
https://www.alamy.com/chilean-air-force-f-16-deploying-its-drag-chute-image353339000.html