


taneal1
-
Content Count
73 -
Joined
-
Last visited
Content Type
Profiles
Forums
Calendar
Posts posted by taneal1
-
-
18 hours ago, Drifterdon said:
Tom,
Having built the Testors SR-71 kit, I don't think you have to risk this being a tail sitter.
If you do make a resin copy (recommended)...Don
Good point Don. I forgot that although the part is fairly long and wide, it's thin enough that not much resin would be necessary, anyway.
I have no experience casting in resin, so it's probably a good time for me to learn. Any thoughts regarding outgassing issues, or is that less of an issue than I recall?
-
On 1/21/2024 at 6:45 AM, airmechaja said:
Go to the "Spares Box" here on ARC and list what you are looking for. Sometimes you get lucky.
Done.
You're right... Sometimes you get lucky. BTW, I'm wayyyyyyyyyyy overdue for some good luck! 😠 -
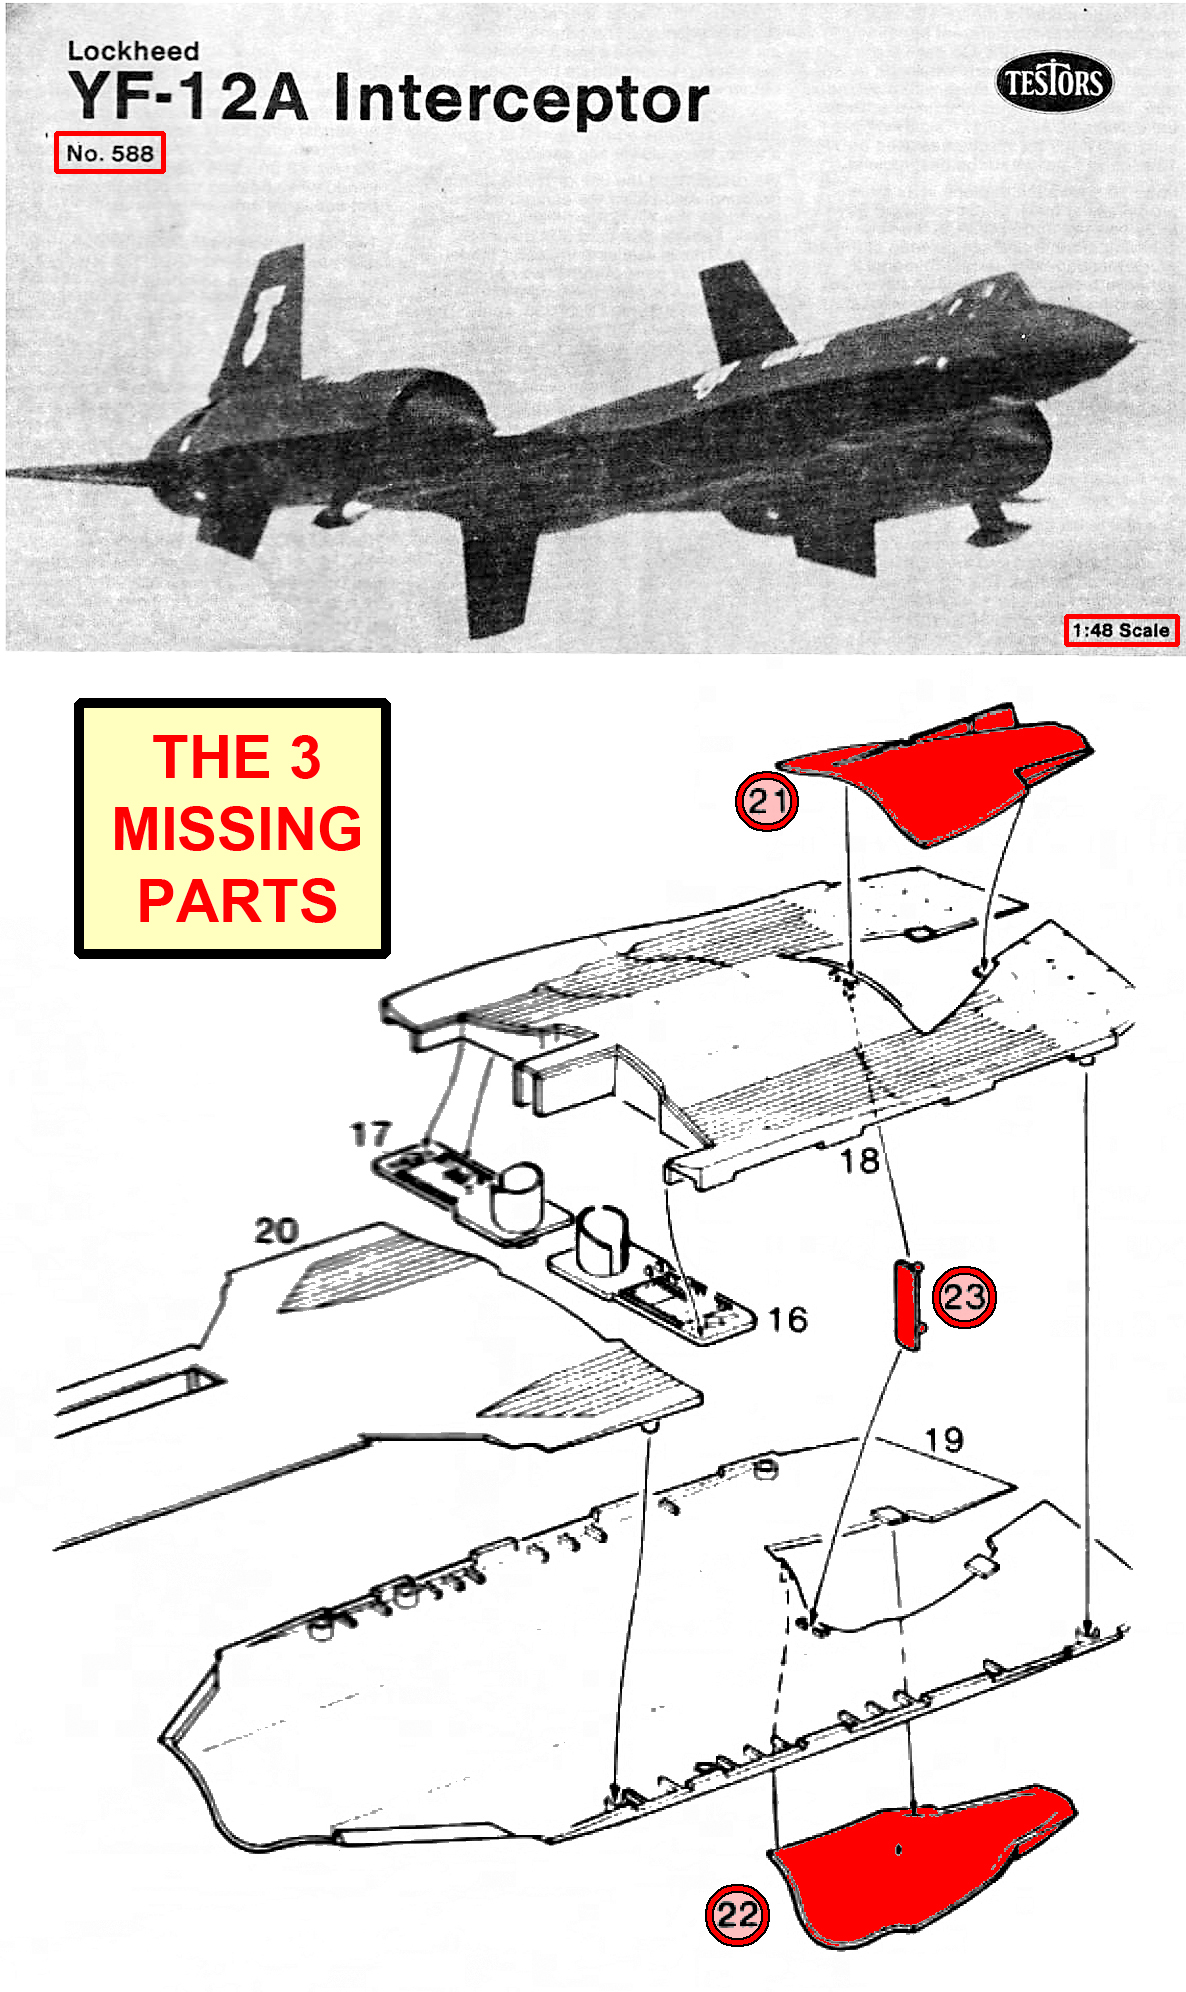
Testor's 1/48th scale "Lockheed YF-12A Interceptor"
NOTE-The SR-71 kit tailcones are not a match for these.
Looking for any of these 3 missing parts:

-
Hello Sigtau,
Thanks for the advice, but I purchased the kit "as is" with the knowledge that it was likely missing parts. There were no instructions with the kit, so the Seller couldn't be sure that all parts were present. Given the open bag he suspected missing parts. These kits are expensive, and this was cheap enough to take a chance. I don't think it would be too difficult to build an acceptable tail, so I'm happy with the purchase.
-
I already have 2 tailcone halves from a different YF-12A kit that are available to use as Masters to make copies. These YF-12A plastic tailcone parts are 4 1/2" long, 2 1/2" wide, 3/4" high and fairly thin, soft plastic. My only thoughts at the moment are to use the kit parts to either Vacu-Form copies, or make Molds of them and produce resin parts. But... I don't like the thought of hanging a heavy piece of resin that far aft of the main landing gear due to balance issues. And... I've never been a big fan of the thin plastic parts produced by Vacu-Forming. All things considered, Vac-ing does seem the better choice.
Any suggestions for alternatives are highly welcome. Also, could I "paint" the interior of the vac'd parts with epoxy to stiffen them?
Tom -
Kinda what I expected to hear. 🤣
Thanks, Dave.
-
Upon receipt of the "Open Box" Testor's Kit No. 588 - Lockheed YF-12A Interceptor - 1/48th scale that I purchased online, I discovered that the three Tailcone pieces (21, 22, & 23) are missing. The Testor's web site has no email address. I would prefer using email rather than their Facebook page to attempt to order replacement parts - presuming of course they have them for this old kit!
Can anyone who has recently acquired replacement parts from Testor's supply Contact info? Thanks in advance for any ideas...
Now for the Hail Mary pass... 🙃 Does anyone have any of these parts that they would be willing to sell?

-
Thanks Jeffrey,
A *great* photo reference - best I've seen for the SR-71.
Tom -
Does anyone have photos (preferred) or accurate line drawings of the Panel Lines on the Elevons?
After perusing every build that I can find, those who chose to re-scribe have come up with different versions of the Panel Lines. The old SR-71 + YF-12 kits that I own have some inaccuracies on the fuselage, and I can't find any helpful photos or drawings of the Elevon panel lines.
Can anyone tell me if the Panel Lines on the new 1/48th SR-71 kit correct? I have it on order...
Tom -
Has anyone used this particular Photo Etch set? Primarily, I'd like to replace the plastic engine grilles, and the engine parts look pretty good, too.
-
10 hours ago, habu2 said:
Instructions available on scalemates.com
https://www.scalemates.com/products/img/4/9/8/192498-19-instructions.pdf
Habu2,
Thanks for the link! These will do nicely. I'm surprised and pleased as to how well done they are. Lots of detailed comments and info.
Tom -
12 hours ago, lyonkubb said:
I actually picked up a collection recently that has a bagged YF-12 kit- all the inner bags but no box.
Thanks LyonKubb,
Box isn't necessary.
The instructions posted by Habu2 are surprisingly informative, so I don't need anything in print.If all the parts are present, I'm good.
Decals would be good to have, but in an "old" kit they may be unacceptable regardless of appearance
There "may" be 3rd party decals for this aircraft, but I imagine SR-71 decals will do, except for the registration numbers
12 hours ago, lyonkubb said:I'll sort out a fair price and take some photos
Sounds good to me -- looking forward to hearing your price.
Tom -
That settles that issue! Finding someone who is willing to 3D Print one would be the only acceptable option unless someone makes a conversion kit for the new SR.
Thanks for the info, Spruemeister! -
1 hour ago, habu2 said:
I have the Testors releases of both the SR-71 and YF-12. In the instructions for both kits there is mention of being given permission to photograph and measure (drop plumb lines) a real YF-12.
Great! I'll be surprised if there are any noticeable inaccuracies. What is your opinion as to accuracy for the two kits? Also, I'm thinking of the standard black for the SR, and probably the titanium color on the upper surface per the original paint scheme for the YF. How did you decide to display the missiles? I'm thinking of inflight with the doors open and the missiles on the rails, or perhaps with an acrylic rod and the missile a bit below the aircraft shortly after release...
1 hour ago, habu2 said:For both accuracy and availability you might consider the much more recent Revell release of the SR-71.
I already have the Testor's 1/48th SR-71, and I just discovered there is also a "companion" YF-12. I am considering getting the improved newer SR-71 model and converting it to a YF-12. From the photos that I have, it appears that simply removing the forward chines would be an inadequate solution, as the YF nose is shaped to conform to the 40" radar dish. The centerline ventral fin would be easy to fabricate as would the engine nacelle fins (strakes). However, the precise angles of the nacelle strakes is not obvious from the photos.
The price of the "old" and "new" kits will probably be about the same, so that's not a factor.
Thanks for the info, Habu -
4 hours ago, aircal62 said:
When those kits were produced they were considered quite accurate. But to understand the times in which they were designed and produced, accurate information was difficult to come by although there were lots of photos being taken at several airshows etc). Lockheed was happy to supply some very nice drawings with shapes and even cross sections, however all dimensions were removed from the drawings. Additionally cockpit photos were almost non existent, only a few photos of a trainer instrument panel and no sidewall details. John Andrews who designed the kit was very good at shapes and such... So he gave general shapes rather than things like including various nose sensor configurations, camera and sensor bay details.
"John Andrews who designed the kit was very good at shapes and such..." This is good news. My concern is for accuracy of the wings, fuselage, nose shape (most important!) and stabilizers. The details can always be added or corrected without a lot of effort but if the basic shape of the airplane is "off" it can be a real pain or even an impossibly to fix.
Thanks for data! -
Has anyone built either of these two kits? My research indicates that they are a challenging build due to "fit" issues. I've found no comments on accuracy which is important due to the high kit price. I have the SR-71 kit, and I've posted a "Wanted to Buy" for the YF-12. Any comments are greatly appreciated.
-
WTB Testor's 1/48th YF-12A
Un-Sealed Parts bags OK, if verified that ALL parts are present. Don't care about box condition.
-
5 hours ago, K2Pete said:
Got guidance on the folding of the seats?, I guess I would say, make a paper or cardboard pattern and fold that up using the LVM kit's instructions. There was a lot of trial and error with me, folded, realized it was wrong and refolded and it broke. (Can I assume you've looked at my other threads?)
Last night I decided to make a couple of copies of the seat on paper for practice folding. As soon as I can get my damn Printer working I'll do that... 😒 Also, I may try trimming the paper versions for a better seat fit. I'm not experienced with PE, but I think it's possible to trim it during the assembly process. If that doesn't work then a styrene version can be done of the paper version.
And you'd better believe I've looked at your other threads!6 hours ago, K2Pete said:with Ejection seats that were 100% scratch built. I had ZERO fit issues with those
Your scratched seats look every bit as good as the PE seats. Do you recall if you measured the Pressure Vessel and sized them accordingly?
6 hours ago, K2Pete said:Let me tell you my approach to building a model. What will the viewer see? Will they be looking at the detail or will a lump of styrene, in the right place, make them think I added a lot of detail? I've determined that that is the case. So with the Gemini's interior, how much is a judge, or a casual viewer, going to notice? Not much, even with both hatches open. Will they notice the Seats are 2 millimetres higher than they are in real life? Nosirree ... I might, but not anybody else. Will they detect a hole in the side bulkhead to allow for an elbow? Nope ... but I might ask about your patched up solution. So the added effort to fit the seats correctly is admirable but not necessary IMHO.
Agree 100%.
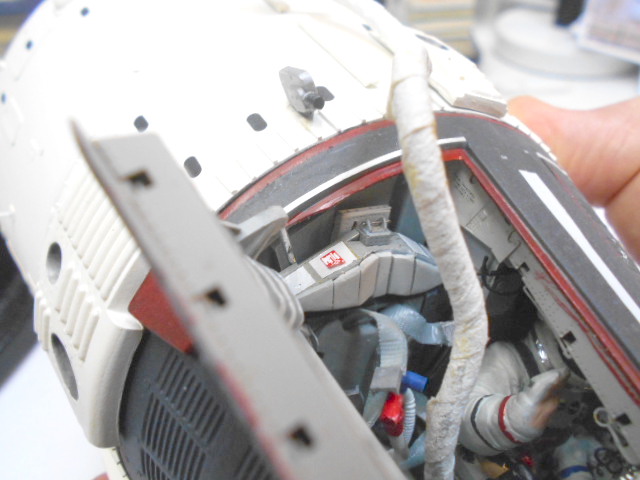
Additionally, I actually enjoy the research every bit as much as actually doing the build. Once I've found every interesting detail that I can, I have to decide what to include and what not to include. Usually, how visible the detail will be on the finished project make this determination for me. At the moment I'm looking at the hatch hinge cover and trying to figure out how that functions. With the hatch closed, the cover is flush with the shingles and protects the hinges from launch and re-entry heat. When the hatch is opened, the cover apparently is first raised out of its niche and then as the hatch is opened it then moves down to provide clearance for the edge of the hatch. The model depicts the cover in the closed position, but during an EVA the cover can be seen in the open position. An interesting detail IMO.
I enjoy the challenge of "fixing" things by modifying or redesigning the original. My plan is to always eliminate any known issues before I start by coming up with multiple possible solutions, and then using the one that provides the best results. If the result is that I still have to carve out pieces in unseen areas then so be it. There are times when that is the only option, but I still am disappointed that I couldn't solve the problem...
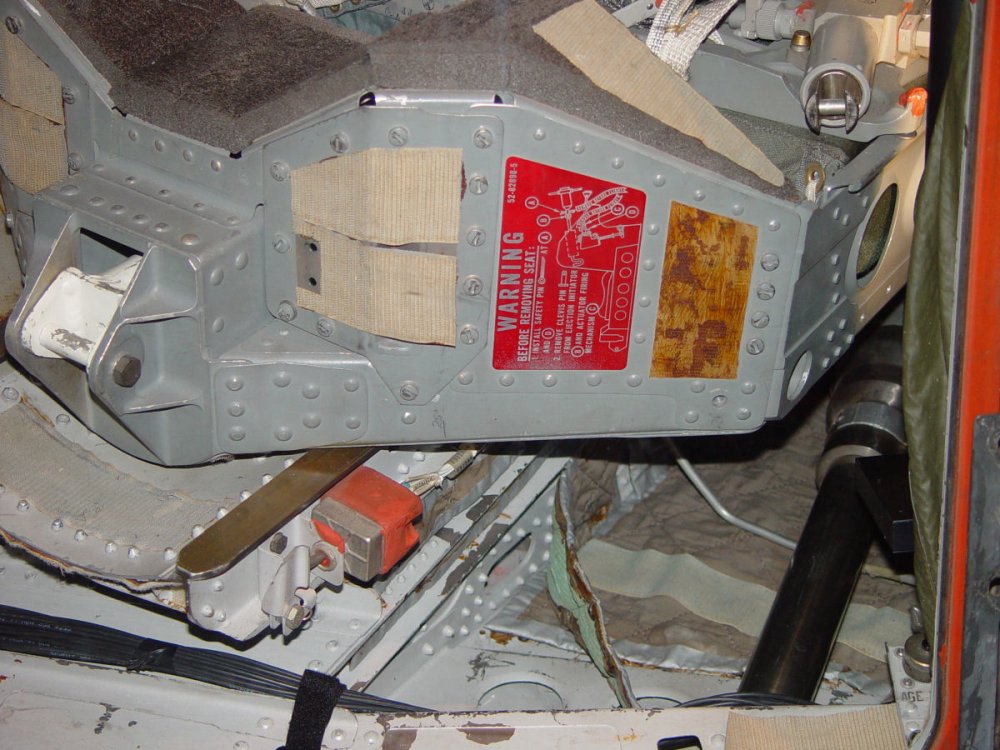
QuoteI just took a couple pix of my 2018 model, see what you can see. Does the height of the Ejection Seat look off? Not to me, another millimetre or two might, but I'd be hard pressed.
Thanks for the new pics, and the seat height against the bulkhead looks perfect to me!
QuoteBut I'm still proud of my builds.
Pete
And well you should be!
Tom
-
Hello There Pete,
I know its been a while since your Gemini 9A build, but I'm thinking the $%$*!!@@ Ejection Seat v. Pressure Vessel issue might have stayed with you...
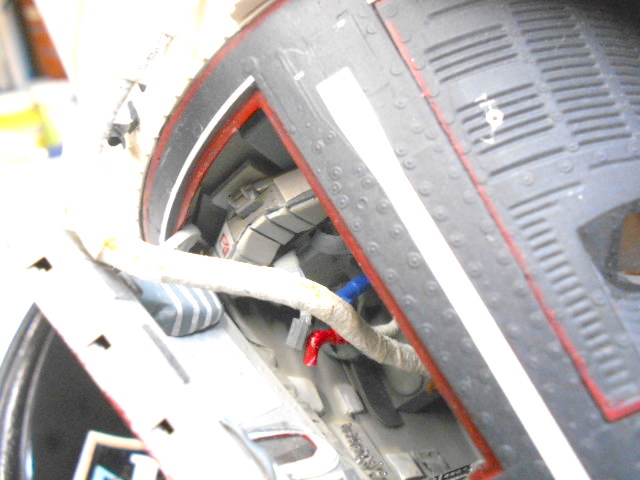
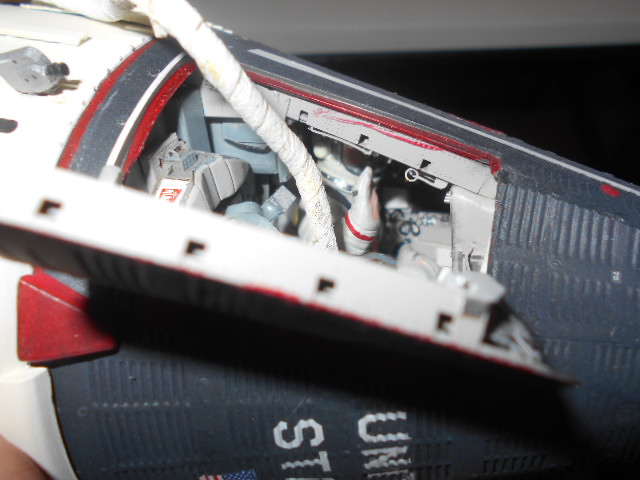
The aft end of the Gemini Pressure Vessel is formed by the "LPB" (Large Pressure Bulkhead). It is dish-shaped like the spacecraft Heatshield, and located immediately forward of it. The LVM kit incorrectly includes a FLAT PE replacement part for this. The bases of the Seat Rail supports are actually semispherical rather than straight as depicted by LVM. At the top of the Rails, the Seat Rail Supports start out quite thin, and then get considerably thicker until reaching the halfway point, and then again taper off until reaching the bottom of the rail. The effect of this configuration is that the back of the Ejection Seat is moved backward several (fullscale) inches. This relocation would allow/require the seat raised to match the hatch lip due to the forward sloping hatch. A narrow plastic extension along the aft perimeter of the Pressure Vessel could then be added which would create more legroom and elbow room.
Also, IMO, the kit astronaut is sitting noticeably lower in the seat than the crew is sitting in NASA photos. If he were raised up higher above the seat pan, or the Ejection Seat back was shortened and the entire seat raised this would create more vertical legroom and elbow room. The original helmet visor on the Gemini suit retracted under a protective guard which was integral to the helmet. This was removed to create more headroom. The Apollo 1 crew wore Gemini suits with this visor guard installed because there were no headroom issue in the Apollo CM. Above an altitude of 15,000' the astronauts decided they would rather remain within the safety of the spacecraft than accept the dangerous ejection process up to an altitude of 70,000'. Thus, starting with Gemini 5, the Seat Emergency O2 pack was removed. This lowered the seat pan by 2". The insulation in the hatch above the astronauts heads was removed to create what was called the "Stafford Bump. Even with all these changes, the majority of the Gemini astronauts were still sitting with their helmeted heads touching the hatch.
Any thoughts on the above are greatly appreciated. Also, a Guide for the folding of this PE would be helpful. 😁Tom
-
4 hours ago, K2Pete said:
Yup, I had the same issues with LVM's interior ... but I made those %#$@&!! Ejection seats fit. It was messy, but nobody's the wiser.
Thanks for the response, Pete.I have seen your excellent build and taken note of your solution to make it all fit. An homage to a footless Fred Flintstone😁. I'd like the option of opening both hatches, so a different fix may be necessary. The model has unoccupied spaces outboard of the pressure vessel on both sides, and below the footwells. I'm thinking that a slight widening of this piece might alleviate the 'elbow room' issue, and an extension of the footwell might allow the complete astro figures to fit.
Time to dig out the kit and try a dry fit...Tom
-
Gemini builds with an interior, either LVM or scratchbuilt, are having issues with the ejection seats. Either the seats are too large, or the pressure vessel is too small. Or both. I'd like to use the LVM seats in a build and I'm wondering if anyone has verified that the size of the Gemini pressure vessel is correct. I think that might be easier to correct than the seats. Also, for anyone that has used the LVM, are the kit astros a good fit? If so, then narrowing the seats is not an option.
Also, has anyone tried Shapeways' Max Gruter astronaut figure designed to fit the Revell 1/24? Shapeways 1/24th Revell Gemini astronaut
-
Thanks for all the photos! I had found them online earlier, but now I can thank you directly.
Tom
-
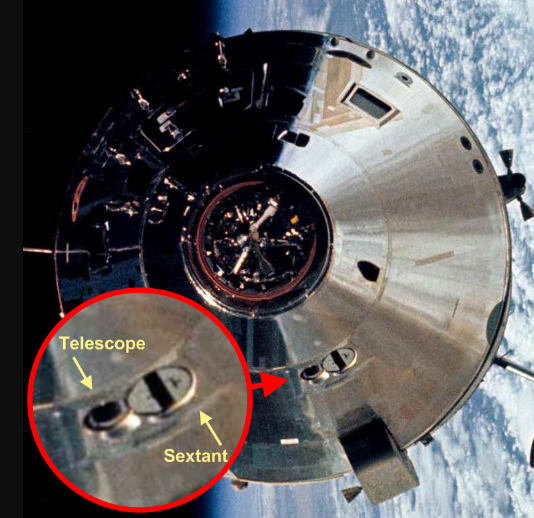
Thanks to Pete and habu2 for the responses. I captured some good shots of the Sextant and I'm looking for something of a known size to compare it with. I enjoyed the Adam Savage video immensely - his enthusiasm is always infectious. Unfortunately, he didn't put his left forearm next to the Sextant/Telescope optics. He has a ruler (scaled in inches and centimeters) tattoo on the inside of his forearm.
The Apollo 14 CM was displayed for quite a while with only a plexi cover, and it was accessible from all sides. I'm hoping some fanatic (like me) made actual measurements...
Tom
-
Hello to all,
Can anyone share the diameter of the Sextant and Scanning Telescope cylinders on the exterior of the CM? Also, the dims of the cutouts for the optics would be helpful...
Surprisingly, neither the Weeks drawings, or the Mackowski book have them.
Thanks for taking the time to read my request.


Lockheed YF-12A Interceptor - Testor's 1/48th scale - Kit No. 588
in Jet Modeling
Posted
Thanks Don, "Bubbles" are one of my concerns. Also, I recall numerous complaints over the years of out-gassing bubbles on painted resin objects. Has new paint and/or primer technology improved enough to eliminate outgassing?
Tom