mynameismatt
-
Content Count
525 -
Joined
-
Last visited
Content Type
Profiles
Forums
Calendar
Everything posted by mynameismatt
-
I'm calling this beast done! final pics posted in the display case here. Thanks for your helps and tips!
-
Just about finishing up my latest build. 1/48 Monogram PBY. Aftermarket used: True Details wheels, Terry Dean nose weight, eduard canopy masks & Yellow hammer decals. The decals were pretty old and did not settle well - probably the biggest fault I have with this build. Oh well, still not bad. Model master enamel paints used - with base black faded on the upper surfaces. Before the black - I painted the kit the original blue/grey camo and then used a magic eraser cleaning pad to scub away the black to reveal the glue grey underneath. Some brown chalk used on the upper wing for some color v
-
Down the the last few details. I still need to do a quick flat coat in a few areas and add the antennas on the sides of the front fuselage. I can smell victory!
-
Many many thanks for the kind words! The kit is the monogram 1/48 PBY-5A. Decals are from yellowhammer. I wasn't too happy with how the decals settled, but they are quite old. The A-6 build is not mine, its Joel_W's. He is knocking that build out of the park, isn't he?! John - aren't you proud of me? It looks like I'll actually complete TWO builds in 6 months. That's a record for me. Must be the switch from 1/32 to 1/48 ;) Just kidding 1/32 is still my go to scale, but these multi-engine 1/48s are fun! No optivision for me - I'm not THAT old P Not sure where the magic eraser is from, pro
-
Hey Joe, I made life easy with the nose weight buy purchasing one from Terry Dean: http://modelingmadne...ssories/td5.htm For the PBY, the weight goes in right behind the cockpit area. Even so, it was still a little tippy - so I put a few small washers in the nose. That seemed to do the trick!
-
Thanks for the help and tips everyone! I was tempted to try the salt weathering technique - but I've had sub par results doing it myself in the past, so I decided to keep the weathering simple. I did add a small amount of brown chalk on the top of the wings - not much, but enough to add a little variation. I've managed to get alot of work done and I'm not doing some of the final stuff. Some things I still need to finish: 1. rigging. 2. prop decals/weather props. 3. touch up in a couple of areas with a dull coat. 4, add the ordnance to the wings and antenna. 5. Add guns to the rear blist
-
Thanks for the replies, gentlemen. I can't really take credit for the magic eraser trick - The yellowhammer decal sheet I'm using has instructions to achieve this effect. They recommend using a scotch-brite pad. I dug underneath the kitchen sink and found one - but it really didn't seem to do much. So I dug a little deeper and found the magic eraser. It works pretty good. It takes a decent amount of pressure and movement to start taking the first layer of paint off. The trick is to stop without reaching the bare plastic. It also seemed to help to get the magic eraser wet. I did touch up a fe
-
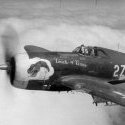
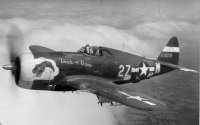
These were taken with a point and shoot. My wife has the DSLR and she wont be home until tonight. The black on the top and sides is definitely lighter than straight black - as it would have faded faster than under the wings and hull. In these photos there seems to be a blue hue - and that is a bit exaggerated. As the black is scrubbed away - the blue is revealed which adds to the effect. The first picture represents the color the best.
-
Well, it was time to go big or go home - so I went big and started "scrubbing" the black away revealing the blue/gray camoflauge underneath. I figured I shouldn't wait for the paint to get overly cured. so off I went! Anways, this was all done rubbing a Mr.Clean magic eraser over the areas I wanted to be faded and rubbed away - this was most heavily done around the cockpit and top of the wings. After one "pass" I went back and touched up a few areas I overdid with the airbrush. Honest feedback is appreciated. Overly done? Not enough? Convincingly real or not good at all? Let me know - I want
-
base layer of black on - I'll be adding lighter coats on the top as well as the top of the wing...even the base layer is not very dark. I'll probably go a shade darker for the bottom of the hull, wings, and elevator (crappy cell phone pic) and yes - the blue grey scheme is underneath! - hopefully we'll see that soon again :-)
-
Thanks Joe!
-
Well, Primer is on! I added the elevators and used white out again for the small seams. I painted the canopy and gun blisters green chromate, then layed a first coat of primer. I use Tamiya grey primer in a rattle can - fantastic stuff! After the first coat I sanded some imperfections and layed another coat. Next up will be preshading and the first color scheme glue/grey - which will eventually be covered with black tones. This is about to get interesting. Praying to the modeling God's this paint is going to turn out OK.
-
Hi Joel - thanks for the info! - that seems to make the most sense. I'll be painting them Blue gray and then black.
-
Good question - I don't remember where I picked this tip up from, but it works well for smaller seams. I used the White out applicator and carefully apply it to the seam being careful not to apply it over the canopy masking. I'll let it set for 30 or so minutes. It dries pretty quick. Then to remove the excess you can either sand like normal or you can use a q-tip end and gently remove the excess white out using a small amount of paint thinner on the q-tip. Be careful not to use a lot of thinner, in fact I usually rub the q-tip down on some scrap cardboard to get the excess thinner off of it.
-
Not too much to show - but with the fuselage closed up - I've been able to install the canopy and mask it. As you can see I've used white-out to fill in the small gap. This will get "sanded" down with a qtip and paint thinner. blister canopies are masked off as well. that's all folks.
-
Just a quick update. The build slowed down a bit over the holiday. I'm also remodeling my basement - so precious modelling time is at an all time premium. I managed to close up the fuselage. Squadron white putty is drying on the seams and the next couple of days should involve my least favorite part of the hobby - sanding.
-
Is this the case of reprinting a decal sheet after more information became available? I am planning on using the old yellowhammer decal sheet #Y48-10 with black and white instructions. If you notice - the "Nite Life" bird has the normal front turret/blister. However, I did a quick google search of the sheet and it looks like Yellowhammer did a reprint at some point as they changed the sheet # to YHD4810. And...if you look at the color profile you'll notice "Nite Life" now has the "eyeball" turret. Can anyone shed some light on this? My gut instinct says that the newer sheet was modified for
-
I've been SO tempted to pick this up - as it looks like a fine piece of resin at a good price. But - I think I'm going to hold off. I'm no PBY aficionado so I can live with the kit error. Probably the biggest reason for me to skip it is because adding that resin weight on the tail pretty much guarantees me being stuck with a tail sitter.
-
Small update - but hoping it will keep me "on track" Glued the sub assemblies into the fuselage. Some minor warping might make joining the two halves together we shall see. Gear wells are installed as well - I glued them in and then used a strip of testors tube glue around the interior joints of added support. I don't want them to "cave in" once the fuselage is joined. Well is painted interior green, but these will get a spray of black as it appears most PBYs had the gear wells the same color as the fuselage. In this photo you can also see that I've istalled the eduard masks. I love these
-
Thanks guys! I figured it was a mistake on my end!
-
Minor work done today as well as some confusion on my behalf. Seems I can't find part 62 (the clear window on the front of the hull). Strangely enough though - it doesn't appear to be a place for it on the clear sprue? No "62" marker on the sprue as well. Strange. I'm sure I'm loosing it on my end, but could someone who owns the kit confirm or deny the existence of this part? Luckily, making a new once should be easy using some clear plastic from product packaging. Anyways, cleaned up some of the clear parts and dipped them in future. I don't always do this - but most of these pieces had so
-
Some work done on the IP. Not the best photo but it will do.
-
One thing that amazed me is the size of the wing on the PBY - its friggin' huge! The way monogram designed the wing is quite nice. I'm fairly certain I can wait until the end of the build to attach it. That said. I've glued the wing together and have started the sanding and putty process. Some gaps need to be worked on, but overall nothing major. Here is a seam on top of the wings that will need some love. Some work on the wingtips needs to be done as well.
-
I've never had much success with my own in progress thread - but that's mostly because I tend to move around between builds. My hope is that this thread will keep me on, gain some wisdom from you all, and help my complete this build by the end of July. This will be the first black finish I've done - I'm a little nervous about weathering a black seaplane - but also excited to try something new. Honest feedback & suggestions are highly appreciated. I think it will help motivate me with the build. This is the aftermarket I'll be using for this build - pretty simple. I also have a Eduard ca
-
This is my latest build. I build terribly slow (too many other hobbies to distract me) But I started this last fall and then put it away for a couple of months only two start up and finish about 4 weeks ago. Classic Monogram B-24 with a Koster rear turret, a mix Kitsword and superscale decals, Squadron canopy, EZ line rigging (That stuff is amazing!), and an unbelievable amount of fish weight in the nose to make it sit properly. Paint is a custom mix of model master for the "pinkish tan". Oil wash. I still need to paint the formation lights. If you see anything else - let me know! Overall I'm