


Trainman 2001
-
Content Count
77 -
Joined
-
Last visited
About Trainman 2001
-
Rank
Canopy Polisher

- Birthday 07/30/1945
Recent Profile Visitors
1,365 profile views


-
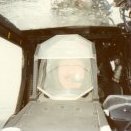
The Hobby Shop, Scale Reproductions, Inc. is thriving and is about 6 miles from downtown heading southeast. I'm a member of the Military Modelers Club of Louisville founded by the hobby shop's owner, Brian Bunger. He established the club 40+ years ago and it's growing with some younger member joining recently. In fact, our meetings and events have record attendances. I did pick up the Apache, but am finishing up a railroad structure before getting started. I'm trying to determine how crazy to go on it. There's not much aftermarket stuff yet available for it other than canopy masks (which I've
-
Your Welcome. The thread may be old, but still relevant if you're building the model. Coming up next is the Takom 1/32 Apache Long Bow that I have on lay a way at my local hobby shop. I'll be starting it in about a month or so and will post the build here too.
-
Great build! Panels look terrific. What was the source of the 3D drawings?
-
Thank you Janus! And happy New Year! I've just finished a project that, in my estimation, is more remarkable in every way and I've done a build thread of its entirety. It's a complete Iowa Class 16" turret structure in 1/72 from keel to gun house. It's based on the Takom 1/72 Missouri turret with hundreds of hand drawn and 3D printed components… all done by me. It's now residing in the Battleship New Jersey Museum and Memorial ship in the Delaware River across from Philadelphia. I delivered it on Thursday. It will go on permanent display probably in the Ward Room. Read all about it
-
Thank you! As an epilog... Here's what my work space looks like when I'm done. This phenomenon only occurs every so often when work is done. Sadly, it doesn't last very long. And here's my high-tech method of dealing with the sharps that are created constantly. I buy my #11s in the 100 piece packs and change then very often, especially when using it to cut decals, masking, bare metal foil, etc. I toss them all in a yogurt container and when full, tape the darn thing shut and toss it in the trash. I don't handle them any more than I have to. Being an AFid person and on a b
-
Thank you C2J. I have very little patience, but lots of perseverance. It gets me through the tough spots. While I may wish to, I never through anything across the room when frustrated. I practice test pilot problem solving,, "try A, B, C, D, E, etc, until you either auger in or start flying again."
-
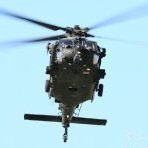
Big day! Had a gall bladder imaging session this morning to see if it's working right and finished the Seahawk this afternoon. Won't know about the gall bladder for a couple of days, but you'll learn about the finished Seahawk tonight. Before putting the rotor on I had to get the tail boom on. I chose to use epoxy putty since there wasn't much gluing surface for conventional adhesive AND the surfaces themselves were not very secure. I put a wad of putty on the back of the fuze side of the ResKit hinge component and pushed the parts together. Had to hold it for a while by hand and t
-
I finished the rotor head, did the repaint, connected the deice lines, and refinished the blades including painting the pop-out nitrogen leak indicator. I also did the anti-collision belly light and finish painted the rear landing gear. I fixed all the blade lock indicators putting on fresh little slivers of PE fret to complete them. They do need some touch up paint. And I notice that I didn't trim the phos-bronze rotating pins. There may be a few more areas needing attention such as cleaning up the accent around the blade bolts. While mounting the rotor and attempting to posi
-
First of all I'm getting this error when trying to enter yesterday's post in the FSM Forum. And I can't seem to enter a new post in the troubleshooting forum. Any ideas? Secondly, I did (FINALLY) get the four blades attached to the hub. My new parts worked although they still required a styrene spacer and then do some creative carving of both the claw and the rotation motor head on the hub to get the new parts to sit correctly on the hub. Again, the pinning idea was the reason I could do this at all. The hub's taken quite a beating and will need some TLC to bring
-
The problem with having your thread read by people who ACTUALLY know about the model you're building is sometimes they tell you things you're doing wrong and that you must fix. This happened with yesterday's post. I was told by words and pictures that I installed the blades in backwards. Ugh! They were awful to get in the first time. However; there is a silver lining... sort of. By spending the time to pin the blades to the knuckles and not gluing them, I was able to pull the pins and remove the blades without breaking them. While trying to get the blades back on I re-torqued
-
Spent a lot of time today fussing with getting the blades mounted and didn't finish. I did get the blade racks installed. i found that there was a pin on one end of the bottom member that could go into the holes in the fuselage if there were holes there. There were keyslot-shaped engravings at the correct locations on the strbrd-side. I measured the pin and drilled out those areas. Then I realized that I had put the mounting pins on the wrong end of this member and had all the paint schemes backwards. I had to make new pin on the rear set using Evergreen round styrene of a very sim
-
It was one of those days where I spent 30% of my time doing new stuff and 70% of my time fixing crap that I broke off. For the new stuff, I built the blade support racks and their associated blade clamps. The kit parts have a very narrow, scale-ish, connection between the forward half of the two-part assemblies and the main part. There are two sets that vary in size. I was seiriously concerned that this narrow part wasn't going to make it especially after it got softened by the solvent cement in its proximity. I fixed this by drilling and applying a piece of 0.014 guita
-
Had an ice/sleet/rain/snow storm today and into tomorrow. Good day to spend some time in the basement building cool things. It was pointed out to me that I mounted the engine hatch at the wrong angle, but couldn't get the work platfom part flat. Well... after carefully looking at a guy kneeling on the hatch and working on the engine, I realized that I put the wear strips on the wrong wing of the hatch. The strips go to the hinge side, not the outside. With that understanding, I removed the strips, fixed the paint, made new strips, applied them and redid the weathering. I also had t
-
My Seahawk pilot has given me more suggestions including how each blade (main and tail) are color coded and used in managing the main rotor folding process. The blade clamps are also color coded to their respective blades. The colors are also on the main rotor hub. I'm going to color some tiny strips of Tamiya tap and add this micro-details. The scheme is Forward starboard blade is Blue, Aft Starboard blade is Red, Forward Port Blade is Yellow and Aft Port Blade is black. I finished all the weathering I'm going to do. I dirtied the bottom up and added dirt on the walking arees on t
-
One of my readers in one of the other forums in which I post this thread is an actual Seahawk pilot and has been feeding me real information about details on the machine that are not easy to find. And I incorporate everything he says. Yesterday he showed me the colors of the sonobuoy dispenser, the tail of the MAD and the brake lines. I put in the brake lines. I used magnet wire and diameters of Albion tubing to make a faux fitting. I made a strap clamp out of wine bottle foil. This stuff works great, but you first must remove any printing or coating on it with acetone. The coating