


GSymmonds
-
Content Count
69 -
Joined
-
Last visited
Content Type
Profiles
Forums
Calendar
Posts posted by GSymmonds
-
-
Awesome - really great paint and weathering. Lovely scheme as well!
Graham
-
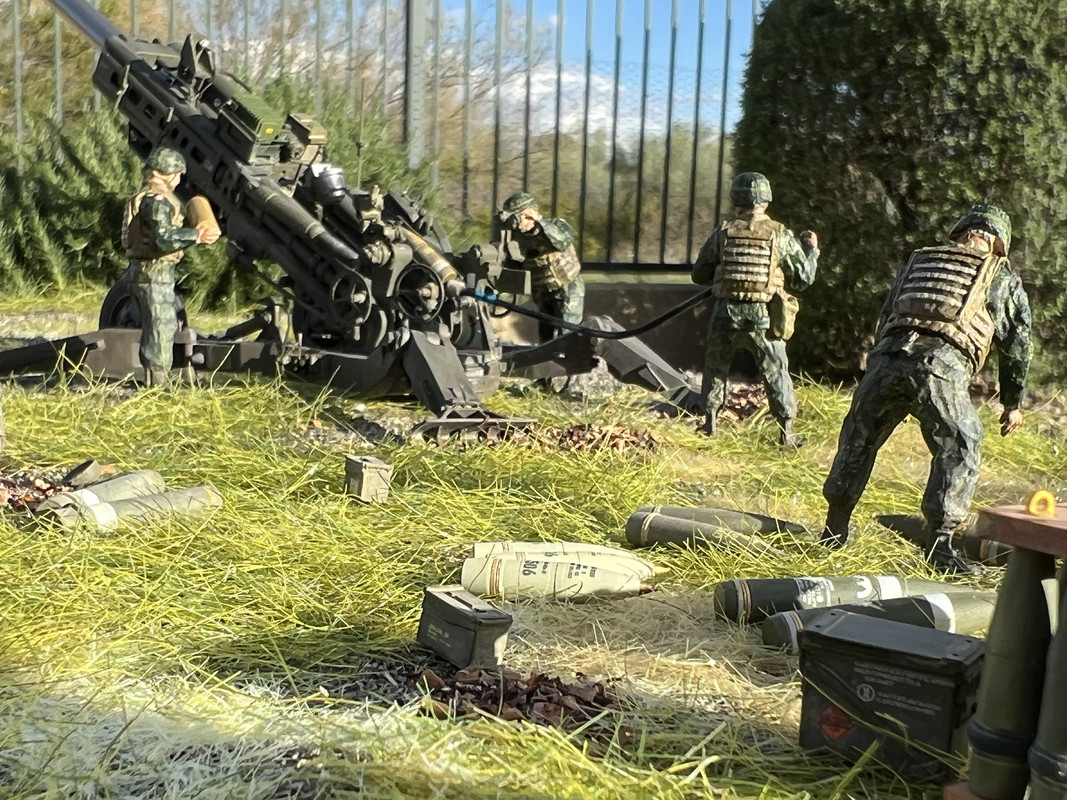
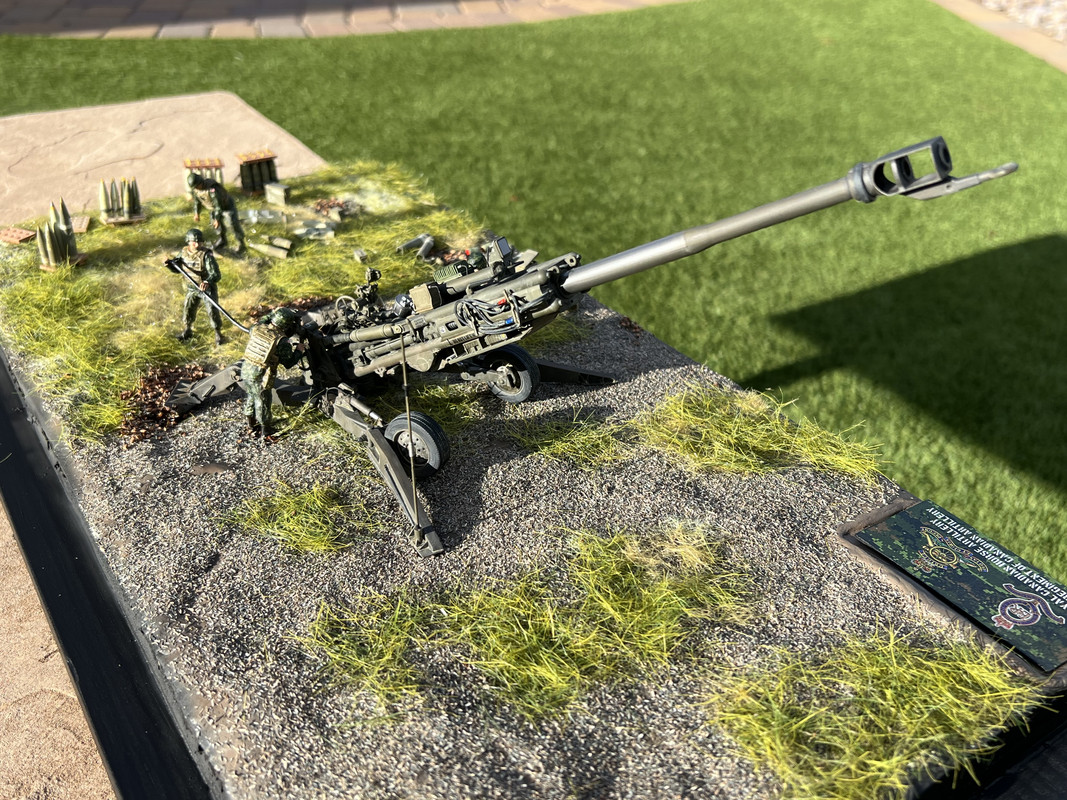
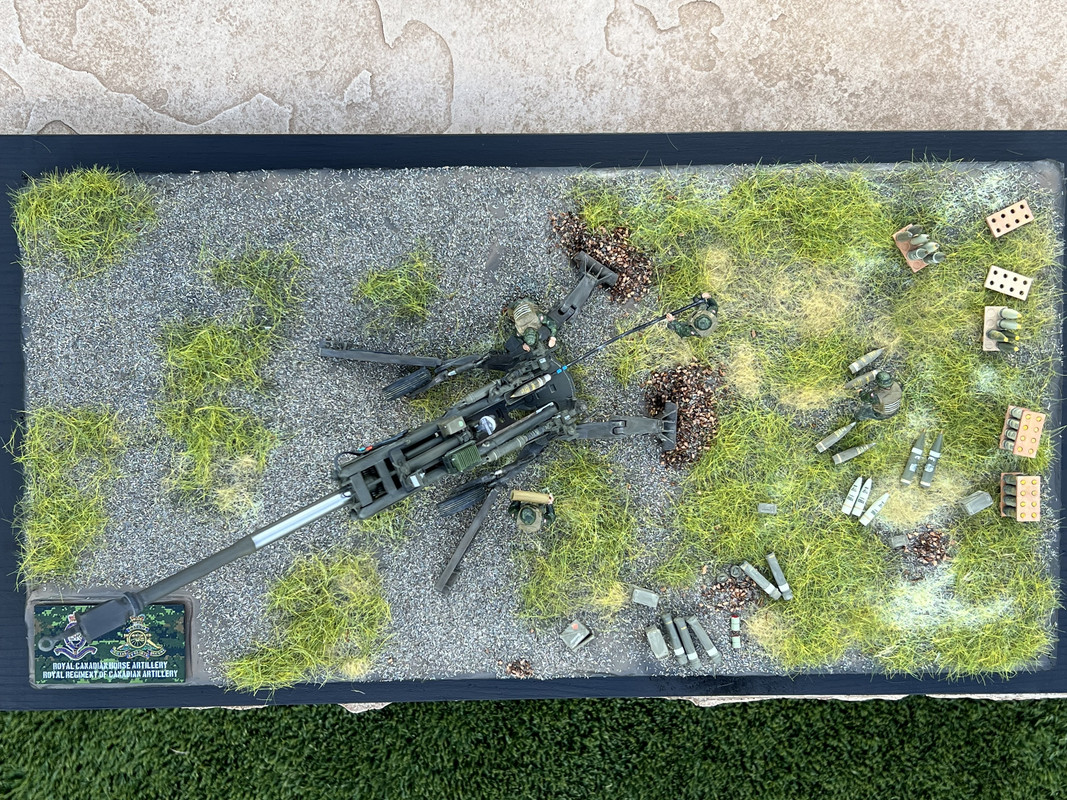
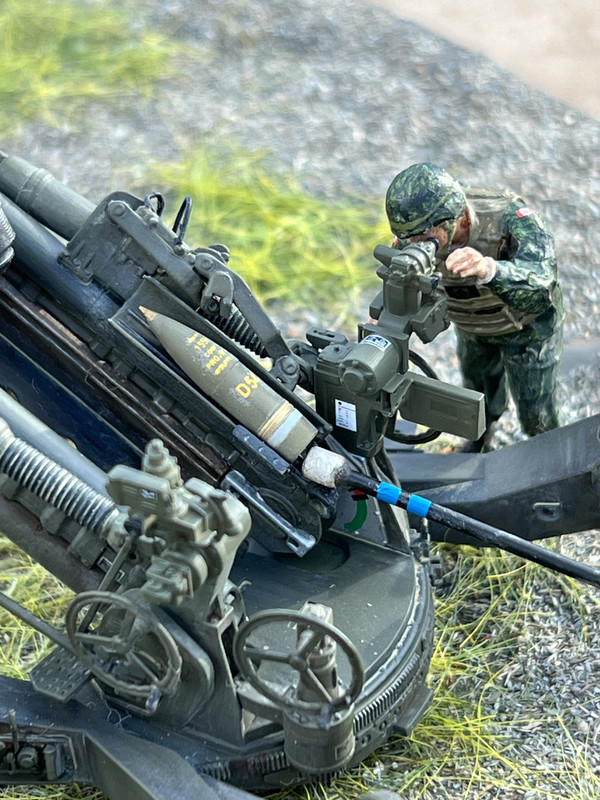
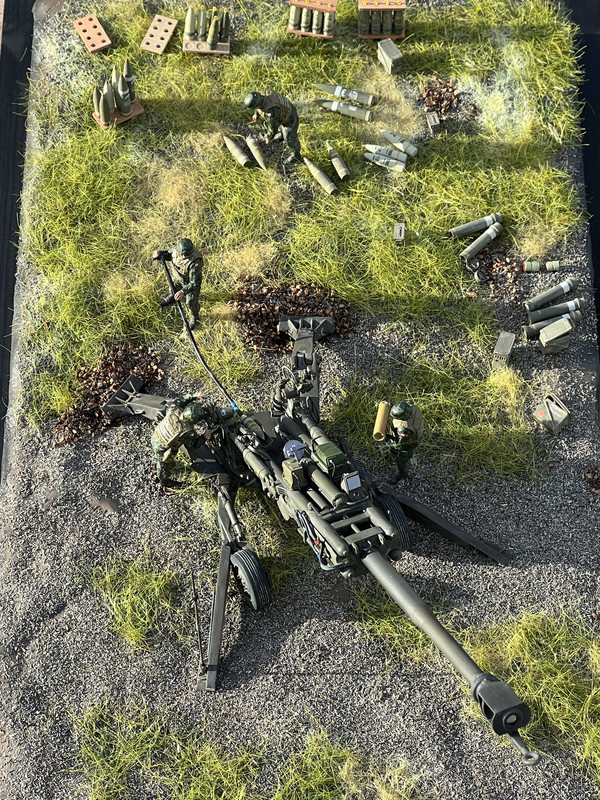
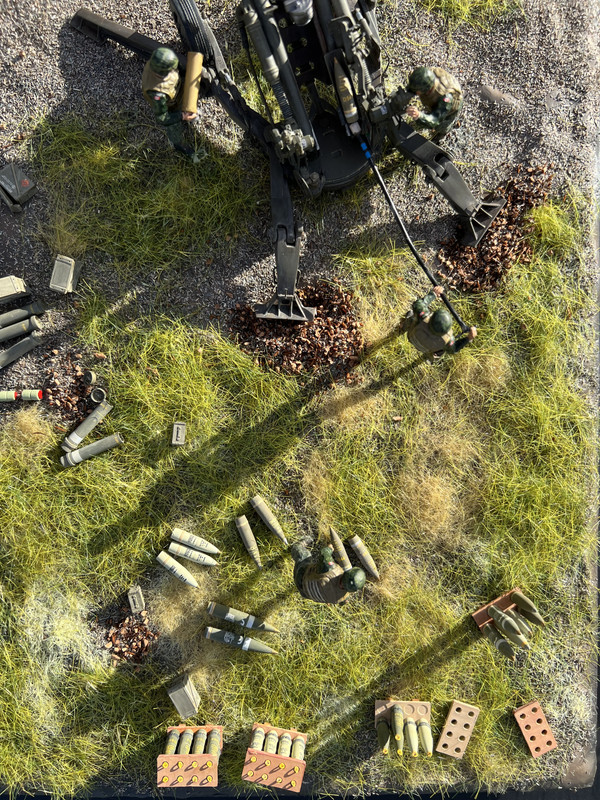
Here’s Vargas’ 1/35 M777-A2 155mm Towed Medium Howitzer (vargasscalemodels.com) – it’s a 3D Printed model – the first I’ve tackled as a whole set.
Overall the detail is really excellent and the end result is definitely impressive – I never appreciated just how big these guns actually are – and the coordinated manpower required to operate them.
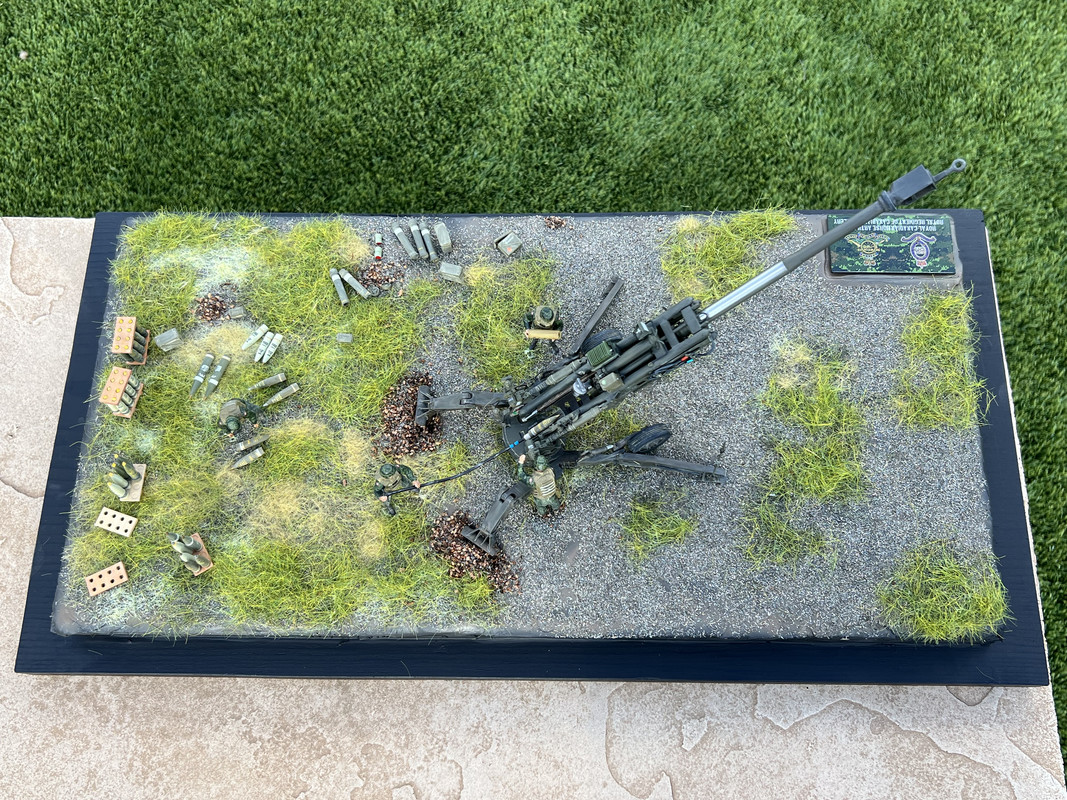
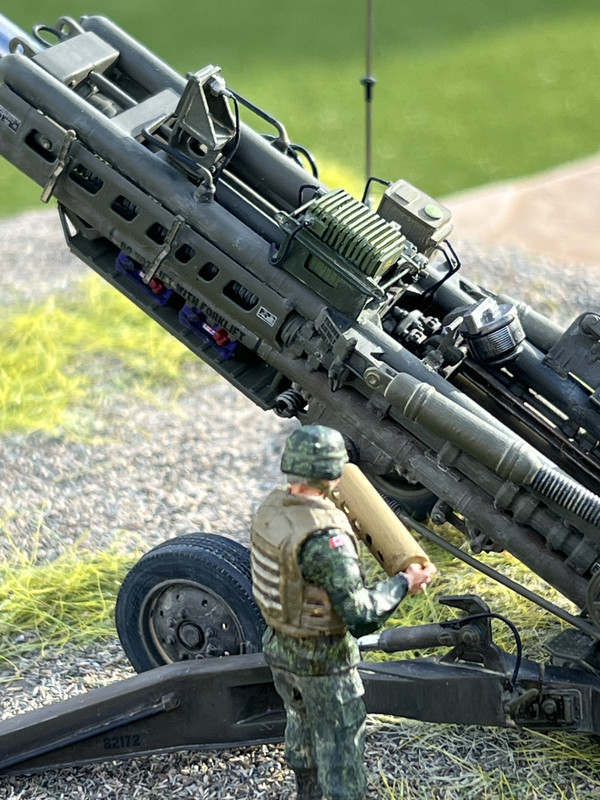


Being essentially a cottage kit – the instructions are sparse and there is generally a lack of locating pins/mounting arrangements. The instructions are emblazoned with “Test Fit” – with good reason: absent an understanding of how these guns go together there’s a bit of guesswork and a lot of diving into Google for photos.
Some parts aren’t quite right: The breech block is both too short and too long! Too long at the front so the cone shape doesn’t fit well into the barrel assembly; and too short to fit all the way back.
The support yoke underneath is too short to put the gun in the “firing” position.
I did replace some of the kit parts – the antenna was lacking girth and detail; the push rod is way undersized. To make the Canadian version the boxes on top are different – not exactly sure what they are (maybe electronics) and added what looks like a sensor panel (muzzle velocity?) on the front.
I also added brake lines (fittings & hose from Detail Master - https://www.detailmaster.com/collections/fittings) and some of the more visible hydraulic lines. Finally I added the firing mechanism on the right hand side.
I painted the bulk of the gun with NATO green (MRP) and weathered with Mr Color Stain Brown, Sandy Wash and Multi Black, save for the steel bits (lower barrel and breech).
Stenciling decals were printed on a laser printer and augmented with a bevy of placards from various aircraft sheets.
To make the scene I used a US howitzer crew from Shapeways, which were made up wearing CADPAT camo with decals from FFSMC Products. That was a chore and a half! Trying to “clothe” a 1/35 scale figure is something I’m not rushing out to do again. Originally, I had planned on adding a few more figures but I couldn’t chin myself up to the task of dealing the clothes…! Also there’s a whole bunch of ammunition from AFV Club, some ammo cans from Verlinden.
Arranged on a home made base with Noch grasses.
Overall a nice kit despite the challenges – and definitely looks impressive.
Ubique, Rudyard Kipling
Ubique means that warnin’ grunt the perished linesman knows,
When o’er ’is strung an’ sufferin’ front the shrapnel sprays ’is foes;
An’ as their firin’ dies away the ’usky whisper runs
From lips that ’ave n’t drunk all day: “The Guns! Thank Gawd, the Guns!”
https://www.kiplingsociety.co.uk/poem/poems_ubique.htm
Graham
-
-
Just received John's DJRP pods and CRV7s - absolute masterpieces! Thanks so much for creating these!!
Graham
-
L'Arsenal 2.0 did make some Paveway IVs in 1/48 scale - there's some at https://the48ers.com/paveway-iv-smart-bomb-x-2.html
They are OK but a bit tough to clean up and paint. Having some printed ones would be ideal!!
-
-
I just received this in the mail today - it's absolutely gorgeous - such an incredible piece of work! John is an exceptional craftsman and his professionalism is clearly on display here. This will make the Trumpeter GR7 buildable!
Graham
-
-
Years ago I scratch built a Surveyor 3 (https://www.arcair.com/Gal10/9301-9400/gal9388-Surveyor-Symmonds/00.shtm) which took an incredible amount of time. Now Derek Ward has been busy pulling together a 3-D print version of this iconic spacecraft - you can get it here: https://www.chronic3d.com/produit/surveyor_3/ along with a bevy of other spacecraft. We're entering into a new realm with spacecraft modelling - I can't wait!
Graham
-
I've got the two bobs 48-019 AFFTC Test Vipers you can have.
Graham
-
I've definitely got those - are you still needing them?
Graham
-
Not sure where to put this but the Canadian Warplane Heritage Museum has just published a data base called Canadian Aircraft Serials and Personnel Information Resource (CASPIR). It is a comprehensive collection of all Canadian aircraft serials and crews and fates. Very impressive and will be very useful!

-
Awesome that 3-D cutes offers AAR drogues - been looking for those for a while! I agree the PK TAT and pitots are very nicely done.
-
Wow - what a great job at such a small scale - the details, weathering and bas all put you right in the scene!
Graham
-
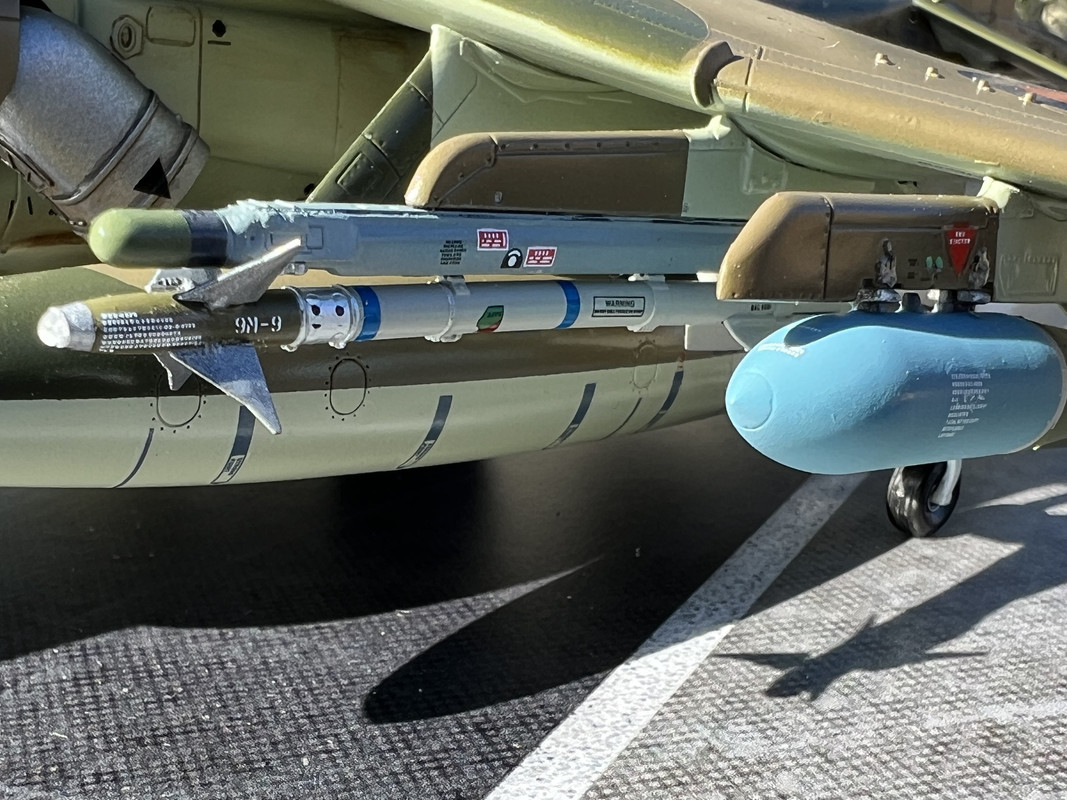
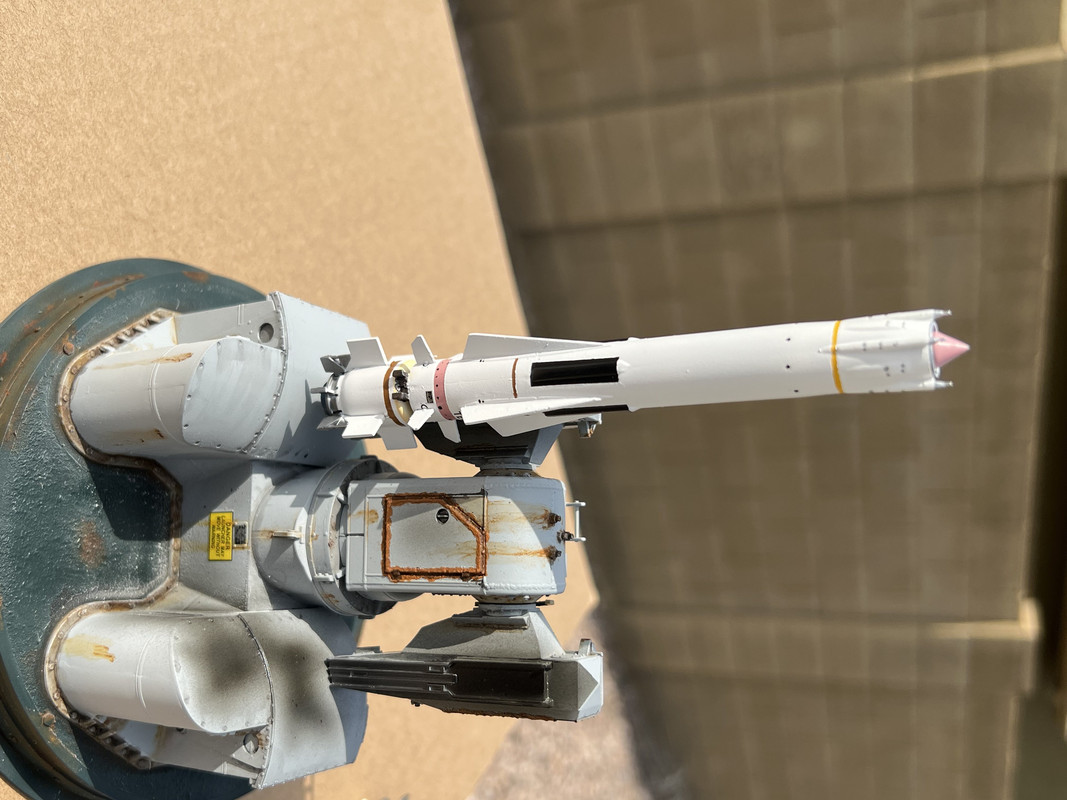
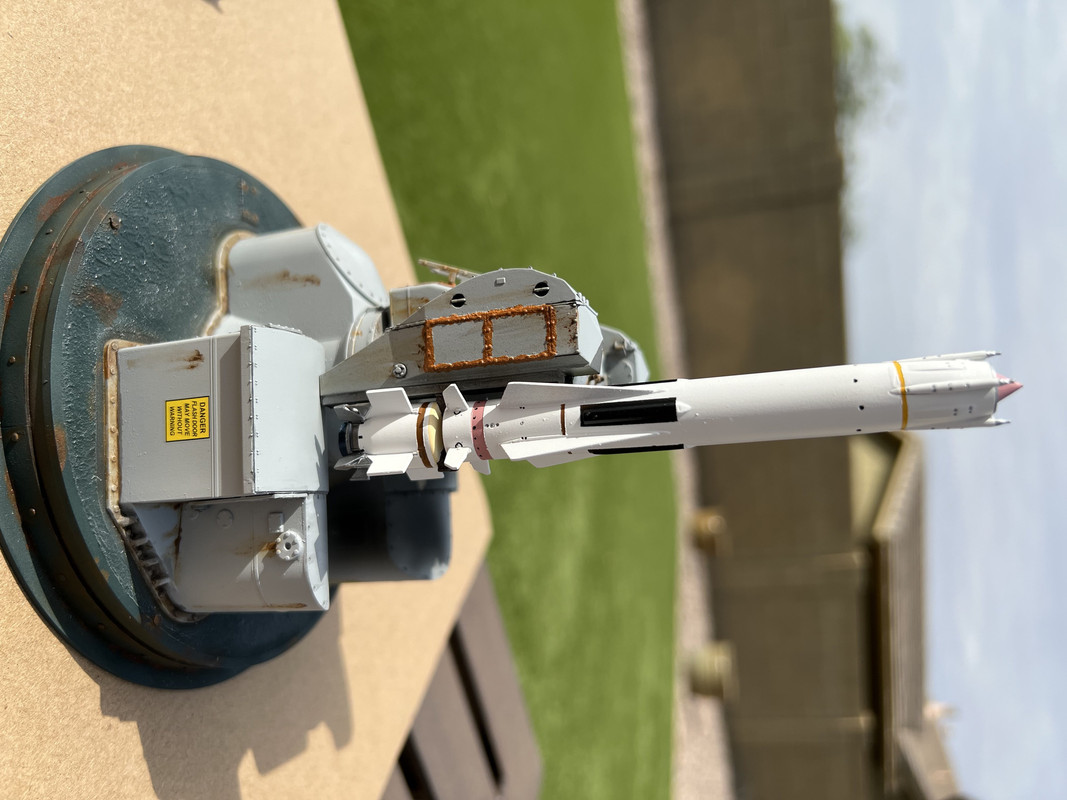
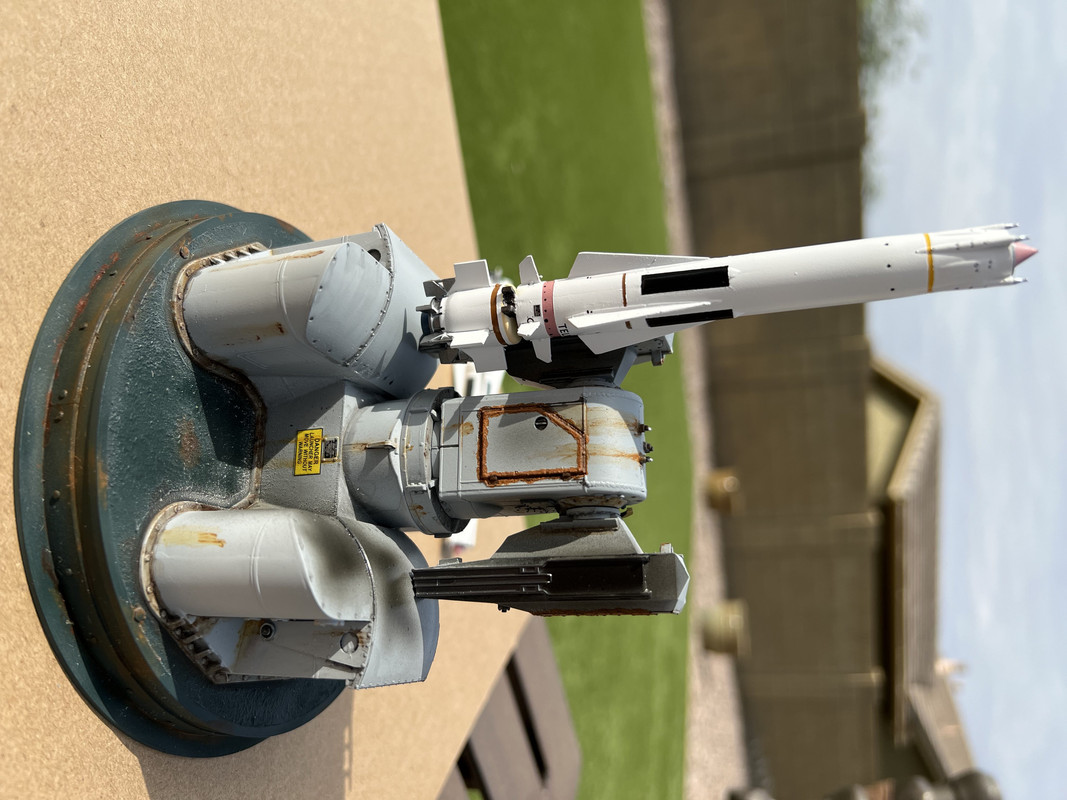
Fox Two's Harrier II book shows GR.7 and 9 used the BOL 304 launcher rail for AIM-9L after the late 1990's. Before that LAU 7As were used.
LAU-117As were used for AGM-65.
-
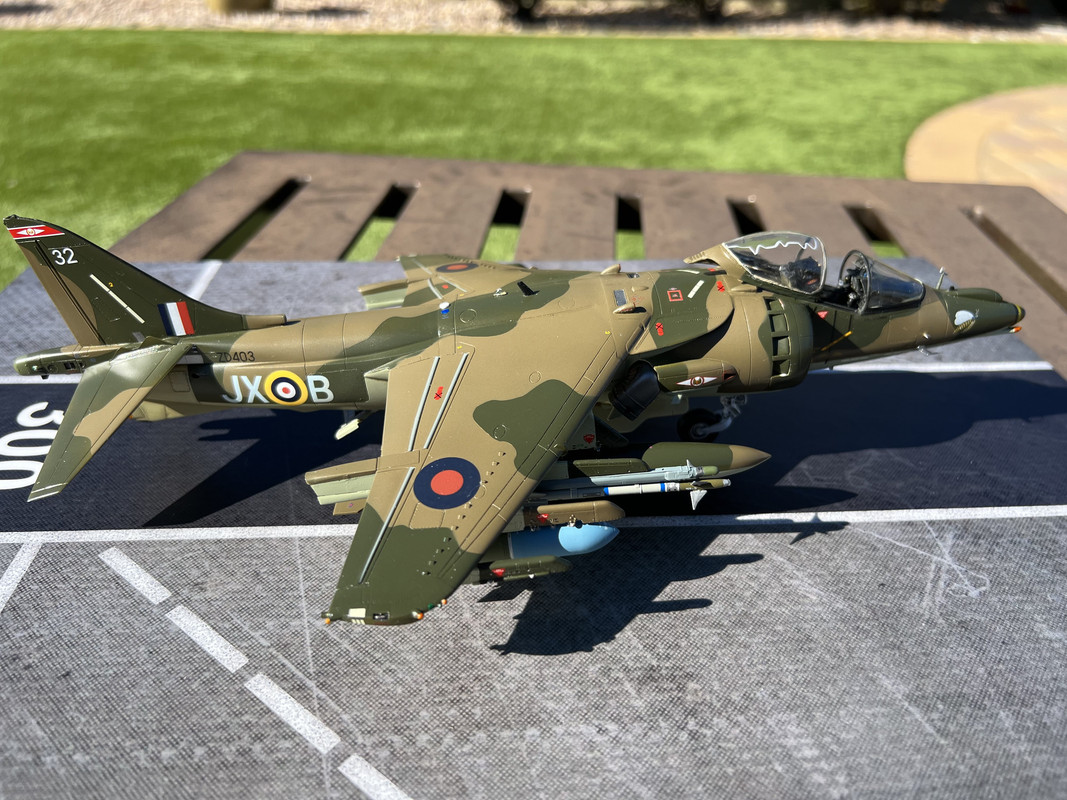
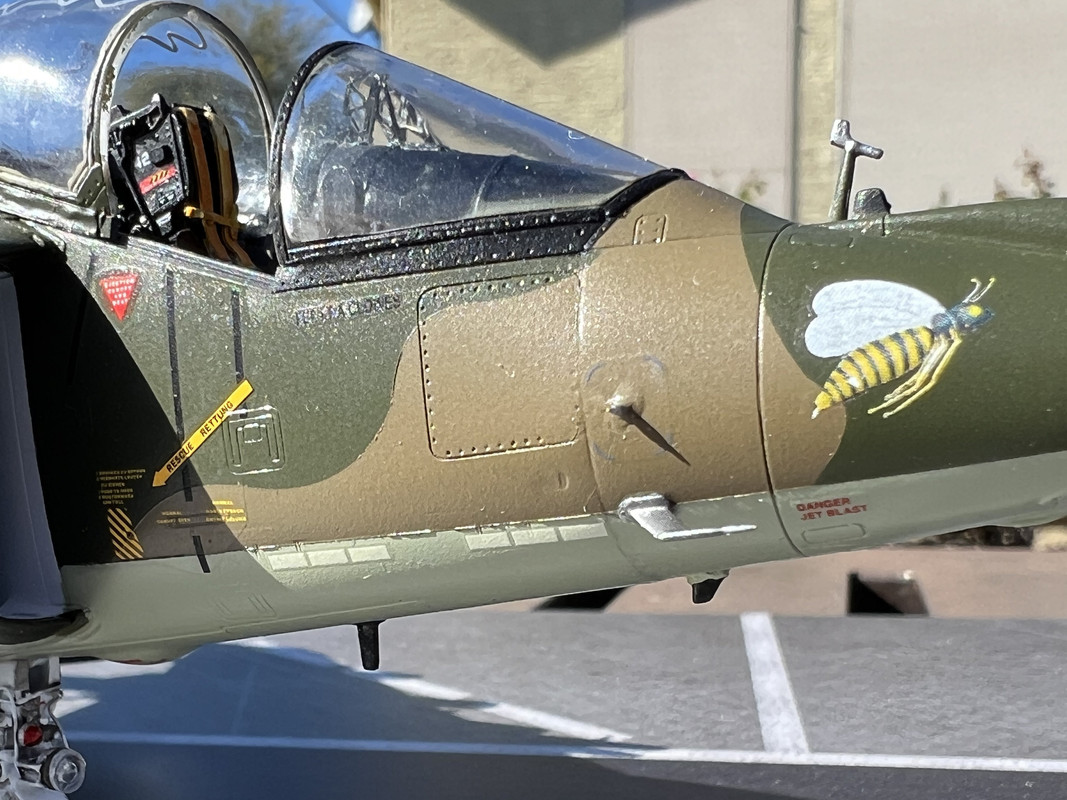
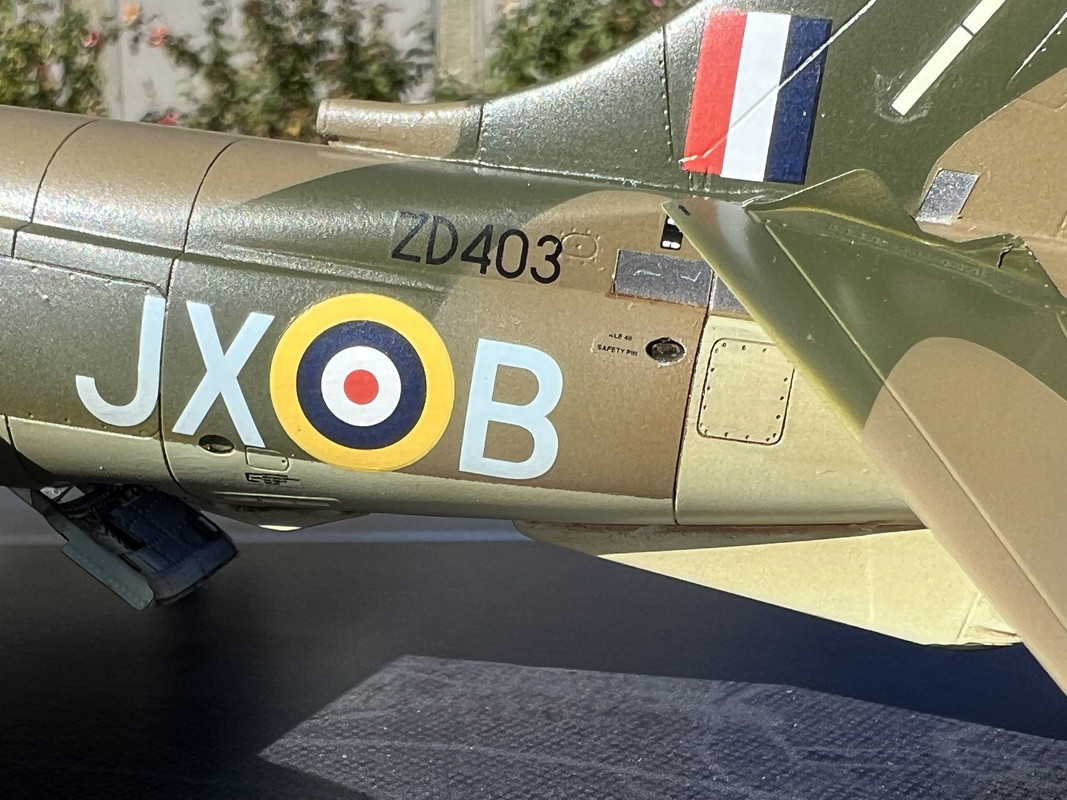
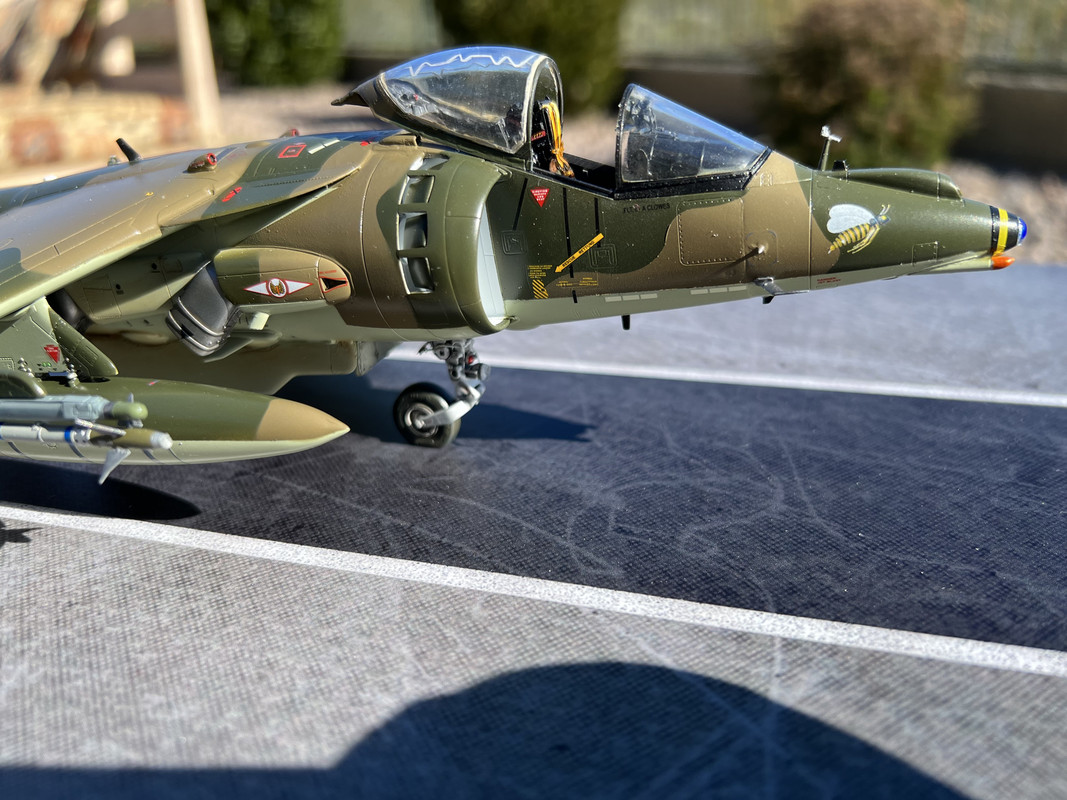
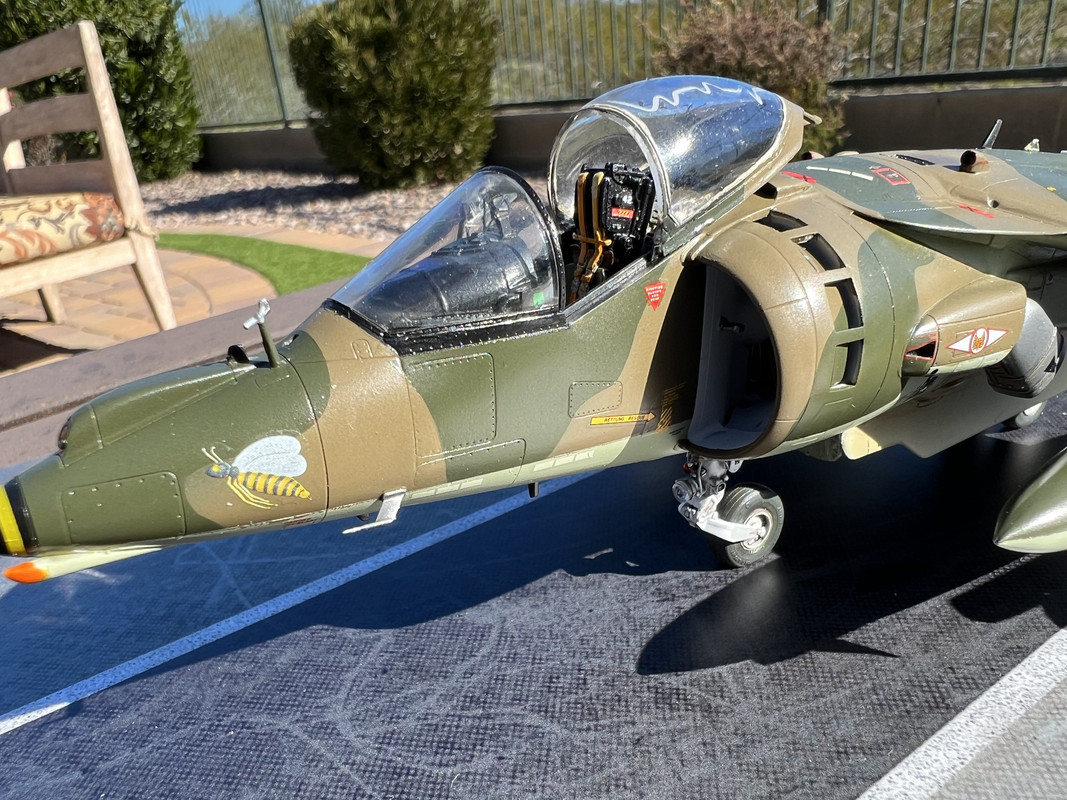
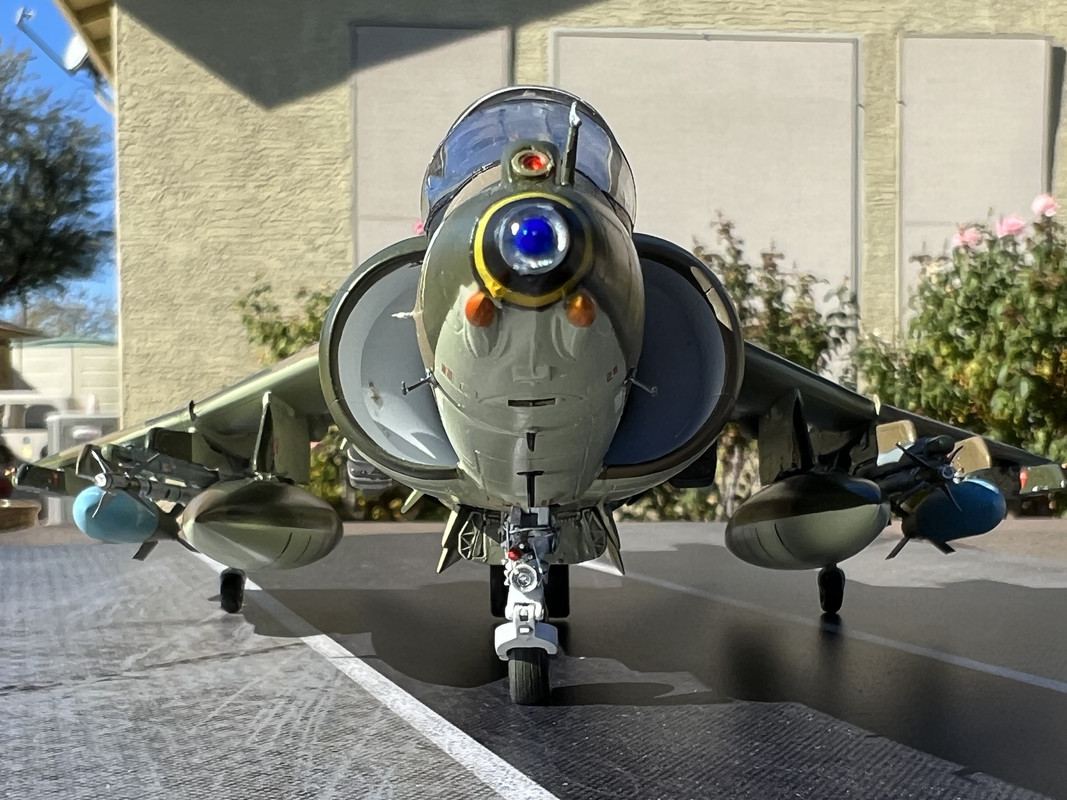
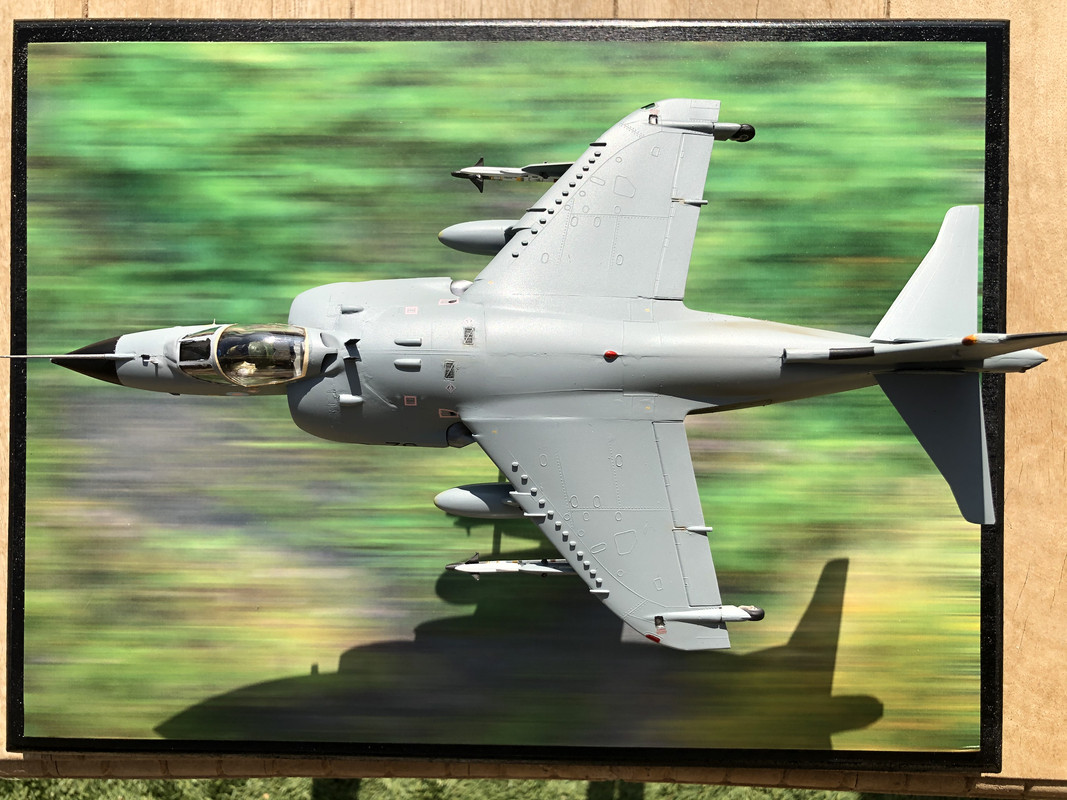
Here’s the Hasegawa GR.7 Harrier done up in a fictitious livery to commemorate F/Lt Clowes (https://www.bbm.org.uk/airmen/Clowes.htm) and his efforts in the Battle of Britain and throughout the war generally. While the RAF did commemorate Clowes with Harrier ZD403 for the 70th Anniversary of the Battle of Britain, I thought that slapping JX*B on the tail of a gray harrier didn’t really do it justice.
So…I thought that I’d try and do up a harrier in the Hurricane paint scheme of dark green and brown over sky, then add larger squadron codes. To do that I used the DN Models upper surface arctic camouflage masks, some gray squadron code letters from Kitsworld, as well as various sizes of roundels to match what the Hurricanes wore. The bumble bee nose art is from the Lifelike Decals Hurricane sheet (48-027).
The model itself has the Aires cockpit set and uses ResKit 1000 lb bombs (painted as practice bombs) and ResKit AIM 9M Sidewinders.
Paint was mostly Mr. Color lacquers. I kept the weathering to a bare minimum as I didn’t want to mess up the squadron codes. Normally the harrier gets quite messy on the aft end, but I’m claiming this one is washed frequently!
A nice project – lots of masking etc but the result is much to my liking!


-
I have taken to inserting steel rod (0.020") into fragile protuberances (drill into to body of the antenna and a receiving hole) then using both CA and plastic glue to hold it in place (eg harrier wind vanes, vertical antenna, small vents with no real locating surface etc). This gives the joint a lot more strength and rigidity - almost impossible to knock off because in order to do so the steel has to rip out of the plastic. Not sure if that would work for 1/144 scale.
Graham
-
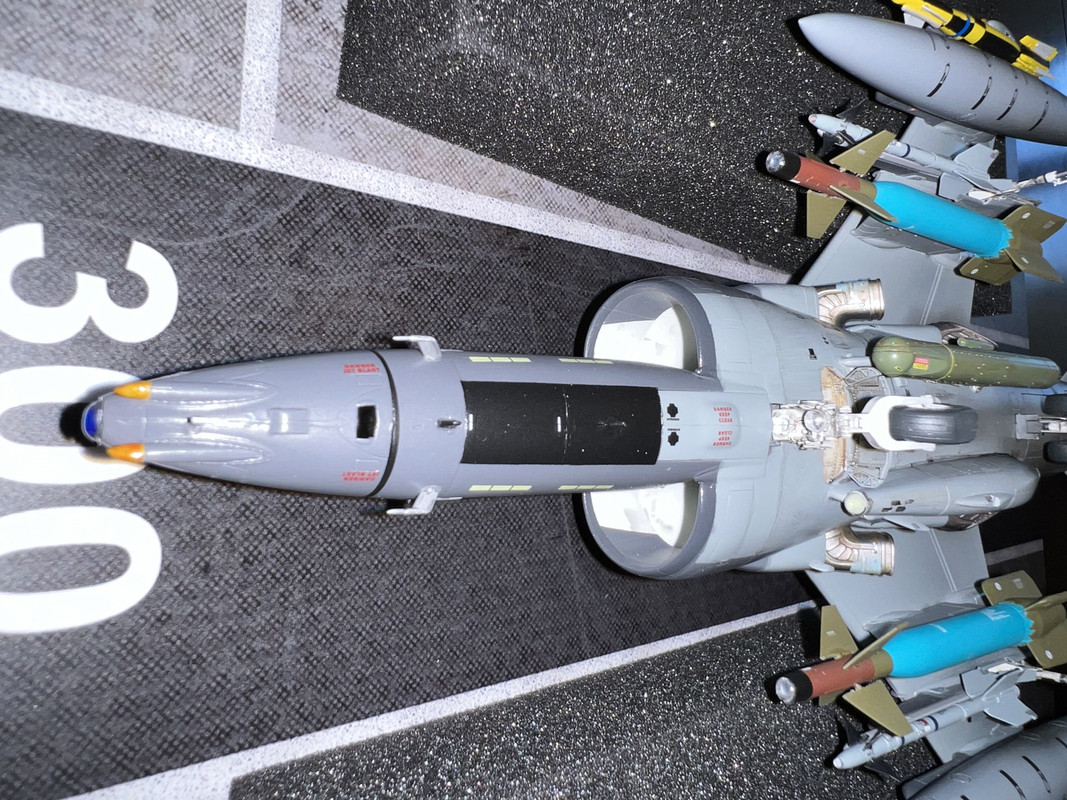
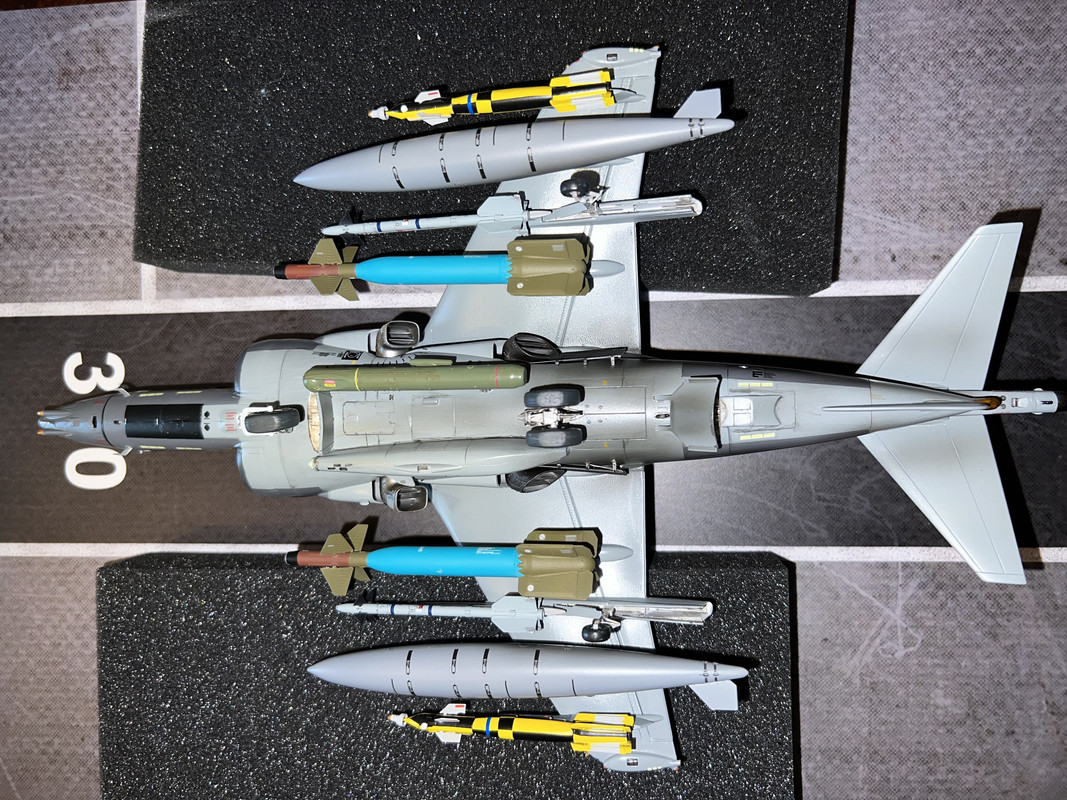
Thanks - yes the pictures are 90 deg off - I couldn't figure out how to rotate!
Graham
-
Takom's Sea Dart (used by the Royal Navy) was a fun step aside from a bunch of aircraft. The kit itself is nicely detailed and builds up into a great looking display. I decided to go with one missile on the launcher with the other having been fired off. The missiles were painted with Mr. Color and MRP paints. The launcher and base are White Ensign Models Colourcoats. Weathering was done with oils. Always fun to weather a naval subject - you can barely go wrong! I added MIG non-skid paste to the base and for what appears to be leak sealing around the doors that I saw in pictures from the Falklands conflict. Also added some Archer weld seams on the top of the central pivot - those looked pretty prominent in pictures.
My only observation is that the kit is not designed to have the missiles vertical - there isn't enough clearance between the flash door and the bottom of the launcer arms - so you have to take about 3/32 of an inch off - this removes the detail at the end of the arm.


Graham
-
Thanks for the nice comments! I agree that the Harrier definitely got better looking with age.
-
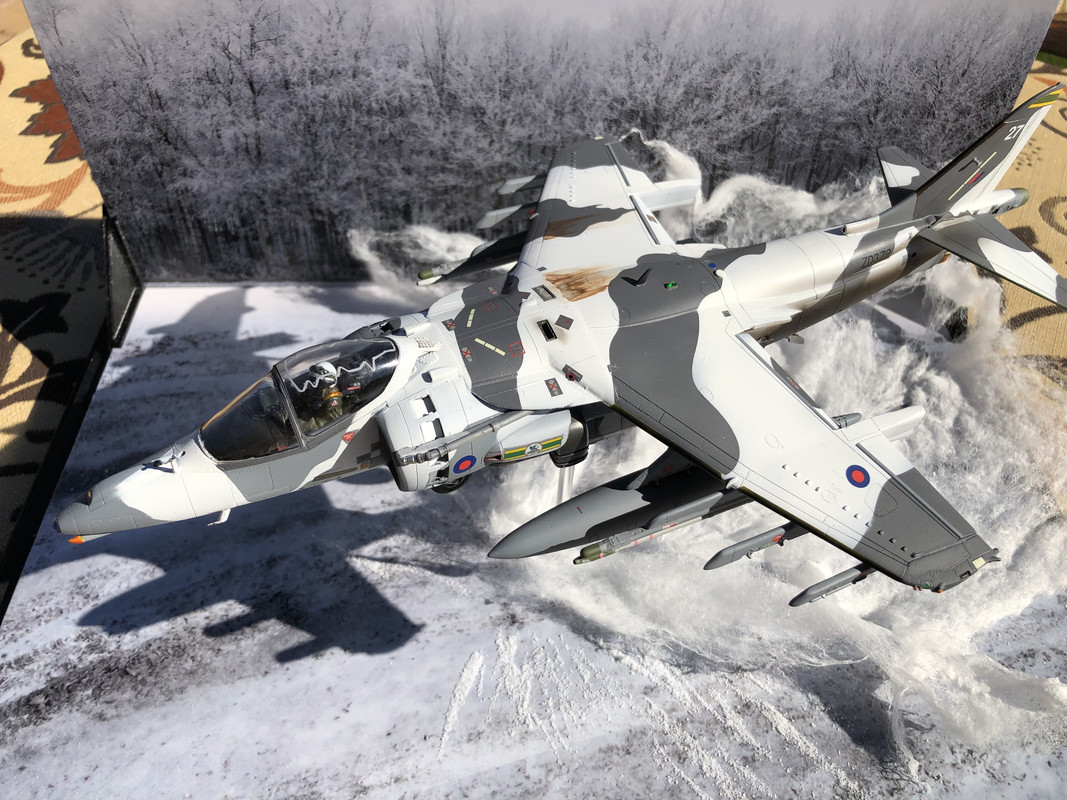
Thanks - it was pretty simple really. Pulled some gauze into a wispy shape then sprayed some Woodland Scenics glue on it a few times, bending and rolling as I went. Also used a brush to paint streaks with glue then sprinkled Woodland Scenics snow over and shook off the excess.
-
I've used them a couple of times and I really like them. They work a treat.
They are easy to trim to whatever size you need.
Graham
-
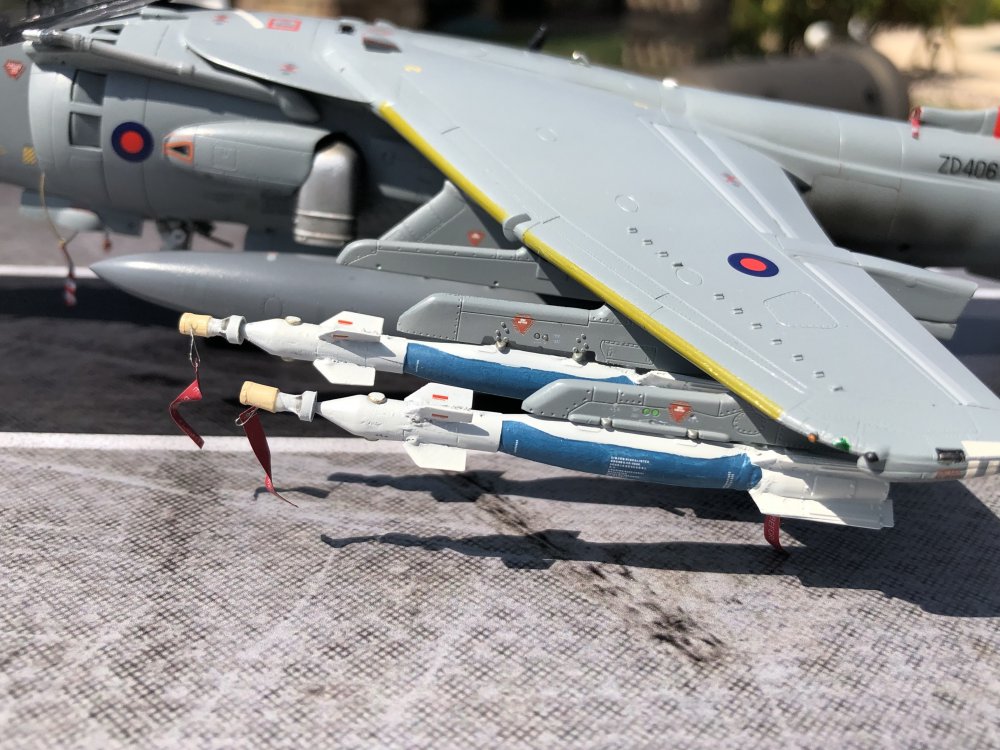
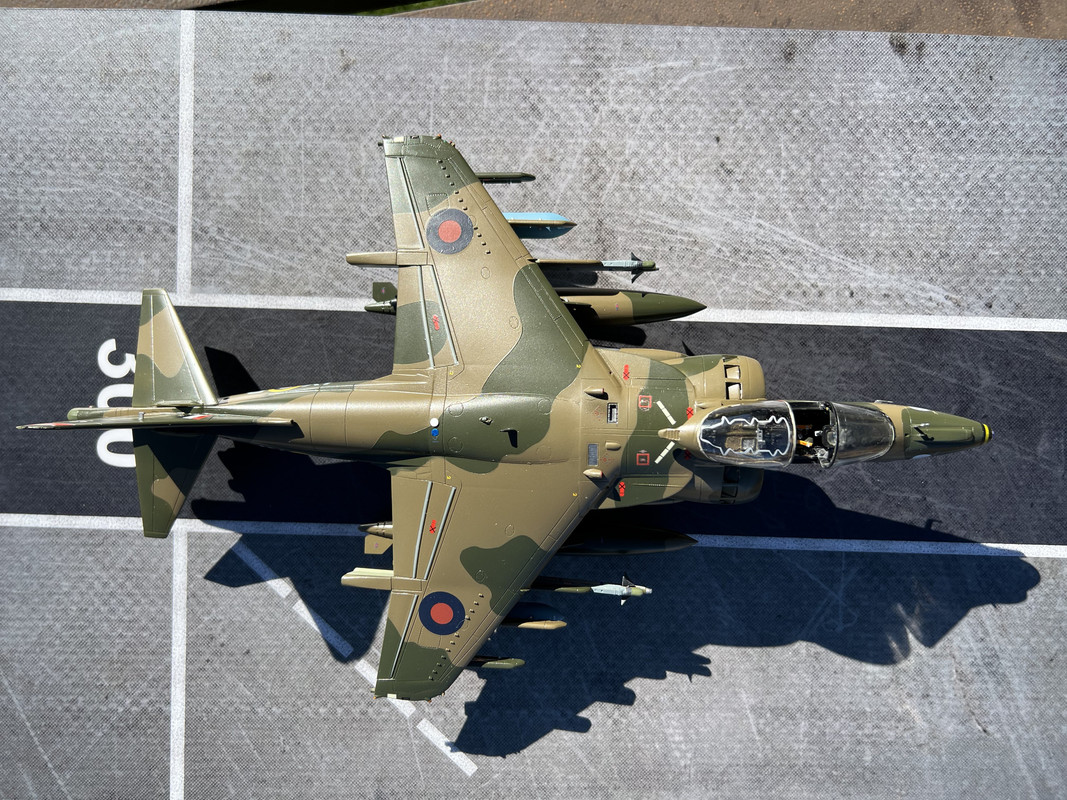
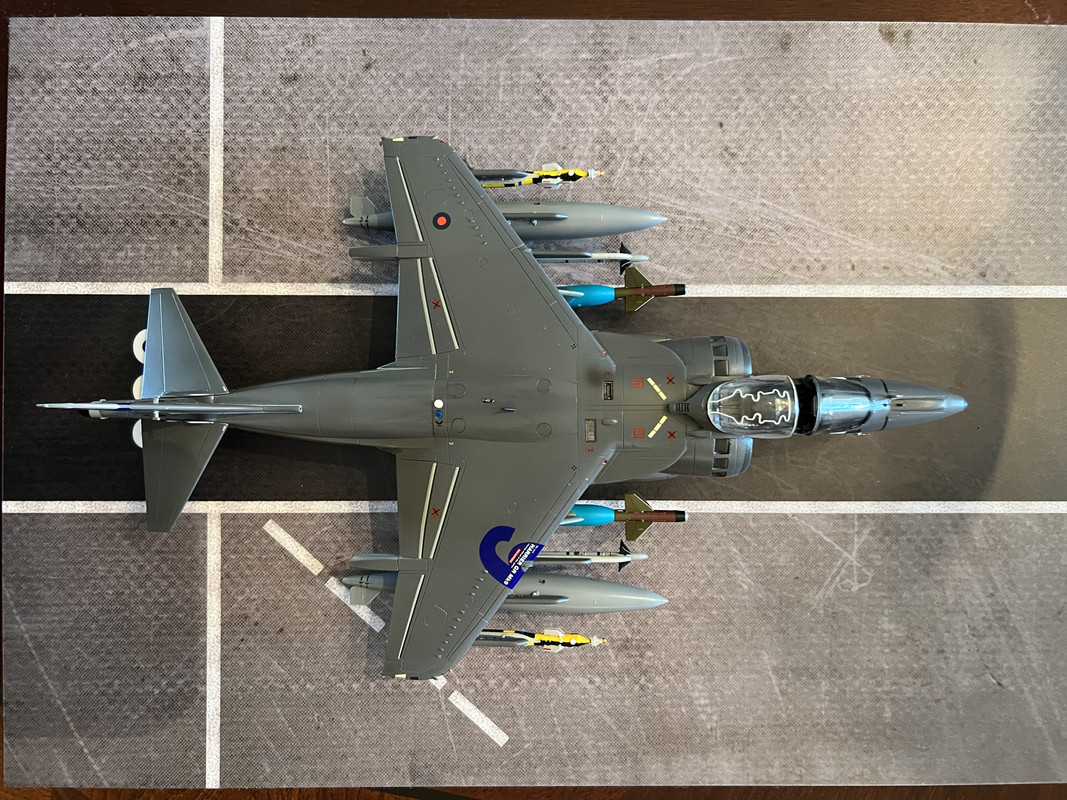
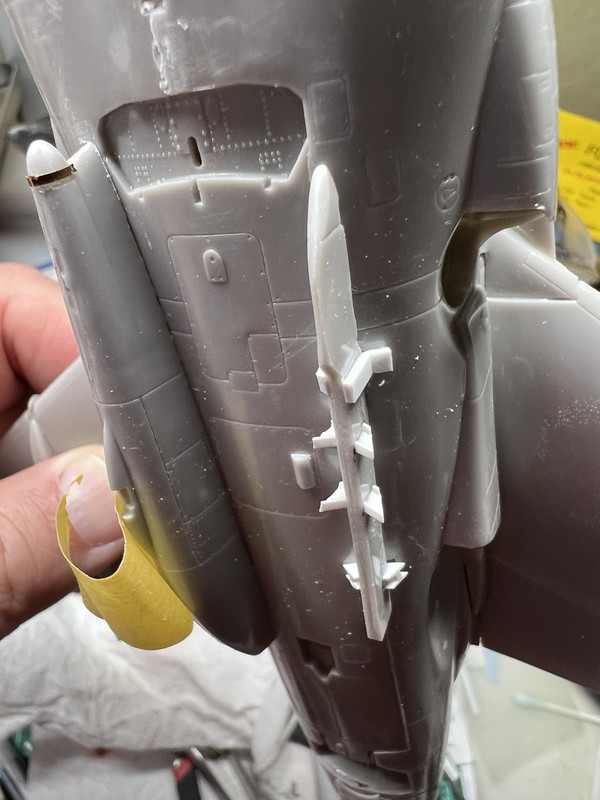
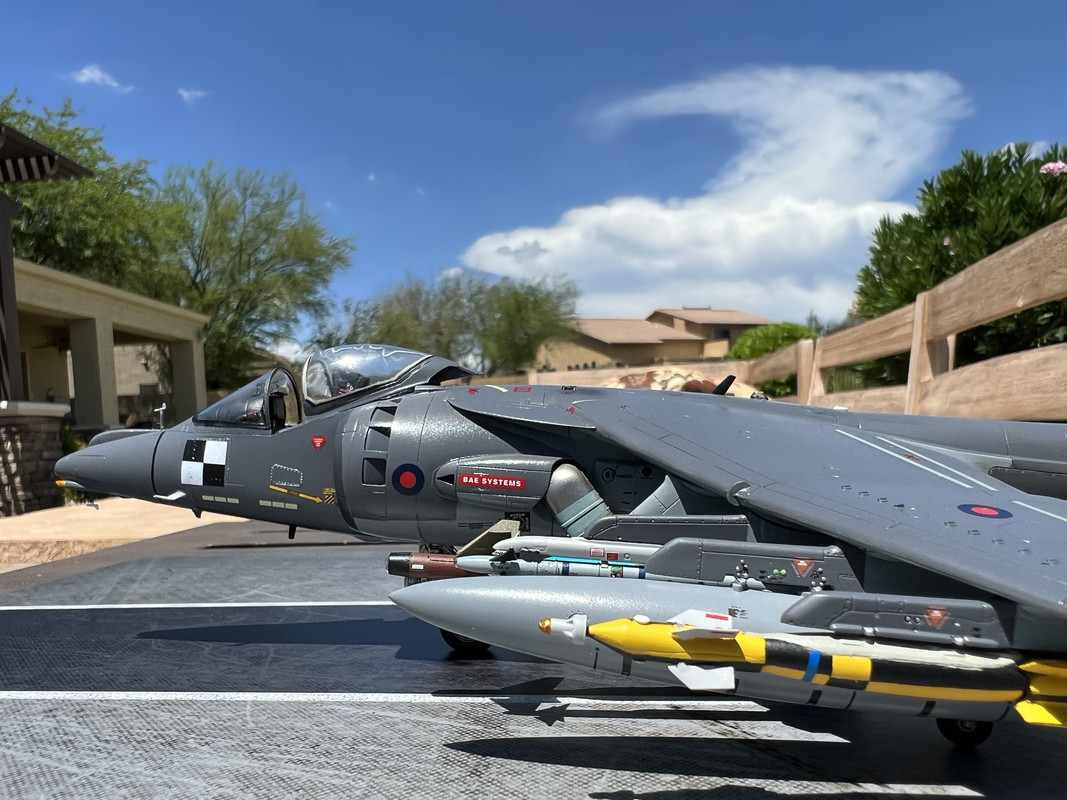
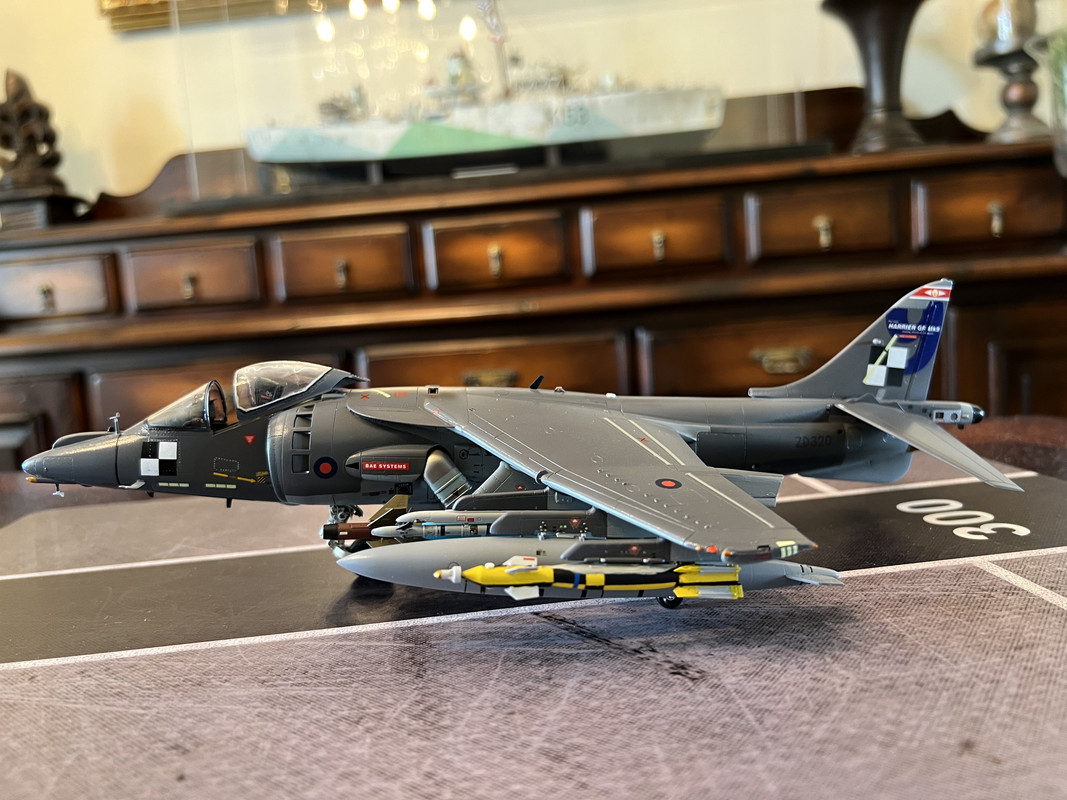
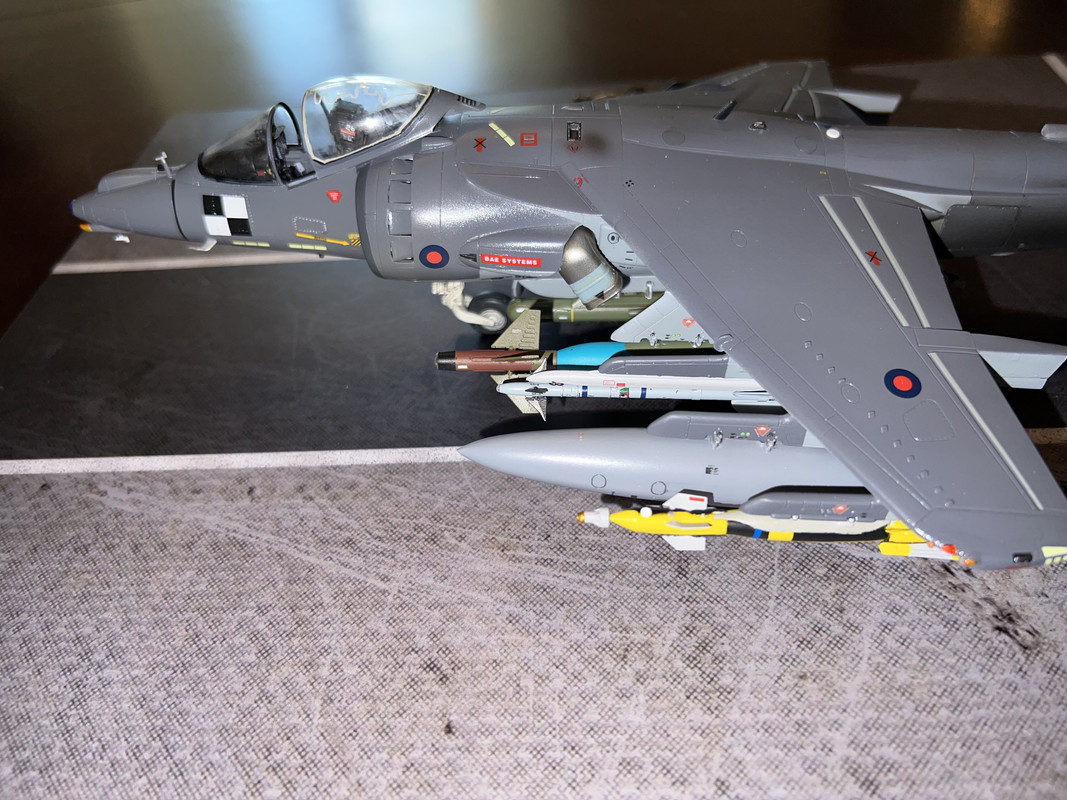
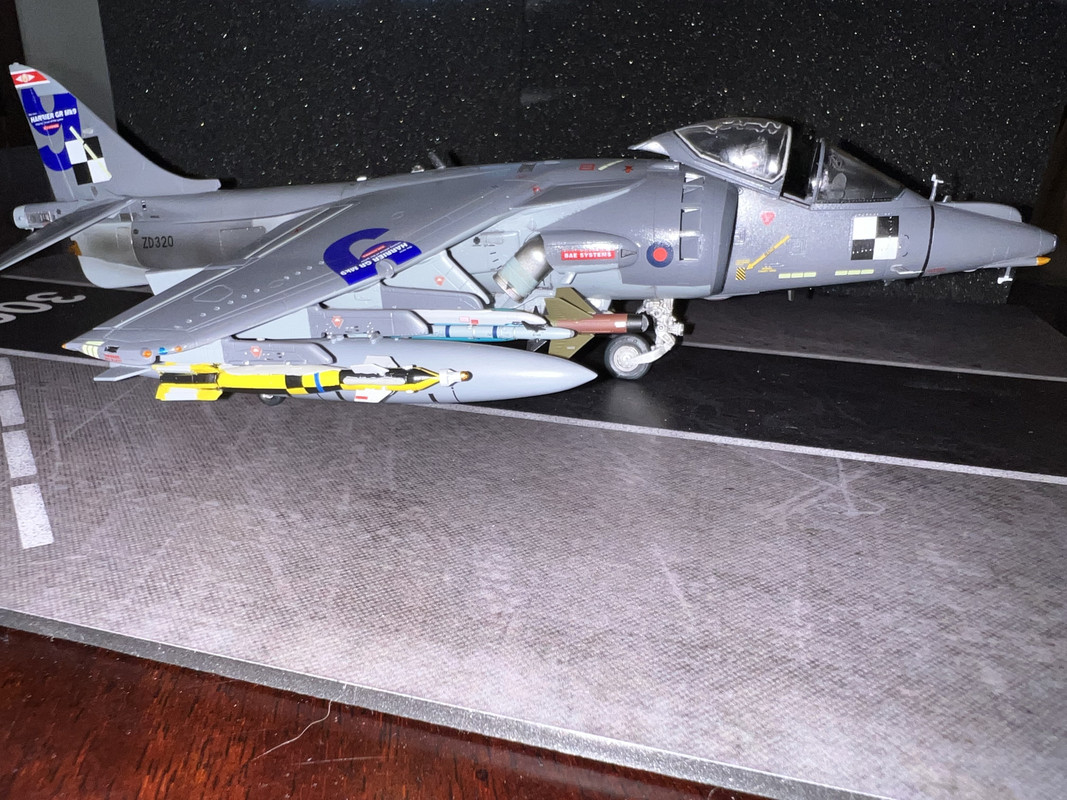
Here’s a few pics of the Hasegawa Harrier GR.9 (ZD320) assigned to BAe for testing and evaluation purposes. The Vingtor decals for this were used, as were some kit plus the Eduard GR.7/9 stencil set. Also used Eduard’s TIALD Pod (with a pylon made from the strake) and GR.7 Cockpit Details; Reskit GBU-24s and AIM-9M; and L’Arsenal’s Paveway IV. Metallic Details weighted wheels and gear detail PE were added too.
I had a bit of trouble with the canopy - originally I intended to use the Phase Hangar det cord, but somehow ended up with some residual glue on the plastic which needed to be cleaned and I was never able to get the canopy back to it's really clear condition no matter how much stripping, polishing and Future I used - almost ended with this one in the bin as a result but I pushed through to the end!
-
Beautifully done!

LF 1/48 HH-60J US Coast Guard Decals
in The Spares Box - add scale to your title
Posted
Long shot request! Anybody got this set and willing to sell it?
Model Alliance No. MA-48186 U.S. Coast Guard Choppers Pt II (HH-3F Pelican and HH/MH-60J Jayhawk)
https://www.scalemates.com/kits/model-alliance-ma-48186-us-coast-guard-choppers-pt-ii--619465
Thanks!
Graham