


foxmulder_ms
-
Content Count
1,618 -
Joined
-
Last visited
Content Type
Profiles
Forums
Calendar
Posts posted by foxmulder_ms
-
-
43 minutes ago, zerosystem said:
If you're paying attention and dry fitting I didn't reach any major issues during the fuselage and wing assembly. There weren't instructions available when we first got the kit and had to rely on early PDFs without sequencing so there were some self introduced issues. Some parts just snap together which is really nice but as always...TEST FIT
- If you make sure that all of the fuselage pins and posts are alligned and inserted all the way then the fuselage flattens out where some see the gap along the wing seal on the rear edge.
- The wings went together without any issues and the spoilers fit perfectly. (I built mine with them deployed)
- The nose to fuselage join was a little off on mine but that was most likely due to my screwups in the initial fuselage assembly (intakes go on first before the ramps) but I was able to make a relief cut on an unseen part of the nose part underneath the turtle deck and it worked out just fine.
- We were under a build timeline so some things were a little more accelerated than I would have liked so once the major airframe components were done. Things like the landing gear doors and actuators, these were a little off for me with the locating holes, this again because of my initial rush to construction might have been an issue with how I put the gear wells together. Not everyone reported issues there.
I can make a pro/con list if people are interested. Overall it was a fun build with some really amazing new engineering ideas. Some worked really well, others need a little tweaking. All in all it's a F-14 to me, which I consider like a P-38...there are alot of things going on in a kit that have to go right for everything to attach properly. The claimed detractors of panel lines and shapes don't detract enough for me to not think of it as an F-14...it doesn't have the Hobbyboss or Academy shape and surface area problems, it doesn't have the famous Monogram step fuselage assembly or the Hasegawa fit issues (admit-idly I haven't built that one in years but I still remember how hard it was to try and get the canopy to sit flat). While it might not be Tamiya, I liked it and will build another. And just to mention it, there were 2 Tamiya cats and the show (though both Alphas) and all of us did look at them side by side.

You suck, dude.. there is nothing good about this kit! Unbuildable!! Remember?
/sarcasm 😄 😄 😄
-
Great! Thanks!
-
I am getting close to be done with Mig-31B/BS. I am building the Blue 73. Does this plane have a refueling probe if so which one? AMK had 2 options in the kit and I am not sure which one is appropriate for the Blue 73. Help!
-
Scale: Only but only 1/48, the master scale :)
Genre: Modern fighter jets.
My current favorite company is Great Wall Hobby. I have their Mig-29s, F-15s and Su-35s. They are magnificent. Only gripe I have is their decals. The detail on them is great but the film is a bit too thick.
Kit: GWH Su-35, I really like AMK Mig-31, too.
p.s. As an airbrush and paint producer: Mr. hobby/Gunze. They are great!
pps: I am really looking forward to upcoming GWH Su-27, Trumpeter J-20 and Zvezda, Su-57 kits and Kittyhawk Mi-28. Hope they will be good.
-

Its done, after 4 and a half weeks......

Magnificent!
-
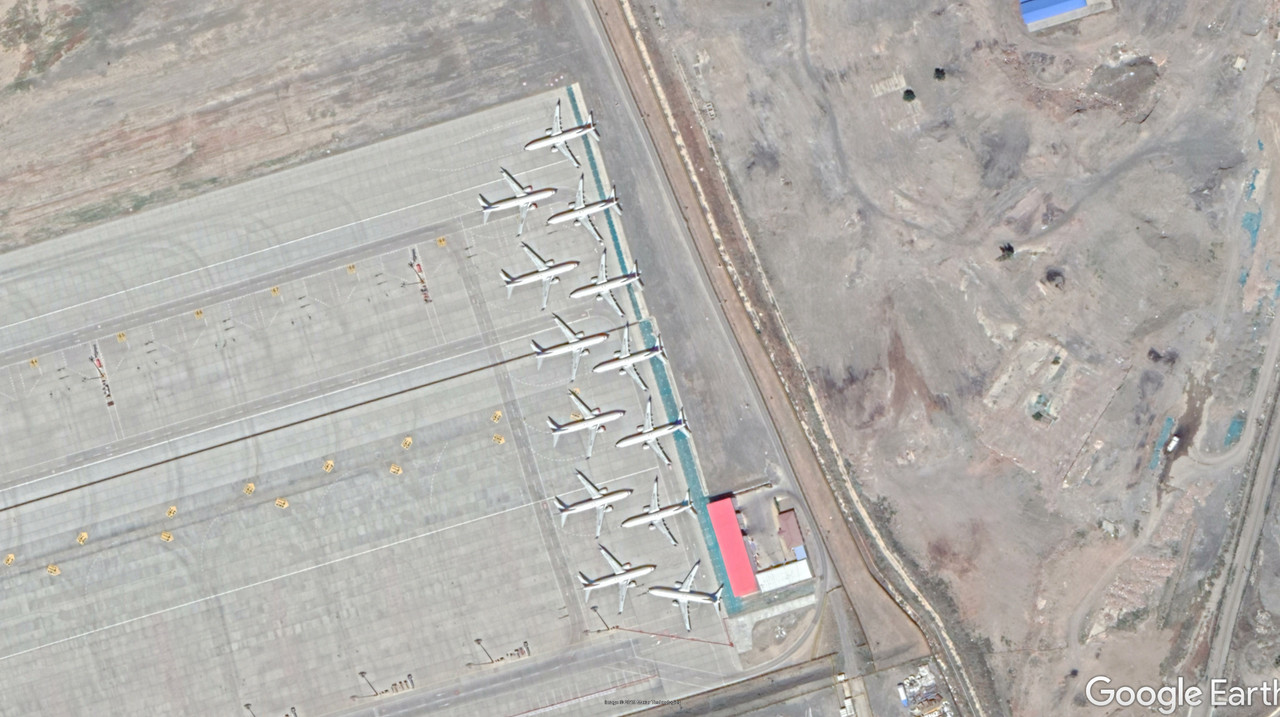
Satellite image from google earth.. In the middle of a desert in China:
-
Jaw dropping built and model:
19 hours ago, Fishbone said:FINALLY, I've done all decals and stencil data, produced by Furball Aero-Design. The decals are one of the highest quality decals I have ever used - thin but tough with very minimum carrier films which you don't even have to worry about silvering problems.
- Resin wheel from Def.Model, Korea.
- Pitot & AoA from Master, pl.
- Figures: ZLPLA 즐프라 & Reedoak (Not in photos)
- Deck: HobbyWorld ESP / Phoenix Model (Not in photos)


-
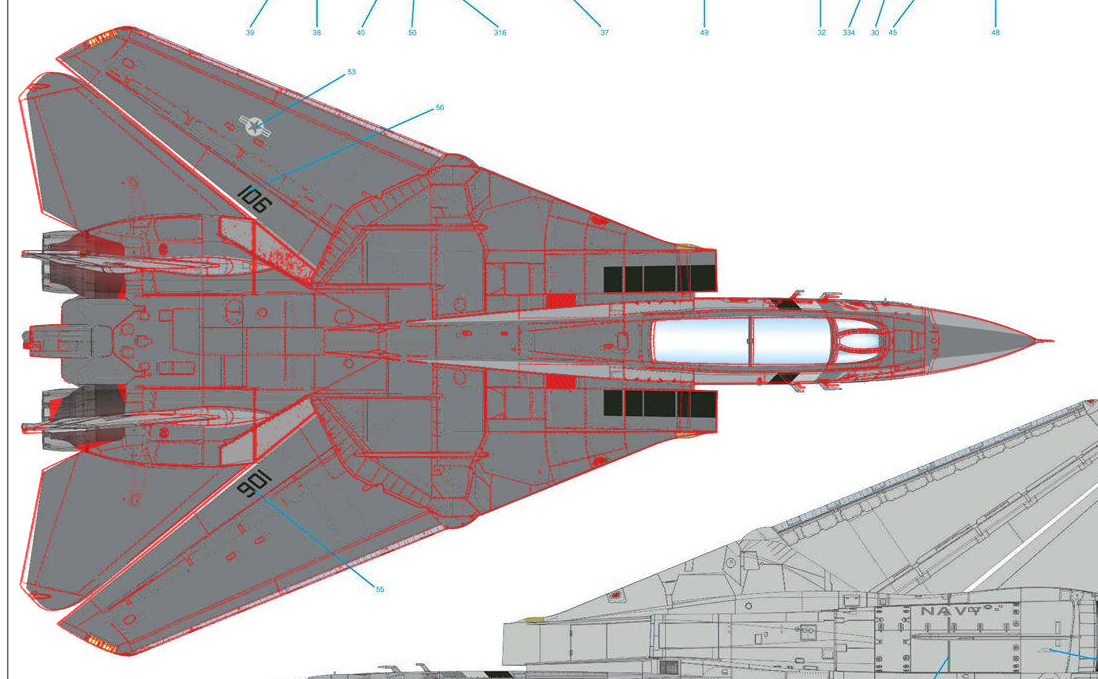
5 hours ago, Alex Matvey said:
There is a comparison between Tamiya (red line) and AMK instruction silhouettes that are actualy renders from 3D works. You can see the differences in side and top views. They are pretty similar exept nose section, which is noticeable "beefy" on AMK model.

:)
no, no... canopy is wrong on AMK, they said.. you cannot build an AMK F-14, they said. AMK butt is tooooo big, they said.. 😄
-
2 hours ago, GW8345 said:
So I see ARC bowed to AMK's demands to delete posts, so much for a fair and honest modeling discussion.
haha. evil billion $$ worth companies are killing us.
-
Very impressive airport and terminal.
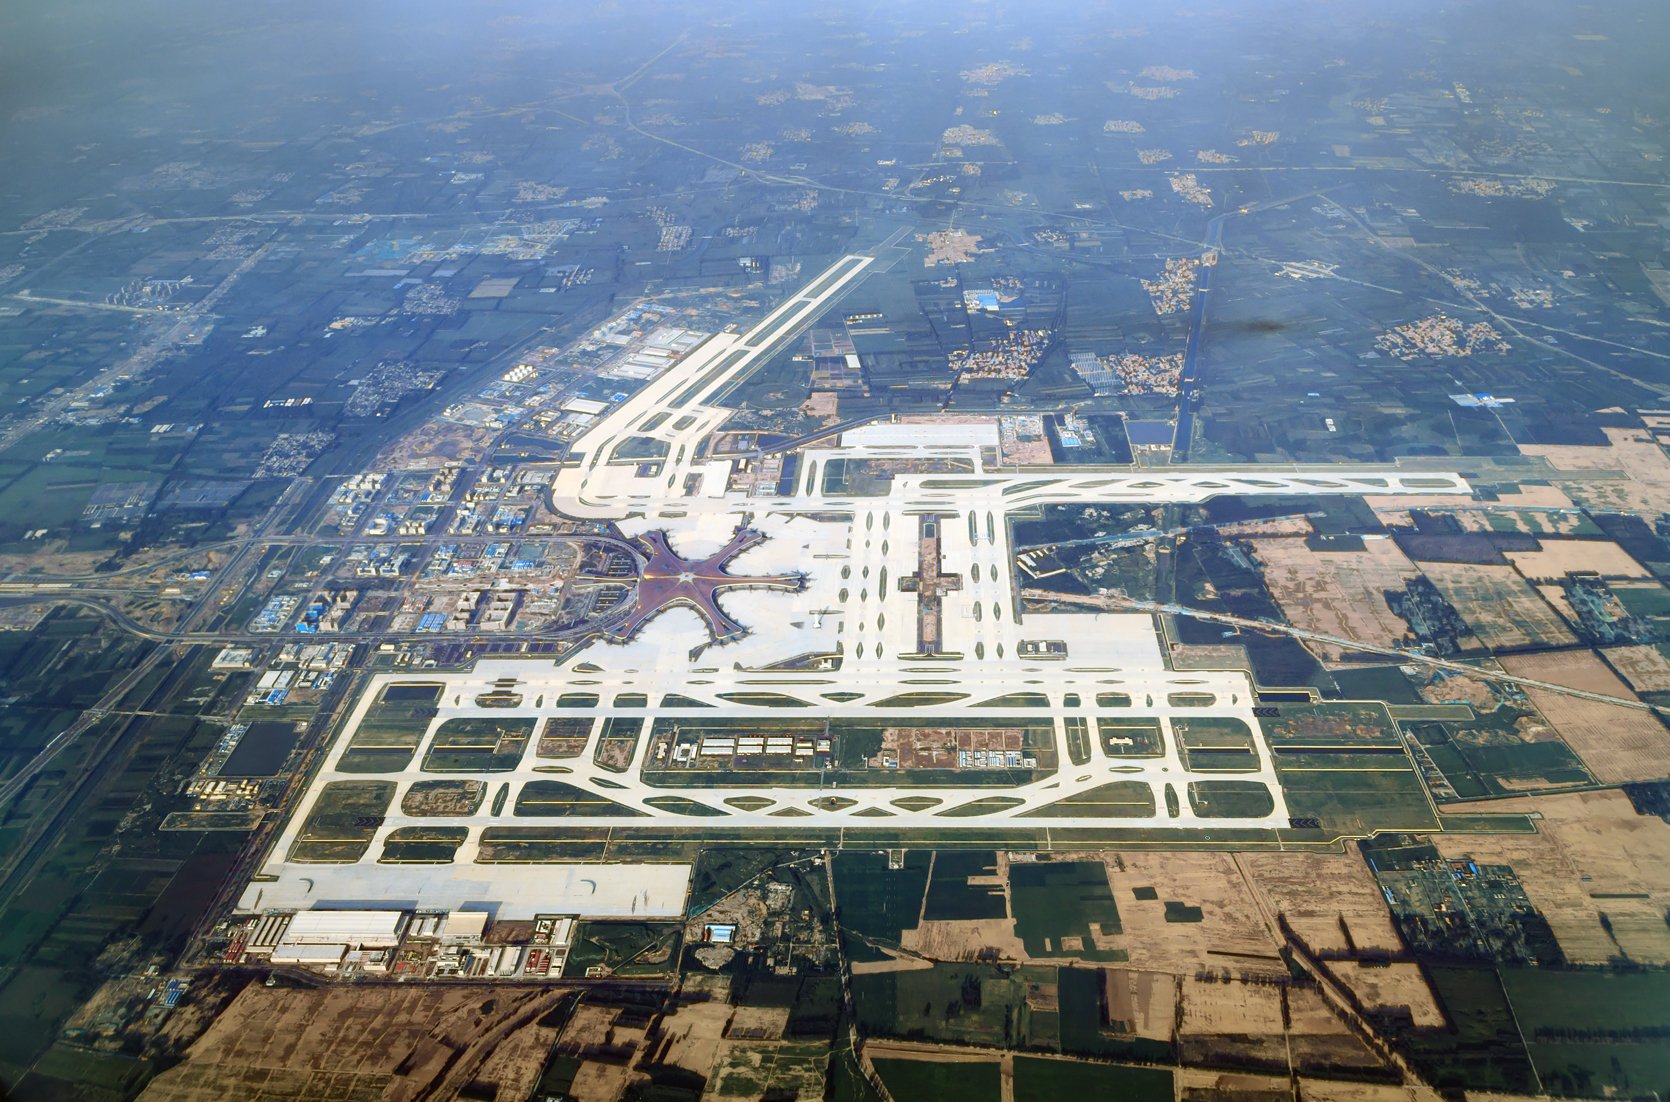
Currently it has 4 runaways + 1 military one to serve 72M passenger/year. In the future it may add 4 more to serve more than 125M.
-
9 hours ago, Nino_Belov said:
I hope that in future Flanker family of GWH will be also a Sea Flanker? 😉
We have a nice Kinetic Su-33/J-15. Early/late Su-27s will be my first choice right now. Then, I hope they include a Su-30 with canard. Then, Su-37. I am greedy, I want Su-47 too :P
-
I will buy couple of these, hope it will be a nice model.
-
8 minutes ago, Sio said:
Oh no!
Please! Terry should do something?
dont worry there are backups.
-
43 minutes ago, Tapchan said:
Actually me too.
ME 2!!! lol.... I feel soooooo ****powerful****. lol. Now, I know how Trump feels. 😄
-
Well, I have three and all are expensive ones. I am a sucker for airbrushes and planning buy more in the future 😄
I have, H&S Infinity, Iwata Hi-line CH and Mr. Hobby PS770.
My favorite is PS770 and recommend to anyone. The least favorite but still good is Infinity. I dont like its trigger.
I am planning to buy PS-266 0.5mm. so saving money 😄 😄😄
-
Cross post (Thanks to Mr. Fishbone):
As the tail fin of this F-14D is fully black so I decided to try the decals which produced by Furball Aero Design. I sprayed SF288 Mr. Finishing Surfacer 1500 Black onto both tail fins - I love the finishing so much, it's fully flat black! I begin the decal work after few layers of clear coat which will make the decals much more easier to slide.
Decals are very good, thin and tough but please remember to put a little more water on the surface otherwise it'll very hard to slide it around. The decals are perfectly settled on the tail fins after 2-3 layers of Softener.


AMK 1/48 F-14D updates:
Pre-shaded with SF288 & Gunze 40, this Felix is too big...my thumb is pain and tired, so that's all for the night.


-
3 hours ago, ChernayaAkula said:
Once you have to bring Surfacer into play, the 15 seconds thing is well and truly busted!
To fix something that shouldnt even need fixing. To fix something that was even touted as a fix to potential problems introduced by the modeller during construction.
This misalignment might even be one of the more manageable instances. When bomb moulds are misaligned, the resulting plastic parts are close to useless. Again: intended to make the modeller's life easier by taking away the need to carefully align bomb halves. Fine in theory.....
what are you talking about??? It is easier to glue two pieces and try to get rid of the seam line than this single piece gem???!!!? lol, You are lost mate. 🙂 you guys don't deserve these models. 😜
-
4 minutes ago, Tapchan said:
love this show. !! :) very appropriate for this thread, indeed... 😄
-
49 minutes ago, B.Sin said:
Word.
haha.
Get real. Once you paint and after the wheathering, you wont see anything from a distance of 10 inch. You need a magnifier to see what is going on.
This is ridiculous.
Also people aligning better than this will be 10% of the modelers, if we are lucky... + potential putty/glue problems.
-
9 hours ago, shion said:
Talking here recently about slide mold misalignement.
Another example:

I cannot see it quite, could you magnify another 10x, please.
-
I still have a grudge to spruebrothers since they bought and *closed* great models, my favorite late online store :[
-
Is this reliable info for Su-35 payload?
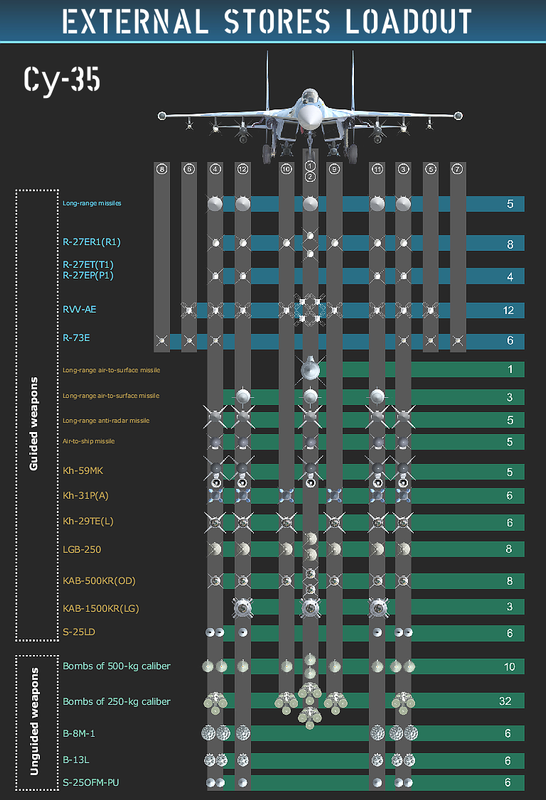
Specifically, can pylons numbered 3/4 carry the same weapons as the most inner pylons 11/12 can.
-
Weapons and decals.
-
1 minute ago, ya-gabor said:
This is an „In-house” conversion by the particular modeller. He simply cut the afterburner section off from the rest of the engine and I believe he has moved the afterburner flame holder ring further front (to the back) than it should be (designed into the kit).
He had moved back the afterburner by about 4 cm. Don’t ask the reason why.
 It is fairly deep inside on the real one (just as in the original kit) it is possible that he wanted it further back (nearer to the end) to be able to show it more. I don’t know what he was doing!
Best regards
Gabor
He was enjoying modelling 😉
AMK 1/48 F-14!!!
in Jet Modeling
Posted
Thank for this great post. Some are more equal indeed 😉