


Chief Snake
-
Content Count
871 -
Joined
-
Last visited
Content Type
Profiles
Forums
Calendar
Posts posted by Chief Snake
-
-
There are some other things on there I have previously seen on USAF MV-22"s. The stuff scabbed along the lower part of the sponson just in front of the rear landing gear is new to me.
Chris M
-
I'm gonna go out on a limb here but a photo of this aircraft was floating around back when the RAH-66 was being developed. My memory of it was it's not a flyable prototype but a trial fit of proposed parts. A mock up. The line that comes up and across the nose suggests those are fasteners that just hold a nose cap in place. If this was a manufactured for flight change, I believe the nose would appear as a solid unit. The photo might have been in the Army Aviation Digest. Since Boeing and Sikorsky were paired on the Comanche project it seems a likely idea from Sikorsky.
Chris M
-
12 hours ago, Whiskey said:
So cool. Was the UH-1D on Floyd's 1/48 sheet?
No, the UH-1D artwork is on the KittyHawk sheet.
Chris M
-
The unit is the same. The design was transferred from one of the aircraft to another. I seem to recall it was on the D first and when that aircraft was damaged the PI moved over to the guns section. The was a risque component in the first depiction, in order to satisfy some issues with it the art was altered by adding panties to the depiction of the girl. The second picture is in more than one book, I have a color photo of it from the crewchief in the picture.
-
Thank you all my brothers.
Chris M
-
1 hour ago, midnightprowler said:
What Chris said. How many degrees did you turn it? Getting anything aftermarket won't be happening lol.
I rotated it to a better position using the alignment of the control tubes as a guide. The damper arm links needed modification as well as the PC links. I also discovered that the stabilizer bar does not have proper mounts and the oil reservoirs for the blade grips are not there.
Chris M
-
5 hours ago, UH-1Mad said:
Would you be able to post pics of how you have corrected that? Sounds like something I need to try on mine.
Cheers,
Chris B
I'll try soon. My wife passed away suddenly September 18th and I am in deep work dealing with legal stuff.
Chris M
-
39 minutes ago, midnightprowler said:
What really surprises me is these mistakes happened under Floyds watch. Are there any easy fixes for the rotor head?
I built one recently and I deleted the little pin on the top of the mast and turned the whole mast clockwise. Couple of little fiddly things to adjust and even though the scissors and drive links are incorrect the control tubes line up without that exaggerated tilt. Looks ok, someone who did not know about it would not realize it.
Chris M
-
5 hours ago, midnightprowler said:
Just interested in reading them in general lol. How can one get a copy? I still don't get how kh can get it wrong with knowledgeable people involved.
I think kitty Hawk got it wrong largely because the CAD designers did not understand what it was they were looking at. And I do not think the CAD designers are as fully capable as they could be. They designed the scissors and drive links and while parts are right, they are mirrored and no one caught that. The locator pin at the top of the mast and it's dimple in the head are placed improperly. While what they did would have worked it simply was not aligned with everything below it in the proper way. Some of the other things, like the overhead detail that was missing and the failure to put a locator for the transmission is just plain sloppy work. That seems to be a theme with practically all their kits. They also designed their mold poorly as we see the mold separation lines running down the lower fuselage halves. Just sloppy.
Chris M
-
5 hours ago, midnightprowler said:
Just interested in reading them in general lol. How can one get a copy? I still don't get how kh can get it wrong with knowledgeable people involved.
I believe they are available on disc, you might find them on ebay.
Chris M
-
11 hours ago, midnightprowler said:
I would give my eye teeth to see the maintenance manuals!
I have a set from 1989. If you want to see something specific I could go through the books and find it. Descriptive illustrations of each model contain multiple pages of parts breakdown.
Chris M
-
11 hours ago, midnightprowler said:
So the Kitty hawk is still wrong?
Yes, the Kitty Hawk kit is wrong. There are incorrect presentations of both hardware and relative location of hardware.
Chris M
-
Yeah, that's pretty exaggerated for the tubes. Look at pictures of B,C and M and that angle isn't as prominent. Must be something peculiar to the E with a 540 head.
Chris M
-
Don't quite get what else you may be referring to but that head is a 540. That control positioning is correct for that install, not for a D or H. Kitty Hawk kit as intended is wrong but I found the mast locator pin was a part of the o'clock issue and the drive links/scissors were backwards. If you had the opportunity to revue the maintenance books for this series of helicopters you would be surprised at the difference that exist between models. The 540 on UH series was a blend of the UH-1 and AH-1 controls.
Chris M
-
The Cobra Company set didn't get the blades corrected because I had a lot of trouble with mold creep and resin droop. Even if I had corrected the chord of the blades the problems remained. And yes, I tried putting brass rods in the molds and poured resin in them. Something of that nature is bound to fail early and the brass rods would show quickly. The set didn't sell well enough to explore more options which certainly would have affected the price.
For myself, I take the blades out the Dragon Huey kit and shorten them and rework the rotor head of the Seminar kit. Takes some inventiveness but it does come out nice.
Chris M
-
There was one special boxing of the Academy kit that had a different decal sheet. It was #12701 and was called "Special Nose Art". The markings can be seen in Brennans nose art books. There were 4 different units provided. Other than that boxing I don't believe anyone did anything other than the Seawolf decals by Fireball.
Chris M
-
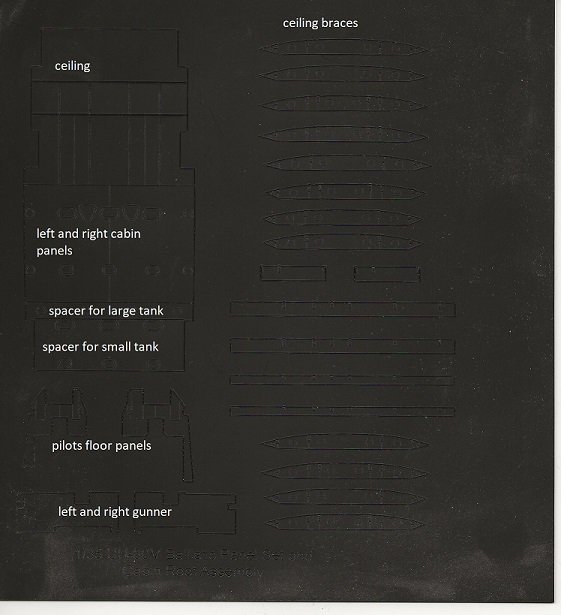
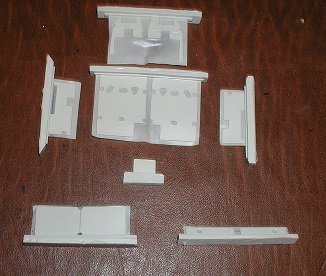
Well guess what? Those laser cut parts were the basis for the resin cast parts. They all are supposed to go exactly as I told you. The sheets were provided to me by the individual who made them. I made sure they fit the model. I elected not to do the ceiling due to it's complexity. I scanned one that is in possession and labeled all the parts as to where they go.
Chris M
-
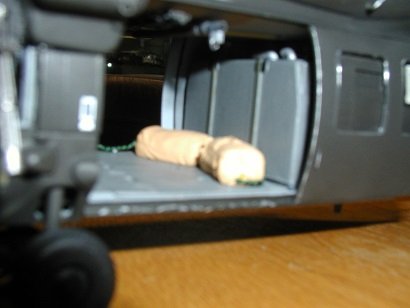
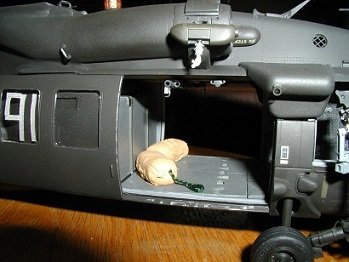
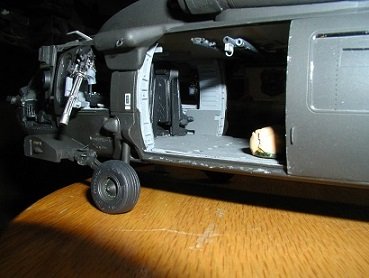
Here are the ballistic panels laid out in the order they would be put in. The two top panels go on the cockpit floor. The two larger panels cover the cabin floor as shown, the small opening is the cutout for the cargo hook opening. The smaller square is a cover for the opening if you want to cover it. The small rectangular panels on the right and left are the gunners panels that would be mounted under the window. They only fit one way so they are mirror of each other. The lower left panels are placed on the floor between the smaller fuel tank and the center plates. The right panels are used if the large fuel tank is used. The color of the panels can be the same color of the interior where they are placed or in some cases they are a slightly darker shade of gray.
Hope this helps.
Chris M
-
I do not have any of the instructions from the MH-60M set. Installing the ballistic plates was included in those instructions. Mike West of Lone Star Models bought all the assets of Cobra Company and all the instruction sheets were stored on a computer that was sent to him. I think I have a set of the plates, if I do I can lay them out on a flat surface and make a photo of them. I will have to look.
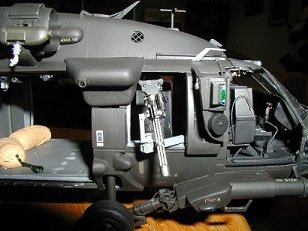
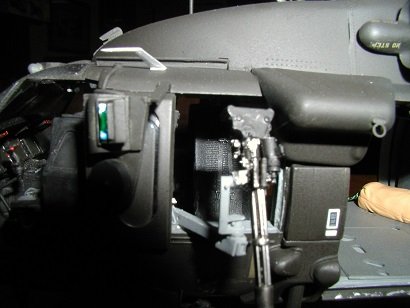
The Academy Blackhawk kits have building problem areas. The pilot seats are set a little too far back. Modify the frames of the seat to shift them forward a bit. The instrument panel sits a shade to far forward, you get interference with the windshield when trying to install it. The exhausts are drooped down too much. It can be fixed to a degree but it's a lot of work. The fuselage halves take some careful planning to join them together. The first thing is the cabin assembly is too wide, it keeps the halves from coming together. You have to plan to shave the cabin assembly sides in order to pull the sides together. The body underside does not join together level, it looks "caved in" when joined. Adjust that by putting tabs along the seams and adding some plastic pieces across the bottom of the cabin to make the halves join level. The upper surfaces of the nose also "droop" downwards. It makes putting the windshield on neatly a real problem. I think there is room forward of the instrument panel to add a couple of vertical spacers inside of the nose to keep it up as it should be.
I still do not have an MH-60 DAP in my collection. While I retained a Cobra Company set the make one, I have the feeling I may use a Kitty Hawk kit instead. Waiting to see how many people build the kit and see what glitches surface.
Chris M
-
Started out as Academy DAP. All that now goes out the window with Kitty Hawk kits. Granted they have a few errors but they look to be a nicer build.
Chris M
-
-
-
-
I do not have a very expensive camera so good close ups are kind of limited.
Chris M

adding depth to panel lines
in Helicopter Modeling
Posted
Dymo tape is much more rigid that electric tape, try some of that. Tamiya makes a scribing specific tool which cuts a neater line. The more passes you make, the greater depth you can get.
Chris M