Hammerhead11
-
Content Count
138 -
Joined
-
Last visited
Content Type
Profiles
Forums
Calendar
Everything posted by Hammerhead11
-
Thanks! Here is my update, sorry it’s not much. Managed to get some aluminum paint laid down over the primer I did previously. I used Vallejo Duraluminum. I’ve really enjoyed the Vallejo metallic colors. They go down great straight out of the bottle and a bottle lasts quite a while. I also managed to get the top and bottom halves of the fuselage put together. I almost forgot the included nose weight and I’m glad I remembered before I put glue down. The fit was phenomenal and there will be very little clean up. Thanks for looking,
-
Quick update. I finished up the nose wheel well and will soon be closing up the forward fuselage. I also started priming the parts for the main wheel wells. I swear, half the part count of this kit goes into the wheel wells. But I’m good with that. I don’t normally paint on the spruce, but Tamiya makes it easy on this kit. The majority of these parts will be painted aluminum, so that will be the next step.
-
I would love to see pictures, and thanks for the heads up about the nose, I will make sure to dry fit a few times.
-
Thank you! I’d very much like to see what you are working on, or maybe any suggestions you have noticed in your build.
-
Thank you!
-
Hey Everyone, somehow my original post has disappeared, so I am starting this new one. Working through the brand new Tamiya P-38. For the most part I will be building out of the box using the decals provided for White 147. There have been plenty of reviews of the kit by individuals far more knowledgeable than myself, so I will refer you to those for a comprehensive overview, I will just be offering my thoughts on a few aspects of the build as I work through it. My First thought, I LOVE the poster sized painting guide. It's super high quality and it will definitely be on my ga
-
This is great, especially considering how small it is. Well done so far.
-
Thank you, I can’t take too much credit for the figure, the fantastic sculpt does a lot of the work for you.
-
Thank you very much!
-
Hey thanks! I didn’t think I’d be able to do it, I’d never really tried to do much scratch building before. It was a learning experience.
-
Thank you so much!
-
Fantastic work! Love the weathering!
-
Hello everyone, finally got around to getting some decent pictures of my completed Hellcat. Finished this one over the weekend. It was a fun journey and I learned a lot. I put about 65 hours into the build, mostly spent scratch building the cockpit and detailing up the engine. Both firsts for me. Thanks for looking, Brett if if you are interested, I documented the build here:
-
Thanks!
-
Thank you and thanks for following. This was a fun build.
-
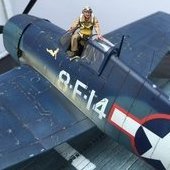
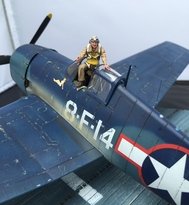
Thanks Steve! The figure also does a good job of showing just how big this plane is! -Brett
-
Hello everyone. This will be my final post. It turns out that a lot of the plans my family had this weekend fell through and I was able to finish up the Hellcat sooner than I was planning. I managed to snap a few pictures with make makeshift workbench photo booth. Once the weather clears up a bit here, I will take her out with my more professional photo booth and get some better pictures to post in the completed section. Thanks to everyone who stopped by to take a look at what I was doing and who commented. It’s been a fun build and I learned a lot about what I am capable of. It’s far f
-
Thanks John! Unfortunately as soon as I applied the matte coat, all of the subtle fading I did with the salt disappeared. I was a little discouraged about it and decided not to attempt to re do it. So I pushed on. She is finally standing on her own legs! I’ve added exhaust and gun stains, some light oil streaks and a matte coat. The masking has been removed from the cockpit and I’ve added the broken antennas back on. I’ve also finished up the exhaust pipes and painted them and mounted the engine. I’m pretty happy with how the exhaust turned out, very thinned Vallejo
-
Hello, back with another update. I’m getting close to final assembly, so I thought I would get a few decent picture of all of the sub assemblies. I’ve also applied my panel lines using the Tamiya panel liner. This turned out pretty good I think. Next steps are to do weathering. I will need to do sun fading, which I will do using the “salt” technique. (Another first for me). I will also need to do the exhaust stains, fuel and fluid stains, guns, and various detail paintings. I also managed to break off both of the antennas after taking these pictur
-
Thanks! It was a first for me and I’m pleased with the results.
-
Thanks Steve! Had the day off of work and in between taking kids to school and catching up on school work I managed to get a few more decals applied. My setting solution did manage to smudge the star, nothing a little paint can’t touch up. I also started adding the exhaust. I replaced the kit supplied pieces with 1.3mm brass tubing. Looks much better in my opinion. (Sorry for the poor lighting, photography is not a skill I have developed.) Does anyone else get excited when the decals start start going on or is it just me? I feel like this is when the build r
-
Finally starting to get some decals on this bird. I’ve started with the wings. Love the contrast between the red and blues. That’s why I picked this scheme. Also I have mostly finished the landing gear and wheels. They will need a matte coat and a light dusting of buff, but I’ll do that close to the end of the build so I can get all of the sub assemblies at once. Cheers!
-
Thanks Rodney! It’s been a bit of an intimidating project, but rewarding. here is another short update. I’ve managed to get paint and chipping on the fuselage. as well as mostly finish the prop, it just needs a matte coat. while the paint is curing on these I will start weathering and decaling the landing gear and wheels. cheers!
-
Quick update, I started laying down some paint and doing the chipping. Here is the left side wing, loving the look of it so far. Hopefully I will be able to continue working on the rest of it tonight or tomorrow. Cheers!
-
Thanks Steve! This has been a learning experience, I’m not used documenting a build. Cheers!