


haneto
-
Content Count
1,945 -
Joined
Content Type
Profiles
Forums
Calendar
Everything posted by haneto
-
 Talking abour MKI, yes I have considered this version when deciding part break down. MKI could be easily made by additional several parts such as HUD, main control panels, warning devices(already in the sprue if you check carefully) etc. And also remove some antennas blabla. It will be released as a seperate product in near future, as far as I heard.
 -
Regarding J-16, it has both features from Su-27UB and Su-30MKK, with some original features such as Chinese weapon/pylons. So it will need over 70% new tools from modelling perspetive, including the most expensive upper and lower fuselage/wing parts, etc. Is it worth the investment considering the market wallet from popularity? In my view it is quite doubtful, especially if the price is much more expensive than the Trumpter/Hobbyboss kit which is very inaccurate from shape to details though. But afterall, how many buyers will care? Many of them will say "at least it
-
For some of you who do not use Facebook. Some updated news about upcoming GWH L4830 1/48 Su-30SM "Flanker-H" kit, released by Great Wall Hobby Facebook official page. 8 painting schemes 11 types of weapons(+APK-9 pod) Kit shall be on sale in early March 2022 in China domestic market.
-
Thank you for the info Bill!
-
Thanks a lot! Much appreciated.
-
Anyone please?
-
Hi guys A quick question want to seek your help. I understand F-14A/B/D uses different wheel hubs for the main landing gear wheels, but I also notice there are both "Michelin " and “Goodyear" rubber tires used by the cats. So just wondering: if both brands are used randomly, by all 3 variants (A/B/D) by all time periods? Thank you for your reply in advance! Yufei
-
GWH 1/48 Su-27 "Flanker B" heavy fighter building record
haneto replied to haneto's topic in In-Progress Pics
Thanks Tom. I'm gonna build the "Red 01" with shark mouth from 689th GvIAP. Still collecting reference photo of the real aircraft though. Thanks Elmo. I just paint/weathered the parts seperately before gluing them. Nothing difficult, just a little patience will do the job. Thanks! Well actually not too much details will be seen after assembling. It's always pain point of aircraft modelling though. So when I designed the kit, I always put the "compromise" logic for part breaking/detail selection in my mind. I'm processing s -
GWH 1/48 Su-27 "Flanker B" heavy fighter building record
haneto replied to haneto's topic in In-Progress Pics
Thanks! And yes I was part of the design team. -
GWH 1/48 Su-27 "Flanker B" heavy fighter building record
haneto replied to haneto's topic in In-Progress Pics
I did not face any, even the nosecone fit like a glove. -
GWH 1/48 Su-27 "Flanker B" heavy fighter building record
haneto replied to haneto's topic in In-Progress Pics
We are in the 3rd day of our Chinese luna new year holidays but I'm processing slowly, since I have a lot of family service to do, for my wife, daughter and all the relationships who keep on visiting our home. 😉 Well, at least, the prime is done. I cannot believe if anyone who dislike prime!? Especially the #1500 surfacer——It's so silk-like smoothy and honest: always tell you all the great details on the surface, as well as the flaws you made. Now we are talking: the real fun, painting, begins! Stay tuned! -
GWH 1/48 Su-27 "Flanker B" heavy fighter building record
haneto replied to haneto's topic in In-Progress Pics
Thanks a lot Tom and Aigore! The honor is mine. 😉 -
GWH 1/48 Su-27 "Flanker B" heavy fighter building record
haneto replied to haneto's topic in In-Progress Pics
Thanks to the great engineering of the mold cutting, the kit gear bay cover parts can be used to "mask" the gear bays. To be continued…… Stay tuned! -
GWH 1/48 Su-27 "Flanker B" heavy fighter building record
haneto replied to haneto's topic in In-Progress Pics
Now the Flanker is sitting by herself! The D&W 3D print landing gears, thanks to the super strong engineering material and stainless rods inside, are more than strong to take all the weight from this beast! -
GWH 1/48 Su-27 "Flanker B" heavy fighter building record
haneto replied to haneto's topic in In-Progress Pics
Gear bays and intake/engine related parts were glued. D&W landing gears dry fit——BTW, they fit like gloves! This is how it looks like. -
GWH 1/48 Su-27 "Flanker B" heavy fighter building record
haneto replied to haneto's topic in In-Progress Pics
The incredible Detail & Wonder Studio 3D print landing gears! -
GWH 1/48 Su-27 "Flanker B" heavy fighter building record
haneto replied to haneto's topic in In-Progress Pics
Gear bay covers and actuators. -
GWH 1/48 Su-27 "Flanker B" heavy fighter building record
haneto replied to haneto's topic in In-Progress Pics
Main landing gear bays. -
GWH 1/48 Su-27 "Flanker B" heavy fighter building record
haneto replied to haneto's topic in In-Progress Pics
Nose gear bay. -
GWH 1/48 Su-27 "Flanker B" heavy fighter building record
haneto replied to haneto's topic in In-Progress Pics
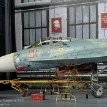
Hi guys Sorry for the silence for a while. A bit busy with my daily job at the year beginning, but still try to find some spare time (1-2 hours before sleeping every night) to catch up. Next week we will have 1 week national holidays as of Lunar New Year, hopefully I can try to finish it by then! So the built went on. Engine intake and trunk. -
Sorry I do not have too much information about that airframe. I believe you can find some from Linden Hill decal instruction sheet, but do not expect too detailed ones, since most of the airframes at the time being, did not leave too many photo evidence, especially the upper fuselage angle which is not easy to see unless it's inflight. Although they may not differ too much compared with factory regulated camo pattern. Yufei
-
I think he is referring to the specified Soviet/Russian green nose Su-27? I almost forget the Begemot decals which you can also find some green nose Su-27 options. But unfortunately most of them are early batches with early style tail boom, which you cannot build from the GWH kit. Sukhoi Su-27 1.48, part 1 Sukhoi Su-27 1.48, part 2
-
Regarding green nose Su-27 single seater decal option, really not too much selection. Besides Eduard D48090, there are: Linden Hill 48005 "Flankers on Patrol" ("Red 36/38", the "Orion Killer" but it's definitely an early batch one with early style tail boom which you cannot build from the GWH kit); Linden Hill 48010 "Flankers on Patrol 3 from Sun Up to Sun Down" ("Red 27", lack of detailed information); Linden Hill 48040 "'Guardians of the North' Update" ("Blue 03", lack of detailed information). Those are top notch quality decals very well researched and printe
-
Hi As the decision maker of the GWH Su-27 kit painting schemes selection, maybe I can give your some thoughts. First, you can find full instruction sheet here: L4824 Su-27 Flanker B (Plastic model) I spent LOTS of time to search early style green nose Su-27 used in Soviet era. Why? Because most of those Su-27 are early batches, with different tail boom(close like Su-35S ones) and other details. Even some of them have the late style tail boom, the front wheel mud guard is the early style(3 holes on each side) and maybe the early style main wheel hub(WI
-
GWH 1/48 Su-27 "Flanker B" heavy fighter building record
haneto replied to haneto's topic in In-Progress Pics
The inner side of both windshield and canopy. I always like to switch the canopy from open to close time by time, so test fit the canopy closing status is very important. So that's all for now, so far so good. Stay tuned!