


Pappy121
-
Content Count
648 -
Joined
-
Last visited
Content Type
Profiles
Forums
Calendar
Posts posted by Pappy121
-
-
G'day TT,
I fully concur, thanks very much for the authoritative advice,
cheers,
Pappy
-
G'day again and thanks for all the replies. The consensus seems to be for a white fuselage bay but the wing underdside not so much. I actually found some pics in a response by the late 'Superheat' which clearly show a white fuselage bay.
The red front wing section is typical, although some units used this as an oppoprtunity to apply some squadron art and painted it in different colours but the uinderside in red I did not see. I am not doubting it but it seems white was more typical?
cheers,
Pappy
-
G'day people.
What colour was the underside of the variable incidence wing and the fuselage bay immediately below it painted please?
I am finding it a little hard to find pics of these areas. I am guessing either Z.C Green or gloss white?
cheers,
Pappy
-
Thank you both for the quick replies. I
t looks like it was possible, awesome work,
Pappy
-
G'day people,
I have a question for Crusader experten. I have read through the pinned topic (differences between E and J) and it did not answer my question:
Was it typical to see the variable incidence wing parked in the deployed position with power off and cockpit unattended?
I would have thought no but happy to be convinced otherwise. I have finally acquired a 1/48 Has F-8E for quite a sane price and over thae past few years have amassed a collection of aftermarket.
I would like to have one of the gun bays open and the wing deployed with drooped flaps and wings folded to show off the Navy lineage but doubt this was a typical scenario. I assume the wing closed and flaps up would be a more typical scenario,
thanks,
Pappy
-
7 hours ago, seawinder said:
I thought I just read that at least some CF-188s were refitted with SJU-17 seats (or something very similar) in recent years. I'm building the Kinetic kit using "60 Years of NORAD" anniversary markings from TwoBobs. I've just invested in a Wolfpack SJU-17 seat and am hoping it's appropriate for that plane?
When the RAAF retired its legacy Hornets, several of these airframes and spares (including the seats) were sold to Canada. All RAAF legacy Hornets were fitted with the SJU-5/6. Maybe the Canucks are retrofitting the NACES seat, but initially they were flying the same seats.
The Supers/Growlers come with NACES as standard OEM fit,
cheers,
Pappy
-
On 7/21/2022 at 12:26 PM, Kurt H. said:
Hello,
I am collecting aftermarket for the Hasegawa F/A-18A I want to build for the Hornet Group build. What is the beast option for a seat in 2022? I see Quickboost makes a seat, are there others to consider?
G'day Kurt,
You did not mention whuch country. RAAF/Canadian A models used the SJU-9 (the '10' was the sub variant used in twin seaters), not sure about Spain, Swiss or Malaysian Hornets. The external difference is the parachute harness arrangement as the SJU-5/6 uses a US Navy style harness system but the 9/10 was fitted with a USAF style buckle arrangement. The SJU-5 (again the '6' was for a twin tub) was used initially in USN/USMC service but later these were retro fitted with the NACES seat, so most likely the latter seat.
I like the Wolfpack Details NACES sets but for the SJU Aires or QB are also good.
On 7/21/2022 at 1:50 PM, Crash Test Dummy said:Good Luck with Quickboost. I've found them hit and miss. I tried Draken and Crusader seats in 1/48 Hasegawa kits, both were oversized. The Crusader seat I could grind off all the detail on the sides to wedge it into the stock cockpit. The Draken seat was impossible to use. It was several millimeters too wide to fit the space. You'd have to carve off both sides of the frame and part of the cushion to get it down between the side consoles. I was able to use their Sea Vixen seats in the Airfix kit and don't recall any problems.
Edit: Figured I should add something useful rather than just rant about poor fitting aftermarket junk. You are probably looking for the SJU-5/6. I'm not sure when the SJU-17 (NACES) started going into F/A-18's or if they were retrofitted to older planes. There have been quite a few of both over the years, but most are from defunct companies. I used a Verlinden seat in a Monogram F/A-18 about 25 years ago. Aires and Legend seats should be obtainable. Scalemates should have a list.
G'day CTD, I had the same issue with the QB F-8 Crusader seat (F5) and the bucket needed some very slight sanding to fit. The detail lost would not have been visible in any case. I find that QB seats generally have excellent detail otherwise.
-
On 7/2/2022 at 12:41 AM, ijozic said:
I guess you're right - e.g. the nozzle detail, it looks pretty much the same.
At least they've reworked the cockpit detail as that bland one from the 1/72 kit wouldn't cut it in this scale.
On 7/4/2022 at 2:23 AM, flybywire said:More important question is how accurate is the new tooling. Not all new tooling equate to accuracy.
I will qualify my remarks by stating that I have not actually seen the kit in person, my remarks are solely based on the imges presented here but I think the kit is a complete new tool kit. The decal sheet looks very nice and the inclusion of the munitions trailers is a very nice and most welcome touch.
No kit is 100% accurate and this kit shares an error common to every other F-35 kit regarding the seat. The parabox is the early style rectangular type not the later inverted triangular type. Strictly speaking this is not an error, as early block aircraft flew this configuration but this later configuration has been in place for some time. The same configuration is also present with the aftermarket resin seats and there is no aftermarket resin option to offer this configuration.
Regarding the weapons, the GBU-31s look okay but will need a thermal coating if they will represent USN variants (the nose cones are different as well), but the GBU-12s need more work. The tail fins seem to have vertical leading edges rather than angled ones. The bombs look like early GBU-12s based on the mk.82, again they lack the thermal coating for USN use. For UK use these are not correct as the UK uses the enhanced PaveWay iV (EP4) configuration which includes a GPS antenna above and below the seeker section, a conduit along the body and a new saddle type hardback on top. Interestingly., the box top artwork got all these features (seat and ordnance) correct. There are aftermarket EP4s available. If you go the aftremarket weapons route this also open up the possibility to use other stores instead, GBU-39 for example.
As for the RAM tape, it is overscale and a matter of personal taste, but it should be far less prominent. The colour callouts are also wrong, although matching the colour is also problematic,
cheers,
Pappy
-
On 6/17/2022 at 1:35 AM, A-10 LOADER said:
"One more tidbit I got to thinking about today. When the ordies loaded weapons on a jet, the flaps and slats were retracted and they would stay that way until just before takeoff. So, while having a model with bombs loaded and flaps & slats down with no one in the cockpit may look cool, it is unrealistic... "
Good point Jim.
Steve
G'day,
This was not the case in RAAF practice. Flaps and slats were extended before engine shutdown and remained so during weapons loading and reconfigurations. it was not uncommon to see an unnatended, loaded pig with deployed slats and flaps during weapons programmes, of course they would also sport an 'ARMED' flag hanging from the pitot cover as well,
cheers,
Pappy
-
13 hours ago, thefngreek said:
Couple questions… Is the landing gear white? Along with with bays? And are they under wings painted white or light ghost grey?
G'day FNG,
Yes the u/c is white, same for the NWW and MWW. The avionics bays are generally a zinc chromate yellow/green with grey or black avionic boxes.
For the HAF SEA scheme, the standard colours are FS34079, 34102 (dark/light green), FS30219 (tan) and the underside colour is actually FS36622 which is a very light grey. On the HAF aircraft it can become very dirty and in some pictures it can look nearly white but it is actually a grey.
The LGG you suggested is incorrect as it is actually FS36375 which is too dark and too blue.
As for the canopy part E13, it is a little hard to explain but it sits on top of the inner canopy frame (part A7) right at the back but it does not sit underneath the rear arch, it should sit in front of it. It looks like you have managed to warp the E13 part a little from the pics supplied as it should be symmetrical. If you place the part into some warm (not boiling!) water for about 30 secs you should be able to gently re-shape it without breaking the part.
cheers,
Pappy
-
G'day FNG,
Typically, aftermarket replacement weapons and undercarriage bays should fit inside the kit, and if they replace the kit part then they should fit the same way as the part they replace (yeah right!).
The problem is that the aftermarket parts don't always come with clear instructions, you may get a diagram or box top picture if you are lucky. You may also need to thin the resin part and the inside of the kit fuselage or wing parts to get the items to fit properly. Some brands fit better than others, Aires for example usually don't fit without a lot of sanding while Wolfpack tend to drop straight in, but that is just my experience,
cheers,
Pappy
-
Lookin' the biznuss now!
cheers,
Pappy
-
8 hours ago, thefngreek said:
I’m back!! Sorry but this project has not been easy!! I’m having lots of fit issues with the aftermarket parts and i had to use lots gap filler which i have little experience with… here are some pictures
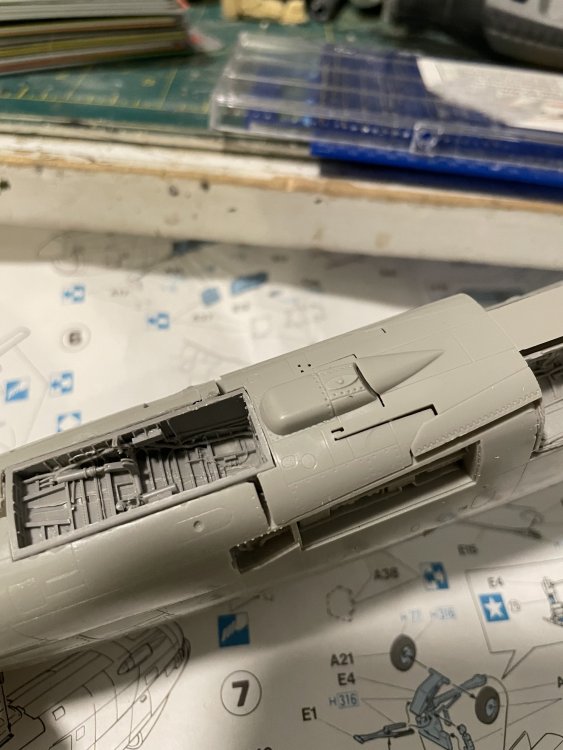
G'day FNG, I am not sure but I would have thought that the edges of the AM nose wheel well (NWW) would need to fit under/inside the edges of the fuselage parts as that is how the kit part (which is replaced by AM) fits. If that is the case you may need to sand down the back of the resin NWW so that it can sit inside,
Pappy
-
G'day TFG,
I am not sure if you were aware but in HAF service the the darker exterior camouflage green (FS34079) was extended inside the intake for quite some distance back, about 6 feet in real life.
I also found the fit of the air brake parts also problematic and it needed several attempts of careful sanding and dry-fitting to get all the parts to mesh together. I ignored the instruction sequence and built up that assembly separately first. There were still some spots that needed a touch of filler but it was easier to get all the parts, especially the small hinged side doors sitting level this way.
This was then added to the fuselage assembly. I needed to add a plastic shim on each side but it was easy to then just sand back and clean up
One final suggestion, HAF A-7Hs did not use the nose gear catapult launch bar so the recess for this needs to be filled in. I just used sprue off-cuts and coated the lot with liquid cement. Once hard, just sand back to flush
cheers,
Pappy
-
4 hours ago, Andrew D. the Jolly Rogers guy said:
Wonderful work, very nicely done!

G'day Andrew,
Thanks very much. I can't wait to get back and start painting,
cheers,
Pappy
-
12 hours ago, BastianD said:
Any indication how long these dischargers were in real size? And were they different in size on tail, stabs and wings?
G'day Bastian,
No idea sorry. If I had to guess about 6in and they were all the same size so the same replaceable part could be used on the wings, fin and stabs
cheers,
Pappy
-
Waaay better!👍
Pappy
-
yG'day people,
I am back home and finally got some bench time in on this one.
The join between the intake and lower fuselage had a slight step. It was not apparent when I test fitted these two assemblies but was definitely there once the glue had set. A quick brush of liquid putty and a rub back soon had things back on track

Next the tedious task of masking off the canopy and 'zorst
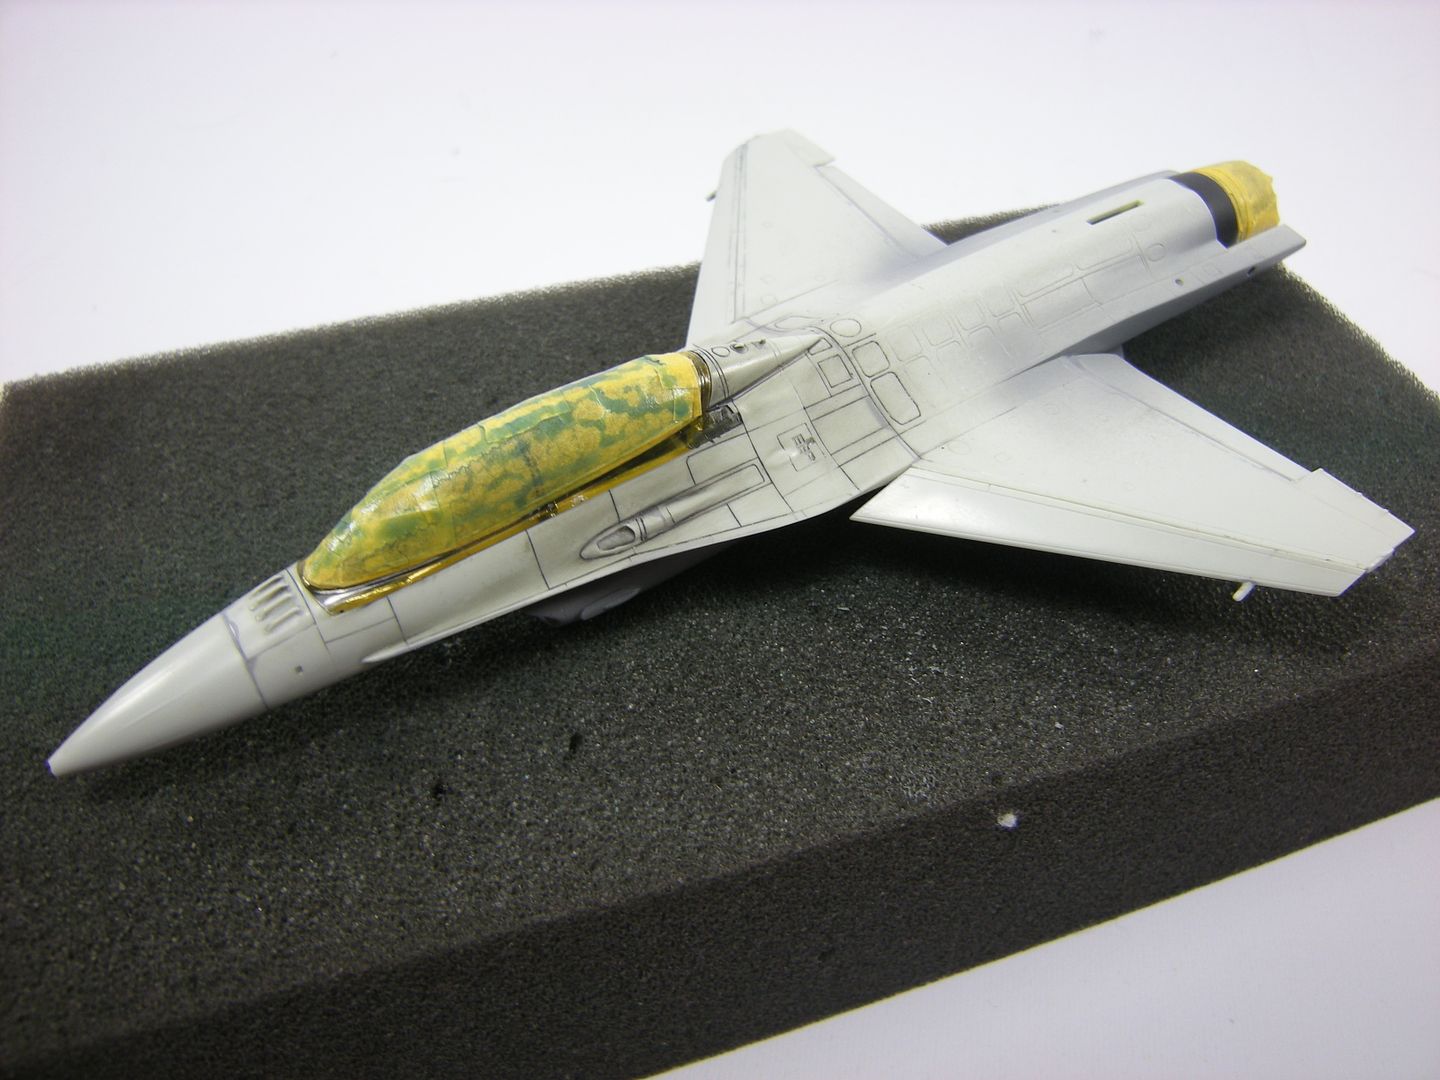
Just about ready for paint.
In the meantime, I thought that I would reward myself with some decal application starting with the fin. As this will be an airshow special, if this decal does not go down well, it is basically the end of this scheme. After painting the fin gloss black, the decals were applied. These consist of two main decals per side, one for the fin base and one for the upper section of the fin. The decals conformed beautifully although they did require several generous coats of setting solution. Once the decals were dry and suitably snuggled down, I used a brand new scalpel blade to 'shave' any excess film from the leading and trailing edges.
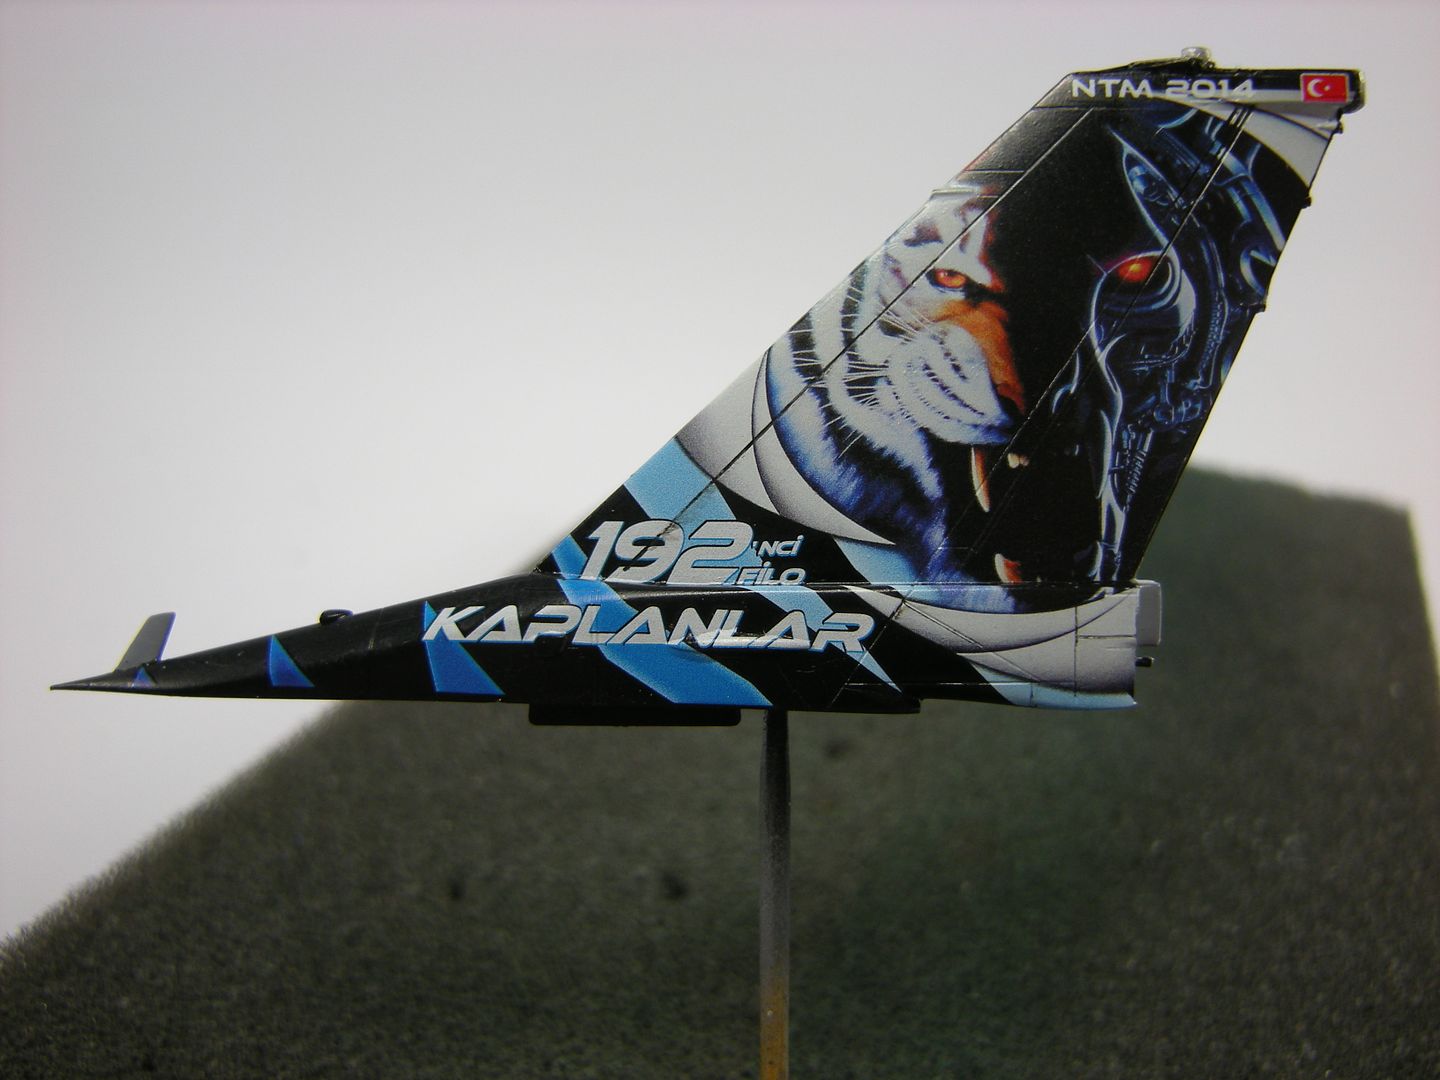
A small decal is applied over the top of the upper fin decal for the Turkish flag and additional markings. I made sure the main fin decals were thoroughly dry and waited 48 hours before applying these decals.
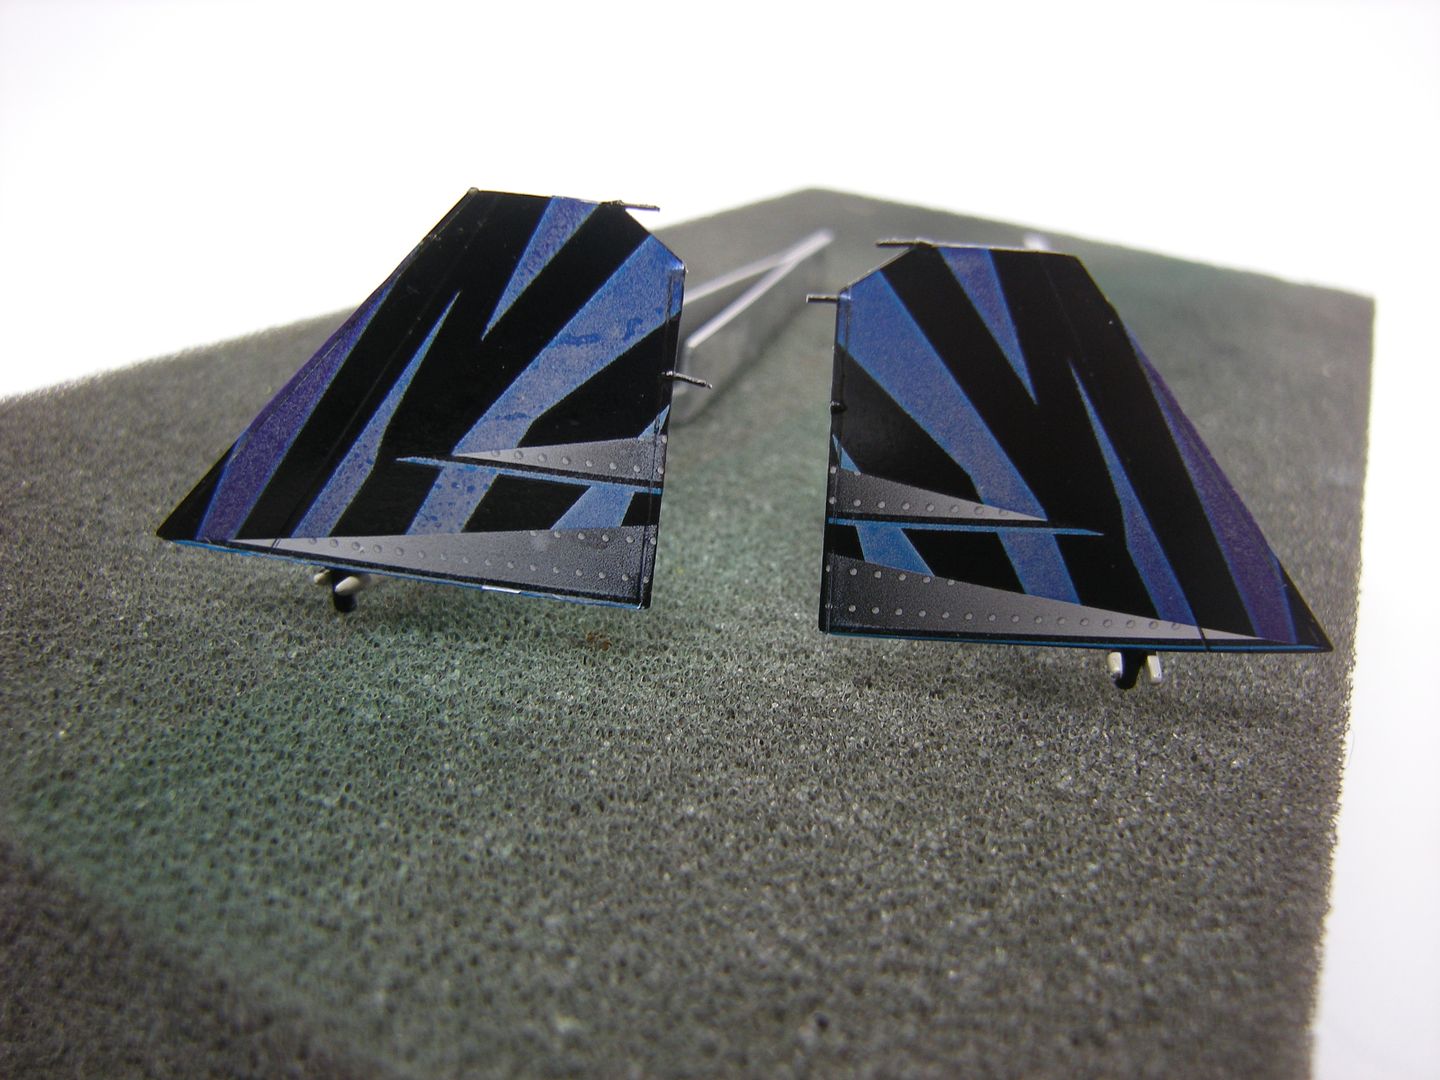
The stabs were a relatively simple affair. Like the fin, the upper surfaces were sprayed gloss black as well but these only required application of a single decal. Unfortunately, I have manged to break of several of the small static discharge wicks with my fat fingers which will need to replaced. These are very fine and top marks to Revell for providing them in this scale
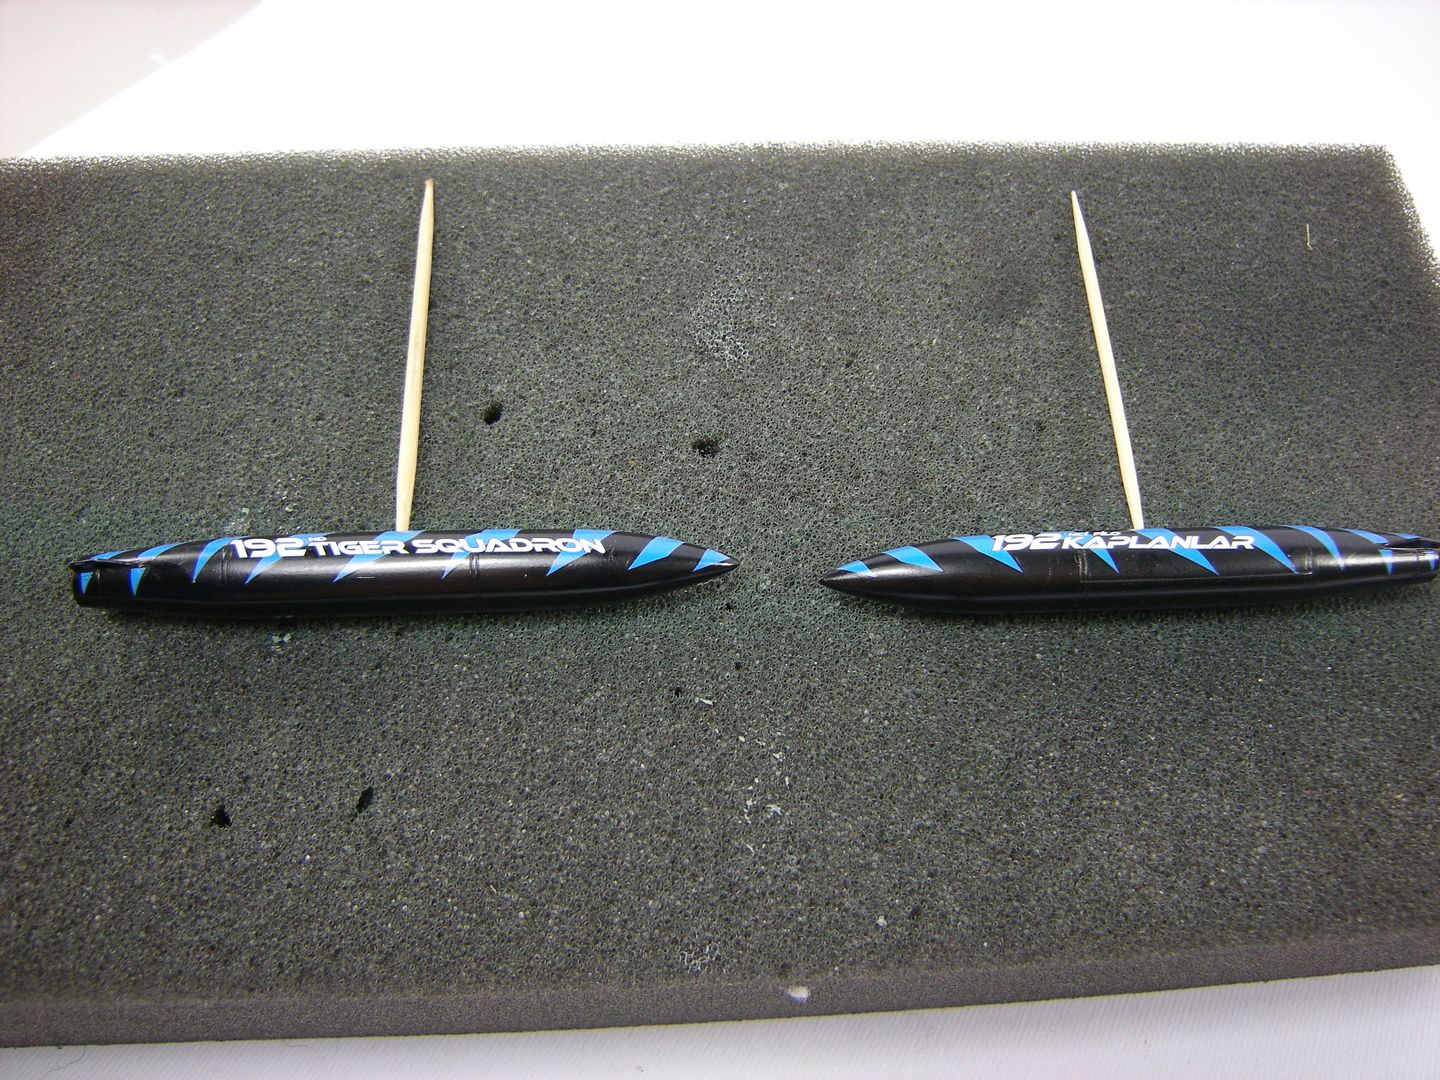
The final job was the gasbags. The same paint prep was followed and the decals again performed flawlessly but these also needed a couple of coats of decal setting solution to snuggle down
I am off again so it will be another while before the nest update,
cheers,
Pappy
-
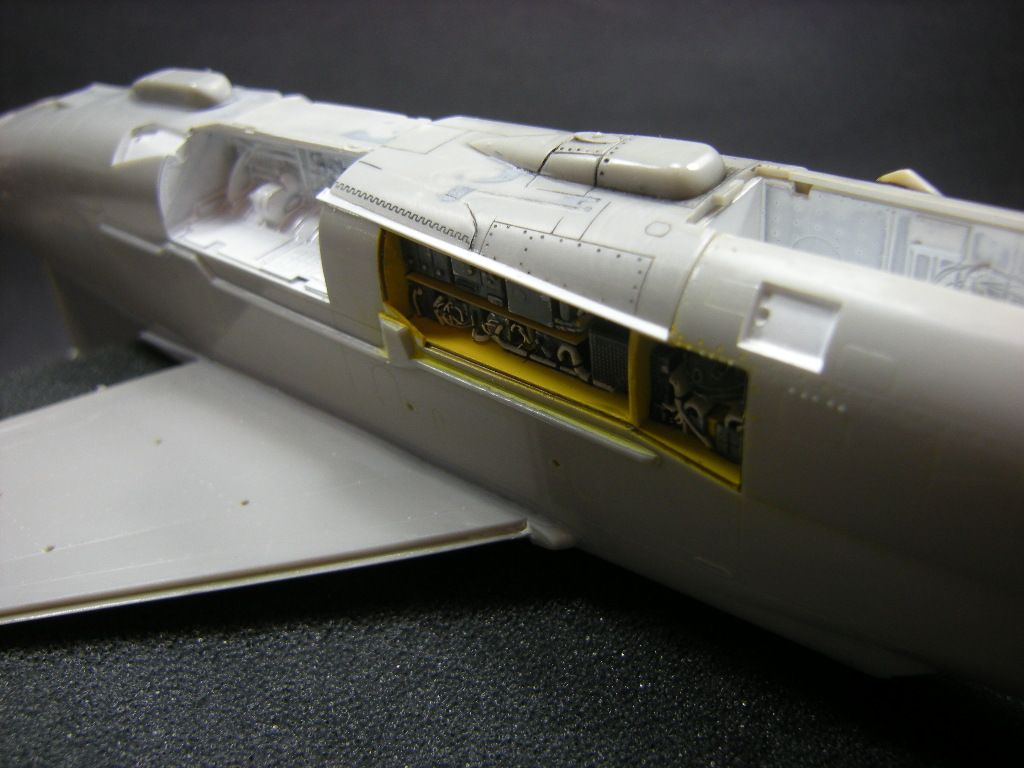
Nice work!
This is how my cockpit turned out - I think it may be the same resin set. I left the HUD 'combiner' glass clear but painted the HUD lens a clear green colour
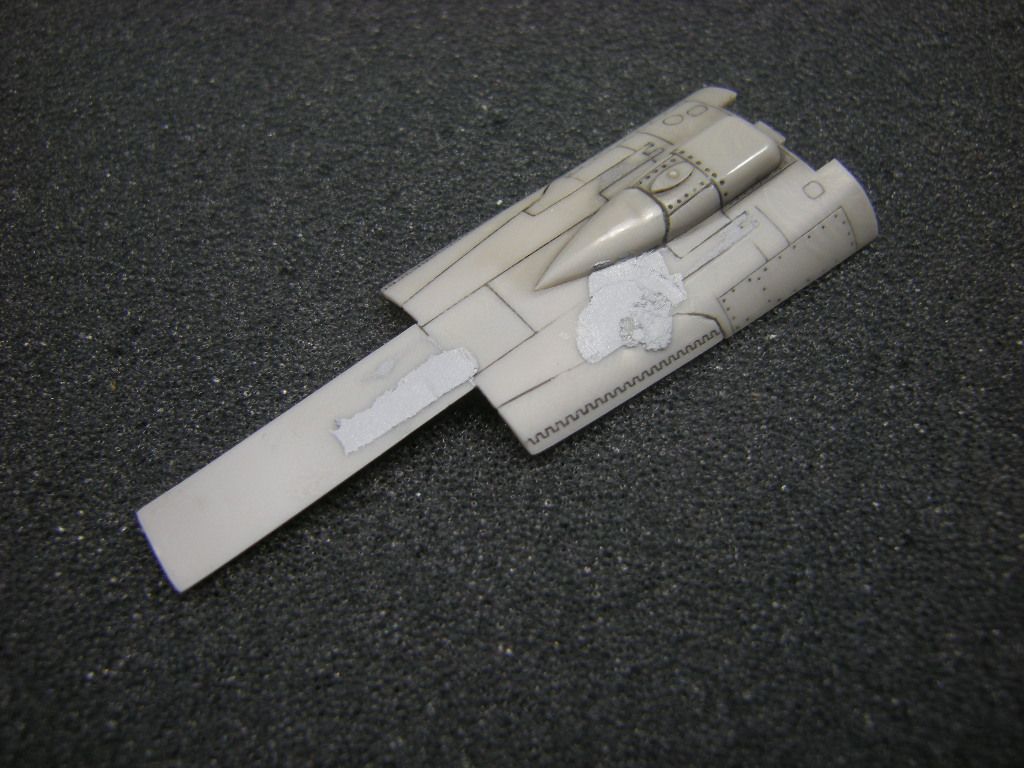
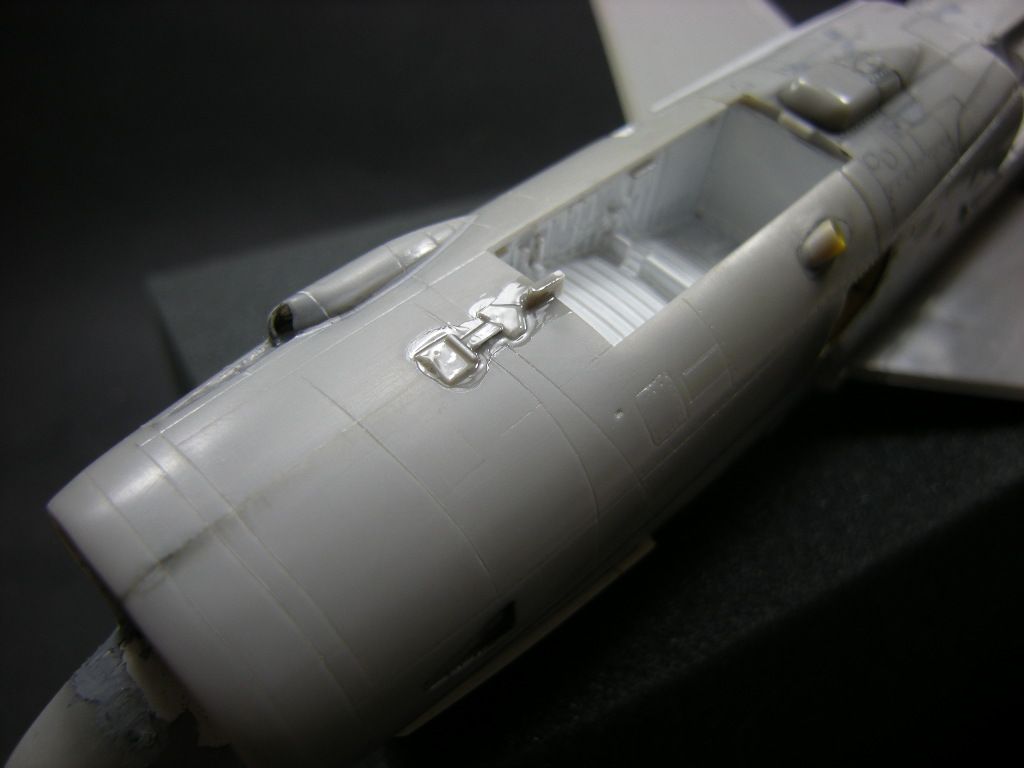
(Incidentally, if you think it rude of me to add a picture of my build in your WIP I will happily remove it upon request, I meant no offence just to illustrate a point re the HUD)
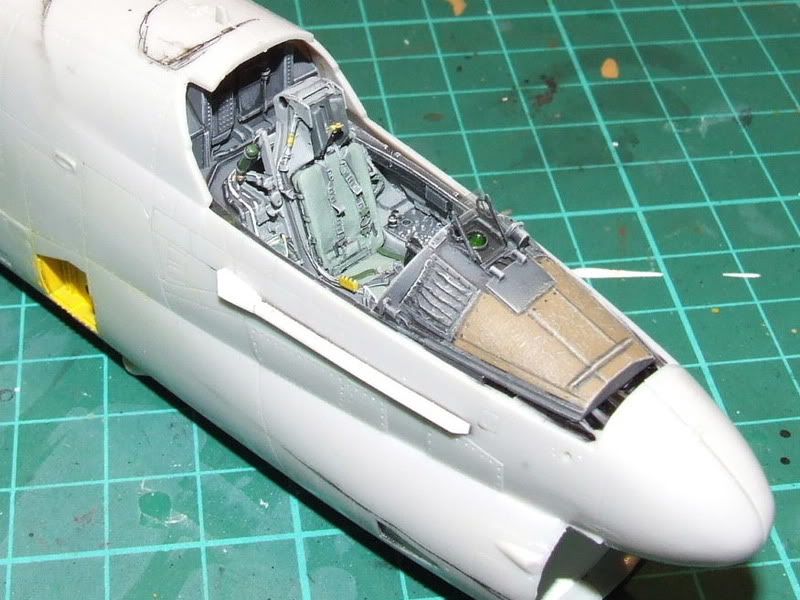
As mine will also be a HAF A-7H 'Alepou' I have modified the IFR probe to reflect the real aircraft. The spot where it normally would be had two strips of plastic glued over the opening to match pictures I found on-line.
Note the HAF also operated some late model ex-USN A-7Es that were fitted with the later style NACES seat instead of the ESCAPAC seat that I have used so check your references.
cheers,
Pappy
-
On 6/3/2022 at 6:46 PM, BastianD said:
Do you have reference pictures?
G'day Bastian,
Sorry I don't but there is this new thing called the internet 🙂
If you have the Verlinden Lock-On book, have a gander at page 8 and the rear cover. Also the scale drawing included in the book.
The wicks were black with yellow end tips. This was to warn and hopefully prevent people from grabbing them (why?) as apart from being fragile the end had two very sharp vertical barbs.
Also they did not droop like some do, they were absolutely straight, If you can find some very fine carbon fibre filament works very well but be very careful using it, wear safety glasses when cutting and cut inside a box to prevent any 'ricochet' rounds finding their way onto the floor and potentially into people and pet's feet.
cheers,
Pappy
-
5 hours ago, A-10 LOADER said:
It should be clear. If you can still do it, maybe hit just the top and bottom edges with some clear green.
Steve
Steve is correct, it should be clear.
When the HUD is operating, the HUD can appear green from some angles and I think some modellers may be attempting to simulate this or have misunderstood the picture (or they saw another modeller do this and have copied it) but the glass is clear. Sometimes you can see a 'prismatic' effect like that seen on camera lenses and there are clear self adhesive films that you can use to simulate this effect but for such a small item you need to decide if the bite is worth the chew,
cheers,
Pappy
-
G'day Bastian,
Love the attention to detail. Ref the static discharge wicks, note that the ones installed on the stabs are on opposite sides. i.e on the upper surface for the left stab and on the bottom for the right stab.
This is because the stabs were symmetrical i.e not a left and right so the same stab could be fitted to either side but it was installed 'upside down' relative to its opposite counterpart. Hopefully this is not too late for you. Most people would not notice and most builders don't add the wicks but since you are, it would be a pity not to get it right,
cjeers,
Pappy
-
On 2/24/2022 at 3:06 AM, ElectroSoldier said:
Yes and no.
Its the chord of the vanes that needs to be mirrored to the other side as the size of the chord changes as you go further along the span of the wings.
The span of the vanes also changes depending on what section of the flaps you are "on".The tracks are the correct size chord wise because the over wing spoilers are or can be mounted in the deployed positions. When you do that you have to attach the tracks to the correct places within the wing chord wise.
The picture of the Ozmods wings above is only relevant to the F-111B, C, G FB-111A as they are the long span wings.
ES is ccorrect, the flap vanes need to taper in cord as they approach the wingtips. It seems to that the easiest (and cheapest!) fix would be to separate the individual flap vane segments and install these the correct way round as suggested by ES i.e with decreasing chord towards the wing tips rather than buying the SD resin wings.
To me, the biggest selling feature of the HB kit should have been the deployed slats/flaps but HB screwed this up completely. Apart from the flap vane issue mentioned above, the other issue is that there are spring loaded panels on the underside of the wing 'core' trailing edge which fold upwards as the flaps deploy. HB have moulded these flush so the builder will need to separate them and angle them upwards if they wish to be accurate. Did I mention there is a fine piano hinge at the front where they pivot?
The SD resin wings actually have this feature correctly depicted (although the piano hinge is simplified to a scribed line )and perhaps Gwen or anyone else who owns this set could be persuaded to supply a pic of the underside from the set to illustrate the point. These spring loaded panels are flush when the flaps are retracted,
regards,
Pappy
-
The Reskit canopy is an improvement over the HB canopy but it is still not correct.
The HB canopy has three errors, the major one being the slope of the windscreen, which should be a flat, descending angle in the side profile.
HB have managed to make theirs curved giving it an upwards bulging appearance. Secondly, and you can see this in the comparison pictures above, HB have located the canopy bow too far forward which shortens the windscreen length in side profile. Notice the step between the cockpit bow and the fuselage side immediately below the windscreen which is slightly stepped in the comparison pictures above. The final error is that the HB windscreen lower edge is curved along the lower edge instead of staying relatively flat until the extreme front edge.
I think that when HB designed the windscreen, they positioned the canopy bow too far forward. To avoid having having the windscreen slope downwards too sharpley to meet the fuselage they attempted to soften the effect by bulging the side profile slightly.
Reskit have corrected the side slope profile angle by flattening the side profile but the position of the canopy bow that separates the windscreen from the cockpit entry 'doors' remains unchanged. Whilst the Reskit windscreen will look less bug eyed compared to the HB part, it is still not quite correct as the windscreen looks somewhat truncated. Finally, the transition between the windscreen lower edge and the forward edge is a bit too angular instead of describing a rounded curve. If the cockpit entry doors are positioned opened this may hide the fact that the doors are too wide as it may distract the viewer from noticing this error but the doors should be less wider in side profile compared to the windscreen which should be relatively longer.
The cockpit is an order of magnitude better as regards kit supplied detail for both the Academy and HB kits but since Reskit have sized their cockpit for the HB kit, they have incorporated one of the HB errors into their set. I am sure most modellers will see the set as a quantum improvement and will be happy to live with the error. It is just a pity that there are so many other things wrong with the HB kit
cheers,
Pappy

(2022 F-16 Group Build)Turkish F-16D
in In-Progress Pics
Posted
G'day Sernak,
I agree, this one goes together really well.
G'day people, it has been a little while but managed to get back to the bench. I have added a nice turned brass pitot
I will add the alpha probes when all the painting and weathering is done, they are tiny and will be too easy to lose during handling.
I have finished blocking out the main upper side colours to go under the decals
A quick dry-fit just because
cheers,
Pappy