


lesthegringo
-
Content Count
367 -
Joined
-
Last visited
Content Type
Profiles
Forums
Calendar
Posts posted by lesthegringo
-
-
SU-25 and a good A-10 gets my vote
Les
-
Just recently i've started using white glue like the ones used in schools. I put a little food colouring in it to help see where it is. The advantage is that it is water based (I predominantly use lacquers and enamels) and it forms a nice skin. I use wooden cocktail sticks to get it into corners, and you can thin it to brush over larger areas.
On cockpit parts it can be trimmed with a sharp scalpel if needed, and once you have painted it can be peeled off. If needed, you can soak with water and remove any residue with a cotton swab.
It's a lot cheaper too, plus no ammonia smell.
If you use acrylics, you need to test it if you want to apply it over existing paint
Cheers
-
I do use acrylics, but would prefer a lacqer or enamel based paint to come out, as I've had acrylics bleed colour when using other wash and decal set products after. The batch of paint I mixed up from Gunze acrylics did exactly that and boy is that a bad colour to have bleeed onto exterior surfaces!
Les
-
I'm very surprised that the paint companies have not come out with something; Gunze could work with Eduard to have a match...... you would have thought.
I mixed my own, which matches Eduards stuff, but am amazed at the lack of interest from companies that you would imagine would leap at this sort of thing
Les
-
Get a load of cheap tie wraps, cheapo super glue and wet or dry paper in varying grit sizes. Cut the abrasive paper into strips and super glue onto the tie wraps - instant flexible files.
Alternatively a load of lolly (popsicle) sticks from a hobby shop (they sell them in packs of 50), some 3m foam type double sided tape, and use that to attach the abrasive paper onto the sticks, that works as good foam backed abrasives. You can cut them into shapes to suit
For very small drills, evilbay has lots of 3D printer extruder nozzle cleaning 'drills' that come in packs of five or ten. They have a 3mm / 1/8" shank, and go from 1.2 mm down to 0.2mm. They are great for drilling small holes as they don't need a pin vice to hold them due to the shank, and they are way better that those cheap micro drill sets
Cheers
Les
-
Guys, to confirm, the non-caustic oven cleaner did the trick, I now have a pristine looking airbrush again
Thanks again for all the input
Les
-
Actually the stuff we have makes a point of being non-caustic, and it does seem to have worked. I'm still leaving it a bit longer for the bits in the tucked away corners, but I have made great in-roads. Certainly worth remembering!
Cheers
-
if the oven cleaner doesn't work, I'll get some brake fluid
Cheers
-
It looks like the shelves are not in a fixed height, so potentially more shelves could be added to one unit - that would be better than the Ikea ones. Looking on the site, the sizes are virtually identical though, which is a shame; I could do with units maybe 5cm wider, that's all it would take to make them a whole lot better for the 1/48th scale aircraft I'm building. If only Ikea would make the Detolf units a bit wider *sigh*
As an aside, they are also white, whereas the seven Detolf cabinets I have are black, but that's nothing that can't be fixed with a quick spray!
Cheers
Les
-
Thanks guys - on the basis we already have oven cleaner, I'll try that first
Cheers
Les
-
Are those the same size as the Ikea ones?
Cheers
Les
-
I have an old (30 year old) Devilbiss Aerograph Super 63 airbrush that my dad unearthed in a cupboard at his house. I used to do fantasy artwork on leather jackets and the like, and I bought it to do the really fine work. It was a fantastic bit of kit but during cleaning one day I ended up losing the nozzle, and being short of cash at the time I just put it back in the box and forgot about it. Of course being young and stupid, I didn't clean it before putting it away and so now, the 30 year old Humbrol enamel paint I used to use has welded itself to the main body of the airbrush.
I have left the disassembled airbrush in lacquer thinners for a couple of days now, and as a testament to the old Humbrol paints quality, it hasn't made a dent. So, what can I use to soften this stuff up without ruining the airbrush?
Les
-
Thanks, will try that
Les
-
A 1/48th mig 29 engine from the Great Wall kit?
Les
-
I have one from the kinetic kit, it would need cleanup due to the sprue gate position (which is why I replaced it with an aftermarket one). Would that interest you?
Les
-
I've come back from vacation to find what PB have done. After all the problems using it and the unreliability I found uploading, I for one won't have any regrets about walking away. I won't even bother deleting the photos, I have them all in original form. They can sit there taking up their space while PB wait in vain for my money
$400? Yeah, right.....
Les
-
To be honest it is such a small feature that I know it was going to break so just waited until it did, put it somewhere safe and put it in when installing the landing gear. 99% of people would see it anyway
Les
-
Also there are different types of airbrushes. A single action external mix airbrush like the badger 350 is excellent for this type of application, as it can spray a fine coat over quite a broad area, so it covers well. It also can hold larger volumes, and is more tolerant of the mix. For large areas it is great, and is also very easy to clean afterwards.
Double action internal mix airbrushes are great for finer detail, but for large areas are slower, and yes they take a bit more cleaningLes
-
Guys, the wash really does seem to be affecting the bond on the Hasgawa plastic; all the undercarriage parts have had all the joints weaken. In addition, it seems to have attacked the plastic at the joint faces. It looks like it has soaked into the surface, and in order to get the joints to bond again I have had to scrape off the joints to the point where I am back at unaffected plastic. I am also surprised that in order to jet to the joint it has had to penetrate the gunze primer and lacquer top coats.
I'm definitely going to stop using it on any undercarriage or load bearing parts just in case. I'm not going to stop using it as it does seem to work well as a wash, but I will be much more careful with it.
Cheers
Les
-
Oooh, forgot about ejector pin marks, good one, some are sooo thoughtfully placed.
Of course, if we open this up to include resin replacement parts, how about those 'direct replacement' part for specific kits that don't come close to fitting correctly - my Kinetic F-16 sits on the shelf of doom for that very reason *cough cough Aires exhaust, cough cough*
Les
-
You all must have been there - the moment when you look at a part of a kit that you are building and think what the hell were they thinking......?
So, a couple grabbed me over the last few weeks, and I couldn't resist putting them up here, but I'm sure that you can all come up with better
My (recent) top three contenders are
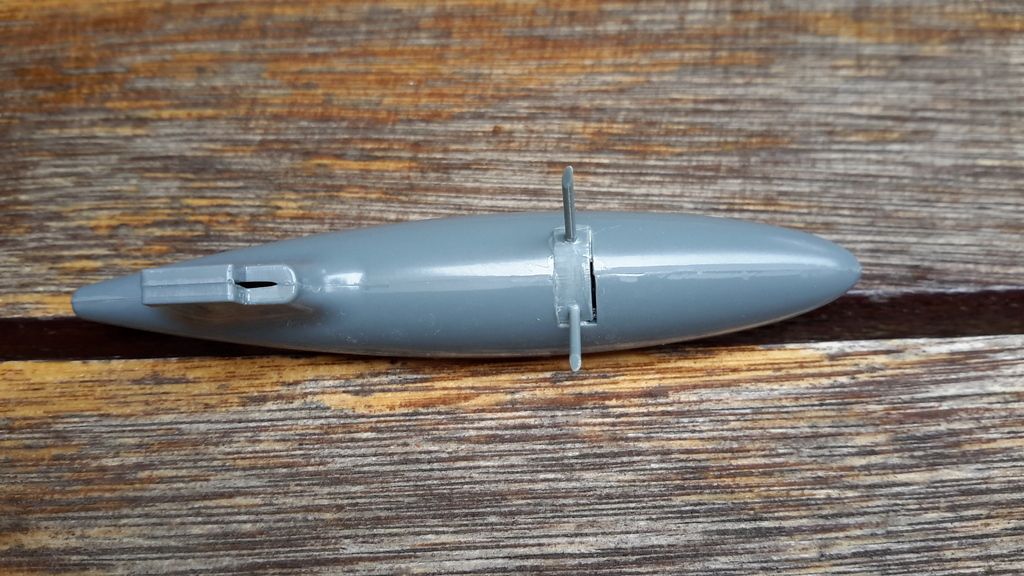
Eduard F6F drop tank - who in their right mind makes an insert with two attachment pins sicking out like this so that there is no way that you can easily sand the seam? And if that wasn't bad enough, let's make the fit so appalling that you have to shim it with plasticard so that you have a chance to make it fit? Now, wouldn't it have been better to make those attachment pins separate so that you didn't have to try and work round them? Even if you wanted to keep the insert (which I can't see the advantage of) at least you can fill sand and finish the top before adding the struts. By the way, I just assembled this for the purposes of the photograph, I have no intention of using it like this
Academy F-4B/C series - that stupid little nose wheel bay insert that has the door actuator integrally moulded on. The one that you have to put in at the beginning of the build otherwise you have to do major work to get it in. Of course, after about four and a half seconds of handling the actuator rod, which sticks out proud of the underside of the fuselage, catches on something and gets ripped off. All three of my builds have had the same happen, so I now don't bother trying. Just wait for it to detach, put it in a small zip-lok bag and keep it with the other antennae and stuff. But why? What's wrong with making it as a part added later? As for the main gear........
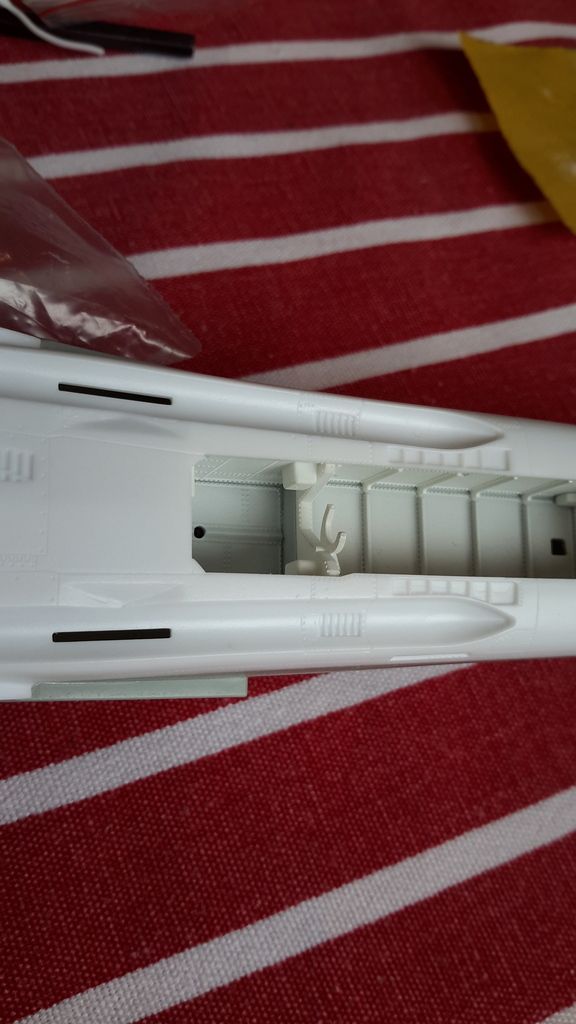
Kinetic F-16AM MLU. They must have had fun when they were designing the sprues for this one. 'Let's see,' they thought, 'the designers have given us a complicated model that requires good fit due to the complexity of the parts and build methodology, and has some fine detail that is tricky to replicate. Therefore we should do the utmost to make sure that we place sprue gates thoughtfully, in places that are easy to access, clean up and result in the minimum of eradication of surface detail' So, of course the sprue gates are a mile wide, and either on critical mating faces or areas where it is impossible to remove without removing very obvious and impossible to replicate detail. Sprue gates that are wider than the actual part you are moulding? Yep. Sprue gates that extend a long way onto the EXTERIOR surface of the part that is being moulded, instead of the inside where it won't be noticed? Yep.
So come on guys, let me know the Kit fluff ups and irritations you've come across that really get your goat, pour it all out on here
Les
-
Go on, ask me how I know!
Looks like it is necessary to seal the metallic coat before the panel line wash, as it eats into the surface of the metallic coat; the wash is enamel based, however I didn't expect it to attack what I thought were lacquers. Anyway, it does, thankfully no long term harm done as I was able to retouch, but just want to make people aware so they don't fall into the same trap. I'll probably seal with Mr Color clear lacquer.
I have to say, every now and then you get a model where things just keep on going wrong. This Hasegawa F-14A has been one of those, I've dropped parts and they have broken, then spent ages fixing it only to drop it again, had the aftermarket decals ruined due to thinners dropping on the parts, then had to buy a new sheet and screwed up the application of the replacement decals. PE that keeps dropping off. Parts getting lost. Paint lifting. Accidental paint spatter on parts that you have just spent hours getting to look right. Etc., etc., etc....... The joys of modelling!
******EDIT*****
The bad luck continues, but I have to report yet another bizarre issue with the AMMO panel line wash. I applied the wash to the landing gear legs, which had been assembled a while back using Tamiya extra thin, left for a good while to dry and then painted using Mr Color white lacquer. Again, it is at least a couple of weeks since I painted them. When I applied the AMMO panel line wash, one of the gear legs literally fell apart. Not into two pieces, I am talking about 5 of the total of nine falling off where the bond line is! I know well enough to apply a good amount of glue to the undercarriage legs as they are weight bearing, and when I look at the surfaces where the glue was I see it is cracked and almost sand like in appearance. Is it possible that the panel line wash has attached the area affected by the glue?
I'm frightened to touch the other gear legs that I applied the wash to in case they are affected so I will leave them until a couple of days have passed to dry - hopefully if the wash has affected them, a dry out period will help. I have never seen anything like this before in all my years of modelling!
hope this helps someone avoid an issue
Les
-
Gents, Ebay and amazon have loads of metal and plastic profile gauges for sale but they are clearly aimed at DIY stuff like tiling and woodwork. As such I have no idea how good they are for modelling, so the 'reviews' don't help me much. Do any of you guys have a profile gauge that you think is worth the money? I suppose my needs are that the profile has to be relatively smooth with small steps, so would have lots of small 'fingers'. It wouldn't have to be very big, just be able to match the profile at a reasonable resolution
Any feedback greatly appreciated
Cheers
Les -
Seems to be much better for paint at least, I've yet to have an opportunity to test it for CA adhesion. I used Gunze lacquers, and it stuck very nicely
Les
Removing adhesive residue without stripping paint.
in Jet Modeling
Posted
I had a similar problem withmasking tape adhesive residue after using 3M masking tape. The issue was that I had left the tape on for too long, it was during an international house move so the packed up part finished models were in a hot shipping container for a couple of months. As a result the adhesive dried on, so when the tape was removed it left behind all the dried adhesive layer.
In that instance I used a scalpel to carefully scrape it off, but would like to know if anyone else has got a better method for removing dried masking tape adhesive
Cheers
Les