


lesthegringo
-
Content Count
367 -
Joined
-
Last visited
Content Type
Profiles
Forums
Calendar
Posts posted by lesthegringo
-
-
Guys, using some ammonium persulphate, I tested the brass photo etch frets to see if it would etch the surfaces slightly to give a better key for the adhesives, whichever flavour is used. On the right is an untreated fret, on the left one that spent a minute in the ammonium persulphate solution
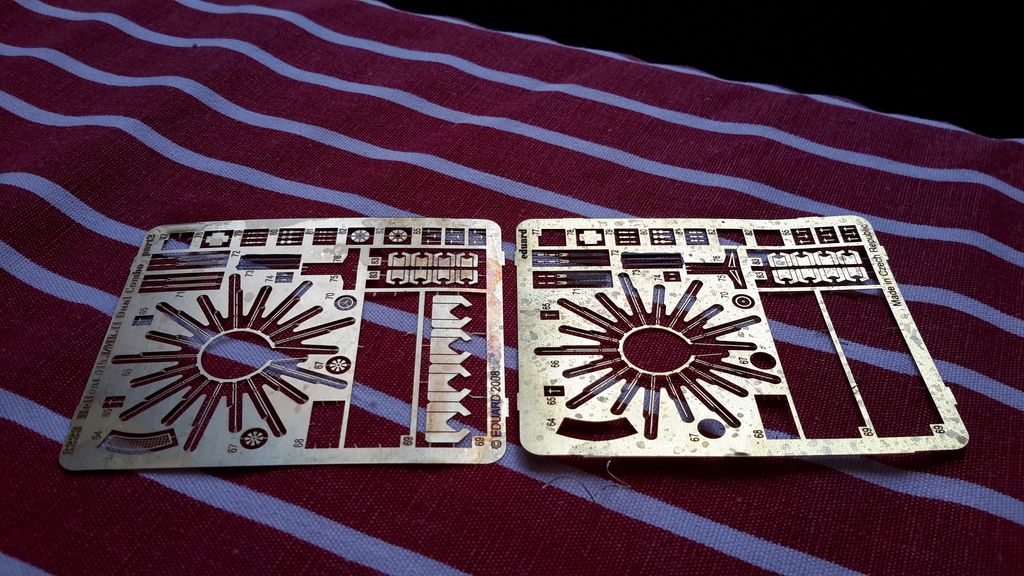
you can see that the surface has been etched, resulting in a matt (or at least satin) finish that hasn't affected the quality of the details.
I will have to use some of it and let you know what (if any) difference it makes
Les
-
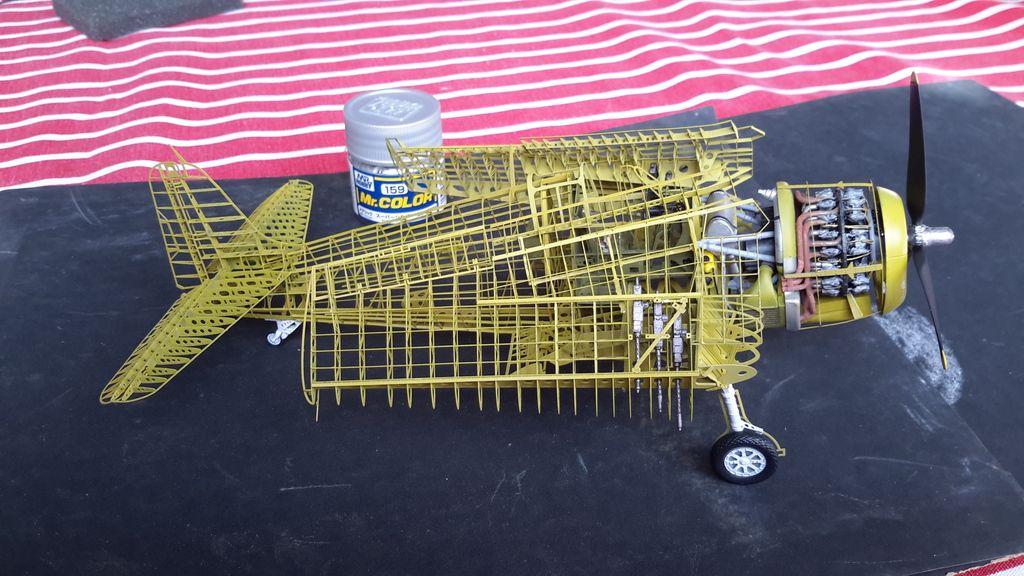
Thanks for all the nice comments! One thing that is not evident from the pictures is the size of it. It is 1/48th, so actually quite small - here's a picture with a Gunze paint jar for size comparison
Cheers
Les
-
Thanks. I have some Ammonium Persulphate, which is used to etch PCB's, I might try a light solution of that on a spare bit of etch to see if that helps too. Thanks for the tip
Les
-
Guys, I'm looking for the national insignias applied to the three colour (navy blue, intermediate blue and white) US navy F6F aircraft. If anyone has these spare I have some decals for various aircraft (all 1/48th scale) that I can trade
Cheers
Les
-
Over a year on, and I'm happy to say that finally I have finished this
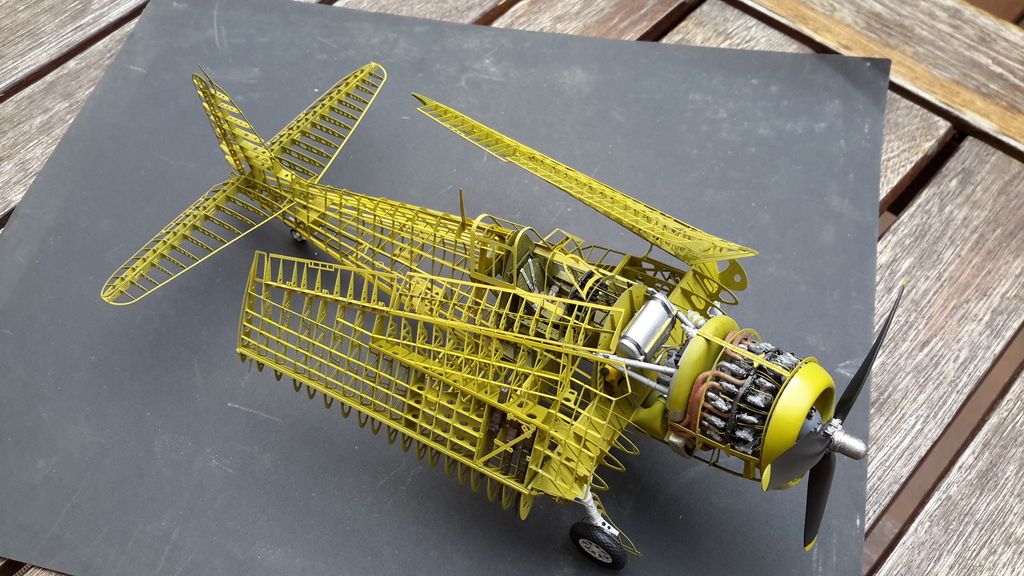
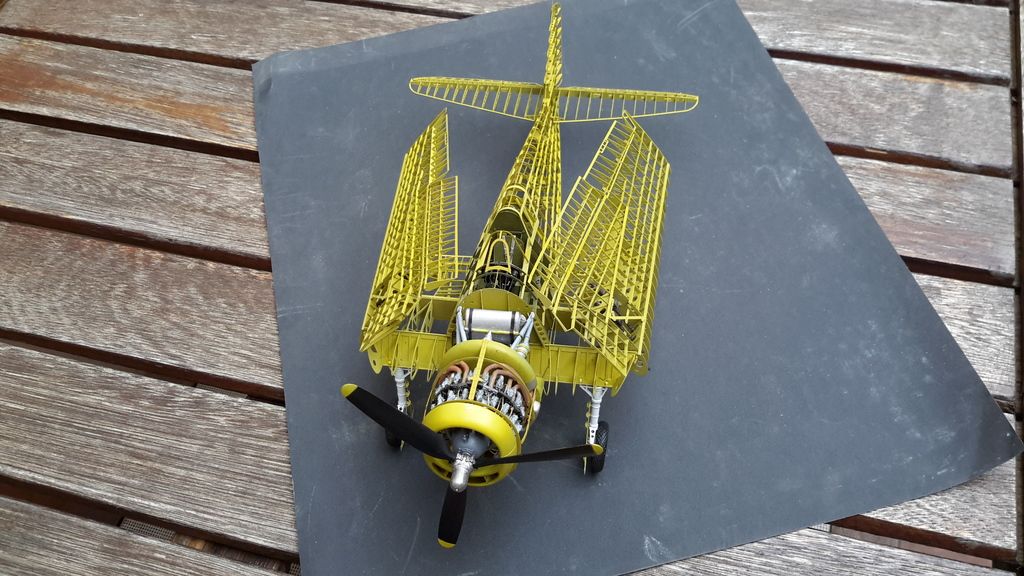
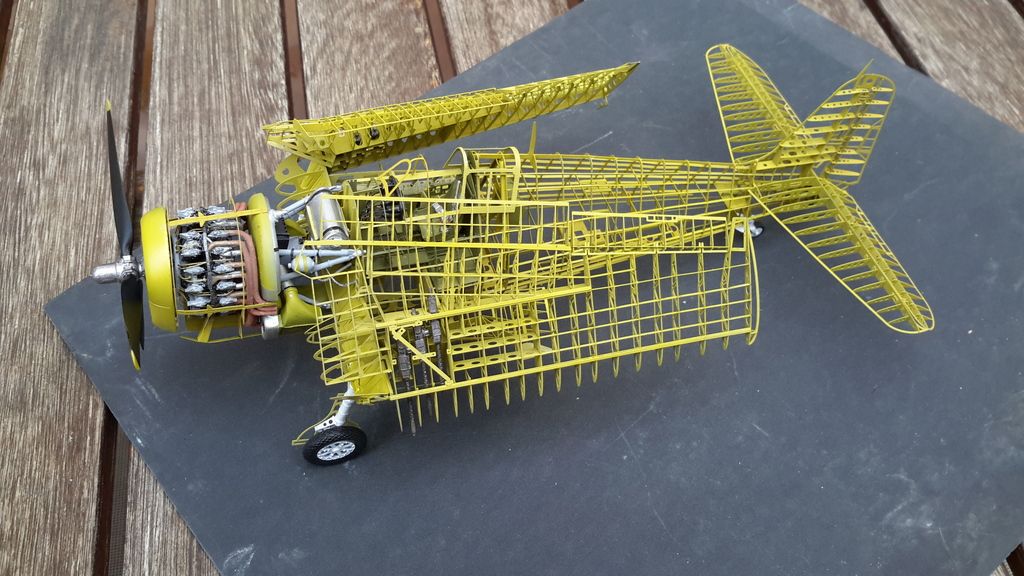
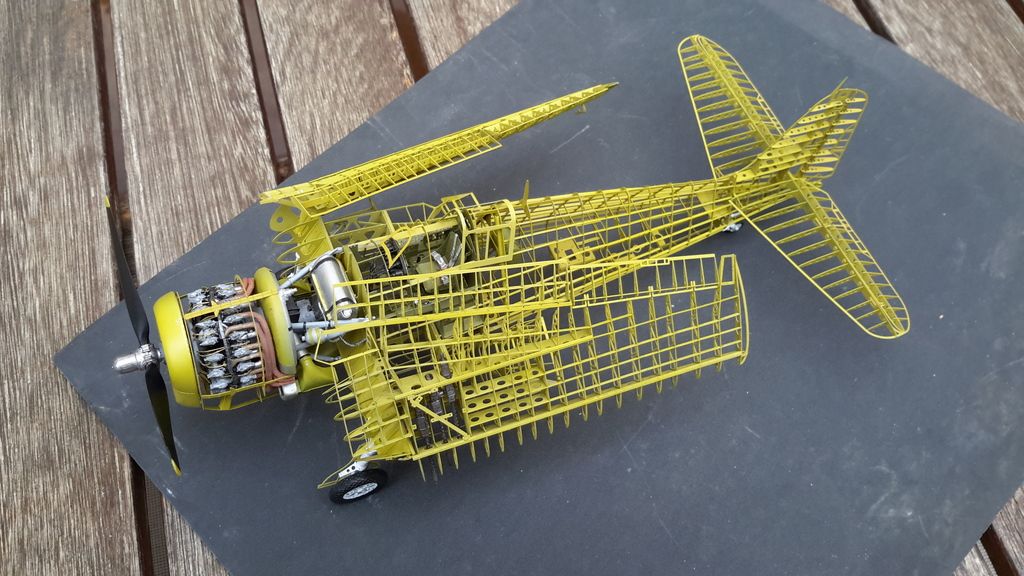
The full WIP is on the Britmodeller site if you are interested in this rather masochistic model!
Les
-
interesting, did it etch the surface?
Les
-
Thanks. I have some Gators grip somewhere, will have to use that for this - I always avoided it as I was not convinced it would cure / dry in the middle of larger areas
Another thought was maybe an epoxy, the slow cure types; I remember the lab guys at work explaining that the slow cure types are always better for applications where a bit of give is good as they are slightly flexible when fully cured, as opposed to fast cure types that embrittle. The fan track and ice impact linings on the engines are now held in using polysulphide epoxies to stop them detaching, and we always cure the blue filler cold and slow where possible as it is tougher and less brittle. Looks like I should have used my memory a bit more
Cheers
Les
-
47 minutes ago, lesthegringo said:
I reattach, after scraping the PE clean of the PE and trying to do the same on the now more considerably more complicated cockpit sill area
I do try, but the issue is you can't remove all the CA from the kit parts due to the geometry - there is always some bits left
Les
-
Guys, my love / hate relationship with PE is well documented on these pages, but I have persisted in using them in certain places because of the clear benefits they can bring in detail. However something that continues to occasionally frustrate me is getting the damned things to stick, and bizarrely the ones I have most difficulty with can be the ones that theoretically should be the easiest to deal with.
A great case in point is the cockpit sill surround on the Hasegawa F-!4A, and Eduards PE replacement. I have now had to re-attach it four or five times, as it pulls off with the absolute minimum of handling. It is a part that has a large, flat, constant gluing area, it is not a pre-printed part. I deliberately do not paint the kit mating parts, and I apply a layer of medium viscosity CA, then lay the PE over it. I use the release paper that comes with double sided tape, plus tape to hold down the part while it cures. So, large flat area, not in an exposed area where it can be easily knocked off, no attaching parts to complicate things. Easy, right?
Wrong. Even using low tack masking tape, when masking off the cockpit sills for painting, off comes the tape complete with the PE. So I reattach, after scraping the PE clean of the PE and trying to do the same on the now more considerably more complicated cockpit sill area. Strangely, the remaining CA does not want to come off the PE nor the cockpit parts, so it baffles me that it didn't want to stick together. By the way, I have tried Loctite, Bob Smith industries, Zap and various unbranded cheapo shop CA's, so it isn't an issue with the CA, although there have been a few cases where it seems that the CA did not want to adhere to the PE parts. But, the re-attached part is more prone to debonding, and with each progressive release gets worse. I now am unable to get it to lay flat on the area, and the unsightly gap between it and the edge of the cockpit has me now thinking that I will remove it and close up the cockpit in order to hide it, rendering all the cockpit work null.
In contrast, I have sailed through putting on the myriad of wing and fuselage mounted vortex generators, landing gear cover brackets, HUD parts, external grilles and chaff dispenser type objects, all with no issue. Some get knocked off when fumble fingers here does something exceptionally stupid, and you actually feel that there has been a lot of force resulting in the part coming away. Also, masking doesn't seem to pull them off.
So it must be me and my technique. I lightly abrade the PE so that it has a surface that the CA can key to, but would like to know any tips, or receive any advice that can help me.
Cheers
Les
-
A mix of CA and talc can make non-shrink sandable filler that cures in less than a minute and can be sanded immediately after.
I stopped buying putty after starting to use talc and CA, and in fact all my putty went in the bin a while back. If you have to do large fills or areas, either milliput, styrene stock or car epoxy fillers would be my recommendation
Hope this helps
Les
-
There are certain colours that get used a lot, black, white, greys, plus the more standard camouflage colours that I also think that we should be able to get in reasonable size containers. However we are essentially raped by the paint suppliers because they know that they can get away with AUS $450 a litre for the small jars based on a 10ml jar of Gunze costing over AUS $4.50
To think, I used to criticise my wife for paying exorbitant prices for little jars of makeup and perfume!
I'm all for being able to get some, if not all paints in more economical quantities
Les
-
Thanks.
Another (maybe daft) question is whether to apply the decals before or after; if they are applied after they may be too bright and clean, but if applied before they can be damaged by the process. Having had decals suffer damage due to their adhesion not being up to any even light abrasion, I'm interested in how people get around it
Cheers
-
Guys, I've been experimenting with the salt weathering method to acheive chipping and blotchy paintwork. However the results I'm getting are not quite what I expected. While the weathering effects are undoubtedly good, the surface finish of the paint is rough and it's clear that some finer particles of salt are getting trapped by the paint. When you wash away the excess, it does not remove the tiny salt particles unless you abrade the surface, which has an adverse effect on the final paint finish.
I understand that for blotchy paint, you are looking at simply putting on a fine filter of lightened or darkened paint so it would be misted very lightly. However for chipped paint, over a bare metal and/or primer substrate the top coat has to go on sufficiently thick to actually cover the surface with the top coat colour. It's here that I don’t seem to be able to avoid the poor surface finish due to the trapped particles of salt.
Clearly my technique leaves something to be desired, and I would appreciate any help or hints in identifying where I am going wrong.
Cheers
Les
-
Decals on fine, do you just want the stripes or do you want the lightning bolt too?
PM me with the address to send to
Les
-
I thought it was the UV light in sunlight that causes yellowing, certainly that's the case with white or clear paints in the past
Les
-
On 4/3/2017 at 2:09 AM, habu2 said:
When I am having a listless day I find the best thing to do is to make a list....
groan......!
-
Looks like you are in luck - I stuffed up the port outer one. I still have to apply the inner one, but I have two of them so there should be no problem sending you the spare, assuming nothing goes wrong! the problem I had was not due to any issue with the decals, some thinner dropped onto the part after the decal was applied and ruined the paint and decal, so I had no option but to strip it back to the plastic.
For info the best colour match that I have for the yellow on the CAM decals is Tamiya XF-3 - if you want to check yours to see that they are similar it might help.
I will apply the decal this week and PM you for the address once I am sure it is spare
Les
-
Which part do you need? I had to buy a second CAM decals sheet 48-028 which includes those as I had a disaster with one of the vertical stabiliser decals. If you don't need all of them, I may have some parts of the sheet I don't need
Les
-
I strongly suspect some previous experience has shaped those thoughts Phantom!
-
I'm definitely having one of those days where you pick up a model, toy pointlessly with the bits for a while and then can't seem to bring yourself to actually do anything worthwhile with them. Certainly one of those days where my modelling mojo has gone for a holiday in Bali without me.
So I'm trying to motivate myself a bit here, what do you guys do when you get stuck in the modelling doldrums?
Les
-
to be honest, I get most of my CA from the cheapo shops, where you get a card blister pack with ten small tubes for a couple of dollars. That way, you don't waste expensive CA if it cures in the tube and actually I have found the expensive varieties to me more finicky for building with. The three big plus points of using CA and talc are
1) very fast cure - no more waiting for a day or so to attack the seam
2) no shrinkage, so you can sand it to a smooth surface and know that the seam will not reappear after you have painted it
3) it sands easily and consistently, can be sanded to a fine feather edge and will still take scribed lines
For the mix, make a little cone of talc on some card or similar (I actually use the 'waxed' protective release paper you get with double sided tape) then make a little dimple in the middle. Drip five or six drops of CA in then mix it with a toothpick until you get a paste. The consistency you get depends on how much talc you mix in, but you can go from sloppy to almost dry and each has a use
If you mix a lot of talc in, it will start to ball up, and can be tricky to get to stick if it is too dry, but if you need to build up an area it is good as the extra talc makes it sand easily. Think where you have a nosecone that is not the same diameter as the fuselage it is gluing to. The step behind it can need a lot of filler to allow enough to be there to ensure a smooth progression of the shape, and large areas can be a chore to sand. With a high talc to CA mix, it is a lot simpler to get the basic shape sanded down. If you need to scribe lines on it, you can use a tissue to rub neat CA over the CA/talc area so that the outside is a bit harder, plus it can help fill any porosity or pinholes
A medium mix is my normal use; basically I stop when it is a nice paste the consistency of bondo. This is wet enough to stick well but has enough talc to sand relatively easily. This is my go to for any seams that need filling, or there are deep scratches and divots caused by my inevitable mishandling. It also helps where there are injector pin holes, with a toothpick you place a little in the middle and push it out to the edges of the hole. It will then flow a little, and then when half cured a craft knife can be used to cut the top off the dome to remove the excess, and you can use a curved blade to scrape it flush very quickly. Ditto any holes in wing leading edges, or pylon or antenna holes you need to fill.
If it is too sloppy, it will flow, which most of the time is not good when you are trying to apply it to a model. However the sloppy mix I find is useful when you have a deeper larger gap, as it can flow into the join. Sloppy mixes dry harder, so if you use this technique try to cut or scrape the half cured excess back while it is still soft to reduce the time spent sanding, or use tape either side of the seam to stop it adhering where you don't want to. However sloppy mixes are tough when cured and can be sanded to strong points and shapes and hold a good edge, so are also good if you have a ding in a trailing edge or need to restore the wingtip to a point.
In all cases, mix small amounts and work very quickly with it as it does cure within minutes. However the combination of cheap CA and talc is really cheap, so you can afford to junk any if you are not happy with it
Hope this helps
-
Saw this at a rather sharp AUS$30 for a tin, so am curious as to how you use it and what, if any, benefits it has
Cheers
Les
-
don't use just CA, mix some CA with talcum powder, then you can use it for filling and it sands back easily. It can be mixed to different ratios, and when you get it right, it will sand easily plus hold a nice clean scribed line
Hope this helps
Les
-
Gents, my wallet has respectfully asked that you stop posting such temptations! They all look really great, and I have to confess that even as a dyed-in-the-wool aircraft modeller, this AFV lark is seriously addictive stuff. The Meng MkV is an utterly fabulous kit, and has seriously changed the way that I do modelling. However, I am still approaching it like an aircraft model in some respects, with (I think) over complicated painting and masking techniques and obsessively painting stuff that will not be visible.
Maybe I have to practice on a few more kits...... like the ones mentioned above....
Les
1/48th F6F american national insignia wanted
in The Spares Box - add scale to your title
Posted
Thanks, e-mail sent as requested
Les