


jimmaas
-
Content Count
44 -
Joined
-
Last visited
Content Type
Profiles
Forums
Calendar
Posts posted by jimmaas
-
-
S-o-o-o, Jim, the colour of the lights on the horizontal stabs would be the same as on the wings? Red on the port and green/blue on the starboard? The lights on the top of the fuselage and the tip of the tail would be clear/white?
The red (port wingtip) - green (starboard wingtip) - white (tail tip) lights are 'navigation lights' and follow a more-or-less international convention that's still observed today for ships, airplanes and evidently is being introduced on spacecraft, which baffles me for sure!
'Formation lights' are different, used for placekeeping during night (or bad weather?) flying. At least for USN aircraft, these were blue through WW II - don't know about afterward. The white light on top of the fuselage is often noted as a 'section light' and I don't know how that works.
It looks like we may be able to go on with more observations and questions for a long time. I may be missing the obvious, but I have another question, concerning the close up photo of the tail hook that Jim included in an earlier post. In that photo it appears the tail hook drops down from a pivot point, but would not be able to retract. Inflight photos suggest the tail hook retracted into the lower fuselage. Was the close up photo from the prototype airframe? I plan on doing my build-up in flight, wheels retracted on a stand.
A recent e-mail from Attack Squadron confirmed they will be producing a 1/72 kit of the F2F-1 in the near future. I have been waiting for decades for an accurate, detailed kit in this scale as I have long wanted to do an inflight set up of those three aircraft from the second section of VF-2.
The whole arresting hook retracts into the fuselage when not deployed. You can see the location of the angled mechanism in this photo of the mockup:

-
...and courtesy of Rich Dann, confirmation that the objects on the tips of the horizontal stabs are in fact formation lights. Going back to the Grumman Biplanes book, they also show up on the earlier two-seat FF-1 and SF-1. When everything was lit, an F2F must have been a wonderful sight at night!
-
Hello again, and good to see Dana's info! I haven't been able to figure out the bumps at the end of the horizontal stabilizers, and I've got an inquiry in to someone who may have more F2F information (I don't claim much expertise on Grumman, having concentrated on their less-successful competitor :whistle:/> ).
We should probably use marked-up photos, cuz the description Dana used of a hole on the left side is I think higher up on the side.
Here's a shot of the tail ident light:

and there's also a light on top of the fuselage on the centreline, located over the 'F', looking like a white dot in this photo:

-
Hi Brian - I'll be honest, I was debating with myself as to whether the metal areas were light Gray or aluminium lacquer. The photo falls right about in the time frame for the changeover and it could be either.
There are three 'holes' when viewing the lower fuselage head-on. The middle one is I assume the carb intake, with screening. The one on the port side is the landing light, angled slightly down, time for an MV lens (and there's a shiny aluminium rim)

The hole on the starboard side is just a small hole. Have no idea what it's for :^)
The tail colors could have been white to reflect the period on Saratoga. But I believe that happened, for a short time, after Soucek had left command. And just to make your life more interesting, look just under the sliding canopy sill, between the N-struts. VF-2 (and VF-3) painted the regular pilot's name in about 1 inch characters (roughly Times Roman) on each assigned aircraft. Fortunately, for 2-F-1, you can predict the characters read LT CMDR SOUCEK.
-
My apologies if my comments belong in the 'Classic Aviation Forum' but I thought more members would visit this forum. I am in the process of preparing this outstanding resin kit for primer and want to get my ducks in a row before I start. I plan on using the black and white photo found at the top of page 28 of Squadron Signals Aircraft Number 160 'Grumman Biplane Fighters in Action" as my reference. These markings are found on the kit decal sheet, 2-F-1, BuNo 9646.
These are my questions and observations:
1. Would the upper wing chevron have black edging? This seemed to vary with section colour and unit.The photo of this aircraft shows a thin black pinstripe for both the cowling and fuselage band marking, so it's a good bet the wing chevron would be the same.
2. The unit badge, as shown on the kit decal sheet is usually dark blue. In the b&w photo this badge appears much lighter, almost matching the red section leader markings on the nose and fuselage band. Should this badge be dark blue as shown on the decal sheet? [/color]That may be an affect of the type of film used. The CPO badge is a dark blue and the kit decal is okay.
3. In the photo the upper wing leading edge appears lighter than the wing under surfaces. Is this where the two colours meet? Usually this upper wing colour extends further back in a sharp demarcation while this appears more like a shadow in the photo.Until mid-1938, the color boundary between the upper Orange Yellow and the undersurface color was on the leading edge. After mid-1938, the Orange Yellow was wrapped around the leading edge to avoid chipping. This photo is cited as September 1937, so the leading edge boundary is correct.
4. What is the small circle below the cowling on the port side of the fuselage? It appears to be a light in some photos but a dark hole in others. Not sure what you're referring to.[color="#0000FF"]
5. In many photos there appears to be a light on the upper wing tips about one foot or so from the tip. It is not included in the kit. Was this found on all F2F-1's? That's the standard position for formation lights - just drill a small hole and add a piece of rounded clear sprue.
6. In the above mentioned photo there appears to be a metal plate where the rear upper tip of the N-strut is attached to the upper wing. It appears more polished then the rest of the fabric surface. This is not represented on the kit wings. Most of the wing is fabric, but that looks like a metal panel. Therefore, Light Gray, like the fuselage [probably - this shot is right around the point of changeover to aluminium lacquer for metal areas]..
7. Lower wing tip hand holds are missing on the kit. These are often black in some photos but unpainted in other photos.
8. The black wing root walk ways seem to vary in width. Notice the difference in the photos of the the three aircraft on page 28 of the 'In Action' book.
Comments and observations about this aircraft would be welcomed.
-
As far as photos of the Soesterberg D.XXI, I can say from personal experience that the aircraft is difficult to photograph. The green comes out, for some reason, as a lighter, almost blue-green, color than what is on the aircraft. Then there's the question of whether the colors on the museum aircraft are correct - certainly recent research indicates the beige color is too tan. I'd go with the FS colors cited from the D.XXIII kit.
-
Just to add to Dnl142's post, here's something I had posted on Britmodeller:
Very nice resin castings (but watch out for loose pieces in your packaging, part of a slender attachment to the port fuselage had broken off with mine). The only part I could measure at this point is wingspan and that is within a twitch of the published 28 foot six inches. The kitmakers did not copy the detailing style of the Accurate Miniatures F3F's: the method of attaching the lower wings is different, the wings have more traditional rib detailing (happily just this side of 'starved cow') and the fuselage emphasises the overlap of panels. The hatch on the starboard rear will need some sanding down, since it stands out a scale inch or so. Decals are comprehensive, the sheet is a semi-matt and you might want to trim closely.
The finish instructions are wrong. Most of the schemes are described with "fuselage and wings in NAVAL AIRCRAFT GREY [sic] color". The color key gives an appropriate FS 595 equivalent of 16473 for Aircraft Gray, but this gray enamel was only used on metal areas (fuselage, struts). All the fabric areas (at least, those not covered with Orange-Yellow or squadron tail colors) were aluminium enamel. This use of enamel ended in the mid-1930's, when the U.S. Navy finally discovered the virtues of aluminium lacquer for metal areas and aluminium dope for fabric. Consequently, F2F's were repainted if and when they came in for major overhaul (and the none of the later F3F's,except the prototypes,had gray fuselages).
-
Ikar no, it is a molding unique to Tonka, that's why I'm asking if anyone has actually ever seen the plastic in this kit.
Yes, and it is (a) a good kit, and (B) really 1/48 (I measured it and the wingspan is within 1/32 of the published span for the Flyer).
From the style of detailing and the ident marks on the different sprue trees, I strongly suspect this kit had some connection to the people that were doing Otaki kits around the same time - it has that feel to it. Some of the pieces are simplified; for example the horizontal pieces that should be covered on the upper surface only are depicted as having covering on both surfaces. But it is better than the Monogram kit and is actually 1/48.
-
Congrats Joel on a nice job!
-
The Marines never had any F4F-3's in the yellow wing scheme. They did have them in the overall Non-Specular Light Gray scheme. You are spot on with your description of the use of 'silver' paint instead of natural metal during the yellow wing period. The Navy from the mid 1930's used aluminium lacquer for metal areas and aluminium dope for fabric. There never were any yellow wing F4f's with gray metal areas - the use of gray for metal areas ended in the mid 1930's when aluminium lacquer was authorized.
-
duplicate
-
Well, Lance and Jennings are right - in the Skyways articles there's a beautiful shot of the CW-20 under construction that shows the fuselage in cross section, with the distinctive double bubble crease. But in the text [memo - must actually read the text!] it states that the crease was plated over to reduce drag. The AAF thought that was unnecessary (along with many other innovative features) so the C-46 didn't have the overplating. That overplating is probably what looks, to me, like a crease line.
-
Well crud, guess that puts that idea to bed. I'll just have to find a unique scheme then. Thanks for the info guys.
Not so fast - from Bowers' Curtiss Aircraft 1907 - 1947: "CW-20T - as completed in 1940, the prototype CW-20 was a twin finned transport....the fuselage cross-section was of the double-lobe type, with two circular sections intersecting at the level of the cabin floor..."
There are a lot of things to change to get a prototype, but the cross section is not one of them.
-
Best info I know of would be Skyways Magazine 53 and 54, from early 2000. There's a small three view (sorry, it's not a Bentley scale plan). Check this LINK which shows they have issue 53 as a PDF download.
Best of luck - Jim Maas
-
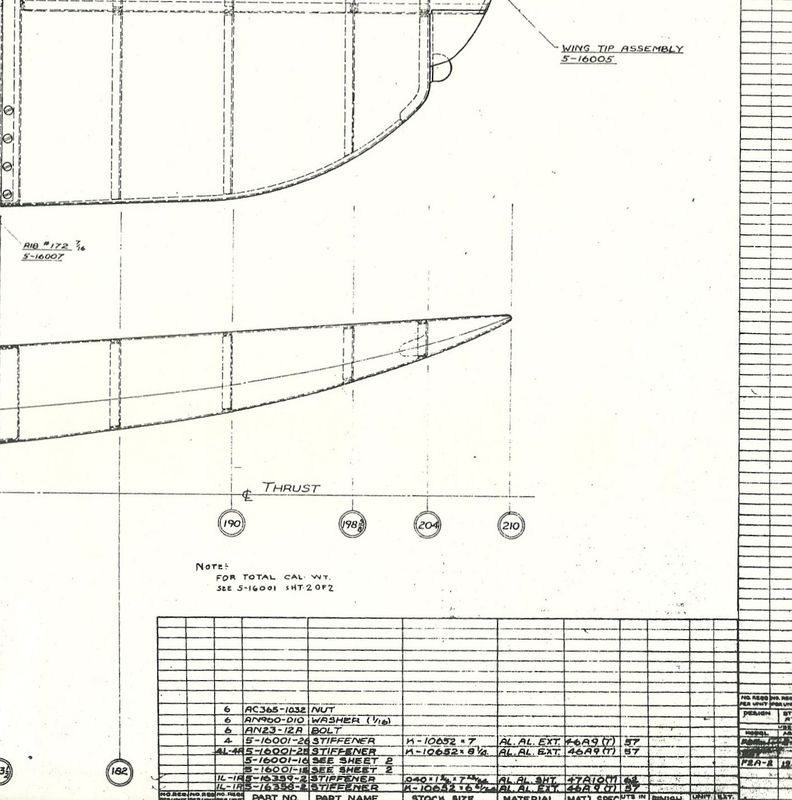
Hey Joel - here's a section from the blueprints for the wing that show the wingtips have a marked upsweep when seen from the front. This was actually pretty common on US aircraft from that period as an aerodynamic feature. The wing should be dead flat along the top line, though.
-
Since the landing gear mechanism is next, this may be of interest....
-
I have three US style PV1's and a couple PV1's with the BP turret. I know the RCAF flew some with the US made turrets, but was thinking about an RAF or Coastal Command airframe.
gary
There are several Aviaeology 1/48 sheets devoted to the Ventura. One is listed here and the others are listed below this entry. The Venturas in Canada 1 sheet has BP turrets.
-
Jim,
The color I'm planning on using to simulate DDG was Tamiya XF-58 Olive Green. There is an even darker Green XF-61 Dark Green. Is there a FS chip that I can match the paint too?
I knew about the central gas tank being added to the F2A-3s but hadn't really studied the entire instruction sheet as yet. Thanks for the information on the switch in part numbers.
Joel
DDG would be near 34092.
As far as the round counter window, in 1/32 the easiest route would probably be to rummage through the parts box and find clear plastic bits (like a teardrop wingtip light) and use those to replace the kit bumps; just masking over the window should do it.
-
Hi Joel - yes, I did the Buffalo I pilot's manual (in the sense that I re-typed the manual to post on Dan Ford's Buffalo site).
Dull Dark Green is usually equated to US Medium Green 42, but Dana Bell gave me a color chip sometime back that shows DDG is darker than 42. Bronze Green is often equated to Model Master Euro I Dark Green.
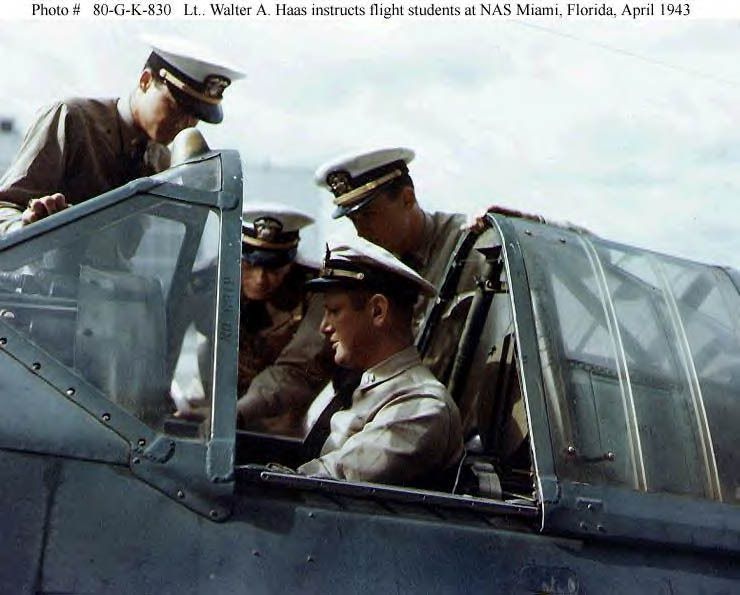
I dug my Czech Models kit out and looked at the instruction sheet. There's a mistake on page 13. The 'solid' ventral insert should be used for the F2A-3, not for the Australian Model 339-23, and vice-versa - the glass ventral insert should go with the 339-23, not the F2A-3. I had originally thought the F2A-3 had a ventral window like all the other Buffaloes, but Brandon Wood pointed out that the F2A-3 had an extra gas tank under the seat, which would have made downward vision pretty impossible. Turns out the window was replaced with solid doors but they still had those oval openings (carbon monoxide vents)just like the ventral windows. By the way, the extra fuel tank needed to be filled, and that's the purpose of that solid panel on the front left side of the rear canopy on the -3. In the cockpit closeup photo above, you can just make out the word 'FUEL' on it. Behind the panel there's a refuelling location for the extra tank. The extra tank gave the -3 a range, at economical speed, of almost 2,000 miles. There are indications that the Navy wanted the aircraft to have a secondary search role (just like the SBD had a secondary air defense role). Secondary roles can really mess things up!
Hope this helps.
-
Hi Joel - glad to help. As far as the cockpit interior goes, my source is the Brewster Erection and Maintenance Instructions For Model F2A-3 Airplane (Report No. 512):
7.23 Cockpit - Detail In addition to the finish schedule of paragraph 7.21, the interior enclosure, as defined in paragraph 7.22, and all the brackets, supports, reinforcements used for structural purposes, control handle shafts, containers and flooring included in this section shall receive a coat of dull green lacquer unless specified otherwise. Note: the control handle shaft is the rod connecting the handle to the control cable or other transmitting apparatus and does not include the handle or knob.
7.24 Canopy and Windshield The metal interior of the canopy and windshield shall receive two coats of zinc chromate primer and one coat of dull green lacquer.
7.25 Pilot's Seat The pilot's seat shall receive two coats of zinc chromate primer and one coat of dull green lacquer.
7.26 Instrument Panels The instrument panels shall receive one coat of zinc chromate primer and two coats of black enamel.
On the other hand the Insignia and Markings diagrams for the F2A-3 (B.A.C. 22-00712) has a note that the interior was to be painted Bronze Green. Dull Dark Green was to replace Bronze Green so I think DDG is more likely. Here's a photo which shows the color:
The rest of the interior (such as the interior of the cowling) was specified as 'aluminized zinc chromate'. I've never been able to determine whether that means yellowish ZC with a metallic sheen, or something that looks like aluminium paint.
-
In fact, the cockpit interior was Dull Dark Green for F2A-3's, so it's going to be pretty dark. (The earlier F2A-1's and -2's had aluminium lacquer interior, except for the eight -1's converted to -2's for VS-201, which were also Dull Dark Green).
A couple of things about the Czech Model kit, and all the other MPM-derived 1/32 Buffaloes:
- they all have two landing lights under the wings; except for the British 339E Buffalo, there should only be one, under the port wing. Sand and fill the starboard one;
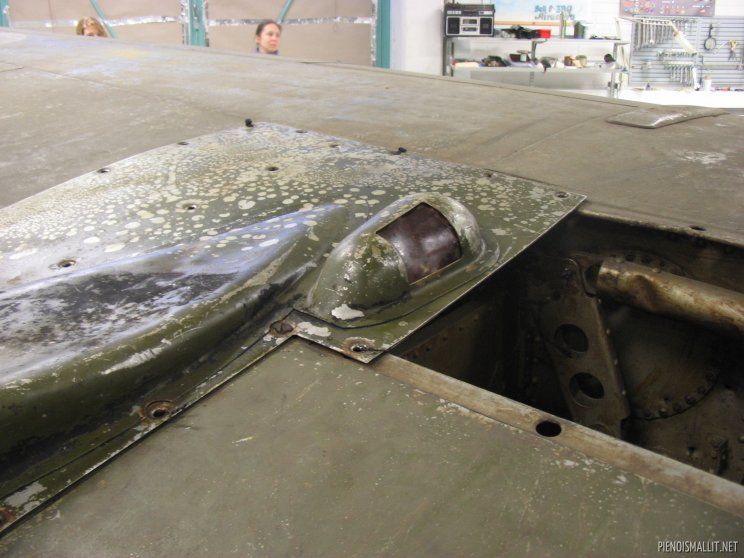
- on the upper surface of the wing there are two bumps on each side over the wing gun installation. The big bump is to accommodate the gun mechanism. The smaller bump is a cover for the round counter and has a window on the side facing the fuselage. I don't know what the actual counter looks like, but the window is seen on BW-372:
- the rectangle in the middle of the instrument panel is meant to represent an instruction placard which will liven things up a little:
-
I like the F-20, great Whif fodder! Hopefully, the F-20 generates the $$$ for future projects. Personally, I'd love to see a...
1/48 North American FJ-3 Fury - love USN Cold War jets in dark sea blue!
1/48 Ford Trimotor (4-AT or 5-AT version) - great "Golden Age" of aviation classic airliner
1/48 Wright Flyer - started it all!
I'm sure the last two might be somewhat esoteric but they are very historically significant and (to the best of my knowledge) have never been kitted in 1/48 scale in injection-molded plastic.
:cheers:/>/>/>/> happy modeling and best of luck with your business! Bryan
There already is a 1/48 Wright Flyer, and a fairly decent one too. No, not Monogram, but Tonka. Tonka Diorama 7011 "Moment of Flight" includes a kit of the aircraft that reminds me strongly of Otaki back in the day. The kit turns up on Ebay for pricing ranging from cheap through reasonable to ridiculous. But it is a worthwhile model and wingspan scales out to 1/48.
-
The oval you're describing is a clear vision port (which the pilot could open if the canopy was fogged), found on the British Buffalo, on the left side of the sliding canopy only. It is essentially the same as one on the Spitfire canopy's left side, though of course that one is much smaller. The most recent Tamiya release, Brewster B-339 Buffalo 'Pacific Theater', item 61094, has a decal for the clear vision port. It's item 12 on the sheet.

You might be able to post to see if someone is using the sheet for the Dutch or USN scheme and would part with the clear vision port decal.
A couple of notes on British Buffs. The small formation lights on the top of the wingtips on the Tamiya kit were on most versions, but not the British one, so they can be clipped off. Good thing, because the upper wing roundels were located very far out on the wing, and this way you don't have to worry about the decal going over that formation light.
The camouflage pattern for the British Buffalos was the standard single engine fighter pattern found on Spitfires and Hurricanes, and there was an 'A' version and a mirror image 'B' version. Most illustrations don't take that into account, and draw parts form 'A' aircraft and 'B' aircraft.
Undersurface was pretty close to Sky but a little greyer and bluer. Fuselage band and spinner MAY have been Sky Blue. Codes (for all but 488 Sdn) were Sea Grey Medium, but 488 codes may have been Sky Blue.
Interior was standard British Grey-Green.
Hope this helps....Jim Maas
-
The very nicely built Ryan ST posted on the 18th was captioned as belonging to the Royal Netherlands Air Force. That organization did not exist until 1953. The closest thing in the East Indies was the ML-KNIL - essentially, Air Corps of the Royal Netherlands Indies Army.
But this particular STM didn't belong to the ML-KNIL (which had many, but all coded with R0-nn). The 'S' serial shows it belonged to the MLD, the Netherlands Navy air arm.
Attack Squadron F2F-1 : Comments and Questions
in Props
Posted
Yes. Actually, my example of the kit does have a small diagonal 'clip' at the inner rear of the elevator, but it should be bigger. A couple of swipes with a file should do. The fairing on the fuselage in the kit is straight across at the rear end, where as Brian notes it should be a concave curve. That might be difficult to fix neatly.
Using the AM F3F-1 as a template for the sleeves sounds like a good idea.