


Cliff C
-
Content Count
273 -
Joined
-
Last visited


-
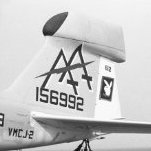
I would love to see some options for the CA ANG. I know they have at least one bird with the late one piece windscreen that would be a cool addition. I have a couple pics if needed. -Cliff
-
A few of pics with the a first coat of primer on the lower fuselage. At this stage you can see the nose gear bay is installed, the weapons bay is installed and I added the four vents just aft of the weapons bay. I also opened up the air exhausts under the intakes. Painted PT pod just set in place.
-
Thanks Rich, that’s helpful! Having the pictures stripped out is frustrating but I found a pic of the AN/ALE-28 dispensers and since it looks like they were most likely used up and through DS, I’ll go with that variant. Part of my confusion is looking older photos, and some had the bump-out for the dispenser and others were smooth and lack the dispensers. I wasn’t sure if these were installed on every aircraft, if they were periodically swapped out or introduced somewhere during the production life. -Cliff
-
Weapons bay taped into place. Once the bay was glued into place, all of the panel line details had to be filled and rescribed to make them more accurate.
-
WEAPONS BAY as I mentioned earlier, I was not planning to open the weapons bay. That would be opening a whole new can of worms for an area you just can’t see very well and I like the look of the aircraft without the additional doors hanging open. I believe “normal’ or typical shut down procedures were to open the doors before shutting off power. Inspecting the bomb bay is part of the walk around before each flight and if the bay is closed, they would need to be opened for preflight. Since there are lots of photos with the Pave Tac pod deployed and doors closed, I went with that
-
Thanks, waiting for Tamiya is probably the smarter decision.
-
Absolutely. I did a lot of research on the cockpit and canopy area and was scratch building a replacement. I abandoned that work quickly when the Reskit came out. Real sore spot with the kit now is the wings. Very accurate in dimension and overall shape but big issues dropping the flaps as already mentioned.
-
For the rear bottom of the fuselage, you can see where additional fictitious rivet and panel line detail needs to be adjusted. Additionally, the ventral strakes need to be modified so that they sit angled out to the side. The kit has you installing them perpendicular to the ground. The panel lines on the strakes need to be aligned with the engine access panels on the fuselage and I added an extra reinforcement strip along the outside of the fins. I also added the center pylon and conduit fairing from Reskit.
-
Does anyone know when the chaff and flare buckets on either side of the engine on the under side of the fuselage were added to the jets? They seem to be there on all the Australian aircraft, but can’t tell when or how many of the EF, E or F aircraft received this upgrade? thanks, Cliff
-
AIRFRAME DETAILS Here’s a pic of the upper rear fuselage. The black areas are where I used black super glue to fill in panel lines and rivets that were put in areas incorrectly. Overall, the panel lines are fairly accurate but you have to keep a careful eye out because there are some that are completely fictitious mixed in. I also added a new spine area that is taller and goes further forward than the one on the kit.
-
As mentioned earlier, try dipping them. I paint the overall forward section using Gunzy Metalics II and then dip the tips into small pools of enamel paint. If you don’t like the effect or don’t get the colors lined up just right, you can use use a little Turpinoid to wipe off the enamel colors and try again.
-
Amazing detailed and precise work. Thanks for taking the time to photograph and share. -Cliff
-
Tamiya 1/48 F-35B, kit 61125 coming in November
Cliff C replied to Dave Roof's topic in Jet Modeling
Dave, any chance we’ll see VMFA-214 on one of the sheets? -Cliff -
Thanks Rich. As maddening as it can be, this is one of my favorite parts of the hobby. Thanks, some good info here. One thing to keep in mind is that none of the resin aftermarket sets fully corrects the intake issue. The TP II intakes used on the D, E, F, G and FB-111A differed from the TP I with the removal of the splitter panel, inlet spike was 18 inches longer, and they were moved 3” farther out from the fuselage. All the resin sets I’ve seen remove the splitter plate, increase the length of the inlet spike and some include a full intake ducting. There are
-
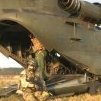
Intakes The kit intakes represent the earlier style and are not correct for the E or F versions. I have several resin sets but decided to go with modifying the kit parts. To save a bit of time, I’m going to use intake covers and skip doing full intake trunking. This may be a major sin for some but for me, I think the red covers add some color to the build and I avoid a lot of work for little return. YMMV. in the first pic, you can see the additional styrene added to move the intake away from the side of the fuselage. Surprisingly, several of the aftermarket sets correct