

DutyCat
-
Content Count
2,229 -
Joined
-
Last visited
Content Type
Profiles
Forums
Calendar
Posts posted by DutyCat
-
-
Ok, well if you are a seasoned user, you have your preferences and your reasons based upon your own experiences. You are correct. I did not answer your question, but incorrectly inferred based on it that you might be an inexperienced user. I tailored my response accordingly and was trying to help.
My experience is that, regardless of how proficient you are at using them, high end, internal mix, double actions are not particularly suitable for general purpose use, both in terms of the spray pattern they generate, and the thinning required to get them to flow properly. I would be spraying forever with my H&S Infinity .15 mm nozzle brush if I were attempting broad area work, which is about 90% of what most modelers do. I only use the Infinity when doing fine line camo, and even then it is usually to tighten up lines after I have laid down the base pattern with my H and #1 tip. Having said that, there are DA internal mix brushes that are "middle of the road" engineered for both general work(sort of) and detail (sort of) work. The HP-CS is one of them. These brushes are marketed at folks that want to "do it all" with one brush. Again, I have used them, and think they are not very good at either. They are exactly the compromises their designers intended. The HP-CS has a .35mm tip...very forgiving with both mixture and air pressure, but not so good if you are trying to lay down a line barely thicker than an pencil. However if it suits your particular use, and you don't mind pulling that needle all of the time to clean it (properly), then I would say you bought the right brush. It just would not be my preferred set up.
And I COMPLETELY disagree on a novice starting out with a DA airbrush. They are more expensive, more difficult to use, more difficult to keep clean, and generally offer capabilities beyond what a novice will need for a couple of years. That is just my opinion, and you know what they say about opinions....
-
1 hour ago, Steve N said:
I always find it amusing to hear someone say they've got "stomach flu." As DutyCat says, there's no such thing..Influenza is respiratory. Most of the time what people call "stomach flu" is actually a foodborne bug of some sort.
SN
It is usually a Norovirus, although you certainly can get it from food contamination, it is HIGHLY contagious and usually spread through simple contact. If someone in your family gets it, STAY AWAY FROM them. I got sick and then it blew through my family like a hurricane. We fell like domino's. It was awful.
-
It is the gloss varnish which yellows in the absence of any paint pigment. So here is your foolproof trick. Flat white until you get good coverage (lacquer paint covers better..check Testors car range), then rub down the flat with 0000 steel wool to knock the roughness off (easy to get the hang of). Gloss white (again, laquer is better...Tamiya TS spray cans are excellent, but you can use thinned out enamel), decals, thin coat of future to protect when weathering, then thin coat of lacquer gloss coat. BTW, I have tried the flat white then clear gloss routine, and that does not seem to gloss up as easily as a thin coat of gloss paint.
You might also consider a drop of blue in your gloss paint. I do that as well.
-
No flu, which is respiratory, but I got a bad intestinal virus that was miserable.
-
Do yourself a favor. If this is your first brush, Get a simple, well made, single action external mix airbrush (I prefer the center trigger Paasche H. Others may prefer the pistol grip Grex, or front mounted trigger Badgers, etc.), a demand type compressor with regulator and moisture trap, and learn how to use it well before complimenting it with a quality, double action, fine line internal mix in a year or two. You can thank me later.
Don't scrimp here or you will regret it.
-
Waterline was sprayed white first, then masked with carefully applied 1/64" graphic arts tape. I think decals would work fine, except around the curvy areas in the bow and stern where you will surely run into trouble.
About the bow decal...I seem to remember hacking at bit off in the front center, but it has been a couple of years since I built this kit. At least I now I know what the markings mean!
-
1 hour ago, parche said:
Pictures from a Russian drydock might be helpful as well. Not sure whose pictures they are, just stumbled on it in an image search.
Cheers,
Dave
That is a good set of images. My November was inspired by a drydock photo.
-
7 hours ago, modelmax said:
Gees!
Gil, that is amazing weathering ma'an! I will use your november class sub as reference when I weather mine.
Thanks for sharing.
Ernie A.
Thanks. You are quite welcome.
-
Amazing amount of work. Good job. I visited the Gudgeon in San Diego in 1982.
-
34 minutes ago, parche said:
Nice overview video. Love the site as well, and thanks for your service.
Cheers,
Dave
Thanks Dave, I assume from your user name that you sailed on 637s? If so, thanks for YOUR service!
-
36 minutes ago, parche said:
Wow, beautiful work on your YASEN. Wish I could do "weathering" like that.
Congratulations on your win.
Dave
Thanks Dave, and you CAN. Just coat your base paint job with an acrylic gloss, get out some oils, and weather away. If you jack it up, just wipe it off!
Here is another one. 2nd place from Orlando IPMS Nationals 2012.
-
I say this because the battle with U-Boats essentially defined the Battle of the Atlantic, which was vital to our staging for the invasion of Europe. My understanding is although the American fleet boats accelerated Japan's defeat, the Pacific War was primarily won with air power. The Japanese under-utlized their subs.
-
-
On 7/12/2016 at 10:19 PM, parche said:
If it was a 1/48 scale Gato, I would buy two. Type VII, no thanks. How about someone gives us a 1/72 Los Angeles or Virginia? Or a 1/350 Virginia that is not a dog? Sorry, didn't mean to be a downer. Glad someone is doing it and maybe it will lead to others.
Dave
The Type VIIC is the most iconic submarine in history, so as much as I love the Gato, it, nor any other sub, is a more worthy submarine modeling subject than a Type VIIC.
-
On 11/10/2016 at 11:12 AM, afterburner said:
Well done Ernie! I've heard of the kit, but had not seen one assembled yet and I am interested in the Yassen. Thank you for sharing!
Here is another one:
-
On 11/27/2016 at 11:29 AM, K2Pete said:
While looking at my next project, the Tamiya 1/100 Shuttle, I found a decal sheet for the 1/144 inside the box!
So Hotdog, you're off the hook!
 but if you still wanna see how well the belly decals fit, let me know!
The Tamiya will be a little more involved ... Payload Bay opened and maybe a satellite, or the LDEF or a scratch built Hubble.
Plus, there's an ARC Group Build coming in January for pre 1980 kits. Seeing as ALL these Real Space kits, almost, are pre 1980, I'm gonna build a 1/72 Shuttle with all the resin I've collected ... so, keep the GB in mind fellas.
The Airfix decals on top, JBOT decals on the bottom. I'll use the cockpit windows from JBOT and mix and match the others.
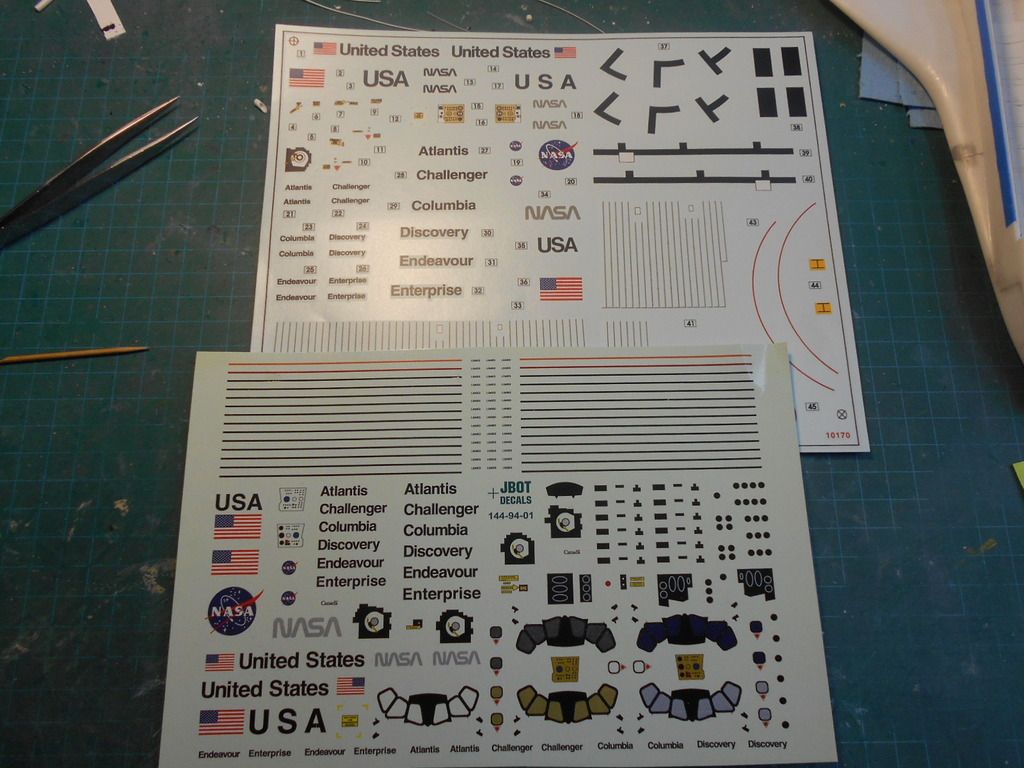
Looking good Pete. You have an older boxing of the Airfix kit. I have that boxing and the newer red boxing. The instructions and decal sheet in the red box are far superior, but, we build what we got! Also, in that scale, you are correct to fill in the windows completely and just go with the decals...just like an airliner. The window shapes on the plastic are obviously way off.
-
9 hours ago, crowe-t said:
Gil, You did an excellent job on the Monogram Shuttle Stack! I really like the thermal blankets. I never would have thought that putty could be sprayed through an airbrush. I sometimes have a tough time getting paint through an airbrush.
 You introduced us to a new idea and technique for creating the thermal blankets that really looks good. I can't wait to see more of your Revell 1/72 Shuttle build.
Mike.
Thanks, Mike. I will get back to the Revell after a break for some other projects. The Revell will be far less complicated, as it is just the orbiter.
6 hours ago, crackerjazz said:Spectacular work!!! It's a sight to behold displayed in its glass case!
Thanks! Yes, a case does help a large model look its best!
-
4 hours ago, my favs are F`s said:
Hi :) For some inexplicable reason I just saw your videos.......
Thank you for your kind words. I am glad you like it. If you are going to "binge watch" the entire series, you will need a large pot of coffee, because there are quite a number of them.
-
Thanks! Update done!
-
How do I update my signature on this new design web board? I cannot seem to find it.
-
-
Pete, thanks for the kind words.
Test the width of the beanie cap before using it. It might be a little wide and short from the molding process (flexible mold between to flat plates, held together with rubber bands). If it is, drop it on some hot water for 20-30 seconds. Let soften it up and squeeze the sides a little. When you are happy with the sape, dunk it in cold water to "fix" it. I found with mine it was a tad wide and short and I had to sand some off of the sides and add some putty to the top to get it to fit.
-
Oh, and Hotdog, your decals look great! Very nice job.
I see that Warbird now makes a tile sheet also They are over-sized and the "patchwork" look they have gone with is kind of wonky looking, but it can all be brought together with oils and a filter.
Yours are better....photographically realistic. Get them professionally printed and they will sell well. The other obvious shortcoming on both the Revell and Monogram orbiters is the lack of texturing in the fuselage. I fixed that the hard way, but I think if a good set of decals were available, all of the strip work I did would not have been needed. I could have simply masked off and sprayed the thinned out putty, textured it with the zimmerit tool, and applied the decals representing the borders of the blankets.
-
Well, Pete, I only have so much room in the house, and it is not so much a matter of "giving up" on 1/72 shuttles...it is more like "been there, done that, got the T-Shirt" and now it is time to move on to other cool projects. I have started work on the big Moebius Seaview. I would like to get that ready for JAXCON this year. That's on Feb 11, so I have to hustle. I also have the Dragon 1/72 Saturn V, the classic 1/350 starship Enterprise, the big 1/72 Moebious Skipkack, and the Revell 1/72 Gato and Type VIIC U-Boat kits. The latter I have all the internal resin for, and I intend to light it up. You can tell I like subs. I was in anti-submarine warfare in the Navy with the S-3 Viking, but if I had not gone into aviation, I would have gone into subs. As it was, I got to learn quite a bit about how they are engineered, and had the opportunity in the Navy to visit and sail on them. They are, in a way, the closest thing to a space ship here on Earth.
But about the model...there is no visible seam on the center belly. That has been puttied and sanded. You might be able in one spot to see it if the light hits it right, but the seam you see in the video is mostly where the decals meet. As they are ink jet decals, they are not opaque enough and if the two sides don't meet up exactly, there will be a seam. If the two sides overlap at all, even slightly, it will be darker there and a seam will appear. There is also a less visible, real seam on the actual vehicle as the tiles are base referenced from that point outward at application.
As I mention in the video, the decals did not really fit anywhere. There are gaps and overlap all over. What I did to bring it all together is give it a blended oil paint treatment and then shoot a gray filter over it. I was real happy with the way the entire project turned out, but it was four years of on and off struggle figuring out and dealing with this kit's shortcomings. My hope is that by going through all of the effort document most of what I did, other folks who attempt to tackle this beast will be aware of its shortcomings and be able to get a better result than they otherwise would have going into it cold. It really is magnificent when complete, if done well. I have on last video to publish on the Monogram stack. After that I am going to push a few other, mostly smaller projects out the door and then maybe I will get around to the Revell Columbia next summer, or maybe even the year after that.
White Paint That Doesn't Yellow
in Tools 'n' Tips
Posted
Aaaack! Enamel/Lacquer guy all the way here. I know how they will behave better than my wife!