-
Content Count
2,247 -
Joined
-
Last visited
Content Type
Profiles
Forums
Calendar
Posts posted by K2Pete
-
-
Last night I read that both Frank Borman and Ken Mattingly died. Borman was the Commander of Apollo 8, the first manned mission to the Moon. And Borman, Bill Anders and Jim Lovell manned this first manned flight of the Saturn V rocket.
They famously broadcast a Christmas Eve reading from Lunar orbit and everybody ... in the WORLD ... watched it!
You youngsters won't remember the excitement of those Moon missions and especially Apollo 8's ... the risks those 3 guys took. I can't imagine today's generation of fragile snowflakes even thinking of doing this. My gosh, they'd be away from their precious phones ... and wigs and make-up!
Borman also spent 14 days with Jim Lovell in Gemini 7 a tiny, teeny cockpit in 1965 or '66 ... amazing stuff.
Mattingly was the Command Module pilot on Apollo 16, with Charlie Duke and John Young ... another remarkable Moon Landing mission. Mattingly was also instrumental in helping the Apollo 13 crew deal with a dying Command Module on Apollo 13.
Frank Borman, I watched a news article on him a few years ago, was still flying his pwn airplane at 92 years old ... what a remarkable generation of men they were!
https://www.cnn.com/2023/11/09/us/frank-borman-apollo-astronaut-obit-scn/index.html
Rest in Peace gentlemen ...
-
Nicely Done Randy!
I would doubt the EVA antenna was attached ... for the same reason the landing probes weren't, they weren't needed. But, hey, I can't confirm it either. That antenna may have been used so John Young could hear Cernan's blue language later on ... ;^ D
And that little bump on the aft panels, I thought I knew what it was but can't find it. I thought it might be in Virtual LM, but not at a quick glance.
Those painted upper aft panels look great! You've got a nice steady hand young man!
And your pix are terrific! This little model really looks good! And I hafta tell ya, I never get tired of seeing these 1960's Space vehicles. Such a remarkable feat of engineering!
Thanx Randy!
Pete
-
It certainly is a nice looking display!
I took mine out of my stash last January and built the rockets and when it came time to decal 'em, the old decals from Tango Papa disintegrated and I, frustratedly, just put 'em all back in the box ... I emailed Tango Papa for a new set o' decals,, or whoever owns it now, and they never responded ... ;^ (
Whose decals did you use? Maybe I can finish this kit this Winter?
It does look like you had fun building these!
Pete
-
Welcome to this Forum karlos221.
i've built a couple Shuttle models in various scales including 1/100 and this is looking pretty good. But when you say it's a paper model, did you just apply the paper tiles over the Tamiya kit? It doesn't matter because the model DOES look nice! and the added detail in the Cockpit and Payload Bay is gonna make this even nicer!
Carry on and keep us posted on STS 49's progress!
Pete
-
WHAT?? You framed the front hatch with foil?? ... Holy Kow ... you've got good eyes and steady hands young man!
Nicely Done Randy ... do you have decals for this itsy-bitsy LM? If yes, are they kit or Rick Sternbach?
Keep 'er goin' Randy! ;^ D
Pete
OOOPS ... yes you've already applied decals to the Descent Stage ... so nevermind Randy! ;^ )
-
Here's a site from Paul Fjeld ( F-yell). He used to be with the Cradle of Aviation in New Jersey IIRC, and rebuilt LM-13. He was also heavily involved in rebuilding the LM at the Smithsonian.
Take a peek at this site, on page 2 is Snoopy's patterns as well as the others.
Pete
-
Looking at your LM, I'm gettin' the urge to build another one, but without foil ... to leave all the mods, the putty, the added styrene, the PE and Resin bits visible.
I just like the look of it. ;^ D Forecasts are that Winter's gonna be a c-c-cold one! Perfect for sitting and building a scale model ;^ )
Did you find many ref pix for this Apollo 10 LM, Randy? All I could find for mine, was just a few on Apollo Archive ... but I'm also curious about your copper colour on the top side of the Descent Stage.
Still watchin'!
Pete
-
My, My, My ... Rostko, this is way-y-y beyond "eye-candy" all the way to Visual Orgasm!
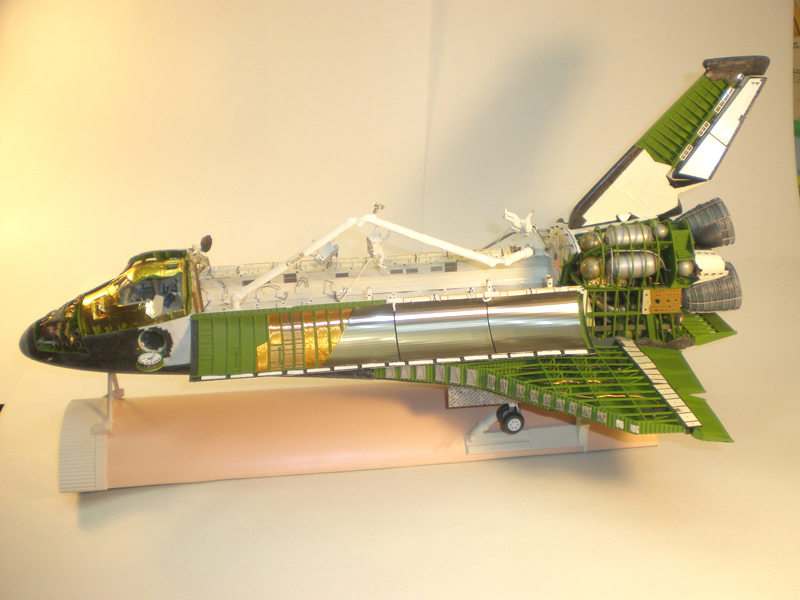
I've built a couple heavily detailed 1/72 Shuttles with open Payload Bay doors and thought I had detailed it pretty well ... well you've made my eyes water! ... with incredulity!
Homer, your cockpit has been improved to the Nth Degree and Rostko has made your design really shine!
Rostko, did you tell us which mission you're representing?
Well Done ... Really, really well done!
Pete
-
When you said that the Ascent Stage was too short by just a couple mm, I looked at my last thread and was pleased to see that I had indeed added a couple thick styrene shims to the bottom ... and I had also enlarged the windows. Is that coming later in your build?
And the engine bell area looks just fine. I have a few references from when I made my LM cutaway plus a view from VIRTUAL LM ( sans foil ) ... and yours looks great!
I hadn't realized that Mr Mackowski said anything about my LMs ... 'tis nice to hear! And I'm happy to have inspired you in this build ... misery loves company! :^ D
Carry on Lad
Pete
-
Good Golly Miss Molly ... when I did my last LM, Apollo 10, it was only then that I realized just how inaccurate the model was. But I had no idea the Ascent Stage was too short. I did fix some facet panels but ... dear oh dear ... you've given yourself a LOT of extra work! ... but FUNN work ... I might add ;^ D
And ... you're giving me the urge to build one more LM, from the 1967 kit, with foldable legs. I gave away mine to a friend and love seeing those bare bones, no paint, no foil LMs. Just PE and putty and no question the amount of mods that were made to this Olden Goldie! ( I gotta call New Ware and get another update set! )
I'll letcha get back to your production ... ;- )
Pete
-
That old LM takes me back ... it's yellowed, broken and inaccurate, but man ... I LOVE IT! ( I've still got two broken, inaccurate and Yellowed LMs from eBay myself! ;^ D
I still have those old LIFE magazines that have the famous VW ad featuring that LM.
I have to ask though, on the Service Module the PE horizontal Radiators have bent lines ... do you know why?
Your build is coming together nicely and it's great to watch!
Thanx
Pete
-
The researching for my models is fun for me too. I thought I knew the Space Program's vehicles until this internet thing came about ... WOW all that good info. And I used to look at other model sites for tips on what to prepare for regarding problems and fit issues.
I came across one builder who solved his LVM fit by cutting holes in the inner bulkhead and I did the same thing. I can't find his webpage any more. So like you, I like to be mentally prepared and pre-emptively think of solutions.
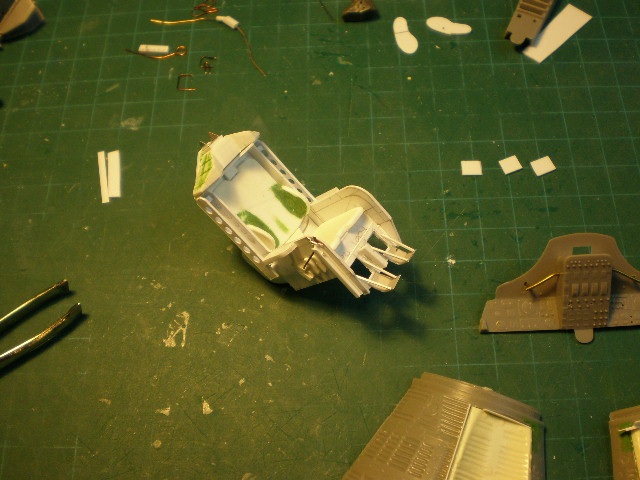
My Ejection Seats were built to fit the pressure vessel. Found a few pix and scaled 'em to fit. No fuss, no muss.
One of my inspirations with this model was David Weeks. I was stunned with his model of the Gemini B. I remember thinking, "I didn't know we could DO THAT!" ... that is improving a kit. Here's a link ...
https://ipmssd.org/wp/2018/02/14/modeling-the-gemini-b-in-1-24-scale/
And this PE is much thicker than usual so trimming it may not be an option. My use of PE is limited too so we're in the same boat.
I like the quote from a Mr Tyson "Everyone has a plan until they get punched in the face" ... with that in mind, I look forward to seeing your build thread Tom.
And if you have more questions, don't hesitate ... i'll help if I can!
Pete
-
Gee ... my Gemini was over 9 models ago so my recollection is poor.
Got guidance on the folding of the seats?, I guess I would say, make a paper or cardboard pattern and fold that up using the LVM kit's instructions. There was a lot of trial and error with me, folded, realized it was wrong and refolded and it broke. (Can I assume you've looked at my other threads?) This 2018 version was my 2nd Gemini 9A model. The first one was in a Group Build in 2008, with Ejection seats that were 100% scratch built. I had ZERO fit issues with those ... the entire interior was scratch built and I had a ball making it all. Here's the link ...

Let me tell you my approach to building a model. What will the viewer see? Will they be looking at the detail or will a lump of styrene, in the right place, make them think I added a lot of detail? I've determined that that is the case. So with the Gemini's interior, how much is a judge, or a casual viewer, going to notice? Not much, even with both hatches open. Will they notice the Seats are 2 millimetres higher than they are in real life? Nosirree ... I might, but not anybody else. Will they detect a hole in the side bulkhead to allow for an elbow? Nope ... but I might ask about your patched up solution. So the added effort to fit the seats correctly is admirable but not necessary IMHO.
In my model, the non-EVA astro is seated on the bare Brass of the PE, so his head clearance is pretty tight and one can't see his feet, his missing feet that is. The thinking that you're doing is good, but you're best to build the PE seats and you'll do a helluva lot of test fitting. Things like the seated height of the kit Astronaut will be better solved when you've got something tangible to fit ...
I just took a couple pix of my 2018 model, see what you can see. Does the height of the Ejection Seat look off? Not to me, another millimetre or two might, but I'd be hard pressed.
I don't remember if there was interference with the Astro's knees to the Instrument Panel ... again, you'll see when you do your dry fits. Will you be augmenting the seats like I did? You may not need to get the Astros to fit properly. With both your hatches open, his head, as long as it isn't sitting a half inch proud of the opening, who's gonna notice?
If you have any more questions Tom, fire away ... but trying to anticipate the problems and solutions will only go so-far ... the test fitting will result in you wanting to pitch the darn thing against the wall ... may-y-y-be-e a few times! :^ D
But I'm still proud of my builds. I just entered this one in a show a couple months ago. The judge had no appreciation for the amount of extra stuff I did to it and it didn't even place, but, i'm quite happy with it!
Pete
-
I did this for a Group Build and the seat issues are better described in that thread ... take a peek, it'll just corroborate your issues.
Pete
-
Yup, I had the same issues with LVM's interior ... but I made those %#$@&!! Ejection seats fit. It was messy, but nobody's the wiser.
Here's the link to the WIP build here on ARC ... LVM closed down during my build. At the time, I wondered if my negative review had anything to do with their decision.
I haven't used the Shapeways Astronaut as I modified the kit's Astronaut for an EVA depiction.
http://www.arcforums.com/forums/air/index.php?/topic/304698-124-gemini-9a-part-2/
Let's see your progress in pix taneal1 ... don't be shy! :^ D
Pete
-
Vito, very briefly, we are on mkjm's thread, this is poor etiquette to hijack in this way, please start your own topic/thread. ;^ D
One more thing, I'm not on any Social Media, if you wish to see my builds they are just on this forum.
I look forward to see your build
Pete
-
I prefer the Monogram mainly because the Payload Doors open more accurately. I like to build my Shuttle with those doors open.
The Revell kit seems to be more of a toy, the cockpit roof is designed to come off which I didn't want.
If I recall correctly, they both definitely look like a Shuttle, the wings are accurate, the nose is shaped correctly, the aft area is good, I just preferred the Monogram.
If you have easy access to the Revell, it will build into a very nice, good looking Space Shuttle ... nobody will even know the difference!
Go ahead and buy it. And the next time you want to build a Space Shuttle try the Monogram ... ;^ D
Just FYI, I've built the 1/72 Monogram, twice, ... the 1/100 Tamiya twice, the 1/144 three times, the 1/144 Buran and the little 1/200 scale Shuttles ... all of the WIPs are here on ARC.
One more thing, on this Forum at the top of the page is a thread titled, Space Shuttle Questions ... it'll give you all the answers you'll want about the differences of the kits.
Pete
This is my heavily modified Monogram ;^ D

-
Vito ... the difference in length isn't noticeable, whether you build it with Payload Doors open or closed. The difference is less than 0.5 cm.
I've built many Shuttles, all the WIPs are here on ARC, my favourite is the Monogram but the Revell is accurate enough.
Don't be shy about posting your new build thread right here on ARC, in your own thread of course! ;^ D
Pete
-
You've already posted WIP pix from a few years ago ... how about something new?
Pete ;^ D
-
Oh dear, that isn't how the MESA works ... the MESA for the Apollo 15, 16 and 17 was proud of the Quad 4 surface.
For the modellers who are referring to this thread for reference, be careful ... ;^ D
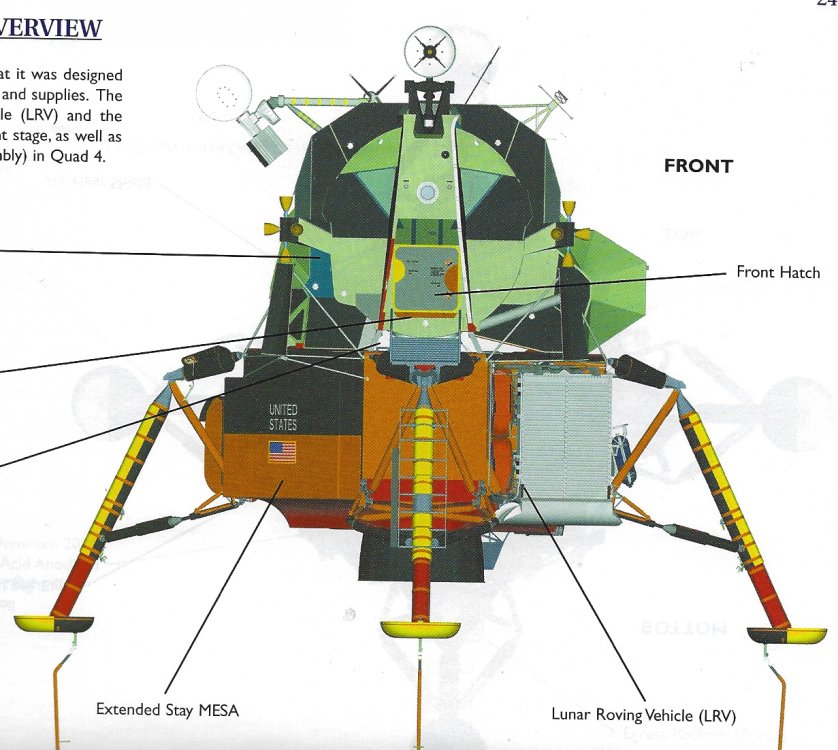
On your above model, the MESA is hinged on the wrong edge. It doesn't tuck INTO the Quad 4 Bay, like the LRV, it's mounted EXTERIOR of the Bay. Yes, there's a 'wall' behind it, but I gather that that is just Thermal covering, not structure.
This is a graphic from Virtual LM ... and my own 'naked' 1/48 LM to illustrate what I mean ...
Yes, the early LMs had their MESAa tuck into Quad 4, but not the extended stay missions, including Apollo 17's Challenger ...
This is a major mis-interpretation of reference material, especially for a commission ... deadline or not.
Hope this helps
Pete
-
Nicely Done! And we haven't seen you here in a lo-o-ong time ... ;^ D
This is a BIG model and Vincent has designed a lotta detail. That Rover is lovely! Both of 'em!
The different sized rivets are a nice detail too. And it looks like Apollo 17's LM.
But is it complete? I don't see the extended stay MESA or the RTG or the bent landing probes ... and little things like cables and seat belts on the LRV ... were they left off for shipping as well?
And how do you ship this delicate, easily damaged model? A Wood crate? Anti-Gravity tablets in a box ... how Mr Nichols?
Thanx for posting these pix ... it DOES look GOOD!
Pete
-
The CSM decals are there on CULT-TVman but the 1/32 LM decals, I don't think, exist.
I even looked thru Vincent's thread on his 1/32 LM, and didn't see any info, so I'll assume he made his own decals.
I've got some leftover 1/48 LM decals if you wanna scale 'em up! ;^ D
Pete
-
It's looking good Randy ... but you just may be sweating the details. Those Plume Deflector plugs just needed a little filing and right now we can't tell there was a patch there ... so ... nice job!
The Landing Gear, again, we'll be distracted by the shiny foil and details on the Ascent Stage, like antennae, RCS etc. In my experience, details like downlocks, ladder rungs, landing probes are missed by even the Eagle eyed Judges, as well as casual viewers. Just 'weenies' like me would notice, but again, I go for the major look of the subject ... those details, um-m-m ... not so much.
But, like you, I KNOW they're there ... so I really do understand where you're coming from! Just don't get too discouraged by the folded Landing Gear ... they'll be tucked under the Descent Stage and we'll be dazzled, nay OVERwhelmed, by the CSM ... ;^ D)) ... "oh, did you see the LM?" "What? ... you mean there was a LM too??"
Pete
-
Yessirree ... that'll be a BIG one!
If you choose to use the SIM Bay, Real Space Models has one ... it doesn't say it's 3D printed so I'll assume it's cast Resin ...
http://www.realspacemodels.com/shop-galapagos/132-apollo-15-sim-bay
I do NOT recall your 1/32 LM from all-l-l those years ago ... And just using the Ascent Stage would be a different look.
You could damage the rear panels and stress the other panels due to the stresses of Lunar Lift off ... but M Meens prints must've cost you a pretty penny and you wouldn't wanna waste the Descent stage ... unless, a diorama with the lower stage on the surface and the Ascent stage with the CSM ... Oo-o-o ... maybe I'll KEEP my 1/32 CSM after all!
... ya ... just kidding ...! ;^ D))
Pete


1/48 Apollo 11 Lunar Module "Eagle" - Completed
in Real Space Modeling
Posted
You did a terrific job on this LM Cap! No need for apologies on its accuracy ... you've got Kapton tape where it should be, paint colours look correct, all the antennae are there, there's a front hatch, the RCS thrusters are there, four Landing pads in their correct foil pattern ... EXCELLENT! ;^ D
It makes me smile because there are professional builders who sell their LMs, for serious coin, and even theirs aren't accurate! ;^ D
You done good!
I'm really glad to see that you soldiered on and took this to completion, 1st Real Space model and all. I realize it's a foreign subject matter but I hope you had a ball researching a bit and building it!
Thanx for sharing Cap!
Pete