


niart17
-
Content Count
4,758 -
Joined
-
Last visited
Content Type
Profiles
Forums
Calendar
Posts posted by niart17
-
-
I know a ex-air force pilot who applied to fly with the CIA and was told the CIA doesn't have any aircraft, so you must be mistaken.... :) ;)
-
Awesome advice guys, thanks so much! I just put a contract in for a house that has a large enough garage and a perfect concrete area out back for the shed, so it looks like I have two options.
One other question- with regards to the AC- do you just flip it on when you're out there? If I'm not in the room for a few days in the summer and its allowed to bake a little what temp is going to start having ill effects on the plastic? Or should the kits go back into the house when not being worked on?
I think I'm just gonna set my ac to kick on around 80 to 90 degrees or so. That shouldn't take too much electricity, but still maintain a reasonably safe temp for paints and plastics and such. Another thing my father-in-law suggested (I hadn't thought about it) is to not crank the ac up too high too fast. That will help cut back on unwanted condensation. Gotta love the father-in-law, smart fellow

good luck.
Bill
-
Sure, maybe the new airframe may be better, save time and tax payer money by standardizing the platform, and it may perform better, but think about how boring an aircraft carrier model is going to look now! :( And THAT's what really counts!
Look, it's a f-18 there.....and oh theres one there...and another there......and sheesh.....
Bill
-
That was mine....................
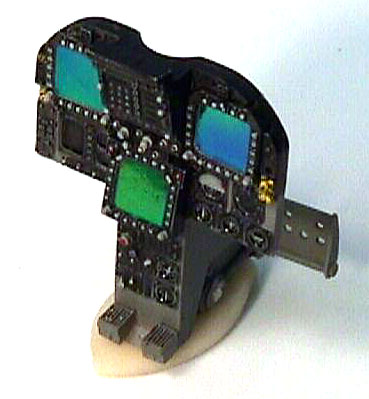
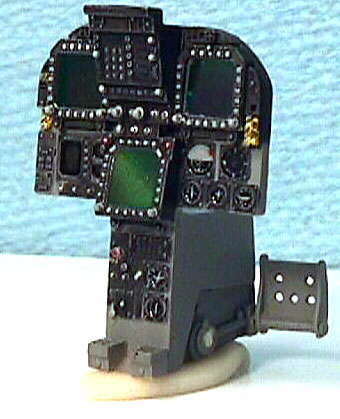
Cool Dave, I had wondered about that technique. I THINK I remember your article on building the cockpit, and seems like you said you'd get back to explaining the CRT screens, but I could never find the explaination. I thought maybe "ancient Chineese secret" or something.
 Just from the photos, some of the best looking screens i've seen, accurate or not, they look maauvalous.
Bill
-
I've used the testor system many times and have never had a problem. It's true that bright colors such as yellow and bright blues, don't really show up very bright on the clear sheets but there are a few "fixes" to this issue. You can put two decals on top of each other, which some decal makers have you do anyway when decaling a dark subject. You can also do a white blank behind the decal (a little trickier) or you can color compensate for not having white and boost up the brightness of the color on the artwork. This works better for blues, not so much yellow. Another thing, Photoshop is good as long as you aren't scaling up the markings too much. If you want to do alot of re-sizing, I would recommend getting a vector-art program such as illustrator. It's a little harder to draw with, but once you get the hang of it, you can do just about anything. the ultimate would be to get ACAD, Illustrator, and Photoshop. with that arsenal, you'd be unstoppable.
Good luck
Bill
-
great looking build. Gotta give ya props, you got B@))$ cutting into an expensive kit like that after putting in all that great work. I'd chicken out. Keep up the amazing work.
Bill
-
I've built the Trumpeter corsair,I think it builds up very well. The engine could benefit from a good wiring and detailing, and there are small problems as mentioned about with the gear door, and the exhaust. I've heard someone was going to make a vac-formed cowling with the proper flaps on it, if that's the case, it should make it that much easier to built an outstanding model. I recommend it. Besides, making things better is half of the fun of the hobby, it's a good starting point IMHO.
bill
-
The time it would require would severely cut into the preflight gross weight adjustment/magazine reading period

i can see you have your priorities in order, keep up the good work.
-
Just curious, when a plane catches a wire, are it's wheels really still off the deck? I've never really watched it that closely, but it seems like that would be a little rough. Could one of the pilots here comment on that?
Bill
-
Hey Mike,
Sounds like we're in the same boat man. My wife is about to drop our first child as well. As the doctor says "any day now!" It's exciting times but yea, kinda hampers the building process. It's not easy trying to convince a pregnant woman that the baby just might very well need some more modelmasters paints, I mean that's a vital baby item......isn't it? Good luck with the baby, and like me, probably have to just watch everyone else build for awhile thru the window. My wife keeps screaming something about "that glue" making her sick to her stomach.....wah wah wah..... :blink:
Take care,
Bill
-
Hello
I did not mention Verlinden. I have bought 2 or 3 sets over the years and at the time I really was happy I had found something to detail my small A-7.
Now as said above resin is no par with the quality of the Aires resin. Not half as sharp. Etched parts are thick and cannot compete with Eduard or Parts etched parts.
And from what I remember I could not use the resin avionic bays of the Verlinden set. I cut the bay doors following the Esci lines (my Corsair IIs are by Esci - I believe basically same panel lines as Fujimi) and electronic bays simply were too small. I had to scratch build them.
Beware then : if you mean to use Verlinden bays check relative sizes and cut model not from a panel lines point of view but with Verlinden bays size in mind.
see below
http://www.aircraftresourcecenter.com/Gal6...ade/gal5084.htm
I think I did use pylons on one of the A-7 but I can't figure which one??
So if you already own a Verlinden set go with it (having a view more Corsairs to build I'll use some parts). But if you are building your A-7 with no previews stocks of aftermarket stuff I believe you'd better go for Aires and/or Eduard or Parts
Cheers
Eric B.
thanks for the info
 You guys come thru again, man this site is awesome. brings to tears to the eyes, just welling up with pride that.....that........snif snif I Love ya man
ahha ahh, how bout dem bears......
take care
Bill
-
Thanks for the insight. Looks like Aires it is then. However, the Verlinden set sounds pretty nice too, with the avionics bays......my mouth is watering just thinking about all the detailing. I know some verlinden stuff isn't really worth the resin it's cast out of, is this a good set?
-
Hey all,
I was rumaging thru some of my old stash and ran across a testors/fujimi a-7e in 1/72 scale. It looks like a decent kit so i figures, "why not, looks like a good project". well the cockpit is missing, not that i would have used it anyway, but does anyone have suggestions as to what the best a.m. pit is for this kit? I'm not even sure who all makes one much less which is the best. I usually use B.B. for all my 48th and 32nd scale stuff, and am happy with them, what about the 72nd scale? Also, are there any other detail sets that may help this become a good looking kit? Help!
Bill
-
Yes, our wingman's plane was like that.
No, I didn't get a photo. It's a pain in the *** to carry a camera, because they're not allowed in the building where we brief and debrief - when it's a special occasion (like a friend's last flight in the navy) I'll work around it, but when it's just a normal day I don't bother with the hassle.
that's cool. My bro-in-law just retired air force pilot, I've seen the red tape he had to go thru just to get a cam up. thanks all the same. if'in the plane happens to be close to you with your camera, and you can get a shot, that would be swell, otherwise, it's all good.
take care.
Bill
-
Yes. Yesterday, anywhere between fingertip and combat spread off our wing...
forgive my ignorance...but.......HUH?

do you mean that you saw one in flight, flying off of your wing? didcha get a photo??

-
I'm not positive of this, but I believe the thickness of the decal has more to do with how much clear you shoot over it, not so much the underlying paper. Someone correct me if i'm wrong. I had the same problem with testors paper, so i just shoot a thinner top coat and it seem to lay much flatter. The trick was finding the happy medium of enough to seal, but not too thick.
good luck
Bill
-
Next they'll say a gray hornet with the inboard leading edge flap painted brown and the outboard leading edge flap in primer green isn't realistic
funny you should say that. i was at a Oklahoma city air show about 12 years ago or so, and saw an f-18 in grey, but the two outboard flaps were both in desert camo. I took a pic but lost it since then. I've always wanted to build that plane just so a judge would balk at it, then i'd whip out the pic.....but since i have no photo evidence.....it'll have to wait. Anyone ever see a similar plane?
-
Hey Dax,
I am in a very similar situation, I lost my model room to our new baby nursery. We have a small shed in the back (only 8' X 12') and I am planning on closing it in to make a hobby room. I gonna sheet rock, insulate and get a little window unit to keep it cool. I found a pretty cheap one at home depot that actually has a good thermostat so I can leave it set to about 80 degrees, to keep the humidity down (I live in southeast Texas, 75% humidity is a dry day!)
Anyway, I figured the cost, and it's just under $400 dollars to weather proof my little shed, so I think it's not a bad deal. Hope yours turns out well, post a pic and I'll do the same, would love to see hoe it comes out.
Take care,
Bill
-
what you are seeing is the sealant they use on those panels. i replicated those on my last hornet build which just happened to be a 533 jet.

i kinda figured it had to be something like that, it was too perfect, but i bet at some contest, that would still get some comments. I like dirty jets, just gives a real used war machine look. btw, yours looked great. that really looked just like the sealant in the photo. anyway, thanks for the info, i may have to try to replicate that on my next academy d model, if i ever actually get around to doing it. Working on my first 1:1 scale baby right now, have to finish the details on that before i can work back in plastic.
Bill
-
Now I want a judge to say that my panel lines are slightly too dark!!! look at the panel lines on the spine! looks like a wash that wasn't thinned or wiped down......hmmmmm..
Bill
-
I guess this is pretty rare material, as I can't seem to get anything on it. Just re-posting my inquiry. Thanks
Bill
-
Since the canopy is almost a write off anyway, maybe you could try to thermoform a copy of it. I know on those dragon ea-6's, the canopy material is really thin, so you definately want to back it up with some putty, but with a little effort, you should be able to make a pretty good copy. Another thought is to get some auto window tint and cover it. I'm not an expert, but aren't those canopies tinted slightly anyway? That might help hide the frosting a little. Good luck, and post some photos of your success.
Bill
-
I learned a trick a while back for using micro mask. After you apply it, before you paint, lightly score the edges with an x-acto knive. Sometimes, in the application process, the egdes kind of feather out a little, so when you paint, it makes a ledge that pulls up the paint that's on top of it. scoring that edge seems to help give perfect lines. Give it a shot if you don't want to try tape. I prefer tape myself, but occasionally it's easier to use micro mask, like on the 1/144 scale blackhawks!!!!
just an idea.
Bill
-
cool site. The only thing, depending on how accurate you want to be, you would have to make sure your screen is properly calibrated and accurately displays the colors. I have seen some screens be off quite a bit, causing some serious problems when sending stuff to the printers......(voice of experience, very expensive lesson learned
)
Hobby Desk
in Tools 'n' Tips
Posted
I don't have a pic because I'm in the process of moving all my stuff to an outside shed/hobby room, but i've been using a hollow core door and two sliding closet doors for my work bench top and shelves. It works great cause it's light, pretty sturdy, stays flat, and I use to hole where the knob was as a pass-thru for all the electrical wire and such. I think I'm gonna put the hinge pins back on the "front" of the desk to use as hanger locations for my airbrush and rotory tool. I'll try to get pic soon, i just have to finish building the room first.
Bill