


sting
-
Content Count
248 -
Joined
-
Last visited
Content Type
Profiles
Forums
Calendar
Posts posted by sting
-
-
After reading all these comments from the "people in the know", I recommend the USAf go back to flying hot air balloons. Thanks for the laughs guys. I needed them.
-
Here are a couple shots of the Cobra's in storage in Tehachapi, CA.
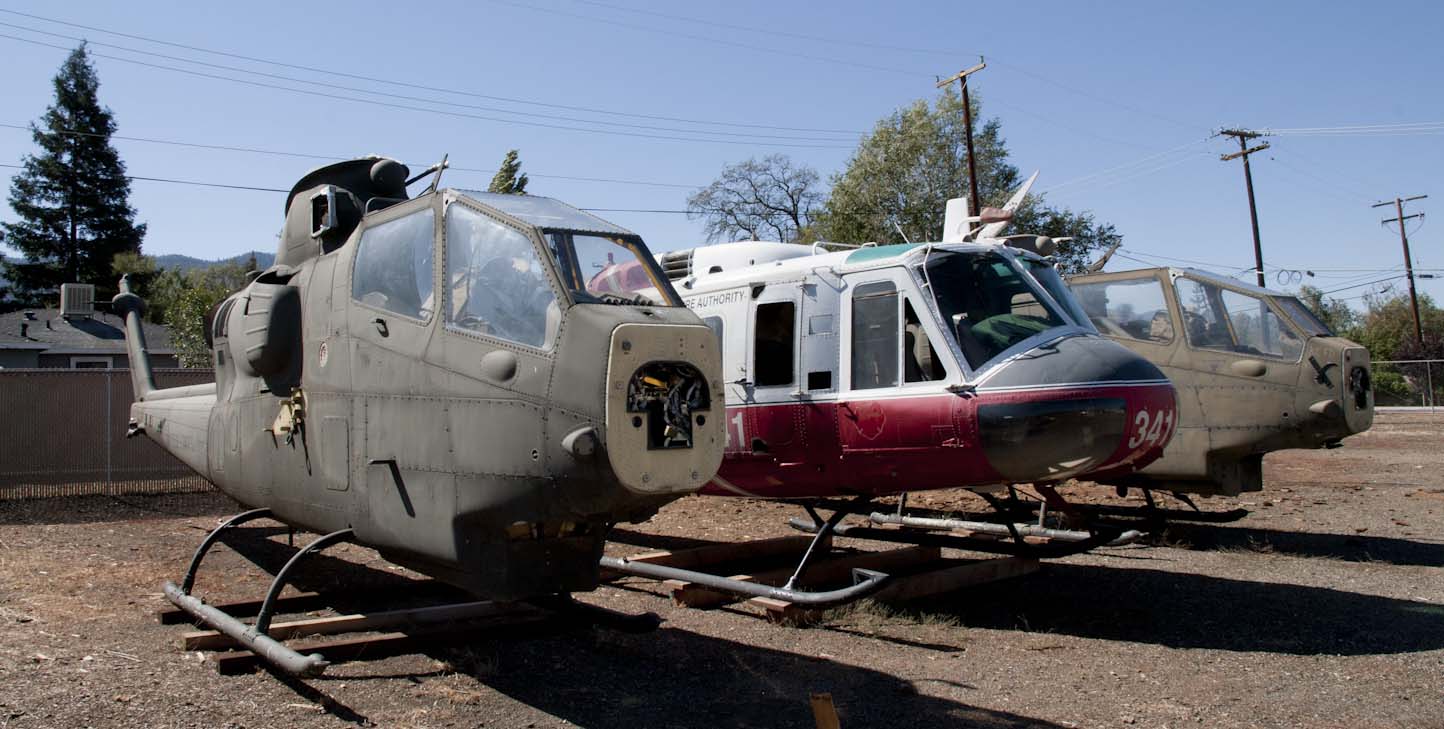
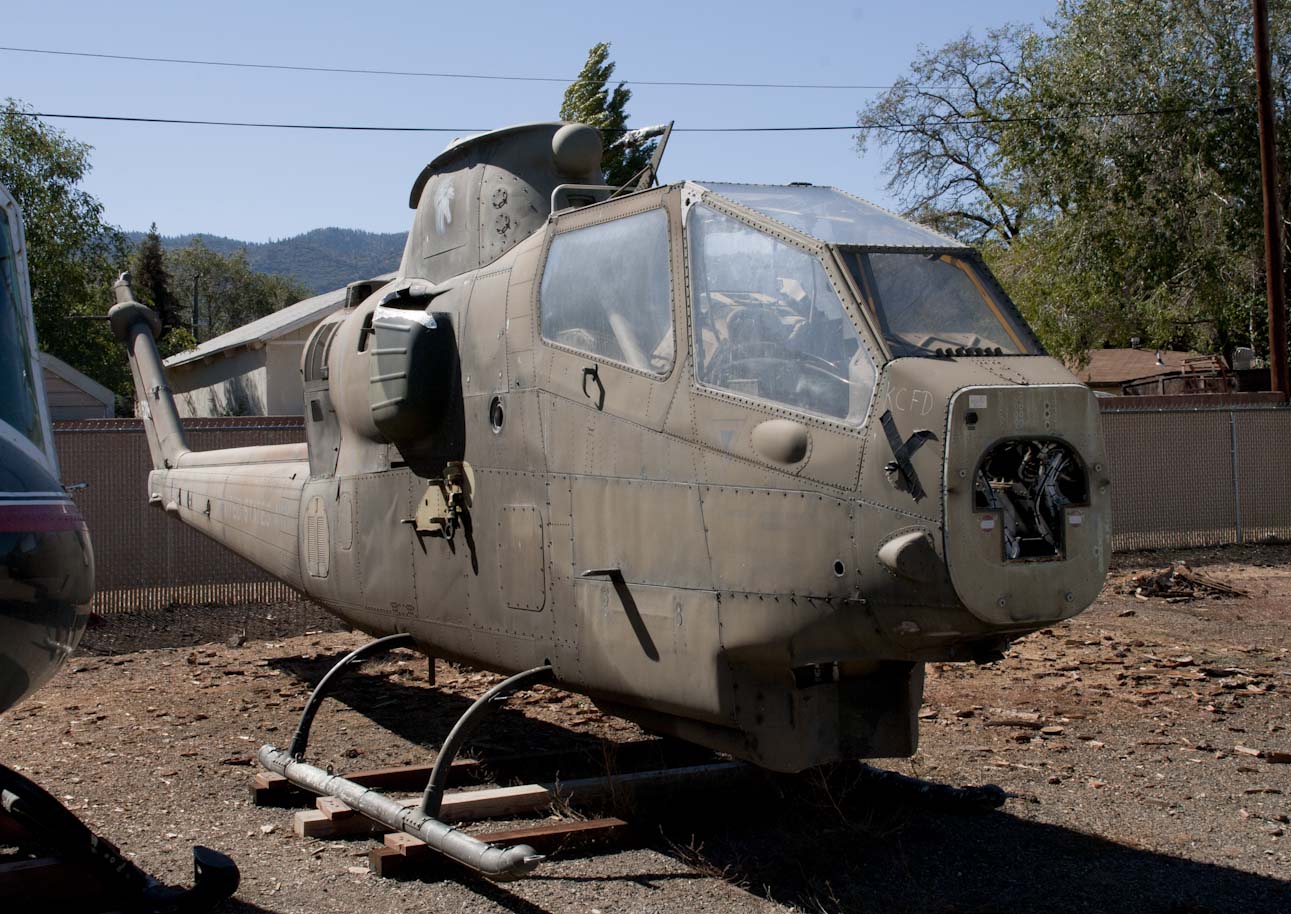
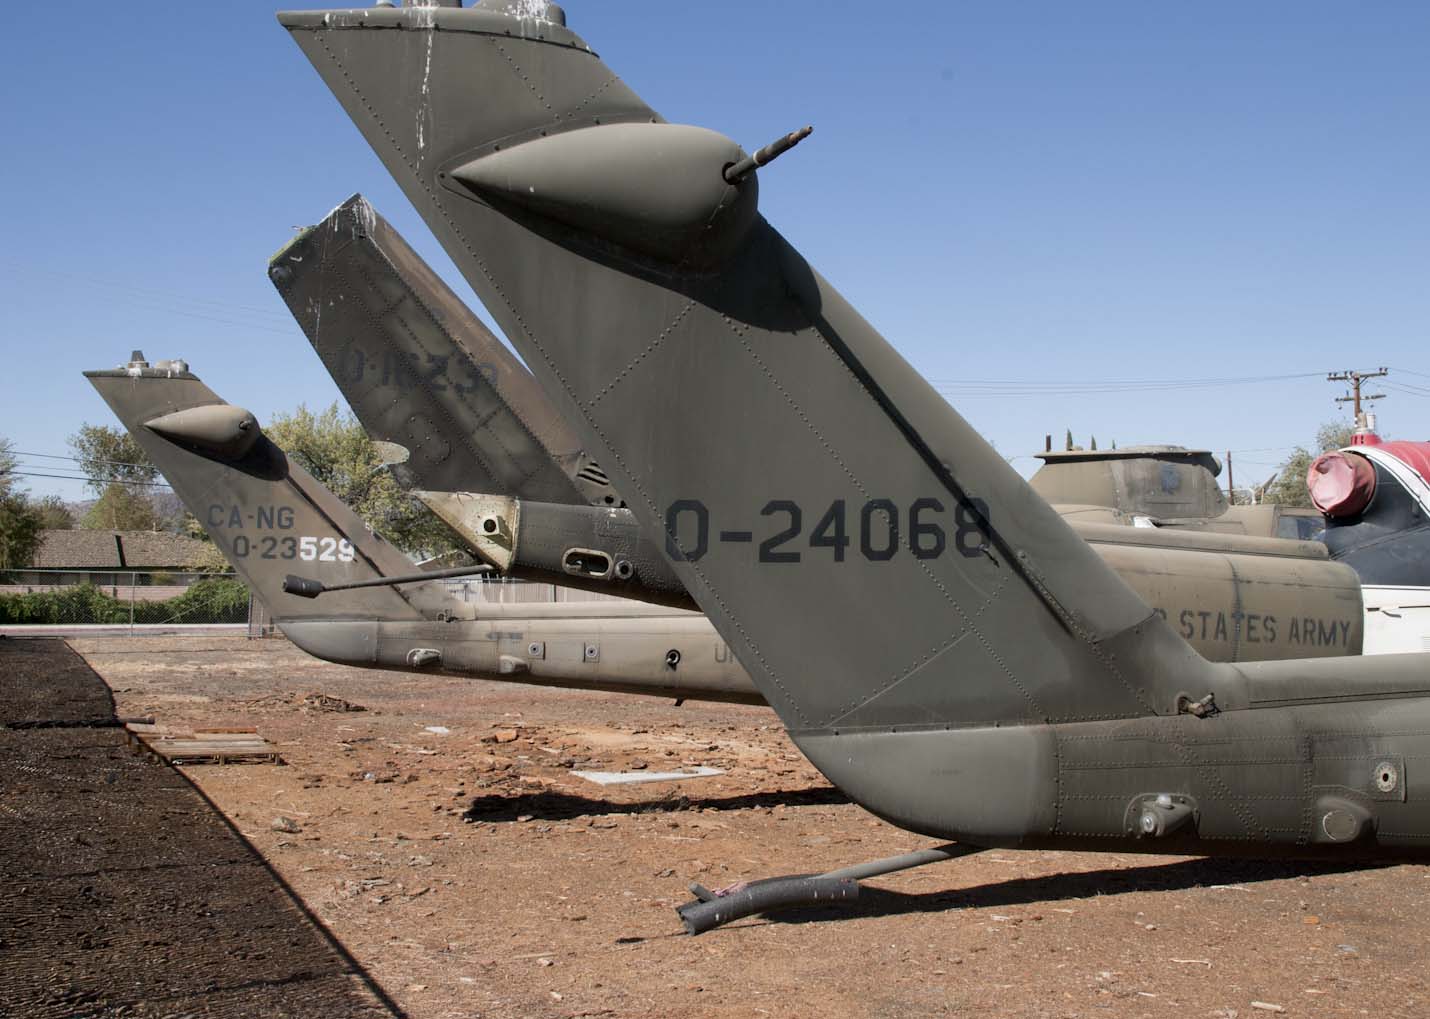
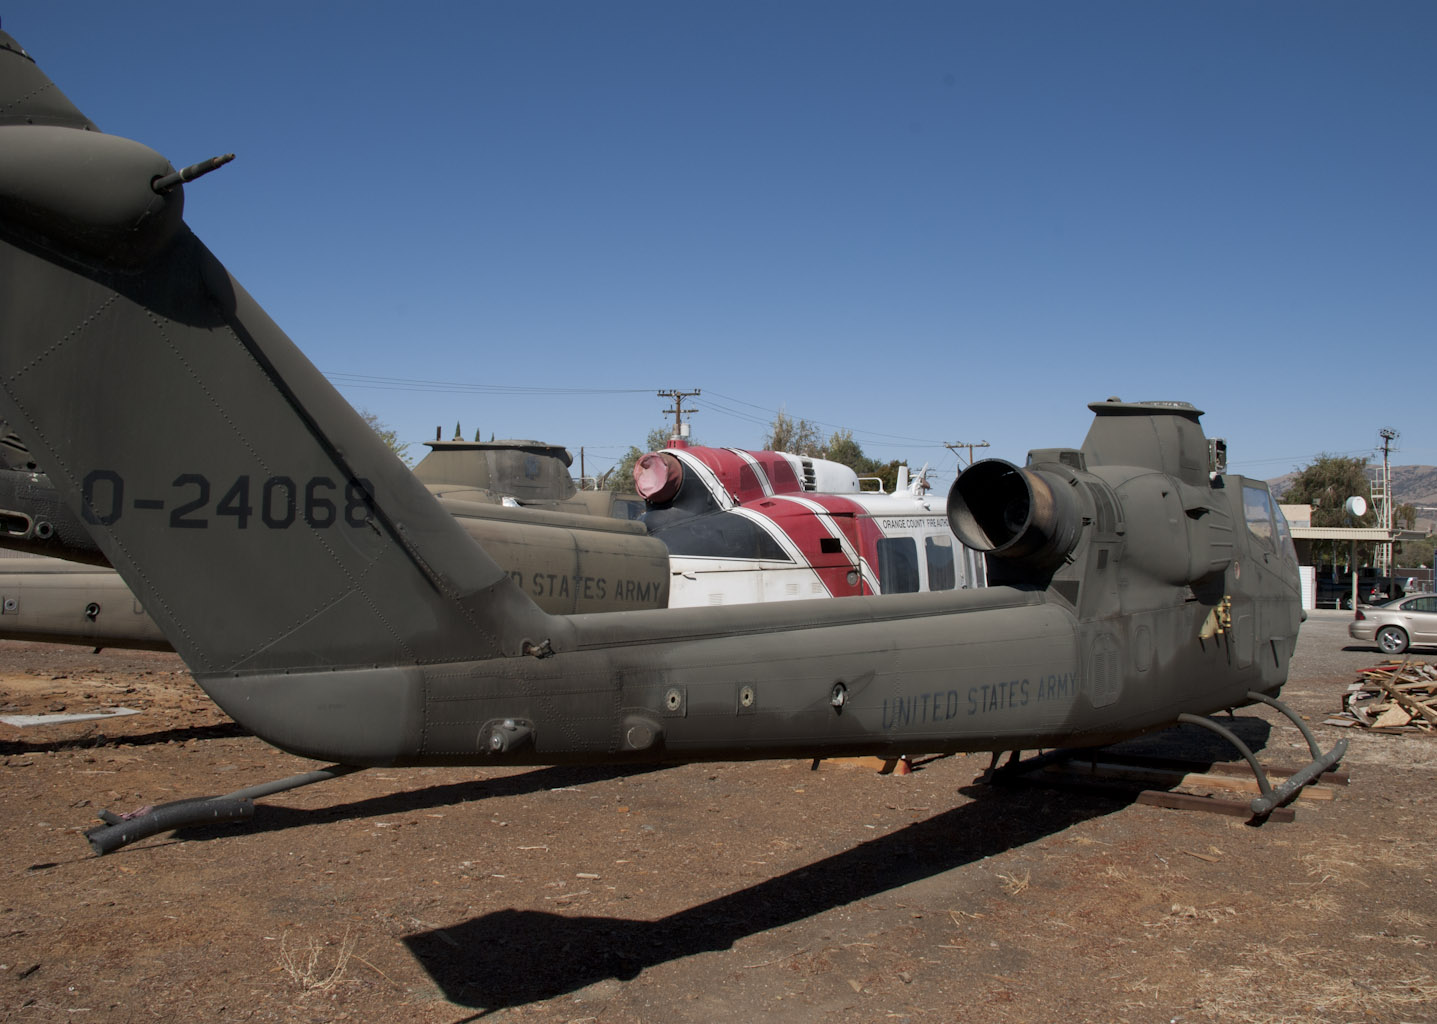
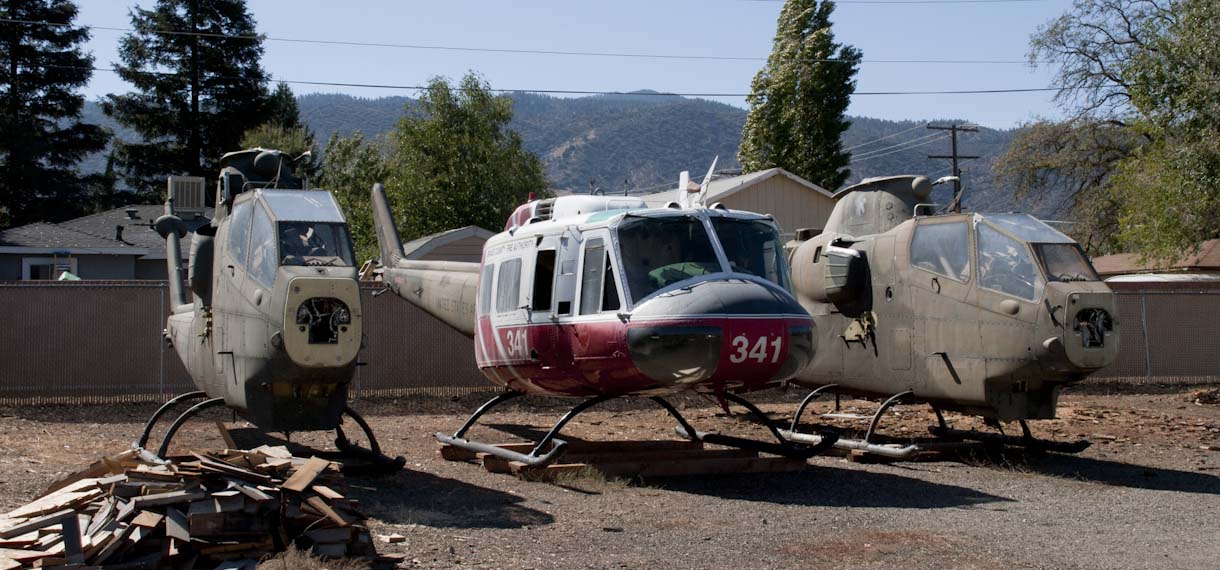
I was wondering what fire did with those fuselages. Our sheriff's air unit is currently occupying the hangar these poor birds use to call their home. I took numerous walkaround photos of the cobras, but couldn't see much of the Huey. Thanks for posting.
-
Try www.ACIG.org It's a web site dedicated to air combat and there are pretty comprehensive records of the air to air victories/losses of the American and No. Vietnamese.
-
I'm trying to find some of those 360 views for a Grumman Avenger. I thought I had a link for one but can't find it now. The page I am thinking of had quite a few including the cockpit, turret, lower gun area, as well as stuff for a B-25, Spad, B-17, and other aircraft. Anybody know which site I might be thinking of.
Here's a link to the Pensacola Air Museum's web site. The link will open to the museum's virtual tour and panoramic view of cockpits. It's probably not the exact ones you're requesting, but nice nevertheless.
http://www.navalaviationmuseum.org/explore/exhibits-and-collections/cockpit-panoramas
-
Nice work sting! May I ask what modification or scrathbuilding you have to do for the composite wing? Thanks!
Eric
Hi Eric,
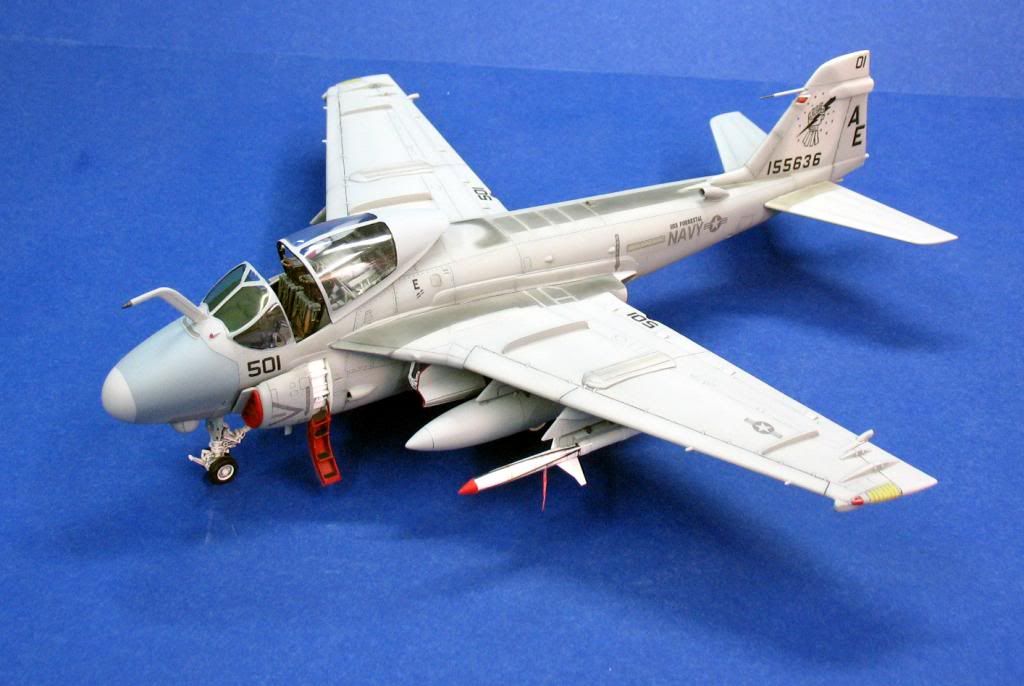
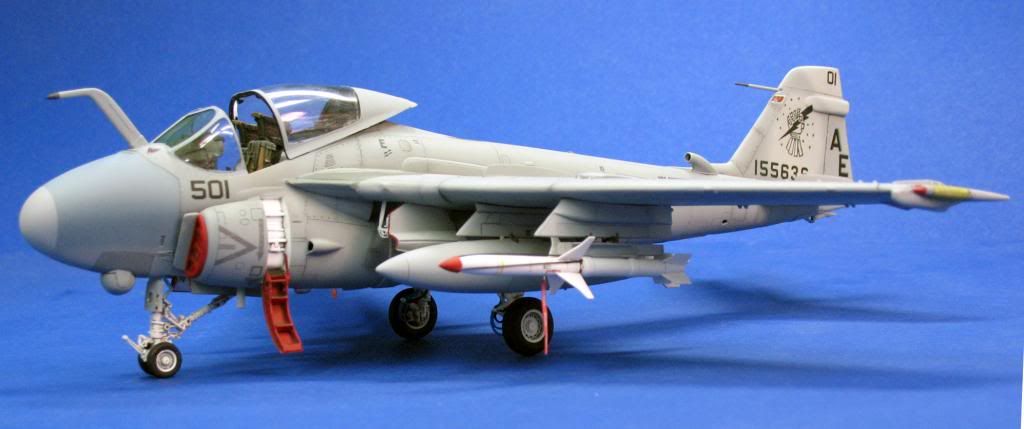
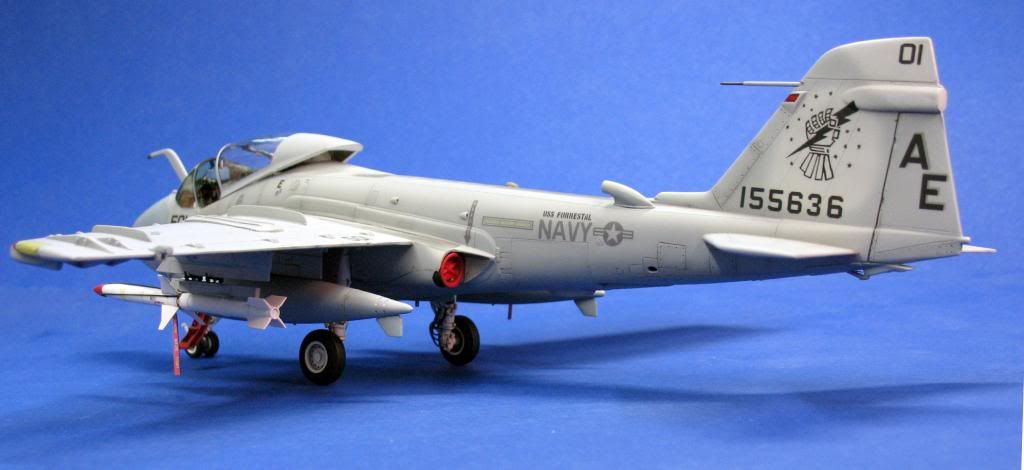
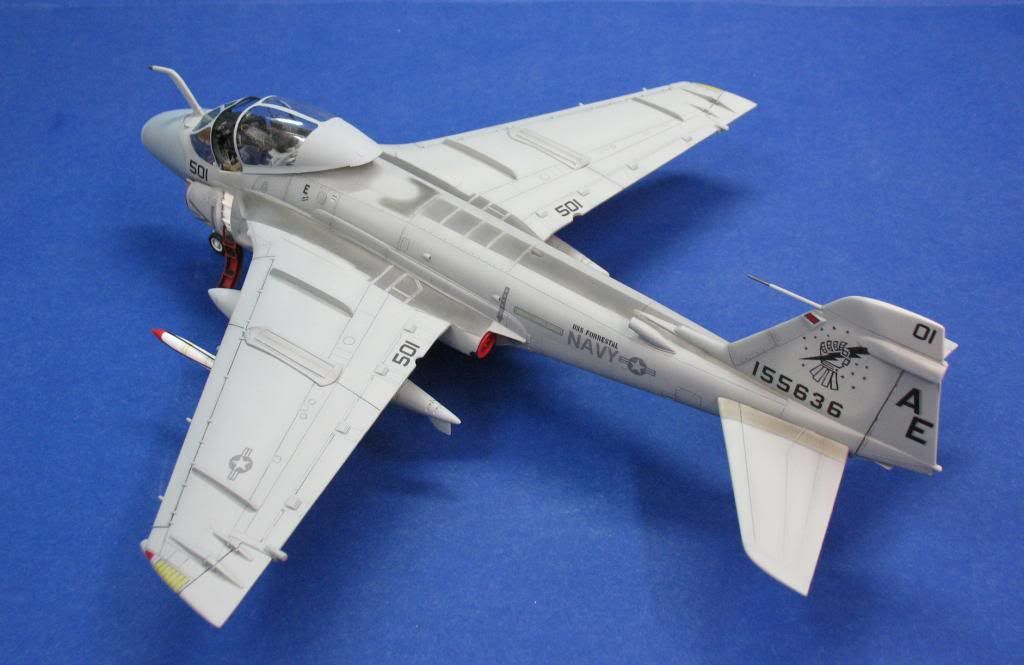
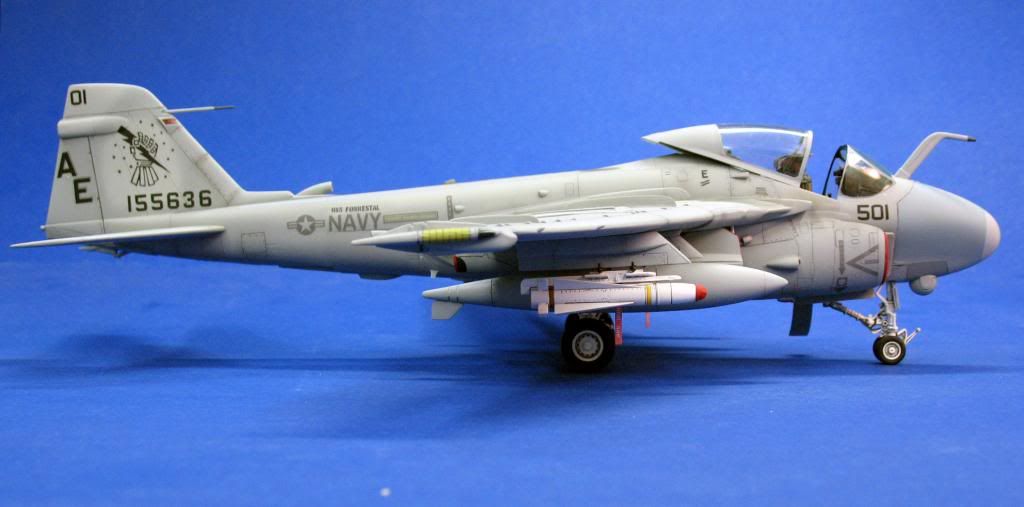
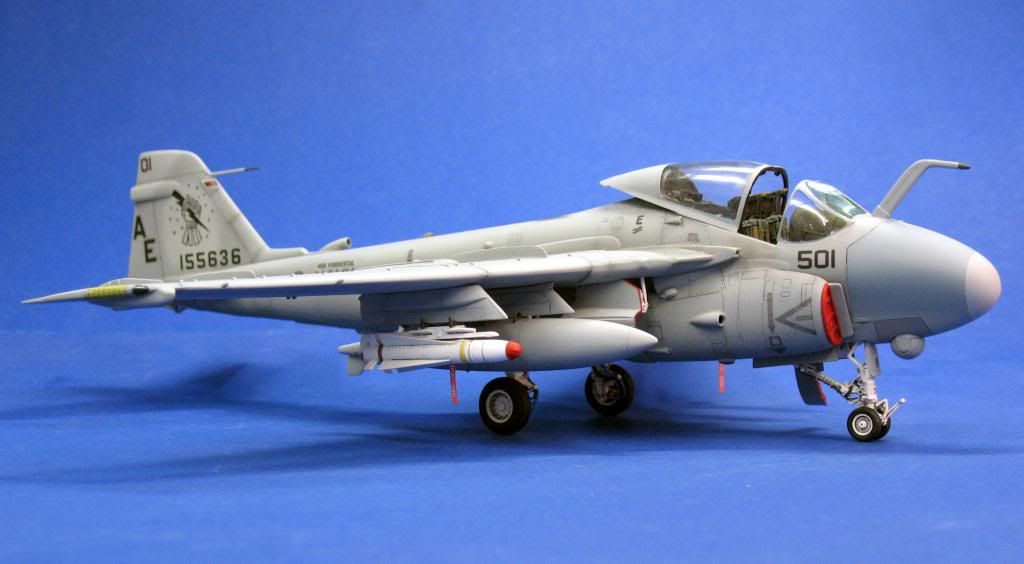
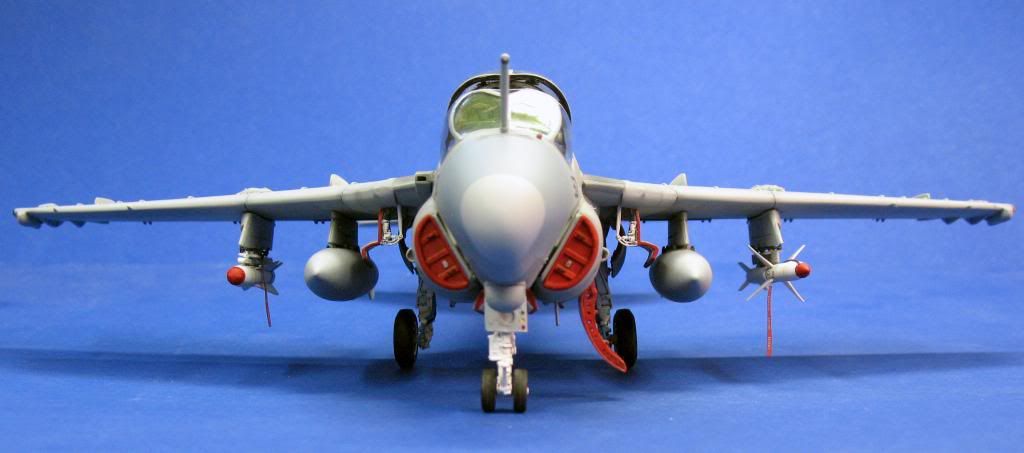
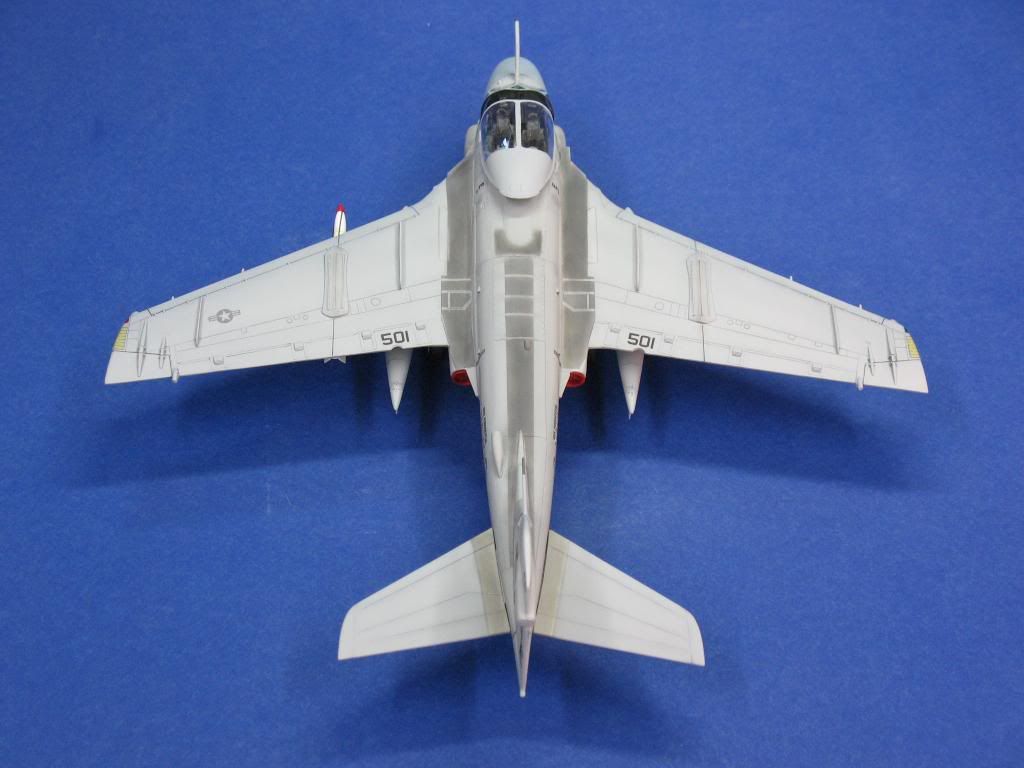
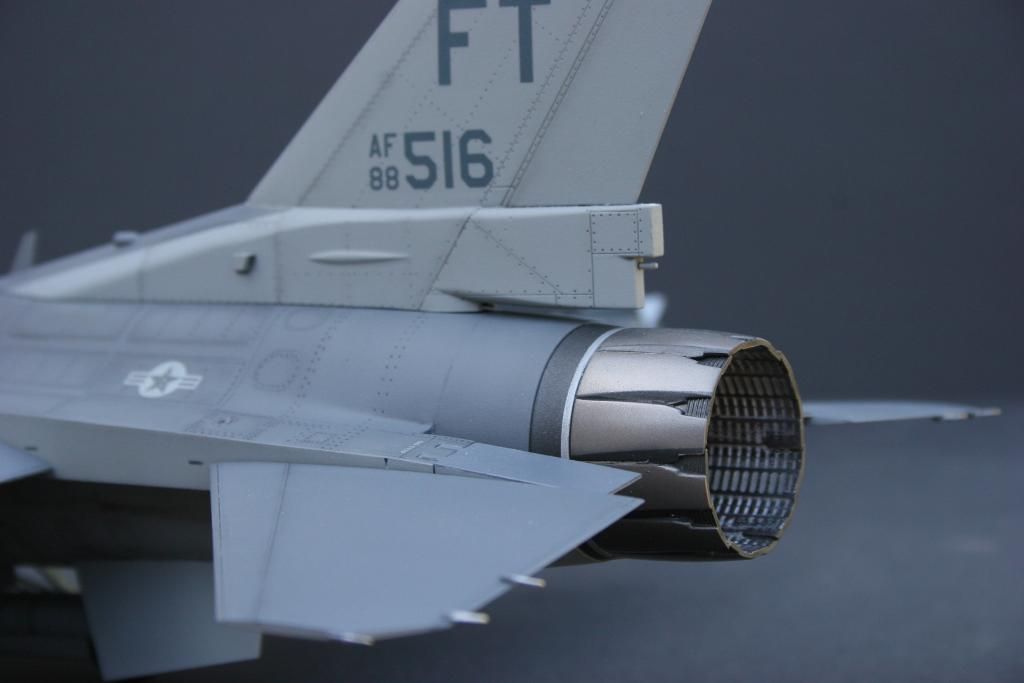
The composite wing Intruders had a different wing hinge cover from the metal wing Intruders. Also, the weapons pylon directly below the hinge was different too. The only reference to the composite wing hinge I had at the time were hinge covers on the EA-6B Prowlers. They are similar, but I'm not sure they are exactly the same. It appears the Prowler's hinge covers set up higher or in other words thicker? I'm not sure, so my hinge covers may be wrong. Anyway, the wing hinge covers were replaced with what you see on the model. The weapons pylon bulge on the outside where it lines up with the wing hinge was enlarged. I also added the rearward facing "beer cans" near the trailing edge of the wing tips over the fuel vents, however those "beer cans" were not specific to composite wings only. Some metal wing Intruders also had them and I believe they were part of the SWIP upgrades. If an Intruder has the SWIP upgrade it doesn't mean it's a composite wing Intruder, so check your references if you plan to build one.
Like I said, I had this build setting around for a couple of years and in the beginning, I didn't have good references for composite wing Intruders. I can admit I have more now, but I didn't want to start over. This build fought me all the way. It is not 100% accurate. There were some smaller details I could have added.
-
I had this build on the back burner for some time and finally got around to finishing it. I made the following pieces specifically for Revell's Intruders & Prowlers and made multiple copies for future builds:
Hard Intake Covers
Hard Exhaust Covers
FLIR Turret
Composite Wing Hinge Fold
Composite Wing Weapons Pylons
Hard Covers For AGM-65 & AGM-88 Missiles
The raised panel lines were scribed, crew ladder rebuilt and the in-board top wing strakes were replaced and repositioned. Decals consist of left overs from the stash, but I made the tail markings myself in Photoshop and clear ink-jet decal paper.
Now that Kinetic have released their A-6E representing a composite wing Intruder, I won't have to bother converting Revell's ever again. However, Revell makes a great base for a nice pre-Composite Wing Intruder if one wants to take the time to scribe the panels and rivets.
-
Nice finish!!
-
The paint and weathering are outstanding. I can only fantasize about doing it that well.
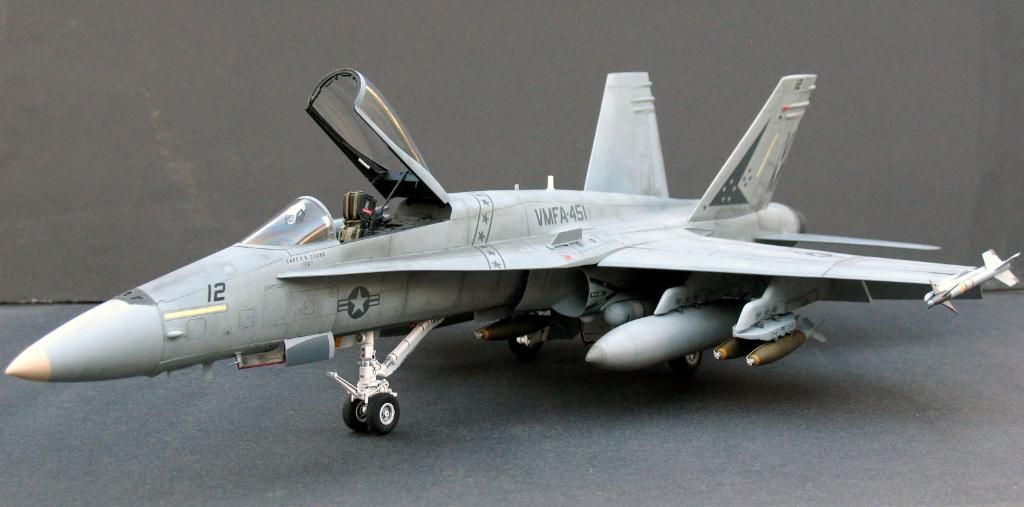
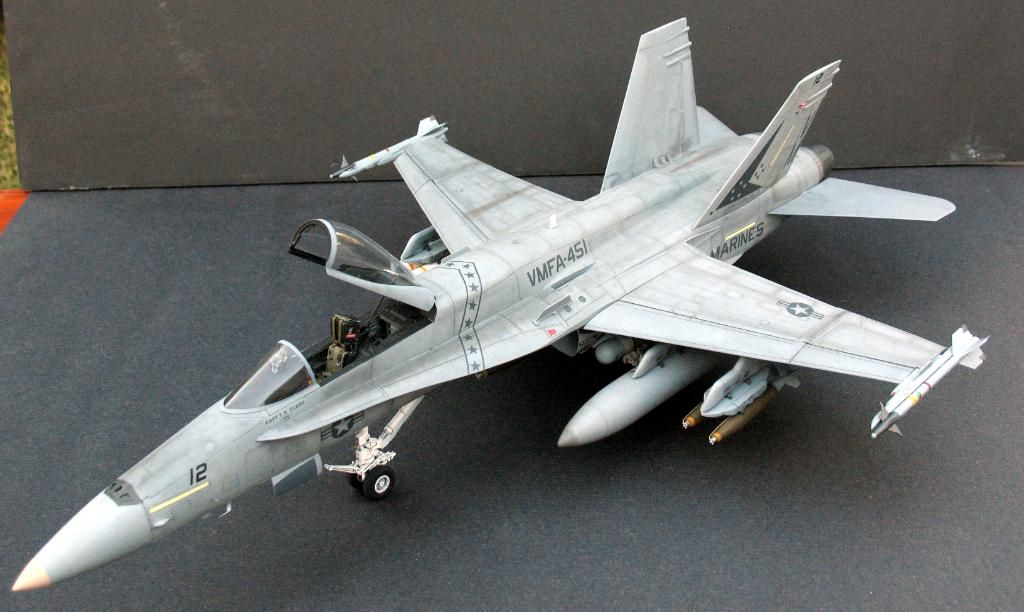
But, since this is the critique corner...check the alignment of the underwing stores, the Mk82s look to be toed out from each other and the inboard Mk20 is a whisker aft of the outboard one.
I reluctantly can only give this build 99.9 out of 100.


-
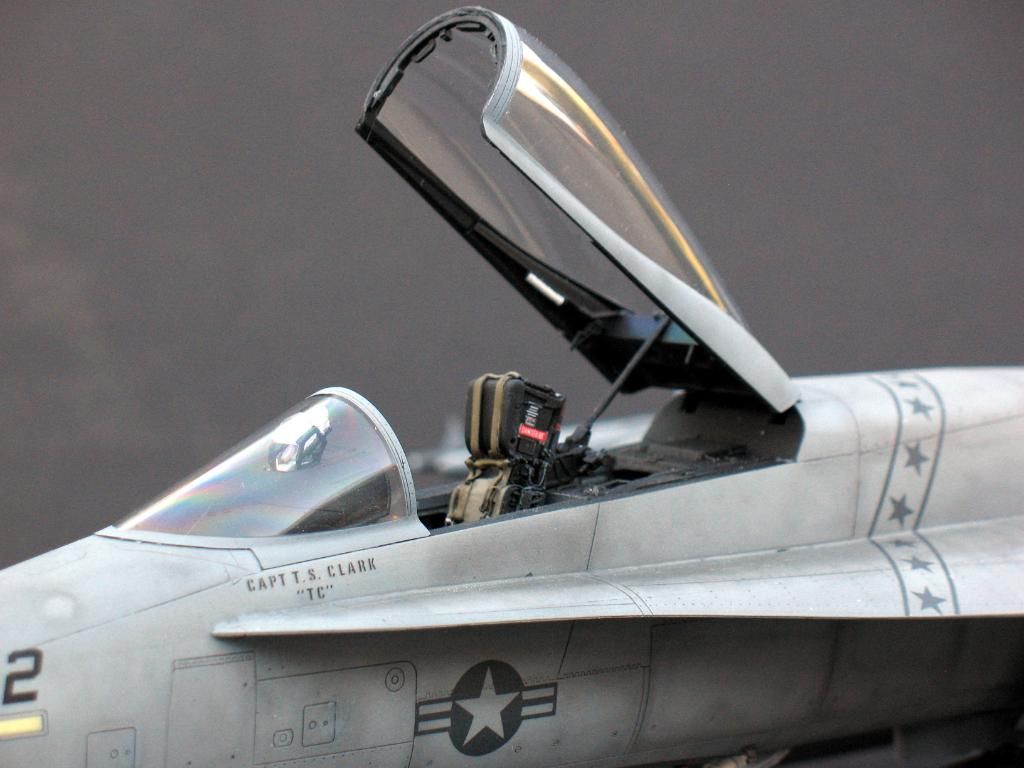
May I ask, how did you get the canopy to reflect rainbow like colors? I'm looking about how to make similar effect on helicopters for a long time:
I used very fine fingernail polishing sticks to polish the plastic before I dipped them into Future. The polishers are the type you find in salons where women get their nails manicured. They are designed to polish and polish they do. I was surprised at the rainbow effect myself. There was no skill involved, so I guess I just got lucky.
-
GREAT looking Hornet! You really did a nice job- especially the weathering.
My only critique isn't even your fault, but you may want to make this change in your next build of this kit. The rear flaps hang down too low using the 45 degree kit hinges. The rear of the flaps don't go below the belly at rest- they are almost flat- so you need to modify one set of hinges to give you about 35 degrees instead. Here's a pic of what I mean, but I won't hot link it to avoid cluttering up your thread.
http://i253.photobucket.com/albums/hh66/chuck540z3/CF-18B/Flaps2.jpg
Again, really nice job!
Thanks Chuck! You are absolutely correct and I never noticed it until you pointed it out. I'll watch out on my next Hornet build.
-
Really? I've been thinning MM enamels with mineral spirits without any problem, what problems have you run into with a generic thinner?
I've tried regular paint thinner (mineral type)and lacquer thinner. The regular thinner works, but to me, it cures too slowly for my tastes. The lacquer thinner works fine to, but it can be too hot for some plastics. I don't know what Testors recipe is in their airbrush thinner, but it has the right combination I seek. I try to save every speck ofpaint I can. I can thin some MM paint, spray what I need of it and pour it back into the MM jar to use again. I know, to some, that's a no-no, but It's been working for me for years. I do this knowing I'll have to use that jar, mixed with the thinned paint, rather quickly. If I wait too long, the rest of the paint in that jar will be useless. I can't do all that with regular thinner or lacquer thinner. The paint in the jar will ruin too quickly. It may be I don't know of a cheaper thinner that's as good as Testors and I'm open for suggestions myself. I'm one of those die-hard types, when I find something that works I stick with it. Like I said, the average price for a can of Testors airbrush thinner is about $5-$6. I'll use it only for thinning the paint. I clean my airbrush with lacquer thinner which is a lot cheaper.
-
Thanks for the comments guys. I have plans to do another 1/32 "A" in the near future, but from VFA-151 Vigilantes stationed aboard the USS Midway during ODS.
-
I only use MM enamel paint and have been for many, many years. I've tried other brands, but I always went back to MM enamels. As you said, their flats are indeed flat, but I can't find anything else to match the quality and choice of colors. The negative, in my opinion, is I have to use Testors airbrush thinners for enamels to thin MM paints. It can be expensive, but the results can't be beat.
-
-
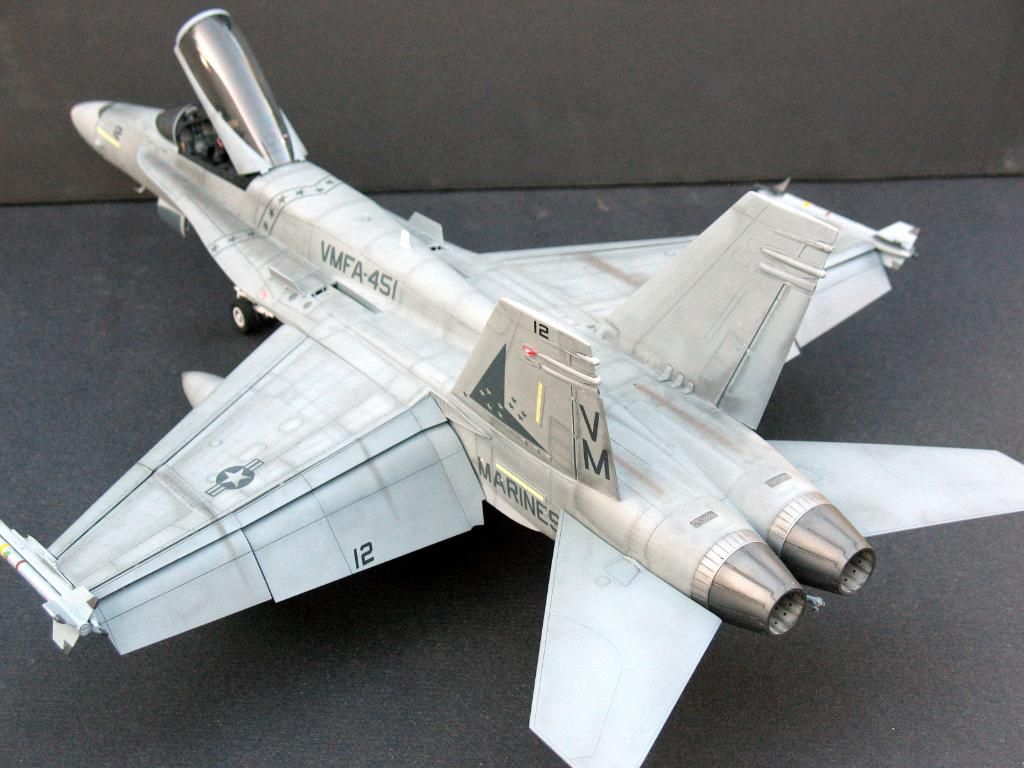
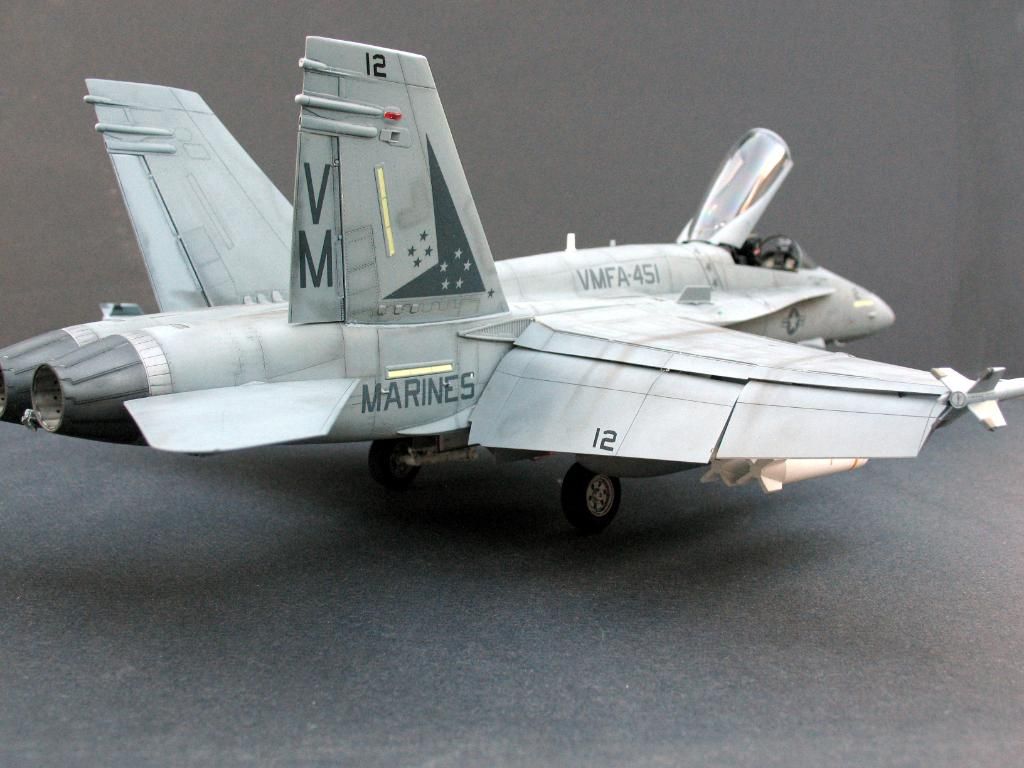
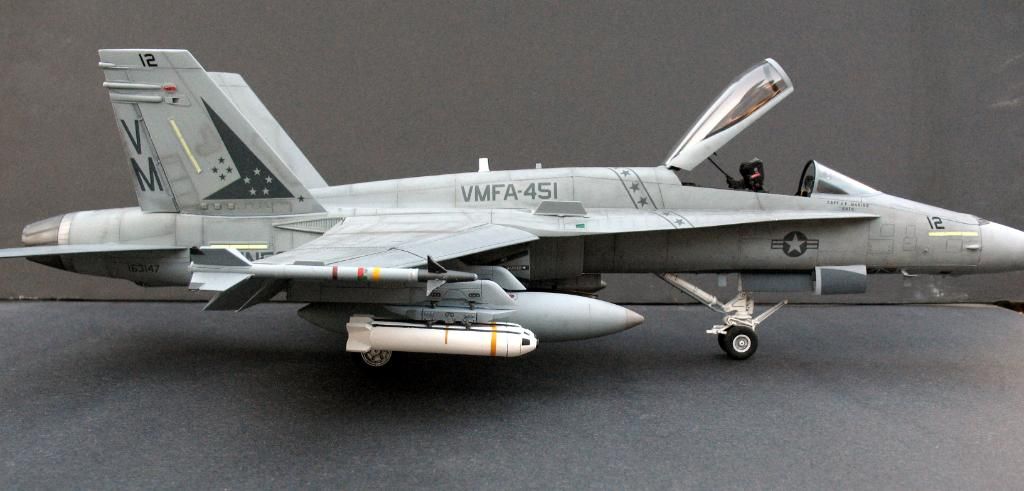
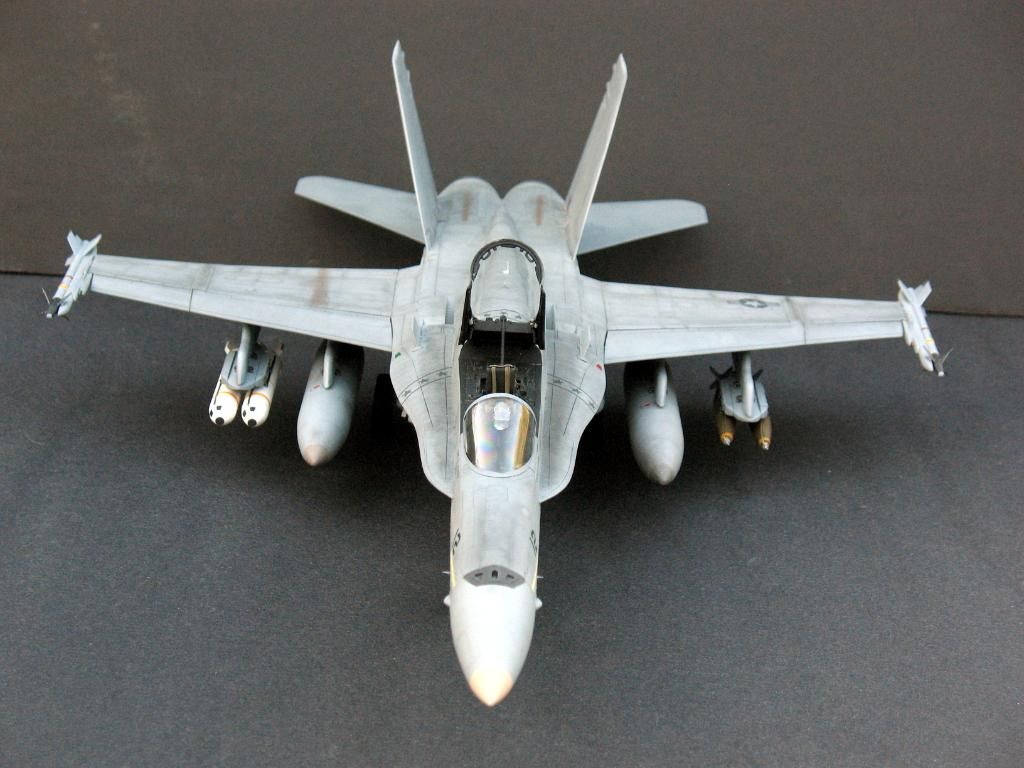
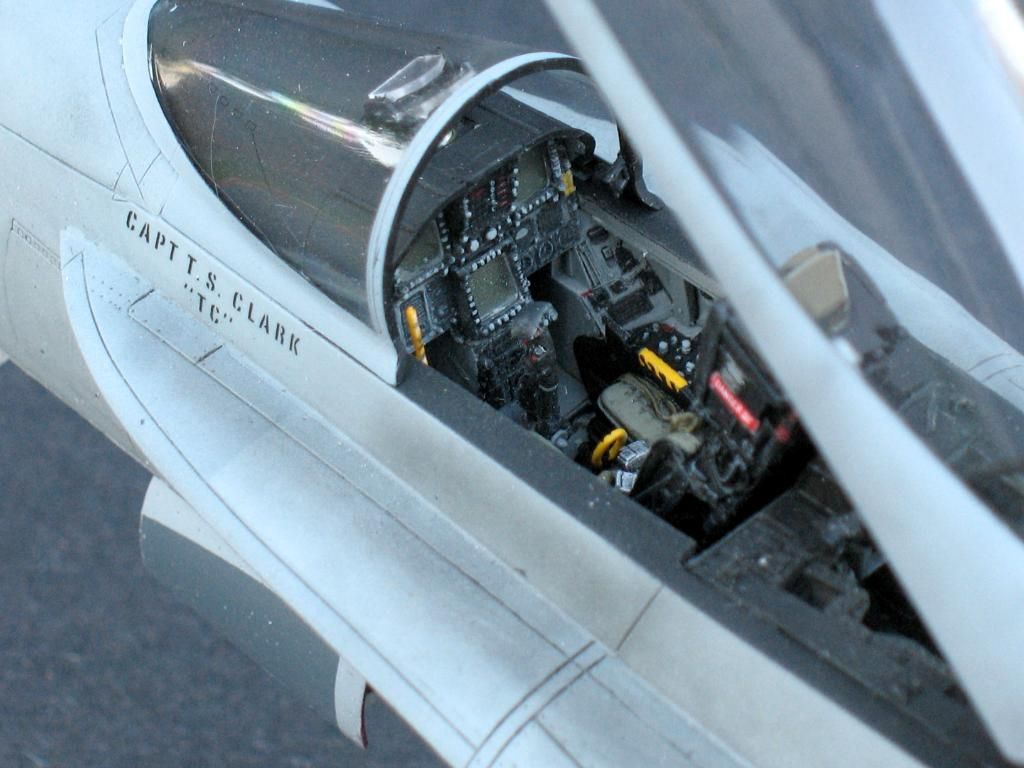
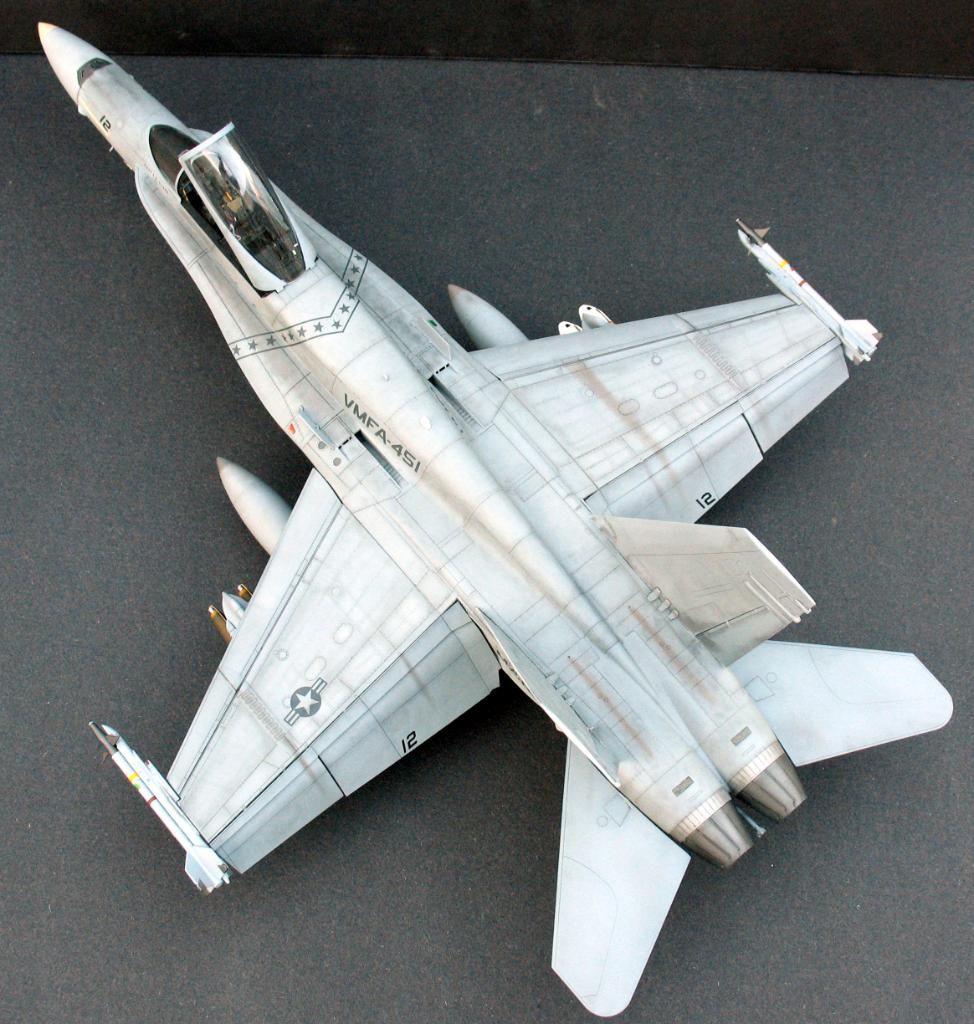
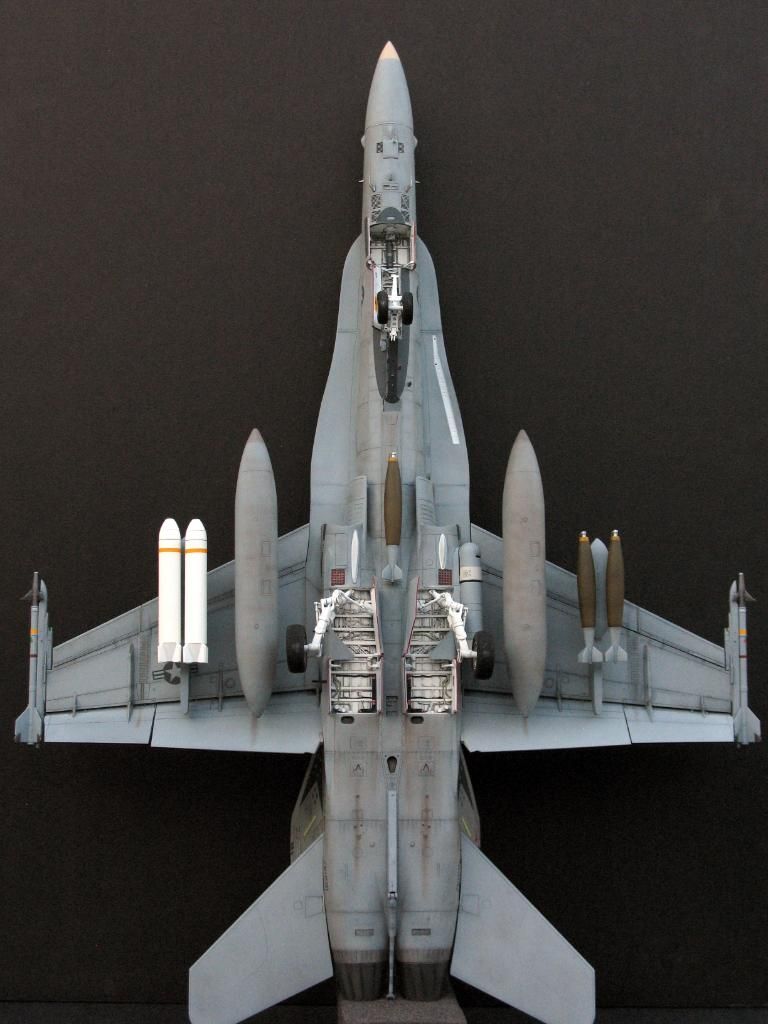
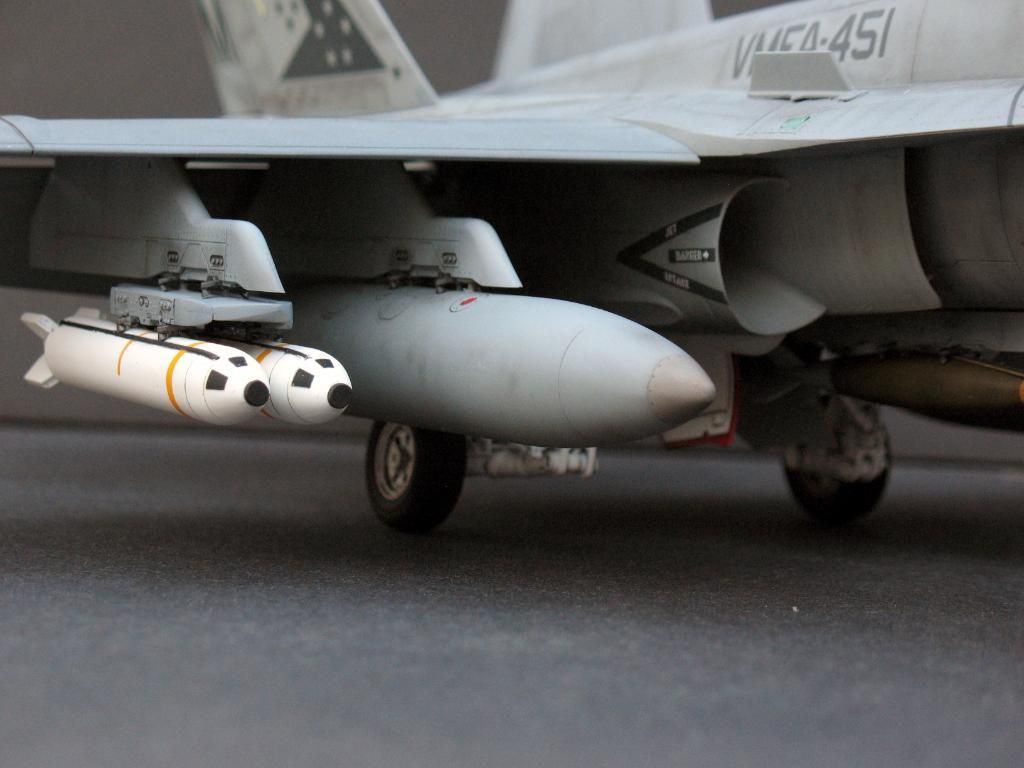
I finished this kit last month. I used the Avionix F-18A "backdate" cockpit and vertical tails set. The vertical tails needed some work to get a tight fit. The cockpit's fit was perfect except for the insturment panel. The panel had chunks of resin on it that made it impossible to use, so I used the upper portion of Academy's "A" version insturment panel included in the kit and fit it to avionix's lower portion of the panel. Paint was Testors Model Master enamels and metalizers. Weathering consists of pre-shading, spot-painting and chalk. Decals are SuperScale.
I read the book Hornets Over Kuwait by Jay Stout which provided the inspiration for the build. In the book, Stout describes the various missions he and the other pilots of VMFA-451 flew during Operation Desert Shield/Desert Storm. During one account of a mission he talked about a hornet which developed a bleed-air problem with one it's engines. That Hornet was grounded for the rest of the campaign. The problem I had was not knowing which Hornet had the bleed-air problem. I wanted to build this Hornet with heavy weathering to depict it as it would have looked at the end of the war. Unfortunately, after talking with Jay, I learned this was, in fact, the very jet (#12) that had the problem. Lesson learned: talk to the expert/s who were actually there first if possible.
Anyway...enjoy!
-
Here's a link to Revell model instructions you can download in PDF. Scroll down toward the bottom of the page/list and you'll see the F-18C instructions (85-5864).
-
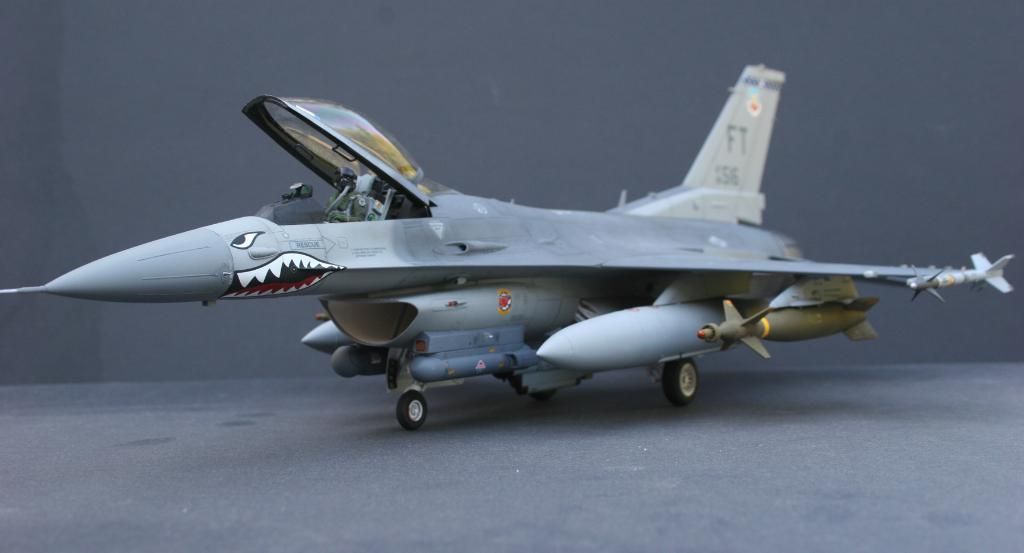
Beautiful Viper!! Man that jet is sexy isn't it?!!
You're weathering is great and the ladder's weathering is impressive, it looks real!!
-

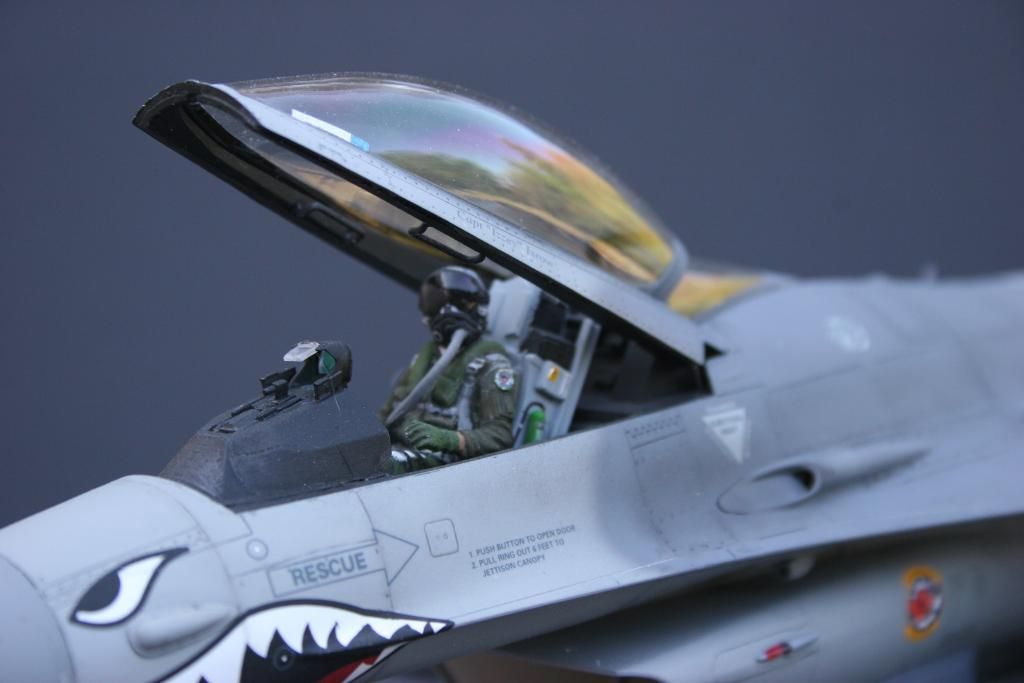
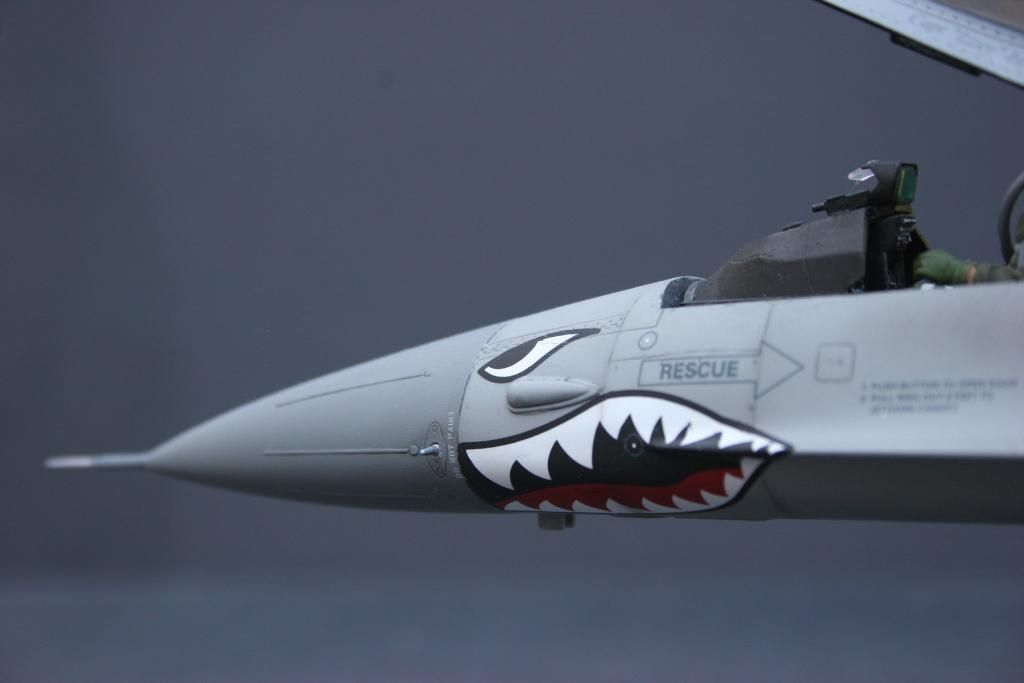
Overall, it was a fun build. The shark mouth decals didn't want to cooperate, but I managed to get them on without them looking too bad.
-
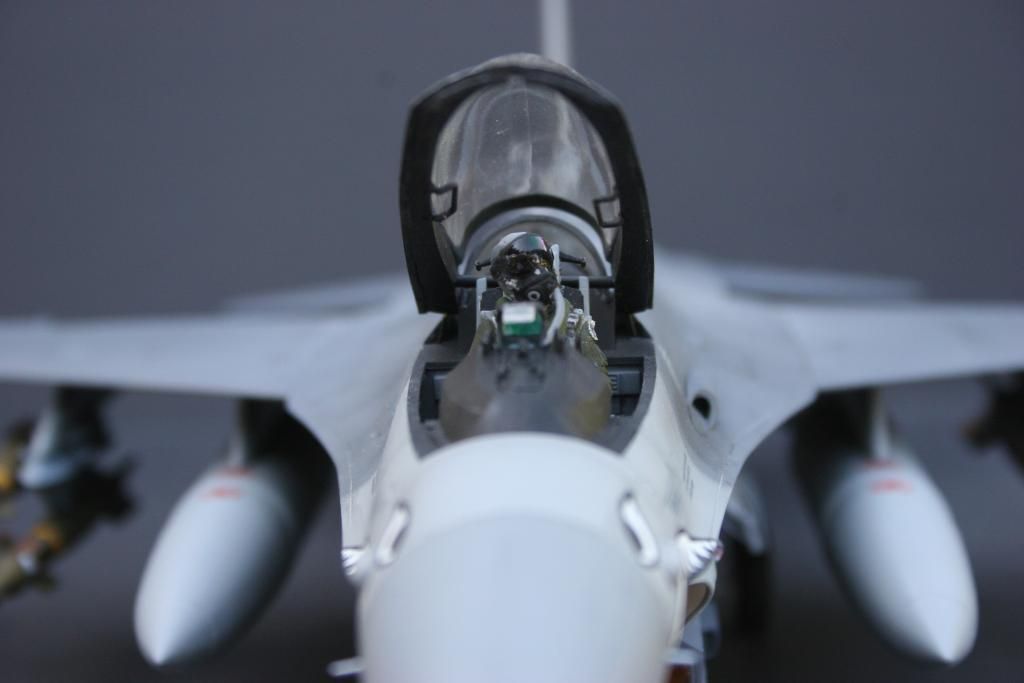
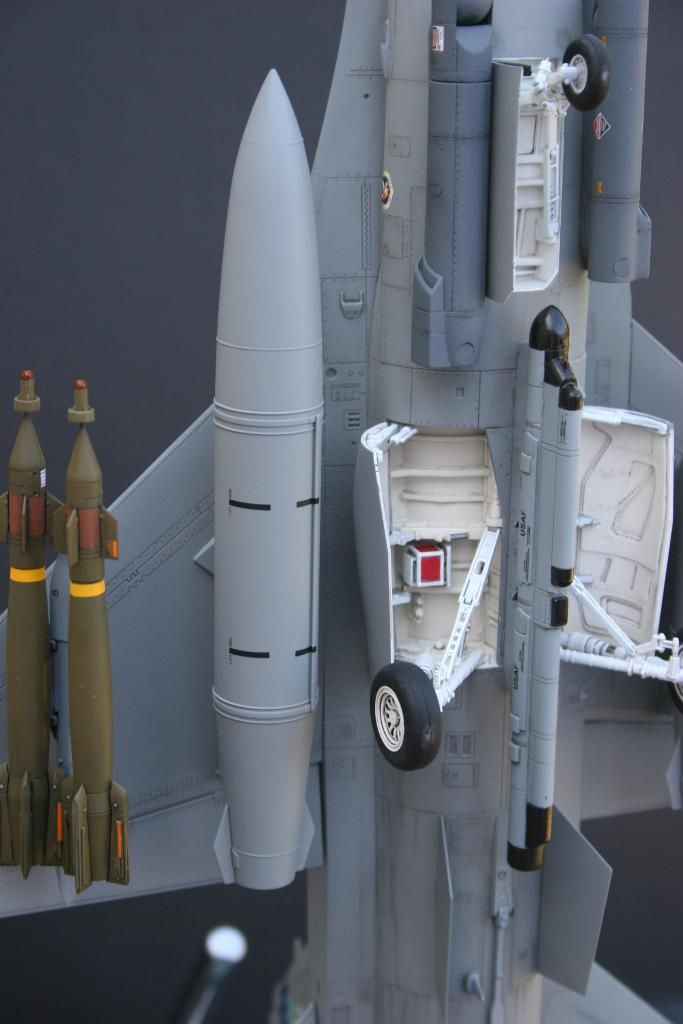
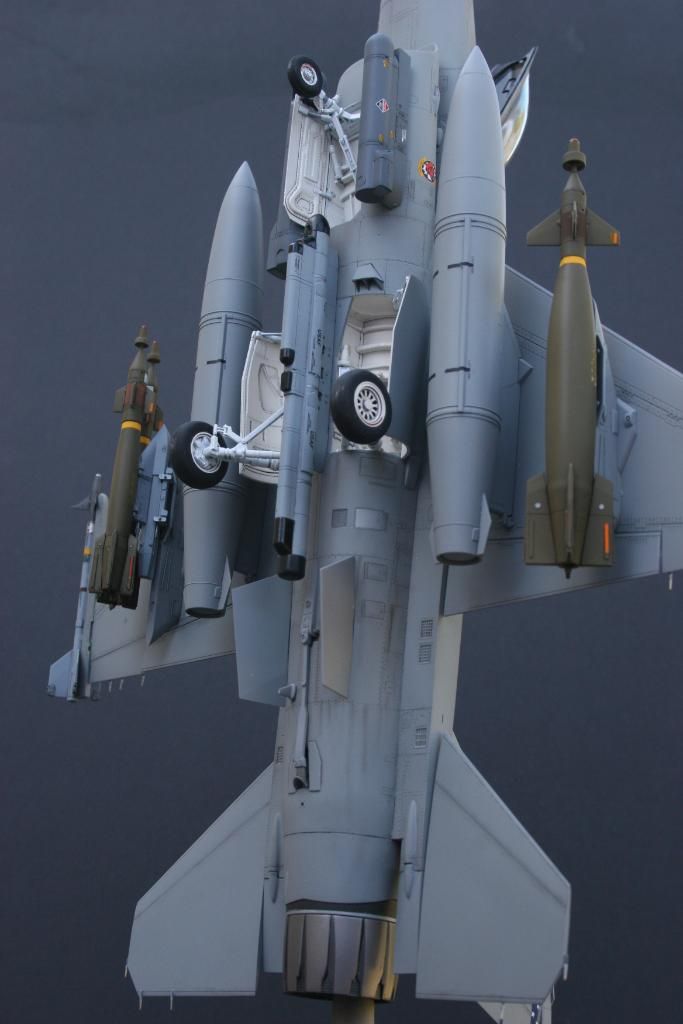
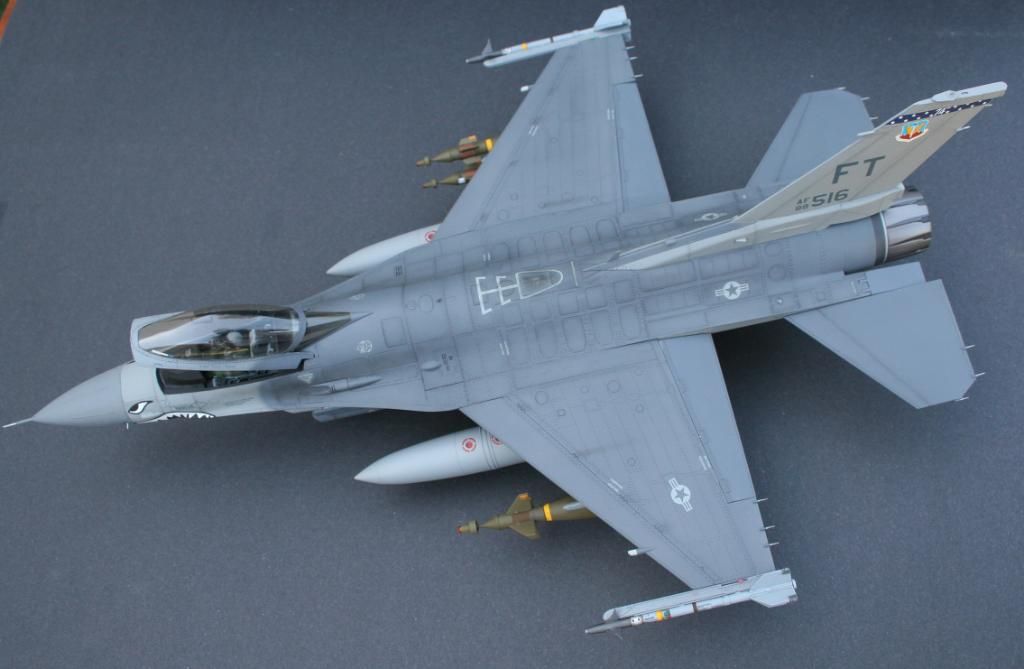
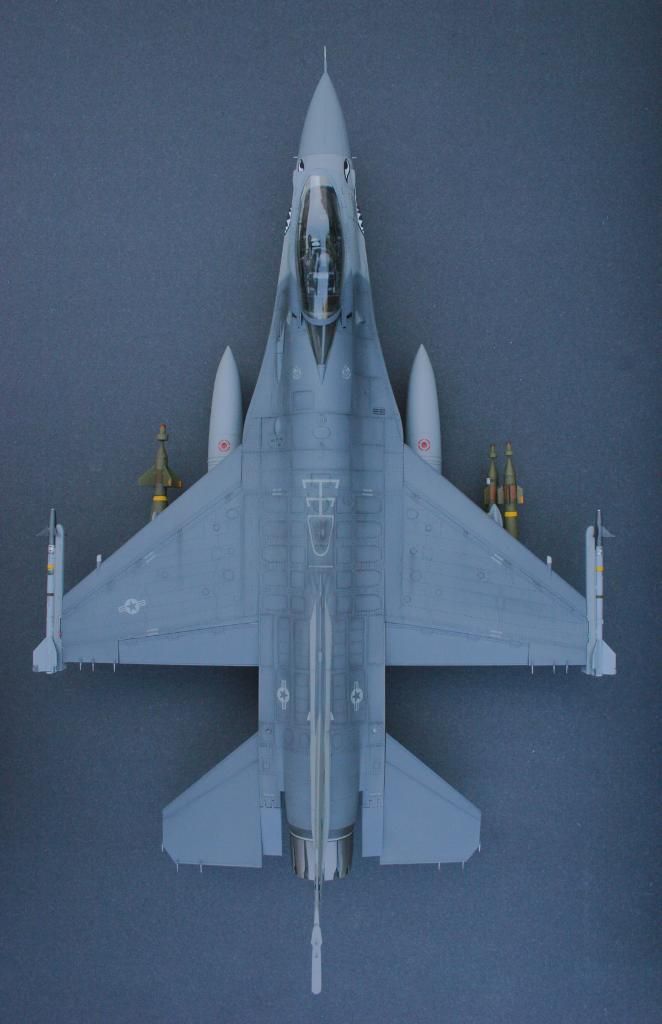
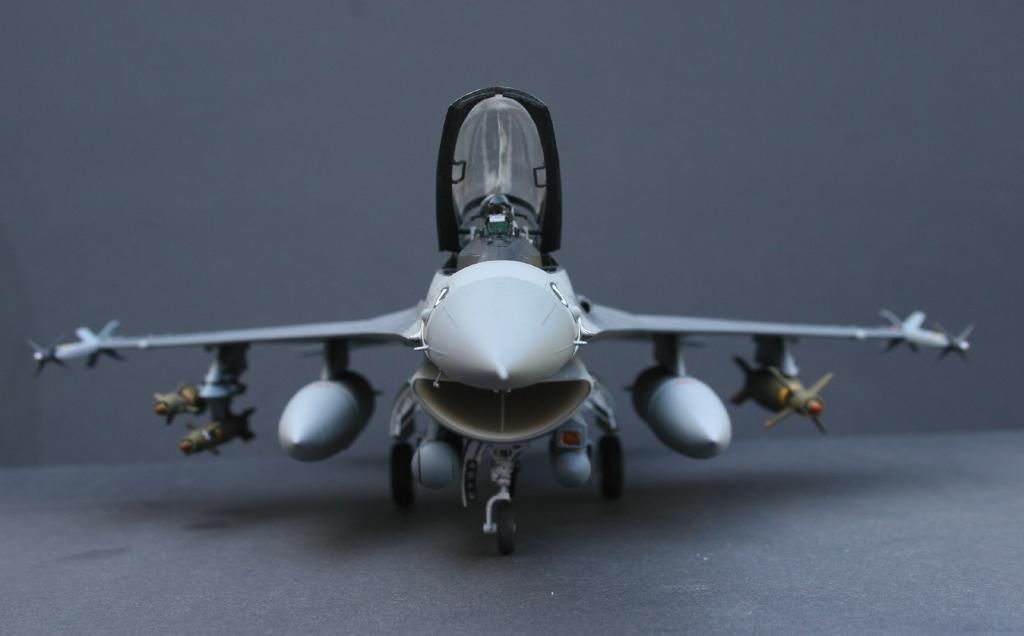
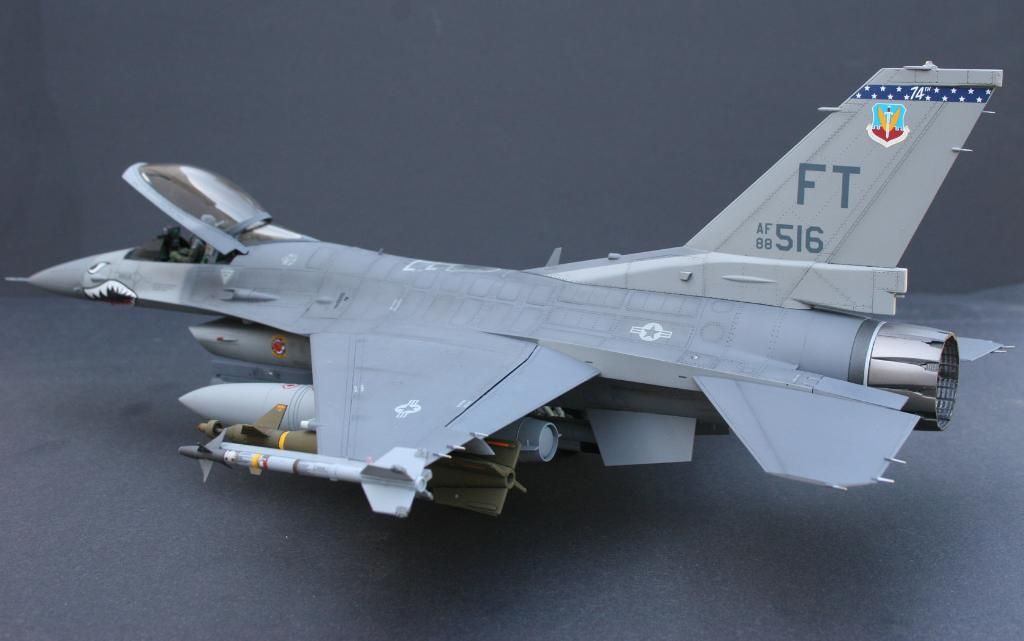
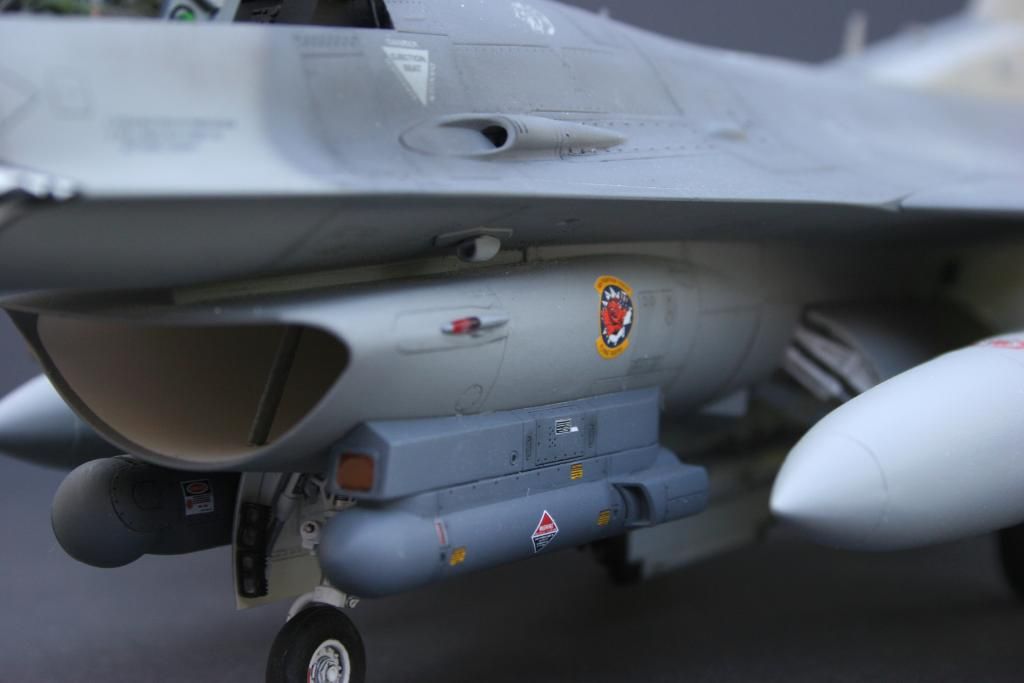
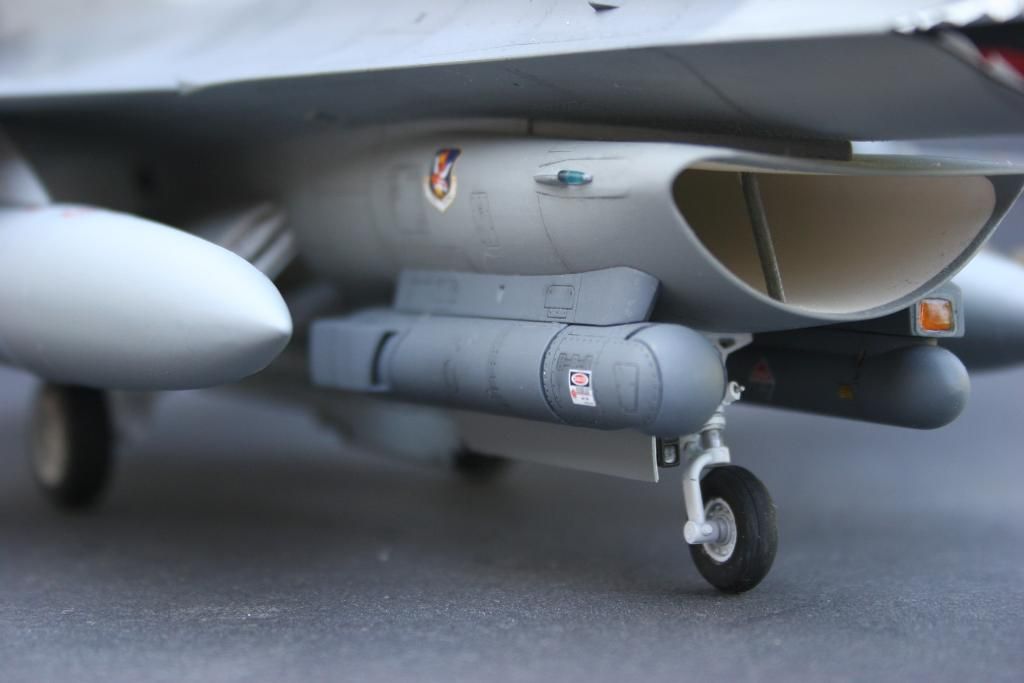
Academy 1/32 Viper with TwoBobs decals from Pope AFB. I did this same scheme several years ago using a Hasegawa F-16A+ kit with CE's resin big mouth intake before Academy or Tamyia released their 1/32 Vipers. I also replaced the IP cover which makes Academy's Viper a lot better to look at with the canopy open. I debated about putting the pilot in the bang seat, but Academy's pilot is so well done I thought I'd go ahead. I made the 74th FS patch on the pilot's left shoulder, but it didn't settle down very well. Warning: Picture Heavy!!
-
I had the same problems when I started making parts. One thing you can do is dip an old paint brush into the resin and use the brush to get the resin into the small areas of the mold it has problems flowing into. Of course you have to work fast, but after using the paint brush and you're satisfied you worked the resin into the small areas, pour the rest of the resin into the mold. The resin applied with the brush and the resin poured in aferward will combine for a solid mold. Even if the resin cures, after brushing it into the small areas, before you can pour the rest into the mold, you can mix up another batch of resin and pour it in. It will adhere to the cured resin making a solid piece when finished. You may see a color differences, but it will be a solid piece.
-
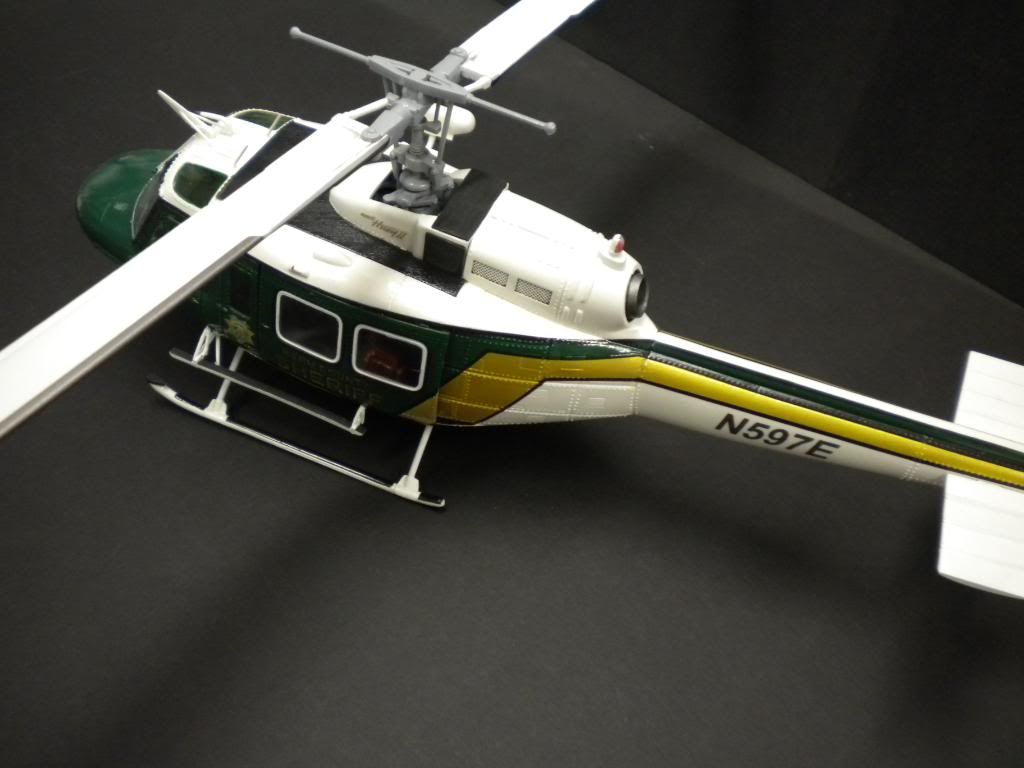
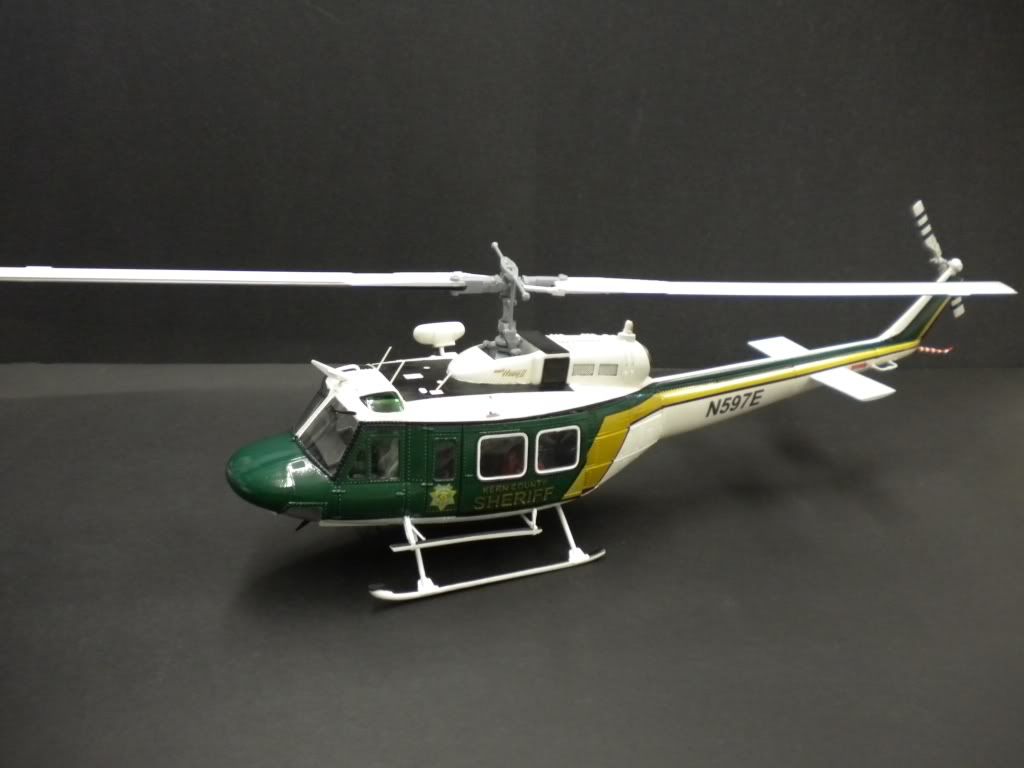
Sting,
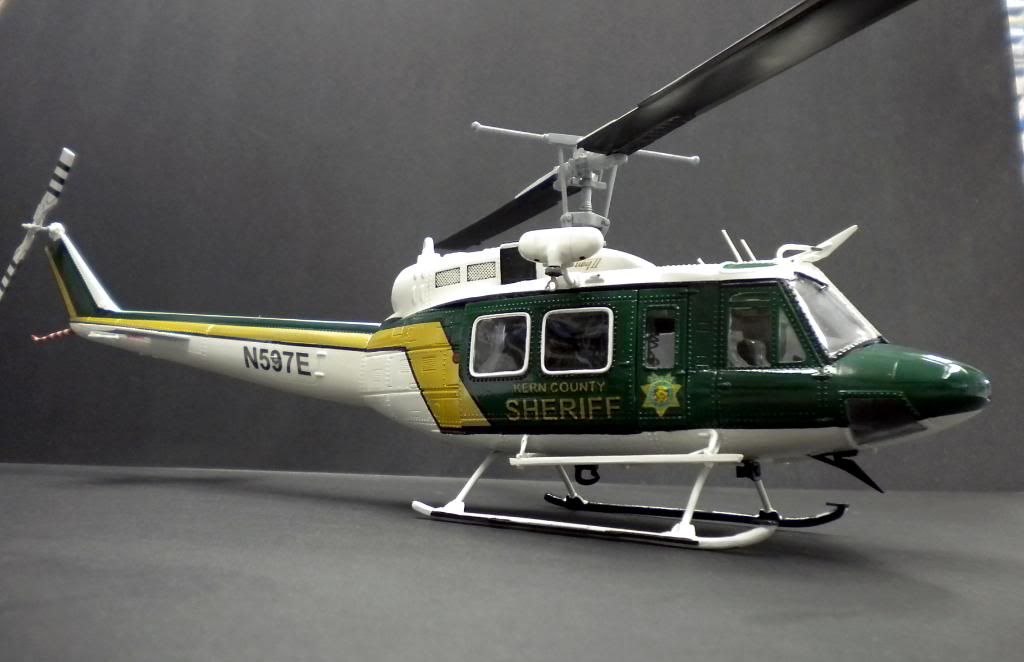
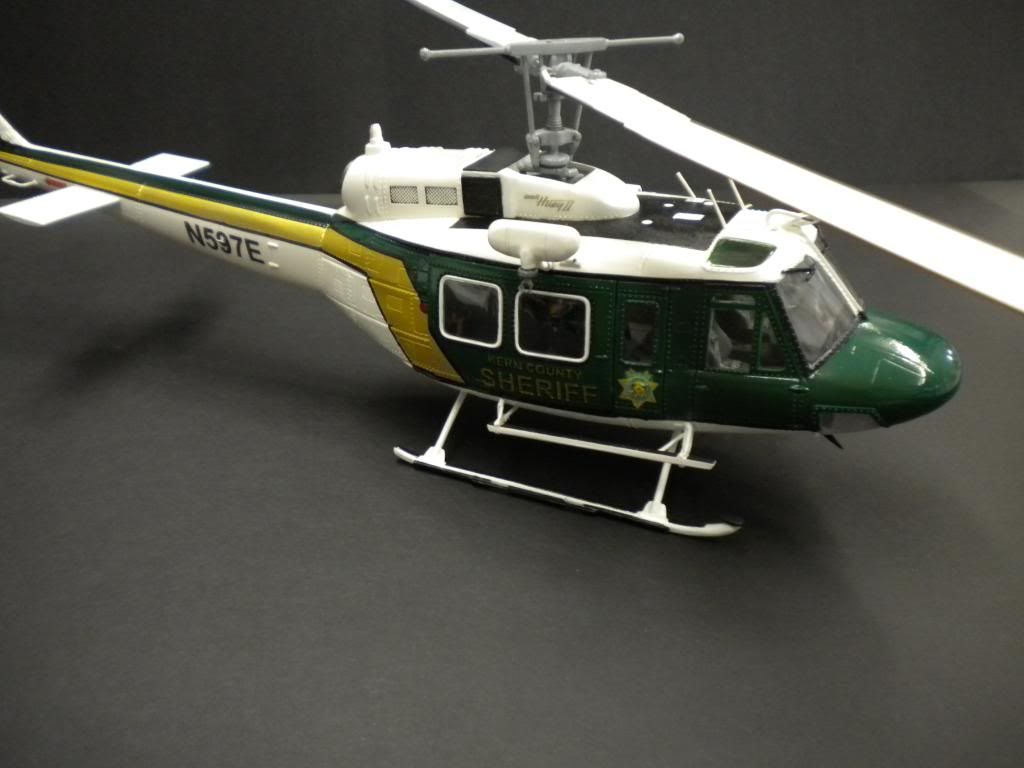
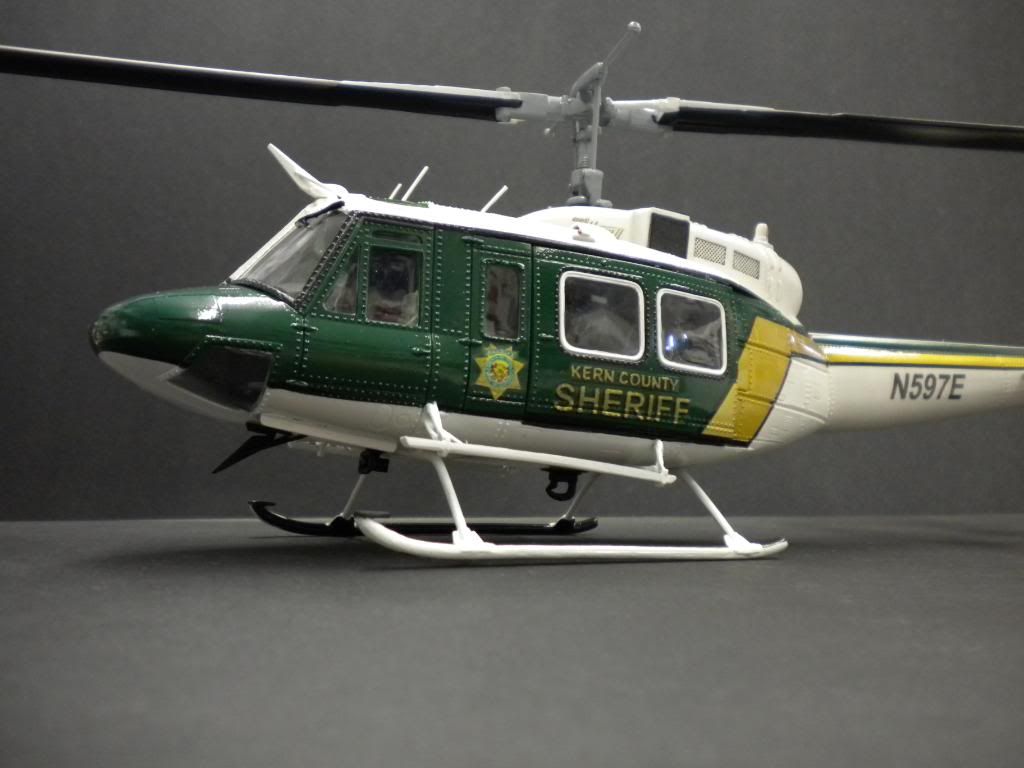
Thanks for posting more pics of your Kern County Huey II. If you have to build 12 more, you might consider getting Joseph Osborne at Fireball Modelworks to help out with the decals. He does great custom work and Hueys are one of his favorite subjects as you can see from his page. Anyway, I thought I'd throw that out as another option.
Ray
I considered contacting Joe at Fireball, but I spoke to other decal manufacturers and their quotes were way more than we were willing to pay. There would have to be a lot of other modelers interested in building the sheriff's helicopter, so I figured the same would be with Fireball. I don't know the guy at Code 3, but my buddy and co-worker does and he did us a favor by designing and printing the decals for the sliding doors. The price was right and he made enough decals for twenty models, so I have plenty for the other models to be built. The badge he made for the small, hinged doors didn't match what's on the actual bird, but I made those myself and they turned out really well. I considered sending Fireball Modelwork walk around photos just in case Joe wants to print them up. He designed decals for the Kern County Fire Dept, so he may be interested anyway.
-
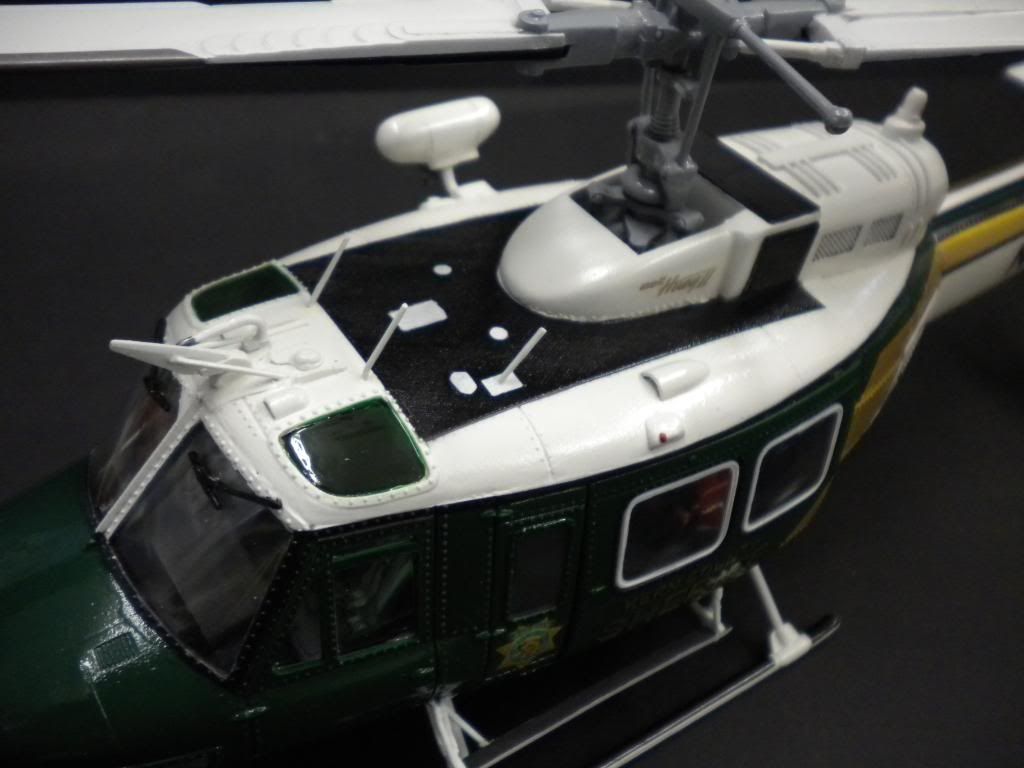
Sting, would you mind posting more pics of your Huey II model, it looks great.
Rod.
As you requested. I have to make one of these models for each of the members of my unit for a total of 12. I carved the hoist from a small block of resin after taking measurements from our hoist on the helicopter. The skid cross-tubes are made from wire coat hangers. I also moved the tail rotor on the other side of the vertical stab. I made the decals myself and as you can tell, the Kern County Sheriff on the sliding doors is hand painted. Another member of the unit and I chipped in and had a friend of his make professional decals for the Kern County Sheriff. His friend owns a web site, Code 3 Decals, which makes custom decals for collectors of die-cast emergency vehicles. The next models will look better than this one. Enjoy!

-
Thanks for the pics Ray. I'm not familiar with Mac, but I didn't fly back there to pick it up either. We were sent a few pics, but the ones you posted are new to me. Thanks again!
Kevin
-
If anyone is interested in building the Huey II, Panda (now Dragon) makes the 1/35 UH-1N. There is an option to build a single engine Huey in the kit. I scratch built the aftermarket particle separator filters, skid cross tubes, Goodrich rescue hoist and skid steps.
)
a good masking liquid
in Tools 'n' Tips
Posted
I make my own using a mix of liquid dishwashing soap and (Elmers) white wood/paper glue. Water to thin if needed. Let dry and apply the paint. To remove I use a wooden toothpick to raise an edge and peal it off with tweezers or sometimes the adhesive side of masking tape to remove larger pieces. There will most likely be an oily looking residue, but it’s soap and clean up is easy with a moist cloth or tissue.