haneto Posted March 29, 2009 Author Share Posted March 29, 2009 Did I miss it before?! Outstanding, great, fantastic build!!! A real masterpiece! Congrats, Yuifey, you've knock us down! Very nice color scheme, very deft weathering. Very deft paint work on the metal surfaces! A real perl!Those tiny adds-on for AA-11 look fantastic, so crisp and neat! Happy modeling! ;) Спасибо много! Those R-27 missiles are home-made resin copies. I used Miniarm's 1/48 R-27 resin ones and great pictures from Flanker DVD as my references! But I have no ability to cast them so I'm looking for any one who's interested to marketing them. I'm also watching your 1/32 russian missiles master making with great interests. Will them be cast as aftermarkets for sale? Cheers, Yufei Quote Link to post Share on other sites
haneto Posted March 29, 2009 Author Share Posted March 29, 2009 It's soooo beautiful. 多谢多谢 难得在这里找到同胞使用母语~~~ ;) Quote Link to post Share on other sites
Eastern Posted March 29, 2009 Share Posted March 29, 2009 Спасибо много!Those R-27 missiles are home-made resin copies. I used Miniarm's 1/48 R-27 resin ones and great pictures from Flanker DVD as my references! But I have no ability to cast them so I'm looking for any one who's interested to marketing them. I'm also watching your 1/32 russian missiles master making with great interests. Will them be cast as aftermarkets for sale? Cheers, Yufei Hi, Yufei! PM sent! ;) Quote Link to post Share on other sites
Hawkins Posted March 29, 2009 Share Posted March 29, 2009 Awesome Flanker, Yufei! Very nice work! Cheers Emil Quote Link to post Share on other sites
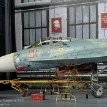
haneto Posted May 1, 2009 Author Share Posted May 1, 2009 I made the “Sorbtsyaâ€ECM pod on base of Ukrainian maker Armory's 1/72 version. Electric tools were used to make more rounded tips,with some other plastic sheets and rods for details. Spray putty for surface check. Navigation lights were made by heat-press method from clear sprue. After painting,washing,weathering,finished! The wingtip pylons were also original mastered resin copies myself. I have to substitute them by "Sorbtsya"...... Quote Link to post Share on other sites
haneto Posted May 1, 2009 Author Share Posted May 1, 2009 Wingtip pylons. Substituted "Sorbtsya" ECM pods. Quote Link to post Share on other sites
haneto Posted May 1, 2009 Author Share Posted May 1, 2009 One more shot. With her littile sister...... Hope you enjoy them! Yufei Quote Link to post Share on other sites
Hornet78 Posted May 1, 2009 Share Posted May 1, 2009 I don't build 72nd but WOW I;m very impressed. Question, did you scratch build the ladders and tow bar ? Jim Quote Link to post Share on other sites
Ettore Posted May 1, 2009 Share Posted May 1, 2009 Fantastic ! I not love moderns planes , but this super realization is truly beautiful !!! Ettore Quote Link to post Share on other sites
haneto Posted May 5, 2009 Author Share Posted May 5, 2009 As known that Aires released another 1/72 Su-27resin exhaust nozzles for Italer kit recently,so I decided to replace it withmy original made resin ones. The master of my original made resin nozzles was infact from Itakeri kit parts,and it fit Airfix fuselage perfectly,so it’s no doubt that the new Aires one will fit on. Here I’d like to share with you of the painting procedure of the nozzles. (All paints mentioned below are GSI Creos Mr.Color lacquer paints) First of all,wash the resin parts thouroughly by dish wash for 24 hours. Seperate the useless part by hand saw,then place the parts on a wasted thick plastic sheet for hold to paint. Parts were placed by both-sided tapes but if the fix area has to be painted,I’d suggest to put modeling use masking tape above the both-sided tape as the both-sided tape is too strong for the paint to hold. Flame holder is made of brass photo-etching part,so spray the metal part surfacer will help to increase the stability of lacquer paint on it. And then resin part surfacer.It’s very important for the resin cast parts. And the quality of Aires goods,top notch,just as always! Quote Link to post Share on other sites
haneto Posted May 5, 2009 Author Share Posted May 5, 2009 Painting beginning. The way I paint exhaust nozzles is not by colours I use,but by parts of nozzles.As the colour gradation on nozzles is always very delicated and it cannot be expressed just by several decided colours. First I’d go with flame holder.The real heavily burnt flame holder looks grayish and matt,so I used C137 tire black+SM05 Super Titanium(little) for the first colour(the darker one). After spraying SM04 Super Stainless on turbo fans,mask the fans and spray grayish colour to express the burnt after burner(C137 tire black+62 matt white with free ratio). Pay attention to the gradation of afterburner from top to bottom.. Finished. Quote Link to post Share on other sites
haneto Posted May 5, 2009 Author Share Posted May 5, 2009 The outside ring and inside ring are most heavily burnt so they are whitish.I hand brushed them to replica the natural effect. Washed the part with dark gray Tamiya enamel colours,I dry brushed some white pastel to gain a more natural effect. Nozzle pipes are also grayish by bunrt effect. The gray colour is hard to explain so finally I used 30% C60 RLM02 Gray+30% SM05 Super Titanium+40% White(“A colour†to be called). The upper area is hand painted clear blue according to the real pictures. And those smoke dirts are all made by pastel+Tamiya weathering set Notice:the hole inside nozzle is MATT except the turbo fans. Quote Link to post Share on other sites
haneto Posted May 5, 2009 Author Share Posted May 5, 2009 Next is nozzle parts. Spray the inside colour(A colour),then masking the recessed slices. Then spray A colour+white(little) The outside surface is sprayed directly of SM03 Super Iron.. As the movable feather shows different colours and textures from the fix feather,so masking the fix ones is neccessory. From the movable feathers,the inner feathers is darker than outer feathers,also with more scratches. So spray 50% SM03 Super Iron+50% C2 Black(“B colour†The maksing the inner feathers,spray the outer feathers by 60% B colour+40% SM03 Super Iron. The scrathes on inner feathers.Use a fine brush with some thinner on it,then melt the surface colour of the inner feathers,then the bottom lighter metal colour will appear. It’s easier to control and the effect is more natural. The burnt orange/blue effect is an attractive charming point of jets. Hand brush clear orange on the fix feather area firstly. After clear orange get dry thouroughly,hand brush the clear blue. The smoke dirts inside the nozzles are hand painted by melt pastel,and rub the feather when pastel is half-dried. Comparation of my original resin nozzles with Aires ones. Quote Link to post Share on other sites
haneto Posted May 5, 2009 Author Share Posted May 5, 2009 Put on the fuselage and it fits like a glove! The inside content is hard to see,especially photographing. Fianally,Tamiya weathering set D was used for the final touch up. Pay attention never over do. The cutting,paiting and weathering cost me an afternoon and a night,but I feel it well worth the time. Four white stars score decal was applied on the fuselage according to the latest information. Finale. Quote Link to post Share on other sites
viperbite Posted May 5, 2009 Share Posted May 5, 2009 wow~ 舰版, good tips for those Tamiya weathering sets Quote Link to post Share on other sites
JB2013 Posted May 6, 2009 Share Posted May 6, 2009 Awesome dude!!! Quote Link to post Share on other sites
haneto Posted May 1, 2012 Author Share Posted May 1, 2012 Thanks a lot for the updated photos, sashaopak! The "Blue 41" has changed so much. It's a pity that the "Rossiya" mark and 4 stars has been painted over. Why? I wonder if the 941 GvIAP badge is still there on her right vertical fin? And it's great that still somebody remember this built. Cheers, Yufei Quote Link to post Share on other sites
bearmatt Posted May 1, 2012 Share Posted May 1, 2012 This is scalemodeling of another level! If perfect needs an exemple, then we have it here.... Gorgeous Quote Link to post Share on other sites
Arne Posted May 1, 2012 Share Posted May 1, 2012 Great Work !!! Quote Link to post Share on other sites
sashapak Posted May 1, 2012 Share Posted May 1, 2012 Thanks a lot for the updated photos, sashaopak! The "Blue 41" has changed so much. It's a pity that the "Rossiya" mark and 4 stars has been painted over. Why? I wonder if the 941 GvIAP badge is still there on her right vertical fin? And it's great that still somebody remember this built. Cheers, Yufei Hi, Haneto. Today marks the fighter are stated in compliance with the new appearance of the Russian Air Force, the walrus on the tail is no longer :( Quote Link to post Share on other sites
PetarB Posted May 2, 2012 Share Posted May 2, 2012 That is absolutely stunning, just beautiful work. Well done! Quote Link to post Share on other sites

Recommended Posts
Join the conversation
You can post now and register later. If you have an account, sign in now to post with your account.