rotorwash Posted July 30, 2009 Share Posted July 30, 2009 Floyd, i am out of adjectives. Your build is just outfrigginstanding! I can't wait to see her in paint. Ray Quote Link to post Share on other sites
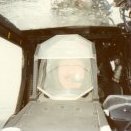
Avus Posted July 30, 2009 Share Posted July 30, 2009 i am out of adjectives. Your build is just outfrigginstanding! I can't wait to see her in paint. I'll second that! I probably missed this, but is the camera detail molded into the TSU or have you added it? Quote Link to post Share on other sites
Tank Posted July 30, 2009 Share Posted July 30, 2009 Floyd, i am out of adjectives. Your build is just outfrigginstanding! I can't wait to see her in paint. Ray +3..... Quote Link to post Share on other sites
Floyd S. Werner, Jr. Posted July 30, 2009 Author Share Posted July 30, 2009 I'll second that!I probably missed this, but is the camera detail molded into the TSU or have you added it? Thanks for the kind words. The TSU detail is molded in the site. Simply paint, drybrush, add Krystal Kleer and add the clear from a template. Floyd Quote Link to post Share on other sites
Floyd S. Werner, Jr. Posted July 30, 2009 Author Share Posted July 30, 2009 OK occasionally I do something and I just go OMG. That is sooooo cool. That was the tail rotor assembly. I was dreading doing this as it looked really complicated from the instructions. Oh I couldn't have been more wrong. The instructions were perfectly clear as long as you read them. LOL Anyhow, these are the pieces provided. and after a little bit of work, less than an hour, you end up with this hopefully. LOL and this That is so cool. Under a coat of paint this is going to look so nice. I decided not to paint today. I wasn't in the mood to paint. So the Main Rotor Blades are next. After that there is nothing left but to paint. LOL Floyd Quote Link to post Share on other sites
Tank Posted July 30, 2009 Share Posted July 30, 2009 OK occasionally I do something and I just go OMG. Floyd, you need to stay away from the valley teenage girls....jest saying. Quote Link to post Share on other sites
Retired GunPilot Posted July 30, 2009 Share Posted July 30, 2009 Beautiful work Floyd. I'm enjoying every post you provide on this build. Charlie Quote Link to post Share on other sites
Rdrunner Posted July 31, 2009 Share Posted July 31, 2009 Truly awesome details there, Floyd, <_< Keep it coming <_< <_< Quote Link to post Share on other sites
Floyd S. Werner, Jr. Posted July 31, 2009 Author Share Posted July 31, 2009 I had previously added twist and flex to my blades. I worked on them individually until I thought they looked correct. I tried my fingers but with the twist (read pitch which is not uniform from root to tip) and the flex (weight of the blade that causes droop more in the middle than at either end) but it was not enough. So I broke out the wife's Stampin Up embossing gun ( by the way she sells these too, shameless plug but I really like this tool) and added heat to the blade concentrating more in the middle but also moving to the ends occassionally and rotating the blades every few seconds. Now the blades never drooped because of the heat just enough to warm them up uniformly. Then I simply twisted so there was less pitch at the tip and more in the middle and at the same time flex them in the middle. I repeated this until I was satisfied. I'm happy with the results. This little feature alone adds to the life of the model. The day started off with finishing the rotor blades. As per the instructions, I glued it and trued it all up yesterday. It did require me to cut the locating pins on the hub a bit to get the main rotor bolts to line up. I think the results are worthwhile though. The sand and dust deflector adds to the hub and the new pitch horns are very impressive. I added some scratchbuilt hinges for the canopy out of brass and wire. I added them to the fuselage and will add the canopy later. Then there was nothing left to do after a coat of primer on all the unpainted components. Sooo, I had to do something so I started to paint the rotor since I had them out and available. This will be a multi-step process. Step 1- Before you prime or anything else, wipe the blades with Polly-S Plastic Prep. I always use this prior to painting. Prime the rotor blades and fix whatever needs to be fixed. The kit blades have a bunch of depressions so you will have to sand them anyhow. Step-2 is to paint Alclad Dark Aluminum which is a good substitute for the titanium leading edge. I always use Alclad here because I'm going to have to do some work and I need the strength of Alclad. Model Master would not hold up to the weathering process that is coming up. Step 3- is to start painting the blades like the real thing so that means primer and in this case I use the small bottle of Testors Zinc Chromate Yellow. It is a great match. Step 4- wait until it is thoroughly dry like tomorrow. While I had the zinc loaded I was inspired to prime the fuselage which is completely different than what I've been doing lately which is to paint the whole model black and then build up the color. This time I needed the zinc. I should have added some salt prior to painting this but I forgot so I'll have to add that later. You have to admit the fuselage looks interesting in this color though. That is it for today. It will have to sit overnight. I hope to get some paint on it this weekend, but probably not until Tues on my day off. Floyd Quote Link to post Share on other sites
Avus Posted August 1, 2009 Share Posted August 1, 2009 This time I'm going to quote Aerosmith: "It's amazing ..." That tail rotor is a looker! Quote Link to post Share on other sites
thegoodsgt Posted August 2, 2009 Share Posted August 2, 2009 Excellence will get you everywhere! Well done. Quote Link to post Share on other sites
doupnik Posted August 2, 2009 Share Posted August 2, 2009 Great work. And that tail rotor is freaking awesome. mason Quote Link to post Share on other sites
Floyd S. Werner, Jr. Posted August 6, 2009 Author Share Posted August 6, 2009 OK you knew I couldn't leave the primer on too long. I painted this thing really fast as it is only one color. Before I painted though I used Margarita salt and water to place some chips where I wanted them to be. Once that was dried I was able to paint as normal. The primer was great because it allowed me to have some areas that were darker than others. I did this by doing a bunch of squiggles instead of a heavy top coat. I used Model Master ACRYLIC US Army Helicopter Green for the main color as it is the ONLY one that really matches the real thing. I did use the enamel to add weathering effects. You don't see them as well in these photos but once the dull coat is on it should add a random fading to the finished product. When everything was dried I used a toothpick and toothbrush to rough up the paint and remove the salt. I really like the effect on the rivets on the tailboom as it makes them pop out. Everything was coated with a coat of Alclad gloss to prep for the decals. Here are the results. Sorry it is blurry. While I was waiting on that to dry I took care of the blades. I painted the main and tail rotor blades Olive drab. Each tail rotor blade was painted a different shade for visual interest. Once the OD had dried, a stripe of yellow was added to the main and one tail rotor blade. You'll see why this is important later. Then the main rotor blades were overpainted with Tamiya NATO Black over everything. This was weathered by some streaking front to back of flat black and some very diluted Tamiya Buff. More buff on the top side and more flat black on the bottom side for sun bleaching effect. I'll have to take more photos of it. I also painted up the armament. Here are my TOW tubes. I started to decal yesterday but was only able to do one side. I'll get more pictures tomorrow. I hope to put this thing to bed by Sunday. Floyd Quote Link to post Share on other sites
BrittMac Posted August 6, 2009 Share Posted August 6, 2009 Awesome to look at Floyd. Let me ask another question though. I understand about how everything works from your posts thus far, which are very helpful. But, is this conversion something a novice like me should attempt? Honestly, you have made it look fairly easy and it has all looked doable with the proper tools. I gotta do this though..... -Brandon Quote Link to post Share on other sites
Avus Posted August 7, 2009 Share Posted August 7, 2009 Since I'm speechles, I'll just say: :) Quote Link to post Share on other sites
Floyd S. Werner, Jr. Posted August 7, 2009 Author Share Posted August 7, 2009 Awesome to look at Floyd.Let me ask another question though. I understand about how everything works from your posts thus far, which are very helpful. But, is this conversion something a novice like me should attempt? Honestly, you have made it look fairly easy and it has all looked doable with the proper tools. I gotta do this though..... -Brandon Brandon, Thanks for the kind words. I really like it. We'll see how I feel after the dullcoat. As far as a novice is concerned, I'm not sure this is where you would want to cut your teeth on resin, photo etch and vacuform canopies. (Shameless plug, check out www.masterclassmodels.com .) While this is THE best engineered conversion I've had the pleasure of building I think the scope is above a novice. Now someone with some experience shouldn't have too much trouble. I don't recommend putting in the interior canopy details that I scratchbuilt, like the Det Chord or the HSS rails, but the rest of the conversion is fairly straight forward. I recommend that you buy the set and build up some experience and then tackle this as your confidence level increases. You might want to book mark this build or even better print it out. You can never tell with photobucket when they will require me to remove some photos. Thanks again. Floyd Quote Link to post Share on other sites
Tank Posted August 7, 2009 Share Posted August 7, 2009 You might want to book mark this build or even better print it out. You can never tell with photobucket when they will require me to remove some photos. cough, cough Joe, you know a build CD might be helpful to some cough, cough Quote Link to post Share on other sites
Joseph Osborn Posted August 7, 2009 Share Posted August 7, 2009 cough, cough Joe, you know a build CD might be helpful to some cough, cough Dude, that's what's taking me so long to get the set released! A very comprehensive (and quite possibly incomprehensible) set of illustrated construction outlines will be included with the set. Each subassembly is treated as its own "mini project" so that the model is broken into manageable chunks of work. My goal is to give you not only the parts to build the model but to document the steps to build it. As a modeler, you are completely within your rights to follow the instructions or completely ignore them Joseph Quote Link to post Share on other sites
Tank Posted August 7, 2009 Share Posted August 7, 2009 (edited) Dude, that's what's taking me so long to get the set released! A very comprehensive (and quite possibly incomprehensible) set of illustrated construction outlines will be included with the set. Each subassembly is treated as its own "mini project" so that the model is broken into manageable chunks of work. My goal is to give you not only the parts to build the model but to document the steps to build it. As a modeler, you are completely within your rights to follow the instructions or completely ignore them Joseph Cool, you set the bar higher with http://www.fireballmodels.info/images/FMR-010.pdf Vipers? really....not that there is anything wrong with that.... http://www.cybermodeler.com/hobby/kits/rm/kit_rm_6442.shtml http://modelingmadness.com/reviews/misc/scifi/leeviper.htm Edited August 7, 2009 by Tank Quote Link to post Share on other sites
Floyd S. Werner, Jr. Posted August 7, 2009 Author Share Posted August 7, 2009 Dude, that's what's taking me so long to get the set released! A very comprehensive (and quite possibly incomprehensible) set of illustrated construction outlines will be included with the set. Each subassembly is treated as its own "mini project" so that the model is broken into manageable chunks of work. My goal is to give you not only the parts to build the model but to document the steps to build it. As a modeler, you are completely within your rights to follow the instructions or completely ignore them I have to say that the instructions are invaluable. If you don't follow them I'm sure you can get it built, ala me because they weren't available at the time I started, but the pages that I did get were simple to understand and easy to execute. Six pages for the Tail rotor alone. As an aside, I will try to get this build published in a magazine so that you can have a written copy of it. What you see here are only small files with a hand held camera. I have my professional camera set up for the article. More pictures later today. Decaling is done. On to the Remove Before Flight tags. Did I mention that this set is very comprehensive and extensive? A joy to build. Floyd Quote Link to post Share on other sites
Floyd S. Werner, Jr. Posted August 7, 2009 Author Share Posted August 7, 2009 (edited) We are getting into the home stretch now, but that is typically when I get in a hurry and cause problems. Today was no different. LOL First off, I realized that I put the wrong Reaper emblem on the left side. Edit:OOPS this is the correct decal before I screwed it up. I pulled off the old one with no problem. I added some Future to the model where I had added a 10mm circle of OD. I should have just sprayed a coat of clear and continued as normal, but I didn't. I set up the new decal on the circle in a small puddle of Future. Allow to dry. Key word here was dry. I did not let it dry as I thought it looked bad so I had one more decal on the sheet so I just pulled up the new one like I did the old one, except this time the paint came up too. Oh you know that is going to leave a mark. LOL And it did. Oh well. I will let it dry overnight and then I'll be sanding that panel down to bare plastic and start again. Maybe this time I'll get it right. LOL And that ain't the only thing I did stupid today. In my haste to see how this was going to go together I drilled some holes for the RBF tags in the appropriate holes and made up the tags from X-ray lead foil from my dentist's office. This actually worked out really well. Then I just had to see how it would fit in the wing and how I would droop it over the rocket pod. So I attached the rocket pod and the RBF with super glue and was really pleased with myself. So much so that I thought why not add the TOW launcher and get the wing done. Why not, it sounded like a good idea but make sure that you add the rocket pod decals before you do this and don't forget to drill a hole for the TOW launcher electrical connection. Yup, I didn't so that will be that much more difficult tomorrow after the gloss coat on the pods dries. At least I only did one wing this way and it did turn out really nice. I'm super happy with it. I have to touch up some of the TOW wiring with black paint now. By the way the RBF flags are awesome too. Other than that the decals are fine. No real problems. Those rivets on the tailboom have required slicing the decals a little bit and adding multiple coats of Solvaset, but these are big rivets. The UNITED STATES ARMY are the worst offenders. Other than that a pretty prosperous day. While I was busily waiting for the decals to dry I decided to build up some small items which is about all I have left now. Here is the turret assembled. I've also started to weather the model a little bit. I did the blades today. I haven't really started to weather the fuselage until the first dullcoat. I'm interested in seeing if I can pull it off. Anyhow, Step 4 of the blades was to paint a yellow tip on the blades. Step 5 was to mask it off and paint the blades OD. I used Gunze but anything would have worked because... Step 6 is to paint the whole blade flat black. Step 7 Allow it to dry throughly. Step 8 and don't try this at home if you are squemish. LOL I used Master Caster Sanding Sticks both large and small to slowly abrade the surface starting at the leading edge and the blade tip and lightly sand away the area until I was happy. I used the blue stick. Now you can see why all that prep was needed for black blades. The tail rotor was given the same treatment. Hopefully more decal fun tomorrow on the Rocket pods, TOW tubes and the left side of the doghouse. Once that is done we are really close and just a session of weathering and final assembly. Floyd Edited August 7, 2009 by Floyd S. Werner, Jr. Quote Link to post Share on other sites
rotorwash Posted August 7, 2009 Share Posted August 7, 2009 Looking great, Floyd! Nice to know even the experts occasionally make a mistake. Looks like you fixed her up nicely though. I am especially impressed with the rotors. They look very authentic. Ray PS: that scheme looks very familiar some how :) Quote Link to post Share on other sites
Anthony in NZ Posted August 7, 2009 Share Posted August 7, 2009 I have to say Floyd, that is spectacular.I love the primer under the paint. I have a Corsair wing ammo box (the top surface is the wing upper surface) and all of the wear and chips show the YZC primer underneath. The Huey Tailrotorblade I have ialso s worn exactly how you have done it too. Thanks for showing us how you achieved this effect! It is stunning On the home streatch now Cheers Anthony Quote Link to post Share on other sites
Floyd S. Werner, Jr. Posted August 8, 2009 Author Share Posted August 8, 2009 Dan Heally a Cobra Instructor Pilot in Korea once said to me as I got lost on the DMZ trace, "It ain't how bad you frack up it is how gracefully you recover." Well that it the case with this problem. Remember I screwed up the decal so bad that it peeled back to the bare plastic. Here is how I did it. Basically I masked off the panel, thank God there were no decals in the area except the bad one. I use Tamiya tape. Then I just sanded the offending decal and panel with some sanding sticks. No rocket science really. Once I had feathered the offending areas into the surrounding paint job I repeated the paint process, prime, XZinc, salt techniqu,US Helo green, mask and paint the OD, and this time a gloss coat. There you go now I'm waiting for the paint to dry prior to adding my last decal of the reaper. While I had the gloss coat out I oversprayed the rest of the decals to seal them in. The rocket pods were a non-event as well. Here is the one that is off the rack and the one on the rack. Now it might be time to assemble the wings. LOL It is hard to tell if the real thing had them by this time of their use but they add some more color to the drab helicopter. The final decal to go on was the TSU cover. I almost threw it out. It is white and I didn't see it on the sheet. So be forewarned. It looks great on there though. I had to cover up my window because I got some overspray on the windows. I could have gotten it off but we always put the covers on when the aircraft was on the ground so it is covered up and adds a splash of color to the nose. That is it for today. I needed to start marketing this set: I will add the reaper decal when I get home tonight at 2AM. Then it should be just a matter of dullcoat and weathering. Floyd Quote Link to post Share on other sites
rotorwash Posted August 8, 2009 Share Posted August 8, 2009 Floyd, that work there is just fantabulous! If you get any better at this stuff you might just have to make a video or somethin'. Ray Quote Link to post Share on other sites

Recommended Posts
Join the conversation
You can post now and register later. If you have an account, sign in now to post with your account.