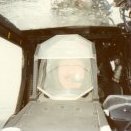
Floyd S. Werner, Jr. Posted February 20, 2010 Share Posted February 20, 2010 OK not out of the box but just a basic build to say thanks. It isn't as detailed as Shark64's piece of art, but just a basic model. It is the Italeri kit with some odd and ends pieces, plus some little scratchbuilding, especially the seat. I will say that the door on the rightside tailboom is a pain in the arse. I will re-rivet the tailboom when I get it together. Eventually it will be a Georgia NG Huey from the Fireball Modelworks decal sheet. I was especially proud of the seats which I built up with some Eduard and Apoxy Sculpt. No these will NOT be available in the Werner's Wings line, but they were fun to build. I really liked the springs. I had to fix the one side of the armor side panel as I matched the kits and then realized that the sliding portion was straight. It helps that I had my Werner's Wings UH-1 Long Body DVD for references. It was just like having Rotorwash in my model room. LOL (OK shameless plug, so sue me. :) ) Here is the completed interior prior to closing it up in the fuselage. Seatbelts are just tape. The bladder is an old Cutting Edge offering. I think the Cobra Company may have this in their line now. I replaced the grossly oversized seat supports with needles. Quote Link to post Share on other sites
rotorwash Posted February 20, 2010 Share Posted February 20, 2010 Lookin' good, Floyd. Great to see another Huey in the making! Ray Quote Link to post Share on other sites
marine4 ever Posted February 20, 2010 Share Posted February 20, 2010 Nice!!!!! Semper fi Dan Quote Link to post Share on other sites
Hueyrob Posted February 20, 2010 Share Posted February 20, 2010 (edited) Hey Floyd, looks good. One thing that caught my eye: The pitch of the instrument panel seems to be to big. I'd rather pull the dashboard a bit upward so it stands in a more vertical way. Looking forward to see you bird done! Cheers, ROB P.S.: Found anything??? Edited February 20, 2010 by Hueyrob Quote Link to post Share on other sites
Floyd S. Werner, Jr. Posted February 20, 2010 Author Share Posted February 20, 2010 (edited) Hey Floyd,looks good. One thing that caught my eye: The pitch of the instrument panel seems to be to big. I'd rather pull the dashboard a bit upward so it stands in a more vertical way. Looking forward to see you bird done! Cheers, ROB P.S.: Found anything??? You are correct on the instrument panel, but it is too late. Once inside it will be hard to notice. The mounting points for the Italeri instrument panel (and Panda's) leaves a lot to be desired. LOL As for the German Huey photos, I didn't have any. Some Bo-105s but that is it. Ray is scanning them in now for me. Sorry I couldn't help. Floyd Edited February 20, 2010 by Floyd S. Werner, Jr. Quote Link to post Share on other sites
shark 64 Posted February 21, 2010 Share Posted February 21, 2010 Hi Floyd. I see you are off to a great start. Another Huey....I love it. I really like your seats. We need a special page just for Hueys. Oliver Quote Link to post Share on other sites
salvador001 Posted February 22, 2010 Share Posted February 22, 2010 Great Huey Floyd, my 1:35 H is on the way too.. we need to make a ``only huey group build´´ what do you say? Greets. Rod. Quote Link to post Share on other sites
Avus Posted February 22, 2010 Share Posted February 22, 2010 Great work so far, Floyd! I'll be following with interest. Quote Link to post Share on other sites
Andrew Doppel Posted February 22, 2010 Share Posted February 22, 2010 Looking good Floyd. Need to get me some of those armoured seats too otherwise I'll have to scratch them for when I finally do my RAAF D Bushranger. regards Andrew Quote Link to post Share on other sites
Floyd S. Werner, Jr. Posted February 22, 2010 Author Share Posted February 22, 2010 Great Huey Floyd, my 1:35 H is on the way too.. we need to make a ``only huey group build´´ what do you say?Greets. Rod. I've elected to hold off on my 1/35th scale Huey for a while. Too much work for me right now. I have to get this done and a 109 before I get to build what I've wanted to build for quite some time, AH-1F Cobras. LOL I think there will be a Vietnam group build shortly that I'm in charge of. I'm sure I'll need help and support for that but it should be cool. Huey, Cobras, Loaches, Chinooks and a bunch of others. Floyd Quote Link to post Share on other sites
hooknladderno1 Posted February 22, 2010 Share Posted February 22, 2010 Floyd, Great work as usual. Look forward to seeing this project progress. David Quote Link to post Share on other sites
norbert Posted February 22, 2010 Share Posted February 22, 2010 Hi Floyd this is nice ! i love the fabric structure on the seats norbert Quote Link to post Share on other sites
arkhunter2002 Posted February 23, 2010 Share Posted February 23, 2010 Looking good Floyd. I'm taking notes for my Huey build... Take care, Austin Quote Link to post Share on other sites
Floyd S. Werner, Jr. Posted February 25, 2010 Author Share Posted February 25, 2010 Here is an update prior to going to the primer shop. The white resin and PE parts are from Fireball Modelworks. They are from Fireball so need I say more, they fit perfectly. I scribed some panel lines, most noteably the electrical compartment in the nose. I also rivetted some of the aircraft like the tailboom and nose. All the clear parts fit well. It will be closed up completely so you won't be able to see a whole lot inside. I'd have to say that I would 'have' to buy the Fireball Modelworks set. The PE tie downs and hell hole are essential for any version of the Huey. Of course if you are doing a post Vietnam aircraft then you NEED the APR-39 mounts and the heat shield for the oil cooler on the bottom. Floyd Quote Link to post Share on other sites
salvador001 Posted February 26, 2010 Share Posted February 26, 2010 Looking nice Floyd, but why dont you put the Fireball Modelworks Cutting cables? those that come with the kit are horrible... Cant wait to see it done. Rod. Quote Link to post Share on other sites
Avus Posted February 26, 2010 Share Posted February 26, 2010 Great progress, Floyd! Keeps coming along splendidly. Quote Link to post Share on other sites
Floyd S. Werner, Jr. Posted February 26, 2010 Author Share Posted February 26, 2010 Looking nice Floyd, but why dont you put the Fireball Modelworks Cutting cables? those that come with the kit are horrible... Cant wait to see it done. Rod. The only reason was that I will have to ship this model to Alabama and the plastic parts will be more secure. I agree the Fireball WSPS are much nicer but this was a durability issue. Floyd Quote Link to post Share on other sites
salvador001 Posted February 26, 2010 Share Posted February 26, 2010 Oh, i see... Rod. Quote Link to post Share on other sites
Floyd S. Werner, Jr. Posted March 13, 2010 Author Share Posted March 13, 2010 OK finally had some time to put some paint on this thing. I'm pretty happy. My instructions were to beat it up but good. This is just with paint. I still have to apply the filters after I get the decals on so that will change the looks some more. I have to get going on the blades so maybe I'll do that tonight. Note the replacement copilot's window. I can't wait to see how that looks when the masks are removed. It isn't my best model but it is coming along nicely. Sorry for the poor picture quality. Floyd Quote Link to post Share on other sites
Chief Snake Posted March 13, 2010 Share Posted March 13, 2010 OK finally had some time to put some paint on this thing. I'm pretty happy. My instructions were to beat it up but good. This is just with paint. I still have to apply the filters after I get the decals on so that will change the looks some more. I have to get going on the blades so maybe I'll do that tonight. Note the replacement copilot's window. I can't wait to see how that looks when the masks are removed. It isn't my best model but it is coming along nicely. Sorry for the poor picture quality. Floyd A built model is a GREAT model! Chris M aka Chief Snake Quote Link to post Share on other sites
huey_crew_chief Posted March 13, 2010 Share Posted March 13, 2010 WOW! She is a sexy beastie! The owner is very lucky! Quote Link to post Share on other sites
salvador001 Posted March 14, 2010 Share Posted March 14, 2010 That Huey is beautiful, congrats. Rod. Quote Link to post Share on other sites
shark 64 Posted March 14, 2010 Share Posted March 14, 2010 (edited) Fantastic. I like the different replacement parts with different shades of green. Great work Floyd. Nice weathering too. Oliver Edited March 14, 2010 by shark 64 Quote Link to post Share on other sites
11bee Posted March 14, 2010 Share Posted March 14, 2010 Looking very nice. Fantastic job on the painting. Looks like some of those old birds that I saw sitting in storage up in Bangor, ME a while ago. Quote Link to post Share on other sites
arkhunter2002 Posted March 14, 2010 Share Posted March 14, 2010 Outstanding paint job Floyd! Take care, Austin Quote Link to post Share on other sites

Recommended Posts
Join the conversation
You can post now and register later. If you have an account, sign in now to post with your account.