homerojr Posted June 18, 2010 Share Posted June 18, 2010 Oh Jesus, what a marvelous job! Keep us posted! ;) Best regards from Brazil! Quote Link to post Share on other sites
Kev67 Posted June 18, 2010 Share Posted June 18, 2010 Thanks, KevinI tried last night, but every time I remove a blade, the plasticine deforms a little. I'll try something similar out of styrene, following your useful tip. Euge Its nice to help a fellow modeller, as they say you have to try these things even if they do not work Quote Link to post Share on other sites
trpsarge Posted June 19, 2010 Share Posted June 19, 2010 Its nice to help a fellow modeller, as they say you have to try these things even if they do not work Drill out the base or each blade and insert some brass rod... instant variable pitch blades..dead reckoning after that. Quote Link to post Share on other sites
72linerlover Posted June 21, 2010 Author Share Posted June 21, 2010 Good day, sirs. So, this is what I did. Based on Kevin's advise, I chose a pitch, made the support for the first blade, adjusted in height. Rotating the hub I will find the same conditions for the further blades. Seems to work. @ homerojr, thanks for your kind words. Regards Euge Quote Link to post Share on other sites
Phatsamurai Posted July 5, 2010 Share Posted July 5, 2010 Good day, sirs.So, this is what I did. Based on Kevin's advise, I chose a pitch, made the support for the first blade, adjusted in height. Rotating the hub I will find the same conditions for the further blades. Seems to work. @ homerojr, thanks for your kind words. Regards Euge that is a damn good idea, added to the mental filing cabinet Quote Link to post Share on other sites
72linerlover Posted August 11, 2010 Author Share Posted August 11, 2010 So, my friends, after a long period of other works to attend to, I am back to this project. I managed to rescribe the wing and to prepare other parts like the little slotted surfaces for the flaps and those little fairings for the actuators. Template for rescribing the lower wing surface Upper right wing rescribed and assembly test Ailerons hinges seem to be on the right place General view Wing and fuselage seem to be OK together I am leaving next Friday for a two weeks holiday in Austria. See you in September. Thanks for watching Regards Euge Quote Link to post Share on other sites
oldHooker Posted August 12, 2010 Share Posted August 12, 2010 Nice seeing you again Euge, Absolutely stunning work you're doing here... I've said it before but I'll say it again, this type of work is a dying art; too many aftermarket alternatives now days, but no amount of aftermarket can replace the sheer joy of fabricating material with your hands! Outstanding!! Look forward to seeing the updates... have a great trip! Take care, Frank Quote Link to post Share on other sites
Rich in name only Posted August 15, 2010 Share Posted August 15, 2010 Hi all, Joined ARC just because of this--was Googling for DC-7 info. I have at least 10 Heller 6Bs/C-118s, mostly from daydreaming about conversions. Flew on Eastern N836D last weekend---first flight on anything was a Delta DC-7. This is a great job and Euge's work is fantastic. One note about a comment (speed brakes): actually the main landing gear was the speed brake. Prop-liners descended at a shallow rate. As the later models had higher service ceiling, Douglas came up with the idea in order to reduce the time the passengers were in turbulent air. So the doors were open but that was so the gear could be down. Nose gear stayed up. I've seen a film but will have to check--I think it's on a DVD but check around. Great job Euge! Quote Link to post Share on other sites
Anthony in NZ Posted August 15, 2010 Share Posted August 15, 2010 This is truly inspiring work. I just love that flap work................beautiful! Cheers Anthony Quote Link to post Share on other sites
Glidingbob Posted August 18, 2010 Share Posted August 18, 2010 One of my gliding club mates is a former SABENA chief pilot with many hours on DC-7C. It's always a pleasure to hear him telling anecdotes about it especially the complxity of the engines and the way to destroy them by bad handling. I flew in it two times in chilhood when coming back from Congo. Still fascinating bird; YOUR MODEL IS TRULY BEAUTIFUL! Keep it that way and I look forward to see it completed Bob Quote Link to post Share on other sites
72linerlover Posted October 18, 2010 Author Share Posted October 18, 2010 Thanks you all friends for the comments. Just a quick update regarding the horizontal tailplanes Once adjusted the thickness difference between the tailplanes and their farings in the fuselage and glued in, I made the hinges for the movable surfaces. I was afraid that a piece of plastic could have been too weak, so I drilled three little holes, glued inside a piece of brass rod, than covered on both sides with thin strips styrene. The parts stay in place without glue, so I think they are ok, from a dimensional point of view. Thanks for watching Regards Euge Quote Link to post Share on other sites
pttaa Posted November 15, 2010 Share Posted November 15, 2010 How come i missed this build??? Congra Euge your work is unbelievable!!!! Quote Link to post Share on other sites
Spruemeister Posted December 2, 2010 Share Posted December 2, 2010 This is an outstanding piece of modelling, Euge. Hope you are making progress and can keep us up to date! Rick L. Quote Link to post Share on other sites
72linerlover Posted December 3, 2010 Author Share Posted December 3, 2010 Thanks, spruemeister and pttaa for your comments. Unfortunately I had a difficult time due to my old mother, but things are better now and I hope to come back to modeling more intensively. Regards Euge Quote Link to post Share on other sites
TXCajun Posted December 17, 2010 Share Posted December 17, 2010 Some would call your attention to detail "rivet counting", but I consider it a classic example of old-school scratch/conversion work. Excellent work and very inspirational! Thanks so much for sharing this with us! Regards, Stew Quote Link to post Share on other sites
Jennings Posted December 17, 2010 Share Posted December 17, 2010 Wow!! Quote Link to post Share on other sites
72linerlover Posted December 17, 2010 Author Share Posted December 17, 2010 Hi, mates. Actually I've never considered myself a "rivet counter" and I don't like excessive detailing. I just try to make decent models so that, when I look at them on my shelf, I can't say: I could have done it better, but I haven't. As for scratch building, in this case there wasn't alternative and, I admit, it makes fun. You know, I choose the subjects for my projects in an emotional way, and in several cases there aren't kits (normally they come on the market when I have almost finished, but this is another story). I really hope to have more time for modeling: more than those 2 or 3 hours a week to bring to the end this project. I owe it you, my friends, since the big motivation you all give to me. Thank you. Euge Quote Link to post Share on other sites
72linerlover Posted December 20, 2010 Author Share Posted December 20, 2010 Hallo. I was lucky last week having time to attach the oil coolers. It took a lot of time filling and smoothing because of the bad fit of resin parts, but I have to complain only with myself. The small oil cooler flaps seem to fit better. Bye Euge Quote Link to post Share on other sites
garcor Posted February 23, 2011 Share Posted February 23, 2011 Hi Euge, Any update? , Was enjoying following this build..... Gary Quote Link to post Share on other sites
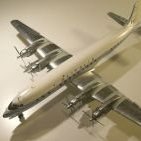
72linerlover Posted July 7, 2011 Author Share Posted July 7, 2011 Hi, friends. Although it could seem impossible, I have got to get back to this project, after another little build for the "On Canadian Wings" GB. Here some pics from the past month works, regarding the engines, the propellers and the decal. engines, propeller blades, spinners, noses, cowlings engine and cowling test assembly of the first propeller the decal artwork and some testing here and there. Thank for watching Regards Euge Quote Link to post Share on other sites
HOLMES Posted July 10, 2011 Share Posted July 10, 2011 Euge, Nice inspiring work..I MISSED this one...Great work.. Can't wait for the finish.. Keep up the good work HOLMESY Quote Link to post Share on other sites
Drifterdon Posted August 6, 2011 Share Posted August 6, 2011 Superb workmanship Euge! Can't wait to see how this one turns out. It really looks the part. Don Quote Link to post Share on other sites
pttaa Posted August 11, 2011 Share Posted August 11, 2011 Amazing, I'm speechless! Quote Link to post Share on other sites
72linerlover Posted November 4, 2011 Author Share Posted November 4, 2011 Hi, friends. The old lady is in the paint shop. Lot of masking, painting, unmasking, painting and so on. Hope to lay down the enamel base for the further aluminum next week end. Regards Euge Quote Link to post Share on other sites
DonSS3 Posted November 4, 2011 Share Posted November 4, 2011 I just came across this thread this morning, as others have said, WOW! VERY nice. Looking forward to future updates! Quote Link to post Share on other sites

Recommended Posts
Join the conversation
You can post now and register later. If you have an account, sign in now to post with your account.