Shahar Levi Posted September 15, 2010 Share Posted September 15, 2010 Incredible fine job! Simply stunning!! If I may ask, how did you make the pitot tube movable? Quote Link to post Share on other sites
haneto Posted September 15, 2010 Author Share Posted September 15, 2010 If I may, what were the circumstances of the engagement. Why did a Chinese MiG shoot down an F-4 (that is assuming it was, Chinese). Not all pilots flying MiG's in Korea were Chinese or Korean, and rumor has it that the same went for some of the pilots flying MiG's in North Vietnam. The J-6 shot down the F-4C belonged to Chinese Navy Airforce 6th Division 16th regiment. The Phantom(63-7577)was shot down over Lingshui,Hainan Island,China,as I mentioned in text. And of course,the J-6 pilot,was a Chinese Navyman. I posted a thread in order to look for the shot down crew of the Phantom who were both rescued but nothing found. Looking for pictures/info of F-4C 63-7577, The Phantom shot down by PLANAF I also found some confirmations via Internet: PRC/Chinese Air-to-Air Victories since 1950 Also here Incredible fine job! Simply stunning!! If I may ask, how did you make the pitot tube movable? Well,it's hard to explain but easy to make. I draw a scetch and hope to be helpful. :lol: Cheers, Yufei Quote Link to post Share on other sites
toniosky Posted September 15, 2010 Share Posted September 15, 2010 Awesome! Awesome! Awesome! I want more pictures !!! Quote Link to post Share on other sites
Superheat Posted September 15, 2010 Share Posted September 15, 2010 "Sorry,Shark.But Farmer maybe too small to show details in 1/72 I'm afraid." Yeah, right, Haneto. We've all noticed that on your previous builds! You, sir, could do it in 144th - or smaller - I have no doubt. Great work as always. Bowing humbly in your direction, Tom Quote Link to post Share on other sites
Tripio Posted September 16, 2010 Share Posted September 16, 2010 Hello Yufei, when it is not a secret,can you tell me please how much research job you are doing before your builds? Your attention to the details is unbelievable.I suppose your builds became very life-like because of this research job (apart from the great skills you have...) :) All details are on the right place with the reight measurements in the right colour... Can't believe this. Regards,Laz Quote Link to post Share on other sites
haneto Posted September 17, 2010 Author Share Posted September 17, 2010 "Sorry,Shark.But Farmer maybe too small to show details in 1/72 I'm afraid."Yeah, right, Haneto. We've all noticed that on your previous builds! You, sir, could do it in 144th - or smaller - I have no doubt. Great work as always. Bowing humbly in your direction, Tom My honor. Hello Yufei,when it is not a secret,can you tell me please how much research job you are doing before your builds? Your attention to the details is unbelievable.I suppose your builds became very life-like because of this research job (apart from the great skills you have...) All details are on the right place with the reight measurements in the right colour... :blink: Can't believe this. Regards,Laz Thanks for your words,Laz. There's no special skills need but only patience and passion to your subject. Actually,my favourite part of modelling is collecting references. And this time one J-6 happened to be near my home so I can study it thoroughly. It's always better to take a walk around the real plane. Not only check the details,but also feel its weight,size and texture. I even sit into the J-6 cockpit though it's totally worn out and very dirty. That keeps my motivation. Cheers, Yufei Quote Link to post Share on other sites
JB2013 Posted September 18, 2010 Share Posted September 18, 2010 (edited) I don't like to say this here friend but your J-6 pictures are gone. Edited September 18, 2010 by Jack Bogart Quote Link to post Share on other sites
Antoine Posted September 19, 2010 Share Posted September 19, 2010 Wonderful work! Quote Link to post Share on other sites
viperbite Posted September 19, 2010 Share Posted September 19, 2010 多谢兄弟!I cannot access SM from my office but still thanks a lot for the comment both here and there.We're planning a model geeks party during National Day holidays in Shanghai. Do you have any friends who can lend the place? ...If it was last year... but... anyway, can you count me in? Quote Link to post Share on other sites
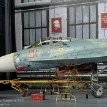
haneto Posted September 24, 2010 Author Share Posted September 24, 2010 Some updates since my return from Tokyo yesterday. Since there's no tire trace on the original plastic parts,I have to rescribe them all. I used cut masking tape for guide,dig some small holes for the rescribing giude. Landing gears finished. Some copper/soldering tin lines are used for wiring. Small antennas are scratch-built. So next will be painting,finally,my favourite part. :) Thanks for watching! Yufei Quote Link to post Share on other sites
haneto Posted September 24, 2010 Author Share Posted September 24, 2010 ...If it was last year... but... anyway, can you count me in? No prob! I'm still searching for the proper place,maybe Aero Space Center? A bit far for you guys though... Quote Link to post Share on other sites
LanceR21 Posted September 24, 2010 Share Posted September 24, 2010 So next will be painting,finally,my favourite part. Thanks for watching! Yufei Great job so far! Can't wait to see this MiG painted! Cheers, Nenad Quote Link to post Share on other sites
haneto Posted September 28, 2010 Author Share Posted September 28, 2010 Thanks,Nenad! I've started spraying surfacer on it,and we'll have a 7-days long vocation(National Day)in China mainland so I hope to finish it very soon! Cheers, Yufei Quote Link to post Share on other sites
haneto Posted October 6, 2010 Author Share Posted October 6, 2010 New progress these days. Mr.Color #1200 surfacer first. Then sand the surface with #2000 sand paper for a smoother surface. The result,not very obvious from the pic though. All parts surfacered. Gloss black for metal primer. First colour,metal black for the huge 30mm guns(or cannons?). Close shot. Quote Link to post Share on other sites
haneto Posted October 6, 2010 Author Share Posted October 6, 2010 The main colour is mixed by Mr.Color SM06 Chrome silver:#8 Silver=4:1 Sprayed. The metal effect is too much,yes I know. What I wanna gain is the extreme neat metal effects any way. Then spray SM04 super iron for the anti-gun flare area. Notice:all MiGs are painted in silver,not in NMF. So this area is also painted,but not due to different metal material. Also here and here. After drying,decaling! The decal was frontpennt studio's products. Just top notch! Quote Link to post Share on other sites
haneto Posted October 6, 2010 Author Share Posted October 6, 2010 Then spray semi-gloss coating to protect the decals before washing. Some high-shining areas shall be protected by masking tape slices. All metal parts coated with semi gloss. I mixed Tamiya enamel colours for washing. black:white:brown=4:2:2 During washing. Washing finished. Then appy the colour for landing gears/gear bays/airbrake bays,etc. #337 Blueish gery Quote Link to post Share on other sites
dragan_mig31 Posted October 6, 2010 Share Posted October 6, 2010 :jaw-dropping: Quote Link to post Share on other sites
haneto Posted October 6, 2010 Author Share Posted October 6, 2010 Accident!! Decal destroyed by the masking tape....SH*T! Use masking tape to clear the left decal. Do it once again. To obtain the Soviet style matt dull aluminum effect,matt coating sprayed. And all parts washed. So the plane is finished. I will find some time to take photos of it. Thanks for watching! Cheers, Yufei Quote Link to post Share on other sites
Andre Posted October 6, 2010 Share Posted October 6, 2010 Awesome! Cheers, Andre Quote Link to post Share on other sites
Tripio Posted October 6, 2010 Share Posted October 6, 2010 Hello Yufei, nice repair job with the decal. It looks awesome.MiG-19 and its variants are one of my favourite airplanes...I can tell you that all of the details are on the right place in the right size. Very nice,I love it. Regards,Laz Quote Link to post Share on other sites
LanceR21 Posted October 6, 2010 Share Posted October 6, 2010 ... Quote Link to post Share on other sites
D_IcarUS_ Posted October 6, 2010 Share Posted October 6, 2010 Bravo, Sir!!! Great job!!! Quote Link to post Share on other sites
Eastern Posted October 6, 2010 Share Posted October 6, 2010 Damn!! How the heck could I miss it before??? Yufei, this is really fantastic build! A real stunner. Great scribing and painting job! Great attention to the details! And yet, you are closer and closer to the only true scale...of course, I mean 1/32! :P Cheers and happy modeling! Alexander. Quote Link to post Share on other sites
haneto Posted October 7, 2010 Author Share Posted October 7, 2010 Thanks for your input,guys! I'd reallt like to start with the 1/32 version of MiG-19,Alexander. But the basic kit is just too poor and finally I regard it not worth the time and effort,so 1/48 this time.:) I'm looking forward to receiving the 1/32 Ta-152 from Zoukeimura though,BTW.:) So some final touch up here. Scratch-build the borading ladder with 0.5mm brass rods. Release it from the 2-sided tape with a new sharp razor blade. And finally painted,weathered with the engine nozzle covers. Poor pic quality,sorry.I'll take formal ones recently. Count down for the final photos online.:) Cheers, Yufei Quote Link to post Share on other sites
POMPEO Posted October 7, 2010 Share Posted October 7, 2010 its beautifull, awesome job, congratulations cheers Quote Link to post Share on other sites

Recommended Posts
Join the conversation
You can post now and register later. If you have an account, sign in now to post with your account.