Sebastijan Posted January 10, 2012 Share Posted January 10, 2012 (edited) Finally got everything I need for my second GB model. Will probably start building her on Monday. Edited February 15, 2012 by Sebastijan Quote Link to post Share on other sites
2qwik4u Posted January 10, 2012 Share Posted January 10, 2012 Sweet. Which one are you doing? I'll be doing one of those from the 1/72 sheet. Quote Link to post Share on other sites
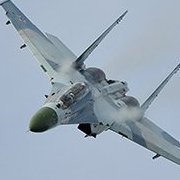
Sebastijan Posted January 10, 2012 Author Share Posted January 10, 2012 yeah these one is also 1:72. Very very likely an old school Eagle from early '80s - there are 3 options but I haven't decided which one yet... Quote Link to post Share on other sites
Benner Posted January 11, 2012 Share Posted January 11, 2012 yeah these one is also 1:72. Very very likely an old school Eagle from early '80s - there are 3 options but I haven't decided which one yet... I vote for the DS option. :) Quote Link to post Share on other sites
Sebastijan Posted January 11, 2012 Author Share Posted January 11, 2012 I vote for the DS option. :) Not this time :D but I'll keep the decals and if you organize another DS GB, I promise I'll build one of the DS options ;) Quote Link to post Share on other sites
Sebastijan Posted January 13, 2012 Author Share Posted January 13, 2012 I've been playing a bit with PE today - seat and IP are just dryfitted Quote Link to post Share on other sites
cpoud117 Posted January 13, 2012 Share Posted January 13, 2012 Neat!! Quote Link to post Share on other sites
Sebastijan Posted January 17, 2012 Author Share Posted January 17, 2012 cockpit finished... Quote Link to post Share on other sites
Grenadier37 Posted January 18, 2012 Share Posted January 18, 2012 Nice work Sebastijan! Quote Link to post Share on other sites
Sebastijan Posted January 19, 2012 Author Share Posted January 19, 2012 thanks mate! Fuselage assembled... Quite tricky fit around the intakes with such a breakdown but I think I've managed to tame it quite well and have only little seams to clean Quote Link to post Share on other sites
jester292 Posted January 20, 2012 Share Posted January 20, 2012 Looking good. Aaron Quote Link to post Share on other sites
markmarples Posted January 20, 2012 Share Posted January 20, 2012 looking cool, silly question i know but what scale is this? Quote Link to post Share on other sites
Sebastijan Posted January 20, 2012 Author Share Posted January 20, 2012 thanks guys mark 1:72 Quote Link to post Share on other sites
Sebastijan Posted January 20, 2012 Author Share Posted January 20, 2012 not much work done today... was cleaning seams a bit and cut the flaperons from the wings as they seem to drop every time the engines are shut down. more progress next week! Quote Link to post Share on other sites
Big Daddy Posted January 20, 2012 Share Posted January 20, 2012 not much work done today... was cleaning seams a bit and cut the flaperons from the wings as they seem to drop every time the engines are shut down. more progress next week! Great work! What do you use as a cutter? BD Quote Link to post Share on other sites
Sebastijan Posted January 20, 2012 Author Share Posted January 20, 2012 (edited) Thanks BD! I've used BareMetal scriber for the inner line and CMK ultrafine razorsaws for the vertical lines Edited January 20, 2012 by Sebastijan Quote Link to post Share on other sites
Deacon Posted January 20, 2012 Share Posted January 20, 2012 Nice work so far mate. Looking forward to the next update. Deacon Quote Link to post Share on other sites
Bigasshammm Posted January 20, 2012 Share Posted January 20, 2012 That cockpit pe work is splendid. Do you have a bender or how do you do that? I have the hardest time bending pe and am too cheap to buy the bender. Quote Link to post Share on other sites
markmarples Posted January 20, 2012 Share Posted January 20, 2012 thanks for getting back to me, looking good mate Quote Link to post Share on other sites
Sebastijan Posted January 22, 2012 Author Share Posted January 22, 2012 for bending PE parts I use tweezers of different kind, metal rulers and even sprue cutters. Quote Link to post Share on other sites
Sebastijan Posted January 23, 2012 Author Share Posted January 23, 2012 Eagle got the wings... slowly getting to the painting stage... Quote Link to post Share on other sites
Sebastijan Posted January 24, 2012 Author Share Posted January 24, 2012 instrument panel coaming with the HUD is finished and I've attached the flaperons Quote Link to post Share on other sites
Pete Posted January 26, 2012 Share Posted January 26, 2012 Looking good, Seb! Can't wait to see some paint on it. :) One thing, though. Wouldn't it be easier to paint the camo on the inside of the vertical tails when they're not on the model yet? Quote Link to post Share on other sites
Sebastijan Posted January 26, 2012 Author Share Posted January 26, 2012 Looking good, Seb! Can't wait to see some paint on it. :) One thing, though. Wouldn't it be easier to paint the camo on the inside of the vertical tails when they're not on the model yet? thanks Pete! yeah it would, but the dryfit showed I had to use some putty on the tail to fuselage join. Quote Link to post Share on other sites
Scott R Wilson Posted January 26, 2012 Share Posted January 26, 2012 thanks Pete! yeah it would, but the dryfit showed I had to use some putty on the tail to fuselage join. A lot of guys leave seams at the vertical tail to fuselage join, and there shouldn't be a seam at all. Sebastijan, you're doing a nice job! Quote Link to post Share on other sites

Recommended Posts
Join the conversation
You can post now and register later. If you have an account, sign in now to post with your account.