Check Six Posted February 18, 2014 Share Posted February 18, 2014 Exactly. Patience is a virtue that I need to work on. My way of doing it is much more 'relaxing'. LOL Floyd Is this baby going to have an LED or two showing off the interior ?! Progress is looking great, BTW . Quote Link to post Share on other sites
Youngtiger1 Posted March 7, 2014 Share Posted March 7, 2014 Can't let this get to far behind...so, friendly bump and hoping for another update soon :rolleyes:/> Mike Quote Link to post Share on other sites
Floyd S. Werner, Jr. Posted March 7, 2014 Author Share Posted March 7, 2014 Can't let this get to far behind...so, friendly bump and hoping for another update soon :rolleyes:/>/> Mike Thanks. I had to build a 1/72nd scale AH-1F for review. I was only seven months behind. LOL I'm almost finished with that then it is back on this. Although the Live Resin weapons have arrived. I've also got most of the things I need for the cargo area. Just need to find two more folding chairs from the Tamiya Command Group figure set. Anybody have that set that they'd like to sell? Floyd Quote Link to post Share on other sites
Twig Posted March 7, 2014 Share Posted March 7, 2014 Hi Floyd, Great job on tackling the soundproofing, especially around the windows. I remember that being quite tricky on my build too. I also think your approach to doing each sides soundproofing is a good one. I tired to do it like the real thing and in one piece across the cabin from the top of each seat rail…… very hard to do and not recommended! You're certainly crafting a fine representation of a chinook interior! Craig Quote Link to post Share on other sites
Check Six Posted March 10, 2014 Share Posted March 10, 2014 Thanks. I had to build a 1/72nd scale AH-1F for review. I was only seven months behind. LOL I'm almost finished with that then it is back on this. Although the Live Resin weapons have arrived. I've also got most of the things I need for the cargo area. Just need to find two more folding chairs from the Tamiya Command Group figure set. Anybody have that set that they'd like to sell? Floyd Did you post said question in the Spare Parts forum? Quote Link to post Share on other sites
Live-Resin Posted March 10, 2014 Share Posted March 10, 2014 Live Resin CH-47 Chinook weapons and mounts for all 1/35 CH-47 including Floyd project You can order right now http://models-hobby.com/?p=3 LRE35168 CH47 Chinook Back Ramp Weapon Mount with M240D LRE35167 CH47 Chinook Window Weapon hand made Mount with M240D Quote Link to post Share on other sites
Live-Resin Posted March 10, 2014 Share Posted March 10, 2014 LRE 35164 CH47 Chinook Window M134D Minigun mount LRE35163 CH47 Chinook Door M134D Minigun mount Quote Link to post Share on other sites
Floyd S. Werner, Jr. Posted March 10, 2014 Author Share Posted March 10, 2014 (edited) Did you post said question in the Spare Parts forum? Nope but I will, thanks The Live Resin stuff is absolutely gorgeous. Floyd Edited March 10, 2014 by Floyd S. Werner, Jr. Quote Link to post Share on other sites
RedCrown Posted March 11, 2014 Share Posted March 11, 2014 Did you ship this latest release to Sprue Brothers yet? I already have an account set up with them, so I would prefer to order from them. Thanks, Rick Quote Link to post Share on other sites
RedCrown Posted March 11, 2014 Share Posted March 11, 2014 Live Resin CH-47 Chinook weapons and mounts for all 1/35 CH-47 including Floyd project You can order right now http://models-hobby.com/?p=3 LRE35168 CH47 Chinook Back Ramp Weapon Mount with M240D LRE35167 CH47 Chinook Window Weapon hand made Mount with M240D Did you send your latest release to SprueBrothers yet? Thanks, Rick Quote Link to post Share on other sites
Live-Resin Posted March 17, 2014 Share Posted March 17, 2014 Hello Rick, not yet, I will try to contact with Spruebrothers today Quote Link to post Share on other sites
Check Six Posted March 17, 2014 Share Posted March 17, 2014 Man; That Live Resin hardware is awesome ! They will definitely compliment you build! Quote Link to post Share on other sites
otis252 Posted March 17, 2014 Share Posted March 17, 2014 That Live-Resin stuff sure looks great. Anyone know the hold up on getting the stuff to Sprue Brothers? Can't wait to order it. Chuck Quote Link to post Share on other sites
Live-Resin Posted March 23, 2014 Share Posted March 23, 2014 Parcels to Spruebrothers is sent, I hope no more than ten days as it will be received Quote Link to post Share on other sites
Floyd S. Werner, Jr. Posted March 28, 2014 Author Share Posted March 28, 2014 (edited) Just an FYI, the Live Resin set for the M-134s only comes with one ammo can, not two as shown. You'll need the spare ammo cans. By the way, ordering direct from them even with shipping is as good, if not better, than ordering from Sprue Brothers and they are always in stock. Floyd Edited March 28, 2014 by Floyd S. Werner, Jr. Quote Link to post Share on other sites
Loach Driver Posted April 6, 2014 Share Posted April 6, 2014 This little article is quite interesting. http://deepbluehorizon.blogspot.ie/2013/02/the-fish-food-express-and-other-secret.html LD. Quote Link to post Share on other sites
Floyd S. Werner, Jr. Posted April 6, 2014 Author Share Posted April 6, 2014 I just added one of my conversions on eBay for those interested. Still debating another run, but there is enough people interested that I put up my extra one for sale. Floyd Quote Link to post Share on other sites
Floyd S. Werner, Jr. Posted April 14, 2014 Author Share Posted April 14, 2014 Update 12 Sorry it has been a while since I updated. Medical and family issues are the typical detractors. I also had to finish a review build in there, but now I’m back on the build. I finally got both sides of the fuselage insulated. Overall I’m pretty happy with the results. I finally got the Eduard Photo Etch seats built. I built them too long but didn’t figure that out until after I was test fitting. Better now than when they are glued in. I tested my first bit of soldering on the legs. I was happy with the results. I need more practice though. Here is my second attempt at soldering, a Stokes litter completely scratch built. This was a fun six hour exercise. I learned a lot and will have to do it again. Yes I know it isn’t perfect, however, once filled up you can’t notice the framework. It just looks cool. I’m doing Razor 1 from Takur Gar and I’m not sure if the Stokes was used or a Skedco. For my model I will have a Stokes litter. Part of the MH-47E’s cabin area will be occupied with equipment. Here is a load of things I have set up for the model. This was a mild detraction and well spent time. I could not have gotten some of this stuff if it wasn’t for some friends on the internet who hooked me up with some of the items or at least pointed me in the right direction. Some of you will notice the folding chairs. I have a source that says they are used by the gunners. Should be interesting. I’ve learned a lot about this helicopter. I’ll try to point out the things that you’ll find cool too. So I’ll have a water cooler, tool box, four folding chairs, water cans, medical bags, back board, Stokes, stretchers (one folded and hanging and the other opened under the Stokes), two storage boxes, a couple of M-4s, four 40mm ammo cans which are used for the extra ammo for the M-134. Speaking of M-134s, Razor 1 did not have the extra battery pack or the extra M-134 can. They used the 40mm cans. While I’m thinking of it, Razor 1 also had an M-60 at the rear windows, not an M-249. Same mounts but different guns. Razor 1 also had a ramp M-60 with spade grips. I’ll make those additions as I go along. That reminds me of yet another point, 475 had a rectangular window on the right side and a round bulged window on the left. I will have to live with my two rectangular windows. Here are the seats with the seatbelts installed. I opted to make them all the low style, instead of over the shoulder. I did this thinking that operators would have a lot of crap and a shoulder strap would get caught on everything. I started to use the Eduard seatbelts but found that they couldn’t be folded realistically enough for me. So I made my own belts out of masking tape. This would have been easier if they weren’t a dark green color. Anyhow that was easy enough to handle with some paint. I liked the look of the seats and belts. Now if they will just fit as well as they look. Left side Right side In model building you can replicate or represent when scratchbuilding. In this instance I elected to represent the wiring and tubes. Solder or tubing was used to make the lines. I’m overall happy with the results. Andriy’s ramp area will replicate it but I just don’t have the time or patience for that. Here is a close up of the aft end with the caution and warning decals in place. The first aid kits look the part as does the ramp control which is a leftover cyclic. All these decals, plus more, will be available from Werner’s Wings in the Night Stalkers Part 2 decals. These decals were made for me by Joseph Osborn from Fireball Modelworks because I couldn’t wait for the new decals. By the way, they will definitely be available at the Nats. If you are building an 1/35th scale Werner’s Wings/Storm Miniatures MH-47E and want to get it done for the Nats, let me know. If I can get you the decals in time I will, but no promises. Here I’m test fitting the seats to see how they look in place. The tops still need to be folded down an secured in place. With that you are brought up to date. I’ll start the Live Resin bits soon. I want to finish the right side fuselage plumbing and wiring first. It is coming along and almost ready to join halves. This is getting exciting. I have to make notes for myself so I don’t forget to do stuff before I shut up the fuselage. I know a lot of this stuff won’t be seen again but I know its in there and as accurate as I can make it. Quote Link to post Share on other sites
doupnik Posted April 14, 2014 Share Posted April 14, 2014 Looking great Floyd! Those markings look great for the interior. Looking forward to more. mason Quote Link to post Share on other sites
11bee Posted April 14, 2014 Share Posted April 14, 2014 Great work Floyd. Interesting anecdote about the gunners using folding metal chairs, did they strap them down somehow? Also interesting about Razor 1 using M60's. Can't wait for more updates. Quote Link to post Share on other sites
MH-47E/G_Graduate Posted April 14, 2014 Share Posted April 14, 2014 All of the seat belts are the "lap" style. The only shoulder belts are on the pilot seats... The "shoulder look" on the troop seats is just for storage. 11bee, no the folding chairs do not get strapped to the floor. The crew dogs are secured to the helicopter via their "monkey tails." Both left and right side have the round "bulged" window on the second window from the aft. 475 had the rectangular window mod on the aft right window but not on the aft left. If you guys think I'm sharp shooting I apologize.... Floyd knows my motivation.... and, it's not critical. Just trying to help the project along. Quote Link to post Share on other sites
norbert Posted April 14, 2014 Share Posted April 14, 2014 Hi Floyd Nice to have an update norbert Quote Link to post Share on other sites
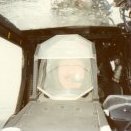
Floyd S. Werner, Jr. Posted April 15, 2014 Author Share Posted April 15, 2014 Update 13 Just a quick update. I installed the left side seats. I initially thought this was going to be a pain but it was actually pretty easy. I’m really happy with the seats on this side. Time to work on the other side. Here you can see how the decals, first aid kits, and hoist control add to the visual interest. How does it look from the outside? Pretty realistic if you ask me. Quote Link to post Share on other sites
Rotorman Posted April 15, 2014 Share Posted April 15, 2014 Yep, looks good from here. Nice job dude. Oliver Quote Link to post Share on other sites
MH-47E/G_Graduate Posted April 16, 2014 Share Posted April 16, 2014 Looking Great Floyd... keep it up. Quote Link to post Share on other sites

Recommended Posts
Join the conversation
You can post now and register later. If you have an account, sign in now to post with your account.