polar bear Posted August 4, 2014 Share Posted August 4, 2014 (edited) Hi, This is my first post here. I want to lower my stash. So, I pick up a Hasegawa F-16CJ block 50. This mold is over 20 years old. Many points need to be correct to match newer blocks. I want to build block 40 from 510 FS, tail code AV, ser.no. 88-0444 in Operation Odyssey Dawn 2011 money shot. To build block 40, I need a lot of afford to correct and improve some detail. I want my model come out with details like Academy's or Tamiya's Modern Hobbies provides a nice cockpit set, no PE involved. It fits like a gloves. I also modify canopy raising mechanism and fire control box behind the seat The only mistake of this cockpit set is the back wall is lean backward, not in vertical position. Some panel lines have to be corrected. Also add some panel line under nose area. And panel line at right back side. Fuel saddle bay panels are corrected to match C type. Fuel tank pressurize door (in circle) Edited August 14, 2014 by polar bear Quote Link to post Share on other sites
JackMan Posted August 4, 2014 Share Posted August 4, 2014 Wow, very good attention to detail. What are you using for reference? Thanks in advance. Quote Link to post Share on other sites
polar bear Posted August 4, 2014 Author Share Posted August 4, 2014 Hi, Mostly Jake's Modern Viper and Daco F-16 unexposed books. Some online source such as Viper FAQ in US IPMS is also useful. Quote Link to post Share on other sites
polar bear Posted August 4, 2014 Author Share Posted August 4, 2014 Add some panel lines in ventral area. Area around arresting hook The in-box gun panel is not correct. I fill and scribe. Flaps are cut and repositioned into 20 degree downward. Quote Link to post Share on other sites
polar bear Posted August 4, 2014 Author Share Posted August 4, 2014 Add GPS dome and nav light. Main under carriage well is from CMK, better detail than stock, but not the best. Exhaust is also CMK. Fit is well. Quote Link to post Share on other sites
polar bear Posted August 4, 2014 Author Share Posted August 4, 2014 One-piece intake is from CMK The fit is poor. Plastic sheet and epoxy putty are added to fill the gap. Do not forget the FOD guard in the intake. Quote Link to post Share on other sites
polar bear Posted August 4, 2014 Author Share Posted August 4, 2014 Add rivet on upper wing surface. Quote Link to post Share on other sites
Gene K Posted August 5, 2014 Share Posted August 5, 2014 Wow ... EXCELLENT! Perhaps you could add a little more verbal detail to your great pictures -- on your techniques. I'd be interested, for example, what you use to scribe. Thanks, Gene K Quote Link to post Share on other sites
polar bear Posted August 11, 2014 Author Share Posted August 11, 2014 (edited) Hi, Thanks for all comments. I'll try my best to do more explanation. I add a small inlet at rear starboard. And small outlet just behind the cockpit. Beer can antenna. Hasegawa stocks are glued under the wings. Real things are wrap around. Lightning strips on radome are replicated by thin plastic. Edited August 11, 2014 by polar bear Quote Link to post Share on other sites
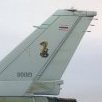
polar bear Posted August 11, 2014 Author Share Posted August 11, 2014 Vertical stabilizer The rudder base of this particular aircraft is modified the radio system to BLOS (Beyond Line Of Sight) Small inlet is deleted. Static wicks are added. Hasegawa‘s horizontal stab has a wrong panel line (arrow). That need to be filled. Antennae. Quote Link to post Share on other sites
polar bear Posted August 11, 2014 Author Share Posted August 11, 2014 My particular subject served as PSYOP in Odyssey Dawn . So, load out is brochure canisters, air-to-air weapons, jamming pod and gas bags. Wing tip pylons are replaced with LAU-129 for AMRAAM. Station 2/10 are AIM-9L on Modern Hobbies’ LAU-129 with AN/ALE-55 towing decoy . Station 3/9 are PDU-5 Leaflet bomb on hi-speed TER. I use Mk.20 cluster bomb from Hasegawa weapon set. Station 4/8 stock pylons need some surgery to update. I replace 370 gal tanks with Attack Squadron set due to better details. I have to make new tabs for pylons. Static wicks added. Quote Link to post Share on other sites
polar bear Posted August 11, 2014 Author Share Posted August 11, 2014 (edited) Add duct to no where.(sorry for bad pics) ECS exhaust scratched from plastic sheet. the original one was sand down during joining the one piece intake to fuselage. More details on ventral area. I use Master model pitot and AOA probes. Pitot tube does not fit properly so I need a plastic sheet as spacer. AOA probes are nice. Replacing the kit intake with CMK intake causes stock NLG door not fit. I need to use CMK NLG door as well. Taxi lights are added. MLG wheels are from Academy. They have better brake details. So, it is ready for paint booth. Edited August 11, 2014 by polar bear Quote Link to post Share on other sites
mario krijan Posted August 11, 2014 Share Posted August 11, 2014 Great work!!! Fantastic! Quote Link to post Share on other sites
KRI76 Posted August 13, 2014 Share Posted August 13, 2014 This F-16 looks AMAZING! /Kristian Quote Link to post Share on other sites
polar bear Posted August 13, 2014 Author Share Posted August 13, 2014 Thanks KRI76 and Mario. Quote Link to post Share on other sites
Ruud Posted August 13, 2014 Share Posted August 13, 2014 Great work PB! Quote Link to post Share on other sites
Joel_W Posted August 13, 2014 Share Posted August 13, 2014 What an amazing build especially for 1/72 scale. Your working knowledge of the F16 down to the smallest details, just makes this a special build to follow. Joel Quote Link to post Share on other sites
polar bear Posted August 14, 2014 Author Share Posted August 14, 2014 (edited) Thanks to Joel_W and Ruud To UKPonchoMan, I try to PM you but failed. Your inbox might be full. But the answer is YES. I am really appreciate your offering. My references show Block 40s do not have these stiffener plates So, they have to go. Edited August 14, 2014 by polar bear Quote Link to post Share on other sites
polar bear Posted August 14, 2014 Author Share Posted August 14, 2014 Prime time!! I use GSI Mr. Surfacer 1500 for priming. It has smallest grain I ever use. Small panel lines and rivets are not overfilled. Quote Link to post Share on other sites
UKPonchoMan Posted August 14, 2014 Share Posted August 14, 2014 How do you spray your Surfacer Nat - I guess you thin it, but with what and at what ratio? Quote Link to post Share on other sites
polar bear Posted August 14, 2014 Author Share Posted August 14, 2014 I usually thin surfacer in the ratio of 1:3 - 1:2. (Consistency of milk) Quote Link to post Share on other sites
polar bear Posted August 15, 2014 Author Share Posted August 15, 2014 (edited) Paint's on. Panel line wash, initial weathering and clear coat for decaling. Edited August 15, 2014 by polar bear Quote Link to post Share on other sites
polar bear Posted August 15, 2014 Author Share Posted August 15, 2014 Flat clear. More weathering Soot around gun muzzle. And dust underside. Quote Link to post Share on other sites
Ruud Posted August 15, 2014 Share Posted August 15, 2014 Lov'n it! Quote Link to post Share on other sites
Air-to-Air Posted August 16, 2014 Share Posted August 16, 2014 This is beautiful work in 1/72 scale - very impressive stuff. Quote Link to post Share on other sites

Recommended Posts
Join the conversation
You can post now and register later. If you have an account, sign in now to post with your account.