zaxos345 Posted July 14, 2016 Author Share Posted July 14, 2016 (edited) .... Then i tried to scratch build the conical exhaust. For this i used this site which proved to be very helpful http://www.blocklaye...e-patterns.aspx So i printed the shape with the dimentions i wanted, made a pattern and i used the empty can of a beer to build it. ...... Edited July 14, 2016 by zaxos345 Quote Link to post Share on other sites
zaxos345 Posted July 14, 2016 Author Share Posted July 14, 2016 (edited) And finally i performed a dry fit in order to be sure that everything is in the right place and also to mark the places i have to glue them later. In the most inner detail you can see that i glued a disk where the engine with the exhaust pipe will sit. Another item i had to be sure that i would sit right and straight. .... Edited July 14, 2016 by zaxos345 Quote Link to post Share on other sites
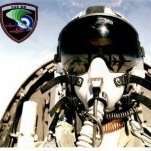
zaxos345 Posted July 14, 2016 Author Share Posted July 14, 2016 (edited) And the real thing, just to get an idea..... Thats all for now guys, hope you like it!!! John Edited July 7, 2017 by zaxos345 Quote Link to post Share on other sites
crackerjazz Posted July 15, 2016 Share Posted July 15, 2016 Beautiful, inspiring work, John! :) Quote Link to post Share on other sites
zaxos345 Posted July 15, 2016 Author Share Posted July 15, 2016 Thanks crackerjazz!!!! John Quote Link to post Share on other sites
Crazy Snap Captain Posted July 16, 2016 Share Posted July 16, 2016 Γιάννη, This is epic work mate! Just amazing. Quote Link to post Share on other sites
zaxos345 Posted July 16, 2016 Author Share Posted July 16, 2016 Αντρέα, Thanks!!! John Quote Link to post Share on other sites
EagleAviation Posted July 17, 2016 Share Posted July 17, 2016 Absolutely stunning! Can't wait for what is next. Quote Link to post Share on other sites
Bravosierra001 Posted July 17, 2016 Share Posted July 17, 2016 Outstanding!! Brandon Quote Link to post Share on other sites
John Wolstenholme Posted January 4, 2018 Share Posted January 4, 2018 Finally found you John, as the search facility gave nothing for A-7H. What's the state of 'play'? I see all your photos have disappeared due to Photobucket's PITA payment scheme. First sign of problems were all the adverts. Crackerjazz put me onto Imgur which works well. Regards John. Quote Link to post Share on other sites
zaxos345 Posted January 11, 2018 Author Share Posted January 11, 2018 Good evening John, happy to see you!! Well i have stalled the build of the A-7H for a while...for sure i will continue!!! As for photos, there is a Photobucket Hotlink fix for chrome and for the Mozilla in order to be able to see the photos posted before the PB change of policy!!! I am also a Imgur guy!! John Quote Link to post Share on other sites
zaxos345 Posted March 1, 2019 Author Share Posted March 1, 2019 (edited) Good morning lads, after a very long time i managed to start with this project again and it is time to ''wake up'' this thread also. A lot of things kept me out, but hey, this is the ''SLUF'' i used to fly with, no way i wouldn't start it again!!! First of all, i glued the avionics panels in place and the resin wheel wells. For some reason in my case, the wells are about 2 mm shorter so some plastic needed to cover the gaps. There is more work to be done here but later and after i close the fuselage. I also glued the panel where the turbine section is going to be placed and i also added the chaff and flares boxes. not much to be seen when it is done but....they were there!!!! After that i started dealling with the cockpit tube. As you can see from the previous pages, i have changed some things on the resin one in order to be as close as it coulb be with the real thing. I added all the small things inside and i also glued the tiny things on the survival kit. Time to put some color.... Edited March 1, 2019 by zaxos345 Quote Link to post Share on other sites
zaxos345 Posted March 1, 2019 Author Share Posted March 1, 2019 (edited) Started from the cockpit... The seat.... Edited March 1, 2019 by zaxos345 Quote Link to post Share on other sites
zaxos345 Posted March 1, 2019 Author Share Posted March 1, 2019 (edited) The instrument panel.... Edited March 1, 2019 by zaxos345 Quote Link to post Share on other sites
zaxos345 Posted March 1, 2019 Author Share Posted March 1, 2019 (edited) And some overall photos with parts dry fitted...I can say that the cockpit is done!!! Hope you like it.... John Edited March 1, 2019 by zaxos345 Quote Link to post Share on other sites
crackerjazz Posted March 5, 2019 Share Posted March 5, 2019 Awesome job, John! It must bring back good memories of your A-7 flying days! : ) Quote Link to post Share on other sites
zaxos345 Posted March 8, 2019 Author Share Posted March 8, 2019 On 3/5/2019 at 4:16 AM, crackerjazz said: Awesome job, John! It must bring back good memories of your A-7 flying days! : ) Thanks Joe, it really does!!!! John Quote Link to post Share on other sites
Aigore Posted March 8, 2019 Share Posted March 8, 2019 Sweeeeeeeet pit! 😄 Quote Link to post Share on other sites
zaxos345 Posted April 24, 2021 Author Share Posted April 24, 2021 Good evening lads, Time to resurrect this topic once again!! It will be a long post with sections, please excuse me for that, hope all the work and photoes to make you forget it!! Closing the fuselage Before that I had to install the M-61A Vulcan gun and add some detail on the rear area of the gun. I also painted all the details not accessible after closing the fuselage. And i finally i closed the fuselage. Not an easy thing to do as i had to align everything, from the cockpit tub to the rear fuselage details to the intake and all the zacto details. Time consuming, a lot of dry fit before taking the decision to put glue on it, but thankfully everything went like a charm! Rear cone glued on without problems, and i spent some sanding periods to get the trumpeter plastic to behave itself!! i also glued on the canoe and the rear cone! Canopy frames I changed some of the details of zacto canopy frames to the A-7H ones.... Wolfapack AIM-9P4 pylon and launcer Engine area... Nose gear leg A-7E Nose gear leg was different from the one used on -7H. I needed the -7D one and a fellow modeller was kind enough to provide me with one!! As you can see i shortened the ''V'' shape of it and i added a lot of details (steering mechanism, landing lights etc.) painted and weathered! ..... Quote Link to post Share on other sites
zaxos345 Posted April 24, 2021 Author Share Posted April 24, 2021 Main gear legs Main Landing gear legs also needed a lot of work to make them resemble the real ones! I use the two metal ones for the main legs and the plastic one as i have to glue it on the resin and i need to put a pin inside to strengthen this point. Below you can see all the details added, some of them from Eduard exterior set! Wheel wells I placed the rest of the resin and i improved the rear section as it was wrong and to add some but not a lot detail inside!! Also the decals on the wheel well doors are custom made from photoes taken from a real bird! Hook Had to modify the trumpeter one from rectangular to cilindrical one, so i cut the front and rear sections, added a rod, epoxy putty and some sanding, modifying the ''horse shoe'' painted and weathered! Really happy with the outcome! Wings Trumpeter gives you the option for folded wing but if you want not to use this option you need to strenghten the point where the two halves are glued together, the joint is very weak. Also i used long strips of a really straight plastic in order to be sure that i will glue them really straight. The wings have a big span and even the slightest curve will be real present on the final symmetry of them!!! I also placed thick strips of plastic where the holes for the weapons are, i will use metal pins to make the joint stronger so i needed something to bite on! Weapons and pylons I will depict the aircraft as a Quick Reaction Aircraft for Attack Mission with 1 Aero1D external tank and 5 Mk-83 LDGB bombs. So i decided to deal with the weapons now as some details should be added to them. We used rear mechanical fuses for soft targets. So i needed to build 5 of them and try to place them on the bombs!! The external tank comes from a Hasegawa 1/32nd A-4!! The trumpeter ones are terrible!! Finnaly i placed the wings on the fuselage, with minimum of work, nice job here from trumpeter. I masked everything and i am read to throw some paint onher as soon as possible!! As you can see i have glued the windshield on...took me some time to make it bahave its self!!! Thanks for your time and patience, hope you like it!! John Quote Link to post Share on other sites
crackerjazz Posted April 25, 2021 Share Posted April 25, 2021 Hey, John, so good to see you back! : ) Very cool update! Quote Link to post Share on other sites
zaxos345 Posted April 25, 2021 Author Share Posted April 25, 2021 13 minutes ago, crackerjazz said: Hey, John, so good to see you back! : ) Very cool update! Thank you very much Joe, for your help too!! John Quote Link to post Share on other sites
scotthldr Posted April 26, 2021 Share Posted April 26, 2021 A modelling masterclass, absolutely superb work👍 Quote Link to post Share on other sites
zaxos345 Posted April 26, 2021 Author Share Posted April 26, 2021 47 minutes ago, scotthldr said: A modelling masterclass, absolutely superb work👍 Thank you very much!! John Quote Link to post Share on other sites

Recommended Posts
Join the conversation
You can post now and register later. If you have an account, sign in now to post with your account.