taggor Posted July 8, 2015 Share Posted July 8, 2015 Nice recovery Nat! See, now you have an excuse to ask your wife for more space to work! So things like this don't happen in the future Haha. -Mark Quote Link to post Share on other sites
polar bear Posted July 9, 2015 Author Share Posted July 9, 2015 Thank gents, After I dropped the model, I lost the wing tip piece. I have already asked for more space that I can find anything on the ground. Quote Link to post Share on other sites
Manuel J. Armas S. Posted July 11, 2015 Share Posted July 11, 2015 I like it... Quote Link to post Share on other sites
polar bear Posted July 12, 2015 Author Share Posted July 12, 2015 (edited) I lost my attention after I dropped the model. So, I turned to do The load outs My model represented Suppress Enemy Air Defend(SEAD) The load out were AIM-120Cs, AIM-9Xs, ALQ-119, left-side AN/ASQ-23 HTS pod and SNIPER XR pod. They were from single box of Hasegawa Weapon set E. The AGM-88 HARMs and their rails were from the box. The 370 gal. fuel tanks needed some correction at tail fins and raised wrapping straps. The pylons needed new panel line scribing. Towing decoy box with LAU-129 was from Tamiya. Edited May 25, 2016 by polar bear Quote Link to post Share on other sites
taggor Posted July 12, 2015 Share Posted July 12, 2015 Hey Nat, at least your attention is still on the same kit! When I loose my focus I tend to buy new model kits! Haha. Nice looking set up for the load out. -Mark Quote Link to post Share on other sites
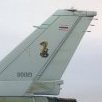
polar bear Posted May 26, 2016 Author Share Posted May 26, 2016 Hey Guys, I AM BACK! It's almost a year away from this thread without any productivity. My Viper got primed and pre-shaded. Quote Link to post Share on other sites
polar bear Posted May 26, 2016 Author Share Posted May 26, 2016 The Viper was painted with custom mix. The lighter grey is Mr.Color No.306 (FS36270) I needed the darker grey on my Viper appear a little bit blue. I mixed up with Mr.Color No.305 (FS36118) and no.72 (intermediate blue). Quote Link to post Share on other sites
polar bear Posted May 26, 2016 Author Share Posted May 26, 2016 The panel lines were brought out by Tamiya Weathering Master wash. my affords on adding panel lines and rivets achieved the goal. Quote Link to post Share on other sites
AndrewS Posted May 26, 2016 Share Posted May 26, 2016 Very impressive painting - great way to show your resumption of this build. cheers, Andrew. Quote Link to post Share on other sites
Lancer512 Posted May 26, 2016 Share Posted May 26, 2016 The paintjob is spectacular. Sometimes it pays off to set a model aside for a while when the mojo is low. And the result is stunning! Quote Link to post Share on other sites
polar bear Posted August 16, 2016 Author Share Posted August 16, 2016 (edited) Decaling time! The kit decal got yellow. After three weeks under sunlight was unable to bleach the yellow film. So I used tail code and unit decals from Tamiya sheet. All stencils came from Astra sheet. Only IFR door marking came from Aeromaster sheet that dedicate to Hasegawa's. Weapon stencil decals were from Twobobs. I 'll try to update more soon. Edited August 29, 2016 by polar bear Quote Link to post Share on other sites
Whiskey Posted August 20, 2016 Share Posted August 20, 2016 I can't see any of the pictures. :blink: Quote Link to post Share on other sites
my favs are F`s Posted August 20, 2016 Share Posted August 20, 2016 I can't see any of the pictures. :blink:/>/> Me 2! It`s just a Posted Image tag... Quote Link to post Share on other sites
polar bear Posted August 29, 2016 Author Share Posted August 29, 2016 Hi guys, I have fixed it. Weathering time. I tried to keep it clean because this plane is the boss bird. But I can't resist using my artistic license. Quote Link to post Share on other sites

Recommended Posts
Join the conversation
You can post now and register later. If you have an account, sign in now to post with your account.