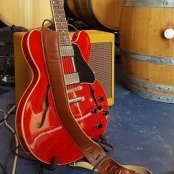
picknpluck Posted January 7, 2017 Share Posted January 7, 2017 Here's my 1/48 Academy F-4J updated to F-4S with the help of some Steel Beach resin. VMFA-333 markings are courtesy of MAW Decals. The seats are True Details and the Mk 82s and the CATM-9 are kit parts. This was my first build in over 15 years and my first effort with a quality airbrush (Paasche VL). I know I made mistakes on this build, but I learned a lot and will hopefully improve upon my next effort. I'd appreciate any feedback and suggestions for doing it better next time. Thanks for looking! Quote Link to post Share on other sites
A-10 LOADER Posted January 7, 2017 Share Posted January 7, 2017 For your first build in 15 years, it looks pretty good dude. The important thing is you know what you did wrong and how to correct it for next time. Nice job. Steve Quote Link to post Share on other sites
Ichitoe Posted January 8, 2017 Share Posted January 8, 2017 Very nice effort for your first build in 15 years! And having a quality airbrush makes the hobby even more enjoyable. Welcome back, Mike Quote Link to post Share on other sites
Grey Ghost 531 Posted January 8, 2017 Share Posted January 8, 2017 The worst thing I can see is a little decal silvering. A smoother gloss coat before applying the decals should fix that. You could also experiment with which decal solvents work best with a specific decal manufacturer. One more tip is a technique used by William De Coster over on Hyperscale. He'll kill decal silvering by careful applications of Tamiya Extra Thin cement. Now for the good: The hot metal look on your stabilators is spot on. Weathering is spot on, particularly the way you captured the tire rubber smudge on the lower landing gear doors. Cap AIM-9 is a good touch too. Also it is also accurate with live Mk82s for a jet going to the range. Over all, damn good job. Quote Link to post Share on other sites
Andrew D. the Jolly Rogers guy Posted January 8, 2017 Share Posted January 8, 2017 Gorgeous!! Boy, there's not a lot that will beat the warrior look of the S-Phantoms IMO.... Quote Link to post Share on other sites
picknpluck Posted January 9, 2017 Author Share Posted January 9, 2017 (edited) Thanks, all! Edited January 9, 2017 by picknpluck Quote Link to post Share on other sites
picknpluck Posted January 9, 2017 Author Share Posted January 9, 2017 On 1/7/2017 at 3:52 PM, A-10 LOADER said: For your first build in 15 years, it looks pretty good dude. The important thing is you know what you did wrong and how to correct it for next time. Nice job. Steve Thanks Steve! Yeah, I learned a few things the hard way on this one. On 1/7/2017 at 4:03 PM, phantom said: Thanks! 17 hours ago, Ichitoe said: Very nice effort for your first build in 15 years! And having a quality airbrush makes the hobby even more enjoyable. Welcome back, Mike Thanks Mike--yeah, having a good airbrush really made a huge difference. 5 hours ago, Grey Ghost 531 said: The worst thing I can see is a little decal silvering. A smoother gloss coat before applying the decals should fix that. You could also experiment with which decal solvents work best with a specific decal manufacturer. One more tip is a technique used by William De Coster over on Hyperscale. He'll kill decal silvering by careful applications of Tamiya Extra Thin cement. Now for the good: The hot metal look on your stabilators is spot on. Weathering is spot on, particularly the way you captured the tire rubber smudge on the lower landing gear doors. Cap AIM-9 is a good touch too. Also it is also accurate with live Mk82s for a jet going to the range. Over all, damn good job. Thanks Grey Ghost! Judging by your screen name, I'm assuming you've got some hands-on time with F-4s. I'll check out the De Coster tip on using Extra Thin. Out of curiosity, what is your technique for gloss coating? I was pretty disappointed at the result of my decaling and want to get it right next time around. As for the stabilators, that's kind of a pet peeve of mine with F-4 builds. I don't like seeing bright, shiny silver--especially for a jet at the tail end of its service life. 4 hours ago, Andrew D. the Jolly Rogers guy said: Gorgeous!! Boy, there's not a lot that will beat the warrior look of the S-Phantoms IMO.... I agree! Although a beat-up B model loaded to bear with bombs and rockets with Vietnam-era markings is pretty damned cool, too! Quote Link to post Share on other sites
my favs are F`s Posted January 9, 2017 Share Posted January 9, 2017 +1! Very beautiful with these decals. The exhaust area looks a little darker, but also phenomenal. Quote Link to post Share on other sites
Grey Ghost 531 Posted January 9, 2017 Share Posted January 9, 2017 (edited) 15 hours ago, picknpluck said: Thanks Grey Ghost! Judging by your screen name, I'm assuming you've got some hands-on time with F-4s. I'll check out the De Coster tip on using Extra Thin. Out of curiosity, what is your technique for gloss coating? I was pretty disappointed at the result of my decaling and want to get it right next time around. As for the stabilators, that's kind of a pet peeve of mine with F-4 builds. I don't like seeing bright, shiny silver--especially for a jet at the tail end of its service life. Sure thing Picknpluck, I call them as I see them! Yup, I worked on F-4Ns in VMFA-531 from late '77 until the end of '82 and then F-4Cs in the Hawaii Air Guard from summer of '85 until the summer of '88. I was in the radar shop both places. I moved to Vermont in '88 and got into the VTANG where I was a loader. I didn't go back into avionics because I was sick of going to schools and I could do the loader training as OJT and correspondence back then. You can't any more. I use Testors Gloss Coat, mostly because I got several bottles for free. Gently sanding between coats with 1200-2000 grit helps, I get a nice, smooth finish after maybe three coats and it only takes a very small amount of sanding, like two passes with very little pressure, keep off the edges and corners. I've tried the Tamiya Extra Thin trick myself. It works, just dab a little bit right on the silvered area and leave it alone. Too much may make the colors run. The best thing about it is it's fast, it only takes a few seconds to dry and check to see if it worked. If not, try another dab. Here's an Italeri 1:72 F-4S I did a few years ago: Edited January 9, 2017 by Grey Ghost 531 Quote Link to post Share on other sites
wardog Posted January 11, 2017 Share Posted January 11, 2017 Hello picknpluck, great job overall, especially after being away from the bench for so long. I echo what others have said, a smoother finish prior to decal application will solve the silvering issue. Also, the main landing gear is a little crooked so on future builds a little more attention in this area will help a lot. Other than that, great build. Elmo. Quote Link to post Share on other sites
ChernayaAkula Posted January 28, 2017 Share Posted January 28, 2017 Neat! Low-viz grey Marine Phantoms ROCK! Quote Link to post Share on other sites
Don Posted January 29, 2017 Share Posted January 29, 2017 I have always liked the toned down Phantom schemes and you did the old girl proud! Cheers! Quote Link to post Share on other sites
Darren Roberts Posted January 31, 2017 Share Posted January 31, 2017 NOICE!!!!!!!!!!!!!! May I copy your pictures and use them on my website? Quote Link to post Share on other sites
picknpluck Posted January 31, 2017 Author Share Posted January 31, 2017 21 minutes ago, Darren Roberts said: NOICE!!!!!!!!!!!!!! May I copy your pictures and use them on my website? Thanks! Yeah, go for it--I'm flattered. Quote Link to post Share on other sites
kellyF15 Posted February 10, 2017 Share Posted February 10, 2017 Beautiful!!! Quote Link to post Share on other sites
aircommando130 Posted February 19, 2017 Share Posted February 19, 2017 The F-4 looked good in the TPS...I think your Phantom looks really good! Welcome back to the hobby. Look forward to seeing more builds. Quote Link to post Share on other sites
picknpluck Posted March 2, 2017 Author Share Posted March 2, 2017 On 2/10/2017 at 1:28 PM, kellyF15 said: Beautiful!!! Thanks! On 2/18/2017 at 4:00 PM, aircommando130 said: The F-4 looked good in the TPS...I think your Phantom looks really good! Welcome back to the hobby. Look forward to seeing more builds. Thanks! I've got a couple of things on the bench...most significant is a Tamiya Tomcat. Quote Link to post Share on other sites
avnav Posted March 16, 2017 Share Posted March 16, 2017 Absolutely gorgeous painting. Your exhaust area looks far more realistic than many if not all of the F-4 models I've seen in recent years. I'd really love to read your description of what colors you used and how you painted it. There only two things I see that could be a little better with the model, and they are both pretty minor: First is that you put the retractable boarding steps on vertically; it should be angled out, with the bottom step further out than the top. Tomorrow I'll see if I can find a good photo to post that shows you the correct angle. I'm guessing you can still fix it. And second the rear canopy needs to be up a bit more, but it's always so difficult to model the open F-4 canopy angles correctly. Few models get them right, and my guess is it's too late or too likely to cause more trouble than it's worth to change it, so I'd recommend just leaving it as is. It's not that far off, you could just claim the pneumatics need servicing so the canopy is starting to sag down! I'm looking at your photos with my iPhone right now so I can't see the decal silvering someone mentioned, but what I can see of the model appears to be amazing. Congrats on a beautiful build! Scott Wilson Phormer Phantom Phixer Quote Link to post Share on other sites
avnav Posted March 16, 2017 Share Posted March 16, 2017 (edited) Looking at this model on my desktop confuser, I can see the silvering on the decals, which isn't too bad but a shame since the rest of the model is beautiful. Hopefully you can find a way to eliminate the silvering, but it's not that bad and hardly worth risking the model if correcting it causes damage to the paint. I am still in awe of the exhaust area on your model. Too many people model the blast panels with various colors to simulate metal that's been heated while in reality the panels should be coated in black soot. It's only in later years that F-4s in USAF service had the smokeless engine upgrade that didn't have as much soot and showed the heat discolored metal. I'm not sure the Navy jets ever got the smokeless engines. For sure prior to the mid to late 80s the USAF jets still had black exhaust blast panels, as smokeless engines just barely started coming into service around 1982 and were phased in quite slowly. Anyway, here's the best photo I have that shows the correct angle for the boarding steps. It's an F-4C of the 149th TFG, Texas ANG at Kelly AFB that took a birdstrike in 1981. I've circled the boarding steps with a yellow oval. Edited March 16, 2017 by avnav Quote Link to post Share on other sites
picknpluck Posted March 27, 2017 Author Share Posted March 27, 2017 On 3/16/2017 at 1:39 AM, avnav said: Absolutely gorgeous painting. Your exhaust area looks far more realistic than many if not all of the F-4 models I've seen in recent years. I'd really love to read your description of what colors you used and how you painted it. There only two things I see that could be a little better with the model, and they are both pretty minor: First is that you put the retractable boarding steps on vertically; it should be angled out, with the bottom step further out than the top. Tomorrow I'll see if I can find a good photo to post that shows you the correct angle. I'm guessing you can still fix it. And second the rear canopy needs to be up a bit more, but it's always so difficult to model the open F-4 canopy angles correctly. Few models get them right, and my guess is it's too late or too likely to cause more trouble than it's worth to change it, so I'd recommend just leaving it as is. It's not that far off, you could just claim the pneumatics need servicing so the canopy is starting to sag down! I'm looking at your photos with my iPhone right now so I can't see the decal silvering someone mentioned, but what I can see of the model appears to be amazing. Congrats on a beautiful build! Scott Wilson Phormer Phantom Phixer Scott, Thanks for the great feedback--it's great hearing from folks with first hand experience! For the engine exhaust area, I used Alclad lacquers over Alclad gloss black primer. The colors from light to dark are Pale Burnt Metal, Duraluminum, and Jet Exhaust. I also did a very light mist of Steel over some areas. I accented the rivet lines on the forward sections of the v-stabs by brushing on a thinned mix of Tamiya XF-1 and XF-10. All that said, the F-4S had the smokeless engines...but they started life as F-4Js, so who knows. I wanted to depict a jet at the very end of its operational life. Re: the ladder, I'll see if I can fix it--I can't remember if I super glued that piece in or not. Hopefully not. Thanks for the reference pic! Re: the canopies....yeah...I really struggled with those. The fit wasn't great and I had to do a lot of trimming on the hinge points. Plus, the kit-supplied canopy struts/oleos proved to be quite a hassle! Re: the decals, man...I've been having a tough time on subsequent builds getting the decals right as well. Still trying to up my game with regards to finishing. ...and I really should weather those bombs! Quote Link to post Share on other sites

Recommended Posts
Join the conversation
You can post now and register later. If you have an account, sign in now to post with your account.