Floyd S. Werner, Jr. Posted June 8, 2017 Share Posted June 8, 2017 Kitty Hawk UH-1D: How does it build? By Floyd S. Werner, Jr. Upfront honesty, myself and Ray Wilhite, were responsible for providing input for the CAD of this kit. You’ll note that the Werner’s Wings logo appears in the lower right corner of the box. Anything I find wrong, you’ll know about. If you know me, you know I’m honest. I, along with Ray, take complete responsibility for the kit. Drawings and instructions not so much, we have no input on that. I did provide the four marking options for the US Army. So with that out of the way, let’s get started. The model comes in a sturdy cardboard box with some beautiful artwork on the front. The kit should be marked as UH-1D/H and not just a UH-1D. The only differences are the engine, which is externally identical, and the position of the pitot tubes. The UH-1D has them on the nose along with two FM whisker antennas while the UH-1H, except for the first few, has the pitot tube on the roof. That said the box top Huey doesn’t have either pitot tube. On opening the box you are treated to three sprues of very light grey plastic. I’ve looked everywhere and could not find any short shot parts which were a problem with some previous Kitty Hawk kits. This is because KH has changed the company that does the injection molding and the metal cutter. There is very little flash on some of the very fine parts. The surface detail is exceptional. There are recessed rivets on the kit. Some have complained about that but in this scale they are prefect representation and not replication of the real thing. Panel lines are recessed. Inside of a small cardboard box are all the clear parts. They are thin and very clear. The windshield and upper windows are molded together and because of this there is no seam and the greenhouse is faired in properly. One thing that we discovered was the left side windshield has an angled bracket at the top corner. Not a big thing to me, but it is not quite correct. A fret of photo etch is included with a protective film on it. The fret has all the screens and seatbelts that are required for the kit. It also has tie down rings, a first, and tow rings, another first in any scale. The pilot shoulder harness is a little long. We’ll see how we deal with that when we get there. There are also bipod mounts for the kits M-60 machine guns. There are two decal sheets. The first one is the larger of the two. It has the basic markings but limited stencils. This oversight will be addressed by Werner’s Wings shortly, but it should have been caught by KH. We provided the markings manual to the artist. There are markings for four US Army Hueys, One D and three UH-1Hs. There are makings for a German Army, Tiawanese Air Force and a Japanese Army subject. The decals are crisp and in perfect register. The second sheet contains the nose art for the four US Army aircraft and the instrument panel. The nose art is some of the best I’ve seen. Photo quality. The instrument and center console are included. The instrument panel is on a black background. This is not correct for a Vietnam era helicopter, but that just means I’ll have to paint it. The instructions are printed in a booklet on 24 pages. The instructions are easy to understand, IF you are putting everything on the model. Where the instructions fall down is they don’t identify what options belong on which version. Not all the parts belong on every version. Unfortunately, the profiles don’t show what should be included on which version. I’ll explain what parts don’t belong on a Vietnam era Huey as I progress this build. So now that we have what is in the box sorted out. The question we all want to know is how does it build up? Let’s get started and find out. The kit, as most kits, starts in the cockpit. The floor features an accurate tie down pattern. The detail is impressive. The transmission area has the sound proofing quilt pattern. The instrument panel glare shield has the correct pattern, again a first in any scale. The rear facing seats are the first time are beautifully rendered with the fabric sagging pattern beautifully depicted. I think this is the first time they have been done correctly. The transmission has the correct number of push pull tubes on the non-rotating swashplate. Well all of that is well and good but does it fit? Let’s see. Floyd The Boxtop Step 1 completed Location tabs for the transmission are missing. Kitty Hawk has been informed. Stay tuned. Remember this is a pre-production model so this is the type of thing I'm looking for. Another thing I noticed was the skids have a flat spot. Not sure what happened here. Again the reason we look for this stuff. There are some mold marks on the back of some parts that need filling but they are not in any area that is really hard to get to or ruin any detail Step 2 completed. Seats are not glued to the floor Main transmission and non-rotating swashplate don't actually mate up if you install the actuator arms so I used the upper part of the mast to make sure everything is aligned. Just had to fit the front seats with the rear facing ones. Again none of the seats are glued. The armored seats are better than I've seen in 1/35th scale. The sliding portion maybe a little smaller but I can't notice it. SO I had had to see what the cabin looked like. Again no seats are attached here. One thing that even Ray and I missed was the rear seats should have two vertical supports. We are sorry about that but we both missed it. Thanks Dave Rosenthal for pointing that out. I deviated from the instructions and added the tailboom to the fuselage half. I wanted this to be a good fit. Not that I was really worried about it but this seemed a good time to do it. That is where I left it at the end of the first day. Quote Link to post Share on other sites
11bee Posted June 8, 2017 Share Posted June 8, 2017 Damn, that looks fantastic so far. Pleease get them going on a 35th scale kit. Need to get my Huey fix ASAP. Quote Link to post Share on other sites
rotorwash Posted June 8, 2017 Share Posted June 8, 2017 Yep, thanks to Dave for pointing out the most obvious issue with the seats, the incorrect supports. Whacking palm against head as I type! Looking great, Floyd. I think I will try putting the two tailboom pieces together first and see how that works out. between the two of us, folks should find out which is better or if it even matters. Fingers crossed my kit is here today so I can get caught up with the comparison builds. Ray Quote Link to post Share on other sites
Tank Posted June 8, 2017 Share Posted June 8, 2017 Looks nice. The three mold marks on the sound proofing quilt pattern is a disappointment. If that and the skid is the worst then it will be a very good kit. Quote Link to post Share on other sites
CharlieUH-1H Posted June 8, 2017 Share Posted June 8, 2017 Looks great! cant wait to see it done! Quote Link to post Share on other sites
salvador001 Posted June 8, 2017 Share Posted June 8, 2017 Looks great, but why did they make the cabin center long seat bench in 3 separate seats?? That is not like that, it will requiere some work, They have only one support rod for each seat, in real life there are tons of rod supports, it can be made from scratch but too bad the model came like this. Rod. Quote Link to post Share on other sites
salvador001 Posted June 8, 2017 Share Posted June 8, 2017 (edited) 8 minutes ago, rotorwash said: Yep, thanks to Dave for pointing out the most obvious issue with the seats, the incorrect supports. Whacking palm against head as I type! Looking great, Floyd. I think I will try putting the two tailboom pieces together first and see how that works out. between the two of us, folks should find out which is better or if it even matters. Fingers crossed my kit is here today so I can get caught up with the comparison builds. Ray Ray, please make the comparisson thread with the Italeri and Esci Hueys, just exactly what you did with the B models in 1/72. Rod. Edited June 8, 2017 by salvador001 Quote Link to post Share on other sites
CharlieUH-1H Posted June 8, 2017 Share Posted June 8, 2017 1 minute ago, salvador001 said: Looks great, but why did they make the cabin center long seat bench in 3 separate seats?? That is not like that, it will requiere some work, They have only one support rod for each seat, in real life there are tons of rod supports, it can be made from scratch but too bad the model came like this. Rod. was thinking about that, I think we will need to add some kind of styrene or aluminum (I use that a lot in my hueys) to make the long troop sit just a one piece not 3 Quote Link to post Share on other sites
salvador001 Posted June 8, 2017 Share Posted June 8, 2017 3 minutes ago, CharlieUH-1H said: was thinking about that, I think we will need to add some kind of styrene or aluminum (I use that a lot in my hueys) to make the long troop sit just a one piece not 3 Yes Charlie, it will require fixing this issue. Rod. Quote Link to post Share on other sites
rotorwash Posted June 8, 2017 Share Posted June 8, 2017 (edited) 19 minutes ago, salvador001 said: Looks great, but why did they make the cabin center long seat bench in 3 separate seats?? That is not like that, it will requiere some work, They have only one support rod for each seat, in real life there are tons of rod supports, it can be made from scratch but too bad the model came like this. Rod. All of them that i have seen are three individual seats just like this AAHF bird, Rod. I think we got them pretty accurate actually, except for the supports. Ray Edited June 8, 2017 by rotorwash Quote Link to post Share on other sites
CharlieUH-1H Posted June 8, 2017 Share Posted June 8, 2017 8 minutes ago, salvador001 said: Yes Charlie, it will require fixing this issue. Rod. Aluminum / styrene and a couple of layers of bandaids should fix that Quote Link to post Share on other sites
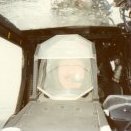
CharlieUH-1H Posted June 8, 2017 Share Posted June 8, 2017 Man! those pilot seats looks PERFECT! Quote Link to post Share on other sites
CharlieUH-1H Posted June 8, 2017 Share Posted June 8, 2017 Ray/Floyd/Rod sorry for my ignorance, but lots of new things to me on this kit since the Italeri/esci one.. can I ask what are those things(red circle) and what are they for? Quote Link to post Share on other sites
salvador001 Posted June 8, 2017 Share Posted June 8, 2017 Roger that Ray, the only problem i see in the kit is that the 3 seat pieces are very separate from each one. Charlie, those are some sort of air ducts from the outside, but i could be wrong... Rod. Quote Link to post Share on other sites
rotorwash Posted June 8, 2017 Share Posted June 8, 2017 1 minute ago, CharlieUH-1H said: Ray/Floyd/Rod sorry for my ignorance, but lots of new things to me on this kit since the Italeri/esci one.. can I ask what are those things(red circle) and what are they for? Those are air ducts. NEVER been seen in kit or AM sets before. It's not the full system, of course, but those ducts are visible under the instrument panel. Ray Quote Link to post Share on other sites
rotorwash Posted June 8, 2017 Share Posted June 8, 2017 2 minutes ago, salvador001 said: Roger that Ray, the only problem i see in the kit is that the 3 seat pieces are very separate from each one. Charlie, those are some sort of air ducts from the outside, but i could be wrong... Rod. I see what you mean, but I'd rather three separate seats than one big bench seat as many Vietnam birds were only fitted with the center section, plus you have the option to turn the end ones sideways which was also done at times. Ray Quote Link to post Share on other sites
CharlieUH-1H Posted June 8, 2017 Share Posted June 8, 2017 5 minutes ago, rotorwash said: Those are air ducts. NEVER been seen in kit or AM sets before. It's not the full system, of course, but those ducts are visible under the instrument panel. Ray Thanks man Quote Link to post Share on other sites
CharlieUH-1H Posted June 8, 2017 Share Posted June 8, 2017 I think this picture show the way the sits can be put side ways as ray said I assume that because of how those guys are sitting inside this bird Thanks for the information Ray Quote Link to post Share on other sites
11bee Posted June 8, 2017 Share Posted June 8, 2017 21 minutes ago, rotorwash said: plus you have the option to turn the end ones sideways which was also done at times. Ray That's a good point. The Huey I'll eventually build had the sideways configuration. So there is nothing stopping me from replicating this, correct? Same with the two seats behind the pilots, most Hueys I flew in had them facing outboard. As far as the supports go, the current legs are a bit over scale, think it's a limitation of the molds. Better off scratch building it all with thinner plastic rod. I did it on my Dragon kit, pretty easy and it will look much better. Quote Link to post Share on other sites
rotorwash Posted June 8, 2017 Share Posted June 8, 2017 (edited) Here are a couple of great shots of a UH-1D with both seat setups. I believe the KH kit is the only one that lets you replicate either one. Ray Edited June 8, 2017 by rotorwash Quote Link to post Share on other sites
CharlieUH-1H Posted June 8, 2017 Share Posted June 8, 2017 26 minutes ago, 11bee said: That's a good point. The Huey I'll eventually build had the sideways configuration. So there is nothing stopping me from replicating this, correct? Same with the two seats behind the pilots, most Hueys I flew in had them facing outboard. As far as the supports go, the current legs are a bit over scale, think it's a limitation of the molds. Better off scratch building it all with thinner plastic rod. I did it on my Dragon kit, pretty easy and it will look much better. Yes, In my case every time I use paper clips for the legs of all troops seats on the hueys I do... and they turn out to be cool. Quote Link to post Share on other sites
CharlieUH-1H Posted June 8, 2017 Share Posted June 8, 2017 Now I cant find the post but in my Hellenic Army huey I remember now to put the troops seats side ways without knowing that they can go like that lol Quote Link to post Share on other sites
Winnie Posted June 8, 2017 Share Posted June 8, 2017 5 hours ago, salvador001 said: Looks great, but why did they make the cabin center long seat bench in 3 separate seats?? That is not like that, it will requiere some work, They have only one support rod for each seat, in real life there are tons of rod supports, it can be made from scratch but too bad the model came like this. Rod. It is actually... a 2 seater, a single middle seat, and another 2 seater. You are correct however on the 2 stanchions per seat though. also the mid ones curve back a bit. Quote Link to post Share on other sites
11bee Posted June 8, 2017 Share Posted June 8, 2017 What are those thick rectangular frames on the sides of the transmission housing walls? I'd still love to see someone offer up "quiltless" walls in resin. A good number of Vietnam helos (and some more recent ones) had the soundproofing removed. Really like the fact that you can configure all the seats to your hearts content. Very cool! Quote Link to post Share on other sites
huey_crew_chief Posted June 8, 2017 Share Posted June 8, 2017 14 minutes ago, 11bee said: What are those thick rectangular frames on the sides of the transmission housing walls? I'd still love to see someone offer up "quiltless" walls in resin. A good number of Vietnam helos (and some more recent ones) had the soundproofing removed. Really like the fact that you can configure all the seats to your hearts content. Very cool! The large one is just detachable soundproofing section. The smaller three would be soundproofing cut outs for some attachment points on the hellhole wall. Quote Link to post Share on other sites

Recommended Posts
Join the conversation
You can post now and register later. If you have an account, sign in now to post with your account.