Brad-M Posted June 8, 2017 Share Posted June 8, 2017 Hey Floyd, So did you need to drill new holes for the swashplate/actuator arms, ir do the arms just sit flush onto the plate? Thanks Brad Quote Link to post Share on other sites
11bee Posted June 8, 2017 Share Posted June 8, 2017 12 minutes ago, huey_crew_chief said: The large one is just detachable soundproofing section. The smaller three would be soundproofing cut outs for some attachment points on the hellhole wall. I don't see any framing like that in the pics I've seen (including the ones above). At most, it looks like the fabric panels just unsnap. Are there variations on these? Quote Link to post Share on other sites
huey_crew_chief Posted June 9, 2017 Share Posted June 9, 2017 8 minutes ago, 11bee said: I don't see any framing like that in the pics I've seen (including the ones above). At most, it looks like the fabric panels just unsnap. Are there variations on these? You are correct Quote Link to post Share on other sites
Tank Posted June 9, 2017 Share Posted June 9, 2017 47 minutes ago, 11bee said: I'd still love to see someone offer up "quiltless" walls in resin. A good number of Vietnam helos (and some more recent ones) had the soundproofing removed. You should be able to do that using sheet styrene and the kit parts as a pattern. Quote Link to post Share on other sites
Tank Posted June 9, 2017 Share Posted June 9, 2017 (edited) Disregard. Edited June 9, 2017 by Tank Quote Link to post Share on other sites
UH-1Mad Posted June 9, 2017 Share Posted June 9, 2017 (edited) the center instrument console looks quite low? Which would make the IP sit too low? Might be just my eyes or the angle of the photos Edited June 9, 2017 by UH-1Mad Quote Link to post Share on other sites
Floyd S. Werner, Jr. Posted June 9, 2017 Author Share Posted June 9, 2017 1 hour ago, Brad-M said: Hey Floyd, So did you need to drill new holes for the swashplate/actuator arms, ir do the arms just sit flush onto the plate? Thanks Brad I didn't drill those holes. Which may be why my swashplate 'floats' on them. Not sure. That is why I'm building it. Floyd Quote Link to post Share on other sites
Floyd S. Werner, Jr. Posted June 9, 2017 Author Share Posted June 9, 2017 Not much today photography wise. Cleaned up some parts and got most of the fuselage together. The very accurate B pillars fit perfectly. Decided to close up the co-plot door so you have to remove the tab on it. Not a big deal. The pilot door will be opened to show the fire extinquisher. By the way, did I mention that door piece has the latching mechanism on the outside. Amazing. That has never been available before in kit or aftermarket form. Just some of the little things that are part of the kit. All the interior parts were primed with Alclad Grey Primer. Then pre-shaded with Tamiya NATO Black and painted with Tamiya Light Grey on the floor. The weathering will darken it up some. The soundproofing was sprayed with Gunze FS34321. I'm trying to figure out how to do the yellow around the door. I've seen no less than five different versions. End of day 2. Tomorrow detail painting and start weathering the interior. Quote Link to post Share on other sites
11bee Posted June 9, 2017 Share Posted June 9, 2017 Anyone got pics that show those quilts with raised framing shown on the kit parts? Quote Link to post Share on other sites
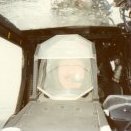
HeavyArty Posted June 9, 2017 Share Posted June 9, 2017 58 minutes ago, 11bee said: Anyone got pics that show those quilts with raised framing shown on the kit parts? The raised area is supposed to represent the Velcro that is also present. It may be a bit exaggerated, but is not really incorrect. You can see the raised area on the removable piece below in the same position. Quote Link to post Share on other sites
11bee Posted June 9, 2017 Share Posted June 9, 2017 Thanks Gino. Nice pic btw, good interior reference shot. Quote Link to post Share on other sites
snake36bravo Posted June 9, 2017 Share Posted June 9, 2017 (edited) 20 hours ago, 11bee said: What are those thick rectangular frames on the sides of the transmission housing walls? I'd still love to see someone offer up "quiltless" walls in resin. A good number of Vietnam helos (and some more recent ones) had the soundproofing removed. Really like the fact that you can configure all the seats to your hearts content. Very cool! Some sheet styrene using the bulkhead and transmission housing as a template with a scribe tool outta give you what you're after. You'd have to rework the overhead too. Would be great for a soundproof free Nighthawk build like '437' from the Razorbacks gunship platoon that operated out of Naval Support Base Nha Be, RVN. Nighthawk is in order for this kit which is my plan for one of them once both orders arrive. They even give you the .50 and M134 minigun in this kit! It was meant to be. Edited June 9, 2017 by snake36bravo Quote Link to post Share on other sites
Floyd S. Werner, Jr. Posted June 10, 2017 Author Share Posted June 10, 2017 OK most of the clean up is done. Now it was time to do so painting. The instrument panel for a Vietnam era Huey is grey not black so I couldn't use the decal that came with the kit. Well not all of it anyway. I painted the instrument panel and individually punched out Reheat Instrument decals for the bigger instruments and the kit ones for the engine instruments running down the middle. This is just the mid stage. I still have to flat it and add the Micro Krystal Klear to the lenses. The doors were given the warning areas. The seats were painted up and added and Ray tells me that they are Olive Drab. I have pictures of them in grey and OD but OD definitely looks to be the 'normal' Vietnam color so I'll be repainting them tomorrow, hopefully. The seats are not attached permanently and just sitting in the mounts so I can see what they looked like. The same goes for the center console. And that is about where I am today. Repainting the front seat armor portions and painting the back seats is next. Then I think I can pull it all together. Floyd Quote Link to post Share on other sites
JesusNut Posted June 10, 2017 Share Posted June 10, 2017 5 hours ago, Floyd S. Werner, Jr. said: OK most of the clean up is done. Now it was time to do so painting. The instrument panel for a Vietnam era Huey is grey not black so I couldn't use the decal that came with the kit. Well not all of it anyway. I painted the instrument panel and individually punched out Reheat Instrument decals for the bigger instruments and the kit ones for the engine instruments running down the middle. This is just the mid stage. I still have to flat it and add the Micro Krystal Klear to the lenses. The doors were given the warning areas. The seats were painted up and added and Ray tells me that they are Olive Drab. I have pictures of them in grey and OD but OD definitely looks to be the 'normal' Vietnam color so I'll be repainting them tomorrow, hopefully. The seats are not attached permanently and just sitting in the mounts so I can see what they looked like. The same goes for the center console. And that is about where I am today. Repainting the front seat armor portions and painting the back seats is next. Then I think I can pull it all together. Floyd Floyd, is that how the center console comes in the kit? With all the knobs and such? If so, that is amazing detail, especially in 1/48. The center console on my Revell 1/32 does not have that much detail. The more I watch of this build, the more excited I am getting about receiving this kit. Quote Link to post Share on other sites
rotorwash Posted June 10, 2017 Share Posted June 10, 2017 Some of you may notice that the map case is built into the center console. Another first in plastic. Ray Quote Link to post Share on other sites
HeavyArty Posted June 10, 2017 Share Posted June 10, 2017 Very nice so far. It is looking great. Quote Link to post Share on other sites
Floyd S. Werner, Jr. Posted June 10, 2017 Author Share Posted June 10, 2017 3 hours ago, JesusNut said: Floyd, is that how the center console comes in the kit? With all the knobs and such? If so, that is amazing detail, especially in 1/48. The center console on my Revell 1/32 does not have that much detail. The more I watch of this build, the more excited I am getting about receiving this kit. I've done nothing to this except paint. Floyd Quote Link to post Share on other sites
salvador001 Posted June 10, 2017 Share Posted June 10, 2017 Guys, i just got a reply from Eduard telling me that they will release a Big Ed set for the Huey (interior, exterior, mask), hope to be released in december. Cant wait to see it!! Rod. Quote Link to post Share on other sites
huey_crew_chief Posted June 10, 2017 Share Posted June 10, 2017 7 minutes ago, Floyd S. Werner, Jr. said: I've done nothing to this except paint. Floyd Two questions, Does heheat still make those decals and what ship are you doing? Quote Link to post Share on other sites
Floyd S. Werner, Jr. Posted June 10, 2017 Author Share Posted June 10, 2017 8 minutes ago, huey_crew_chief said: Two questions, Does heheat still make those decals and what ship are you doing? I don't know about Reheat. I got mine at a show. I do know that airscale out of England makes something similiar I'm thinking the Good Widow Mrs. Jones is calling me. I was going to do Little Annie Fannie but since that was done on KH website let's see something else. Floyd Quote Link to post Share on other sites
CharlieUH-1H Posted June 10, 2017 Share Posted June 10, 2017 4 hours ago, rotorwash said: Some of you may notice that the map case is built into the center console. Another first in plastic. Ray That is awesome! No more dealing with styrene for that map holder! :) Quote Link to post Share on other sites
11bee Posted June 10, 2017 Share Posted June 10, 2017 1 hour ago, CharlieUH-1H said: That is awesome! No more dealing with styrene for that map holder! :) Yeah, those three pieces of plastic always drove me crazy. Good news about Eduard stepping up. Be interesting to see what they offer. I'm only seeing a need for better belts to replace the crude KH ones and an IP. Maybe see if they can do better cowl screens but the kit ones look pretty decent already. Quote Link to post Share on other sites
Winnie Posted June 10, 2017 Share Posted June 10, 2017 I'm liking this a lot! Quote Link to post Share on other sites
Floyd S. Werner, Jr. Posted June 13, 2017 Author Share Posted June 13, 2017 Nothing on Sunday. Spent it with the family. Today I made some headway. The Instrument panel was completed and attached. The fire extinguisher was added before I lost it. The weathering of the interior took place too. First was a wash of burnt umber artist oils over the flat paint. Then some chipping with a worn brush and a sponge for wear. The Vietnam dirt was added next with Mig Pigments. The seats were hit with some Mig Pigments green for variety in the 'fabric'. Floyd Instrument panel completed. Instrument panel and center console added permanently. Interior weathered. Just some of the seat belt bending going on. This isn't even half of them. The tough thing is to get them to look like fabric bends. Quote Link to post Share on other sites
CharlieUH-1H Posted June 13, 2017 Share Posted June 13, 2017 Now that's a gorgeous dirty bird!! Quote Link to post Share on other sites

Recommended Posts
Join the conversation
You can post now and register later. If you have an account, sign in now to post with your account.