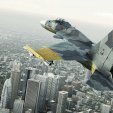
Flyboy3394 Posted August 29, 2017 Share Posted August 29, 2017 Logging my Zvezda SU-33 build. I am doing a Yellow 13 themed build instead of the standard blue/gray Russian naval paint job. For those who do not know, Yellow 13 is the main "boss" adversary in the Ace Combat 4 video game. In the game, his (and his squadron's) planes are listed as SU-37's, but in reality they are SU-33's. All glued up and in major need of putty and sanding all over the place. The belly, complete with intakes... The intakes will need a fiar bit of putty and sanding to get them looking right. Bit of a rushed job on the cockpit. Did not feel like putting the pilot figure in and completely forgot to put decals on before gluing the pit into the fuselage. We will see how/if I can fix this major snafu. Pretty happy with how the exhaust nozzles came out. I like the weathered look that came from overbuffing them. Makes them look used and abused. Need to seal them to avoid further wearing. Another view of the Exhaust. Again, pleased with how they came out overall. Inside was a mix of Alclad pale burnt metal and a dusting of MM metalizer exhaust lacquers. More to come once main wings are placed, sanding and puttying are done, and painting begins. Any tips, tricks, or suggestions on this kit, or my theme are welcome and greatly appreciated! Quote Link to post Share on other sites
Flyboy3394 Posted August 31, 2017 Author Share Posted August 31, 2017 Part two: Paint Post glue/putty and sanding. Probably could have been more thorough, but I was eager to slap some paint on while I had a day. Here are all the paints i will be using throughout the build. Main colors are obviously the greys, but the yellow is an important aspect as well This is the camo scheme I am going for. dark yellow on wingtips and some other areas, diluted yellow across the underbelly. First coat is on and looking good! This is dark ghost grey. Next to the camo scheme I will stencil out. Quote Link to post Share on other sites
Flyboy3394 Posted August 31, 2017 Author Share Posted August 31, 2017 Part three: randoms Lots of ordinance included in this kit! Will be going with a flat white base coat and black/grey accents on all these missiles. Lots of pylons for the missiles. Coated in dark ghost gray to match the airframe. Canopies masked and painted with a flat black around the edges. My test spoon. Shot this with every color I sprayed today. I now understand what crazing is and why i want to avoid it at all costs. Thats at least 4 layers of enamel paint stacked within a two hour period. Next up will be a 72 hour curing period followed by masking with my camo stencil and then painting the camo itself! Will likely begin that process midway through next week. Quote Link to post Share on other sites
JackMan Posted September 1, 2017 Share Posted September 1, 2017 Good stuff! I like build reports like these Quote Link to post Share on other sites
jocool1 Posted September 2, 2017 Share Posted September 2, 2017 Hello- The plane is looking great! I have done a couple of these in the last two years for commission builds and they are quite a project. Glad to see someone else doing one. Looking forward to your progress pics! Nice work so far! JD Quote Link to post Share on other sites
Flyboy3394 Posted September 2, 2017 Author Share Posted September 2, 2017 2 hours ago, jocool1 said: Hello- The plane is looking great! I have done a couple of these in the last two years for commission builds and they are quite a project. Glad to see someone else doing one. Looking forward to your progress pics! Nice work so far! JD Thank you! Its been a real learning experience. I have been doing this alongside a 1/72 F-15E, and together they are my first aircraft models ever. Lots I have learned about gluing, puttying and other fitment issues. Part of me is almost bummed I decided to do this as one of my first models, as i could have benefitted from a good deal more experience. I will definitely be doing more SU-27 series birds in the future. Quote Link to post Share on other sites
Flyboy3394 Posted September 2, 2017 Author Share Posted September 2, 2017 Small update: Got all the missiles painted. Decided to do them all on that piece of cardboard. Needless to say it was difficult, and I probably got a ton of overspray on the adjacent missiles. Well, they seem to have come out ok. Doubtless they will take a bit more time than normal to cure up. Got the white nose done. Opted for Model Master Insigna semi gloss white. I like a bit of shine on an otherwise matted out jet Next step, the diluted yellow on the underside. Definitely going to need to do some color swatch tests and get the perfect mix on that one.... Stay Tuned Quote Link to post Share on other sites
jocool1 Posted September 2, 2017 Share Posted September 2, 2017 Yes you picked a tough one for an early project, but you will be very experienced and ahead of the learning curve when you're done! JD Quote Link to post Share on other sites
Wolfgun33 Posted September 4, 2017 Share Posted September 4, 2017 Very cool and interesting subject. Can't wait to see more. Quote Link to post Share on other sites
Flyboy3394 Posted September 6, 2017 Author Share Posted September 6, 2017 Update: Really messed up on the bottom of the plane. First, I used far too much yellow and was forced to use almost two whole bottles of white to dilute it down to the preferred color. Then, of course, I used too much thinner, and the paint began puddling on the surface. So, i decided to step back, strip it all back to bare plastic, and restart. This time, I began by shooting a grey primer coat across the entire underside. Now, while letting it dry for 24 hours, I need to really perfect the ratio for the yellow white color. The first and hopefully the last blunder on my part during this project. Quote Link to post Share on other sites
Flyboy3394 Posted September 7, 2017 Author Share Posted September 7, 2017 Update: Fixed the underside and repainted! While it is a little darker yellow than called for (and intended), I do not mind it. Paint went on mostly smooth and I avoided getting it all puddled up like I did with the first try. Turns out, the yellow I used, MM Blue Angels yellow, is a gloss paint. I cut it with both a semi gloss and flat white, so I do not know if that contributed to the issues I had with this coat, but overall, I think it came out ok thus far. It is drying now in a covered container to keep dust and all particles off until tomorrow, when it will be laid out in the sun for as long as it can be. Next steps: cutting out camo stencils while the belly dries, and clear coating weapons, masking prep for the trademark yellow wingtips! She is really coming along! Stay Tuned..... Quote Link to post Share on other sites
Flyboy3394 Posted September 9, 2017 Author Share Posted September 9, 2017 Update: Unmasking the top I realized I got some yellow paint bleed all over! Not such a huge deal though, as i will be painting over these sections when I get around to the camo. Next i will seal up the bottom, prep the masks, paint the wingtips and fix up some damage on the radome, where somehow yellow paint seeped through... Gah! Stay Tuned.... Quote Link to post Share on other sites
Flyboy3394 Posted September 11, 2017 Author Share Posted September 11, 2017 Update: I really screwed up this time: Houston we have a problem. Thinking about drilling a tiny hole in both the canard and the airframe and placing a tiny metal rod in to provide more support than was previously possible. Any thoughts? Quote Link to post Share on other sites
JackMan Posted September 11, 2017 Share Posted September 11, 2017 (edited) Quote Thinking about drilling a tiny hole in both the canard and the airframe and placing a tiny metal rod in to provide more support than was previously possible. Any thoughts? Yup, that's the way to do it. You could use a paper clip for the metal rod as this gentleman did for his 1/72 F-4 Phantom's stabilizer: http://www.modelingmadness.com/scott/basics/uhoh/u.htm Edited September 11, 2017 by JackMan Quote Link to post Share on other sites
Flyboy3394 Posted September 14, 2017 Author Share Posted September 14, 2017 (edited) Update: Reglued the Canard and moved on to painting the wings. Which is where I ran into my next issue, tghat still plagues me. Hard to see here, but the yellow wingtips are almost transparent when the spray on. They darken only a little when dry, and I am not happy with them at all. The color called for in the directions is more of an orange yellow, whereas this is a very lemony, nearly greenish yellow. Anyway, I stripped it and re primed. May try a white base coat then yellow on top. Going to use Acrylic here going forward to reduce the cure time. Edited September 14, 2017 by Flyboy3394 changes Quote Link to post Share on other sites
jocool1 Posted September 14, 2017 Share Posted September 14, 2017 With the yellow tips you'll need to prime with white. If you can, prime with white on the wing tips and on the tips of the verticle stabilizers. I used model master insignia yellow and got a nice rich yellow. JD Quote Link to post Share on other sites
Flyboy3394 Posted September 14, 2017 Author Share Posted September 14, 2017 14 minutes ago, jocool1 said: With the yellow tips you'll need to prime with white. If you can, prime with white on the wing tips and on the tips of the verticle stabilizers. I used model master insignia yellow and got a nice rich yellow. JD Jocool you da man! I had planned on exactly that! Last two tries were with Blue Angels yellow, and obv. not working. Bought some Acrylic Insignia white and yellow so I am glad to hear it! Quote Link to post Share on other sites
Flyboy3394 Posted September 18, 2017 Author Share Posted September 18, 2017 Update: Yellow Wingtips done! I am sure you can tell, but there was a ton of overspray from painting the bottom yellow and the wingtips as well. Most will be covered by the camo scheme, but I will likely have to go back and cover some of it with another light coat once camouflaging is complete. Now I wait on the camo stencils that I ordered online. Stay Tuned.... Quote Link to post Share on other sites
Flyboy3394 Posted September 21, 2017 Author Share Posted September 21, 2017 Update: The night before my stencils came in, allowing me to begin painting the camo scheme, something dropped from the ceiling onto my model. Resulting in a broken main wing, horizontal stabilizer, and wingtip missile pylon: The main wing is the biggest issue, as now it droops down instead of angling slightly up like it should. So now, I strip paint, putty, sand, putty, sand, glue, putty and more sand, then repaint, then, maybe.... if no other massive roadblocks occur, I can paint the camouflage. Quote Link to post Share on other sites
Flyboy3394 Posted October 24, 2017 Author Share Posted October 24, 2017 Finally got the Camo scheme down and (mostly) good to go. Paint down: And Masking removed: But there were some problems. Lots of lifting of the mask, so lots of bleeding, and lots of sticky residue left over from the not-model friendly masking decal. Anyone have suggestions for getting the residue up without stripping paint? Next will be the Vertical Stabs and then a good while for curing. Quote Link to post Share on other sites
jocool1 Posted October 26, 2017 Share Posted October 26, 2017 Try a tiny spot with Q-tip using goo gone and see if will take the goo off without damaging the paint. wash off with mild soapy water after. JD Quote Link to post Share on other sites
Flyboy3394 Posted October 26, 2017 Author Share Posted October 26, 2017 2 hours ago, jocool1 said: Try a tiny spot with Q-tip using goo gone and see if will take the goo off without damaging the paint. wash off with mild soapy water after. JD Yeah it worked perfectly. Nice clean surface now! Quote Link to post Share on other sites
Peterpools Posted October 28, 2017 Share Posted October 28, 2017 Yikes Can't believe the damage the masks did. Try some de-tacked masking tape to lift the masking residue. As for the lifting- gentle sanding and polishing then some very delicate masking with tamiya tape and AB work. Fingers crossed Keep 'em coming Peter Quote Link to post Share on other sites
Joel_W Posted October 30, 2017 Share Posted October 30, 2017 Just an absolutely fantastic paint camo scheme. Really glad that the Goo Gone worked. Will make note of it just in case I ever need it. Joel Quote Link to post Share on other sites
Flyboy3394 Posted October 30, 2017 Author Share Posted October 30, 2017 17 hours ago, Joel_W said: Just an absolutely fantastic paint camo scheme. Really glad that the Goo Gone worked. Will make note of it just in case I ever need it. Joel Yeah it is a seriously pretty paint scheme. And yeah, believe me, after all the stupid setbacks with this kit, am very happy about the goo gone actually working as well. Quote Link to post Share on other sites

Recommended Posts
Join the conversation
You can post now and register later. If you have an account, sign in now to post with your account.