Craig Baldwin Posted July 30, 2018 Share Posted July 30, 2018 I see this bird moving closer and closer to the paint hangar. What I like about the Revell 101 is the shape is very good, just some TLC on the modelers part. Quote Link to post Share on other sites
Joel_W Posted July 30, 2018 Share Posted July 30, 2018 Giovanni, Gotta love your technique, and it worked to perfection. The splitter plate wiring as with the rest of your build, came out perfect. Joel Quote Link to post Share on other sites
CaptainObvious Posted July 30, 2018 Share Posted July 30, 2018 Hi Giovanni, That's fantastic reengineering on the intakes, cones and splitters! Really impressive. Quote Link to post Share on other sites
Peterpools Posted August 1, 2018 Share Posted August 1, 2018 Giovanni Fantastic progress on the Voodoo. Splitter plates reinforcement hinges look perfect. Keep ‘em conmin Peter Quote Link to post Share on other sites
Giovanni Posted August 7, 2018 Author Share Posted August 7, 2018 Thank You all guys You're really kind with me! Today's update: While dry fitting the stabilizers I decided to give a fix to the tail area. There's a plate here that should rotate together with the stabilizer. The kit isn't really accurate here and the detail was excessive so I made some scratch. The stabilizers are always drooped on a parked plane so I take it into account while positioning the plates. That's all for the moment. It's hot in here for our hobby and I'm proceeding a bit slowly. Sorry. Giovanni Quote Link to post Share on other sites
Peterpools Posted August 8, 2018 Share Posted August 8, 2018 Giovanni Love the small details - great eye for sure. Keep ‘em comin Peter Quote Link to post Share on other sites
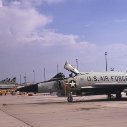
Craig Baldwin Posted August 8, 2018 Share Posted August 8, 2018 Nice to see the corrected panel as well. This beauty continues. Went into my collection and posting this taken by a friend Capt D Foulds spring 1984. Quote Link to post Share on other sites
Joel_W Posted August 10, 2018 Share Posted August 10, 2018 Giiovanni, Great job on those plates. Joel Quote Link to post Share on other sites
Giovanni Posted August 14, 2018 Author Share Posted August 14, 2018 Thank You Joel, thank You Craig for nice picture! I spent at least three days to adapt the nose cone to fuselage! It has been thinned and little reshaped. At the end of the work I had to re-scribe some panels. Here You can see the result with the nice pitot from Master company in place: I also added an aerial to the fin leading edge. This is no always present but my subject 70308 has got it. Now I will switch to windscreen and canopy detailing and masking in order to have fuselage and all the main parts ready for being primed and painted. Smaller external details and undercarriage will come later. Bye Giovanni Quote Link to post Share on other sites
Peterpools Posted August 14, 2018 Share Posted August 14, 2018 Giovanni Nose looks spot on the tail arriel fits perfectly. Keep ‘em comin Peter Quote Link to post Share on other sites
kurnass77 Posted August 18, 2018 Share Posted August 18, 2018 Every aspect of your model is simply lovely Giovanni! Gianni Quote Link to post Share on other sites
Giovanni Posted August 28, 2018 Author Share Posted August 28, 2018 Thank You Peter and Gianni! Today's update: I added to the wings no less than 3.000 rivets (in reality screws). The canopy and windscreen received a polishing treatment: They were riveted as well and masked to receive the first layer of color. I started from the yellow sealant. Now I have to mask them again in prevision of painting with the ADC Grey. I chose not to add the interior detail now in order to paint them positioned on the fuselage. That's all for the moment. Bye Giovanni Quote Link to post Share on other sites
kurnass77 Posted August 28, 2018 Share Posted August 28, 2018 Giovanni, fantastic job!!!! How you riveted the model? On my MiG-21 I used four different riveters,but I'm afraid that are too"weak",not enough deep and crisp...and can't be visible after the painting! Gianni Quote Link to post Share on other sites
Joel_W Posted August 29, 2018 Share Posted August 29, 2018 Giovanni, your riveting is truly amazing. The canopy really looks greats with the added rivet detail. I keep on having to remind myself that all of this is in 1/72 scale Joel Quote Link to post Share on other sites
Speedy Posted August 29, 2018 Share Posted August 29, 2018 Have to copy Joel! Micro Midgets in shifts, hope you pay them a good salary😃 I used to do 1/87 scale train, building loco's. Now having trouble seeing 1/48 scale without magnification. Hats off! Kind regards, Robert Jan Quote Link to post Share on other sites
K2Pete Posted August 29, 2018 Share Posted August 29, 2018 Giovanni, I just discovered this thread and your work, your scratch building, is remarkable! Whether it's 1/32, 1/48, this is spectacular! But because it's, in your case, the tiny itsy-bitsy 1/72, this is even more gorgeous to look at! Your attention to the smallest details, even those tucked into the intakes, your rivet making ... oh ... my ... gosh! More than a few posts, my jaw kept dropping and hitting my table top! Take your time, don't break any more bones and keep doing what you're doing! As a few others have said ... WOW!! Thank you!! Pete Quote Link to post Share on other sites
Nikolay Polyakov Posted September 3, 2018 Share Posted September 3, 2018 On 6/18/2018 at 6:08 PM, Mstor said: Wow, if I I can make my 1/48 KH 101B look half as good as this I'll be happy. Great work! The same. I’m building the Kitty Hawk’s F-101 A/C now, but it’s far away from the @Giovanni‘s work... Quote Link to post Share on other sites
Nikolay Polyakov Posted September 3, 2018 Share Posted September 3, 2018 On 7/29/2018 at 7:33 PM, Giovanni said: Then with pieces of copper wires ciano-glued to the holes I had previously drilled on fuselage I made the splitter plates reinforcements/hinges: Absolutely masterpiece! Amazing work @Giovanni 👍 Cheers! 🙃 Quote Link to post Share on other sites
Giovanni Posted September 4, 2018 Author Share Posted September 4, 2018 (edited) First a BIG THANK YOU to all of you friends supporting this project! In this fase in which the initial enthusiasm has naturally faded and every fase is little boring your support is much welcomed. Today's update… this week end I made the identification lamp from scratch, painted it and placed inside its vane. Then I made also from scratch a new window masked it and attached with vinylic glue. On both side of the fuselage I engraved the little widows allowing ground personnel to take a look at some indicators without opening the whole panel (orange arrows- on opposite side they were in a different position see next one picture). The canopy and windscreen had been masked again: In this precise moment the situation is the one depicted in the following picture with air intakes and main wheel bays masked while I'm working on flaps interiors. Then I have to do the same on nose wheel bay. So I'm not far for the paint job but this is an activity which i really don't like!!! Bye, thank you for following this. Giovanni Edited September 4, 2018 by Giovanni Quote Link to post Share on other sites
Parabat Posted September 4, 2018 Share Posted September 4, 2018 What an epic build! What was the finest grit paper you used to polish the canopy? Quote Link to post Share on other sites
Giovanni Posted September 4, 2018 Author Share Posted September 4, 2018 25 minutes ago, Parabat said: What an epic build! What was the finest grit paper you used to polish the canopy? Thank you Parabat. Unfortunately I just had a 1.500 sand paper so I had to work a lot with polishing paste then. Ideal is to start with a 1.000 then 1.500 and as a last stage with 2.000. And then switching to polishing compounds/pastes. Here also You can use different grades but I think the finishing one will work as well. It's just a matter of patience. I used the one from Tamya (compound finish). The last passage was washing off all with a mild soap and wiping with a very clean and soft cotton cloth. Some very really fine scratches are already visible on mine (with a loupe) but I think are appropriate for the scale. I mean that a too shiny canopy is unrealistic in 1/72 and could be acceptable only on larger scales. Hope this helps. I'm not a very expert on this so If anyone would suggest something better we're here to learn! Bye Giovanni Quote Link to post Share on other sites
RKic Posted September 4, 2018 Share Posted September 4, 2018 This is making my head spin. I was searching for 1/72 build threads to inspire me to return to the scale I used to love most. This thread is inspiring, but also overwhelming. I don't think I can do this level of work, but this is the level I want. Quote Link to post Share on other sites
Giovanni Posted September 4, 2018 Author Share Posted September 4, 2018 7 minutes ago, RKic said: This is making my head spin. I was searching for 1/72 build threads to inspire me to return to the scale I used to love most. This thread is inspiring, but also overwhelming. I don't think I can do this level of work, but this is the level I want. Hello RKic, I have the same feeling when I look at what Gabor is doing with the Eduard mig-21MF: Quote Link to post Share on other sites
Joel_W Posted September 4, 2018 Share Posted September 4, 2018 Giovanni, Your continued attention to the little details are really adding up. Your build is becoming a cult of it's own. I'm really looking forward to seeing some paint on it sooner then later. Joel Quote Link to post Share on other sites
SERNAK Posted September 4, 2018 Share Posted September 4, 2018 If you added 3000 rivets to an 1/72 model, then for my 1/48 T-2 Buckeye, I guess I'll need more than 10000!!! NOT, no way I'm not that crazy!!! Of course, there is always the option now that you've got the hang of it Giovanni, to send you my T-2 to do all the riveting!!!😎🤩 Quote Link to post Share on other sites

Recommended Posts
Join the conversation
You can post now and register later. If you have an account, sign in now to post with your account.