salvador001 Posted December 18, 2017 Share Posted December 18, 2017 (edited) Hi everyone, this is my next project, a Bell UH-1V from the Georgia Army National Guard. I will represent UH-1V 71-20255 from the 148th Medical Company AA GA-ARNG ca.2003-4. For the model i will use the Kitty Hawk UH-1D 1/48 kit, Werner Wings sets, Eduard photoetch, and Fireball Modelworks decals, and the rest will be scratch including the medevac interior. The model will be a tribute to all the Pilots and Crew Chiefs of the GA-ARNG that worked with the mighty Huey. This is the bird i will build: Hope you all enjoy and lets start this beauty! Rod. Edited March 5, 2018 by salvador001 Quote Link to post Share on other sites
JesusNut Posted December 18, 2017 Share Posted December 18, 2017 Looking forward to it Rod! Quote Link to post Share on other sites
CharlieUH-1H Posted December 18, 2017 Share Posted December 18, 2017 (edited) I have my popcorns ready!!! For this! Edited December 18, 2017 by CharlieUH-1H Quote Link to post Share on other sites
salvador001 Posted December 18, 2017 Author Share Posted December 18, 2017 Thanks Tom and Charlie! Rod. Quote Link to post Share on other sites
huey_crew_chief Posted December 18, 2017 Share Posted December 18, 2017 A new canvass for your art!!!! Quote Link to post Share on other sites
Whiskey Posted December 18, 2017 Share Posted December 18, 2017 Skids are for kids! Quote Link to post Share on other sites
midnightprowler Posted December 18, 2017 Share Posted December 18, 2017 Looking forward to it. Quote Link to post Share on other sites
CharlieUH-1H Posted December 18, 2017 Share Posted December 18, 2017 I cant wait to see what you have done with the KH main rotor and blades! Quote Link to post Share on other sites
salvador001 Posted December 21, 2017 Author Share Posted December 21, 2017 (edited) Ok guys, heres the first progress of the build. I have encountered various issues with the kit, the first one being this nasty moulding line that runs through the whole main lower fuselage section, i just had to eliminate it and redo the inspection panels that were lost during the sanding process. Hope you all enjoy. Rod. Edited December 21, 2017 by salvador001 Quote Link to post Share on other sites
UH-1Mad Posted December 21, 2017 Share Posted December 21, 2017 I just noticed that on my kit too, nasty... nice start though Chris B. Quote Link to post Share on other sites
JesusNut Posted December 21, 2017 Share Posted December 21, 2017 Thanks Rod! I am going to have to check my kit in the morning for what I am sure is there now that you pointed it out! As far as the PE on the outside, did that come with one of your sets or did you cut that out on your own? Quote Link to post Share on other sites
CharlieUH-1H Posted December 21, 2017 Share Posted December 21, 2017 Great work! On fixing that.. I was thinking that this line is from the ensamble machine that make the kits to put those parts together.. great fix Rod! Quote Link to post Share on other sites
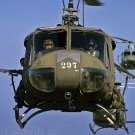
dnl42 Posted December 21, 2017 Share Posted December 21, 2017 Nice subject! I'm working very hard not to add this kit to my stash, so I'm hoping watching you will help me avoid falling off the wagon...this time. I'm curious about the tail boom's color variation in your image: At first, I thought it might be intentional, but I now see it's discoloration. As the discoloration is demarcated by an apparent panel line, is there a different material or finish between the upper part and main body of the boom? Or, might that just be due to the replacement of one or more panels? Quote Link to post Share on other sites
huey_crew_chief Posted December 21, 2017 Share Posted December 21, 2017 4 hours ago, dnl42 said: Nice subject! I'm working very hard not to add this kit to my stash, so I'm hoping watching you will help me avoid falling off the wagon...this time. I'm curious about the tail boom's color variation in your image: At first, I thought it might be intentional, but I now see it's discoloration. As the discoloration is demarcated by an apparent panel line, is there a different material or finish between the upper part and main body of the boom? Or, might that just be due to the replacement of one or more panels? I took the pic, as I was the crew chief on 255. It is just dirty and faded. I think the dark part of the upper rear part of the boom is stained with exhaust, even though it had a toilet bowl. As for as the spots. I am sure it is just grease, maybe some spot touch up paint. Quote Link to post Share on other sites
salvador001 Posted December 26, 2017 Author Share Posted December 26, 2017 Another update. Now working on the main rotor gearbox and correcting some minor issues that Kitty Hawk totally forgot. Hope you all enjoy. Rod. Quote Link to post Share on other sites
midnightprowler Posted December 26, 2017 Share Posted December 26, 2017 Looks like a pretty extreme angle for the swash plate. Quote Link to post Share on other sites
CharlieUH-1H Posted December 26, 2017 Share Posted December 26, 2017 Awesome!! Quote Link to post Share on other sites
11bee Posted December 26, 2017 Share Posted December 26, 2017 On 12/21/2017 at 1:47 AM, salvador001 said: Ok guys, heres the first progress of the build. I have encountered various issues with the kit, the first one being this nasty moulding line that runs through the whole main lower fuselage section, i just had to eliminate it and redo the inspection panels that were lost during the sanding process. Hope you all enjoy. Rod. Didn't notice that in any of the other posts, that's a bad place for a mould seam. Nice work on the cleanup, probably worked out for the best since KH decided to make all those access panels way over scale. Pretty sure they are just sheetmetal on the real thing, on the kit, they look to scale out to be 1/2" armor plate! Huey Crew Chief is correct, that discoloration is just exhaust soot and some oil splatters. Even with the toilet bowl, you still got some staining on the tail boom, just further back than normal. Quote Link to post Share on other sites
huey_crew_chief Posted December 26, 2017 Share Posted December 26, 2017 Looks great, but that swash plate looks to be out of sorts. I bet you know hat though Rod...lol Quote Link to post Share on other sites
CharlieUH-1H Posted December 26, 2017 Share Posted December 26, 2017 To me, I think Rod. got the right angle.. Quote Link to post Share on other sites
salvador001 Posted December 26, 2017 Author Share Posted December 26, 2017 2 hours ago, CharlieUH-1H said: To me, I think Rod. got the right angle.. Yes, i am creating the angled downward swash plate just like the Huey in Charlies photo. Quote Link to post Share on other sites
CharlieUH-1H Posted December 26, 2017 Share Posted December 26, 2017 4 minutes ago, salvador001 said: Yes, i am creating the angled downward swash plate just like the Huey in Charlies photo. so, is perfect! :) keep on the magnificent work! brother! Quote Link to post Share on other sites
midnightprowler Posted December 27, 2017 Share Posted December 27, 2017 2 hours ago, salvador001 said: Yes, i am creating the angled downward swash plate just like the Huey in Charlies photo. I stand corrected then. Carry on sir. Quote Link to post Share on other sites
huey_crew_chief Posted December 27, 2017 Share Posted December 27, 2017 You know what you are dong. Go forth and conquer Rod! Quote Link to post Share on other sites
salvador001 Posted December 29, 2017 Author Share Posted December 29, 2017 Ok guys, ive finally finished detailing the rotor transmission, hope you all like it. Next update will be the cockpit. Rod. Quote Link to post Share on other sites

Recommended Posts
Join the conversation
You can post now and register later. If you have an account, sign in now to post with your account.